CYP OR-HD62CD User manual

OR-HD62CD
6 x 2 UHD HDMI Switch with Audio De-Embedding
OPERATION MANUAL


3
DISCLAIMERS
The information in this manual has been carefully checked and is
believed to be accurate. CYP (UK) Ltd assumes no responsibility for any
infringements of patents or other rights of third parties which may result
from its use.
CYP (UK) Ltd assumes no responsibility for any inaccuracies that may be
contained in this document. CYP (UK) Ltd also makes no commitment to
update or to keep current the information contained in this document.
CYP (UK) Ltd reserves the right to make improvements to this document
and/or product at any time and without notice.
COPYRIGHT NOTICE
No part of this document may be reproduced, transmitted, transcribed,
stored in a retrieval system, or any of its part translated into any language
or computer le, in any form or by any means—electronic, mechanical,
magnetic, optical, chemical, manual, or otherwise—without express
written permission and consent from CYP (UK) Ltd.
© Copyright 2011 by CYP (UK) Ltd.
All Rights Reserved.
Version 1.1 August 2011
TRADEMARK ACKNOWLEDGMENTS
All products or service names mentioned in this document may be
trademarks of the companies with which they are associated.

4
SAFETY PRECAUTIONS
Please read all instructions before attempting to unpack, install or operate
this equipment and before connecting the power supply.
Please keep the following in mind as you unpack and install this
equipment:
• Always follow basic safety precautions to reduce the risk of re,
electrical shock and injury to persons.
• To prevent re or shock hazard, do not expose the unit to rain,
moisture or install this product near water.
• Never spill liquid of any kind on or into this product.
• Never push an object of any kind into this product through any
openings or empty slots in the unit, as you may damage parts inside
the unit.
• Do not attach the power supply cabling to building surfaces.
• Use only the supplied power supply unit (PSU). Do not use the PSU if
it is damaged.
• Do not allow anything to rest on the power cabling or allow any
weight to be placed upon it or any person walk on it.
• To protect the unit from overheating, do not block any vents or
openings in the unit housing that provide ventilation and allow for
sucient space for air to circulate around the unit.
REVISION HISTORY
VERSION NO. DATE SUMMARY OF CHANGE
v1.00 20/01/2014 First release
v1.01 02/04/2014 Updated Introduction
v1.02 21/05/2014 4K Support Note
v1.03 08/08/2014 Updated RS-232 commands, Preview
and PIP Functions, DVI Compliance
v1.04 20/05/2016 Corrected Audio Tables Information

5
CONTENTS
1. Introduction...........................................6
2. Applications ...........................................6
3. Package Contents ..................................6
4. System Requirements ...........................6
5. Features..................................................7
6. Operation Controls and Functions .......8
6.1 Front Panel................................................... 8
6.2 Rear Panel...................................................10
6.3 OSD Menu ..................................................11
6.4 Remote Control........................................16
6.5 RS-232 Protocols.....................................17
6.6 RS-232 & Telnet Commands.................18
6.7 Telnet Control............................................21
6.8 Web GUI Control ......................................22
7. Connection Diagram .......................... 24
8. Specications...................................... 25
9. Acronyms............................................. 27

6
1. INTRODUCTION
The OR-HD62CD allows HDMI signals to be routed from any of the six
connected HDMI sources for display on two connected HDMI displays.
With fast switching technology this device dramatically improves the
sync time to the connected HDMI displays over traditional switchers.
In Matrix Mode, it allows any source to be routed independently to any
output. An on-board EDID management tool (via on screen display) can
be utilised for advanced audio and video signal management. In addition,
this switcher also includes a cutting edge Picture in Picture (PIP) preview
mode allowing the user to show 5 unselected HDMI sources in a row
of small windows overlaid on top of the primary selected HDMI source
video . In preview mode, both HDMI outputs show identical feeds. Further
features include the ability to de-embed Hi-Denition lossless audio via
a dedicated Optical output for each HDMI output, 4K resolution support,
and 3D signal support.
Control is via front panel buttons, IR remote control, RS-232, Telnet or IP
control for easy integration into control systems such as Control 4.
2. APPLICATIONS
Home Theater/Entertainment
Lecture Room/Hall Presentation
Show Room/Demo Room
Public Commercial Display
Information Board
3. PACKAGE CONTENTS
6 by 2 HDMI 4Kx2K Matrix
Remote Control with Battery
Left & Right Rack Ears
5V/2.6A DC Power Adaptor
IR Receiver Cable
Operation Manual
4. SYSTEM REQUIREMENTS
Input source equipments such as Blu-ray/DVD/PS3 player or Set-Top Box
and output HDMI TV/Display and or audio amplier with connection
cables.

7
5. FEATURES
HDMI, HDCP 1.1, DVI 1.0* compliant
Resolutions supported: HDTV - 480i to 1080p plus 1080p24fps, and
4K2K; PC - VGA to WUXGA;
High Denition audio supported: Dolby TrueHD, Dolby Digital Plus,
DTS-HD Master Audio + 7.1 Channel LPCM
RS-232, Telnet or IP Control, IR Remote Control (supplied), Web GUI
Control
Supports audio extraction from HDMI input to Optical output, input
audio sampling rate up to 192 kHz
Ability to switch between any two sources within 1 second
Built-in EDID Management
Supports 3D and 4K signals
Cutting edge Picture in Picture preview function:
When in Preview mode, the system will be treated as a Switcher (two
simultaneous HDMI outputs)
In Preview mode, the unit supports 'View All' (1 Main video source
and 5 Sub video sources) and 'PIP' (1 Main video source and 1 Sub
video source). 3D and 4Kx2K sources inputs are not supported for sub-
windows
Note: View All is TDM (Time Division Multiplexing display)
*Supports HDMI to DVI conversion when the HDMI source is not 'deep
colour' and has an RGB color space. Does not support HDMI to DVI
conversion of a HDMI source that is 'deep color' and has a colour space
that is YCbCr 444/422

8
6. OPERATION CONTROLS AND FUNCTIONS
6.1 Front Panel
POWER
IN 1IN 2IN 3IN 4IN 5IN 6 MUTE CONFIRM
OUT A OUT B CANCEL
ENTER
MENU
PRESET
ALL
MODE
LOCK
+
-
1 2 5 6 8 1113 153
4 7 9 10 12 14
1POWER: Press this button to turn ON the device, the LED will
illuminate.
2IR Window: This IR Receiver receives the remote control signal from
the device's remote control only.
3IN 1~6: Press these IN buttons to select an input from the 6 input
sources.
4OUT A/B: Press these buttons in combination with with the IN
buttons to select an input source for an output display i.e. OUT A→ IN
1→CONFIRM or OUT B→IN 6→CONFIRM.
5MUTE: Press this button to mute video and audio on OUT A or B.
6CONFIRM: Press this button to conrm the selection of an IN and an
OUT button.
7CANCEL: Press this button to cancel the IN/OUT selection.
8ENTER: Press to conrm the selection.
9MENU: Press to enter into the menu.
10 +/-: Press these buttons to navigate up/down the menu.
11 PRESET: (PV MUTE: Preview ON/OFF)
¾When in Preview mode, press the button to turn ON/OFF the Sub
video windows.
¾When in Matrix mode, press “PRESET” to switch between Normal
and Preset mode.
9Normal mode:
Press OUT A or OUT B or ALL and then press IN 1~6 or
MUTE to select the input sources. After the selection,
press “CONFIRM” to conrm the selection or press“CANCEL”
to cancel the selection.

9
9Preset mode:
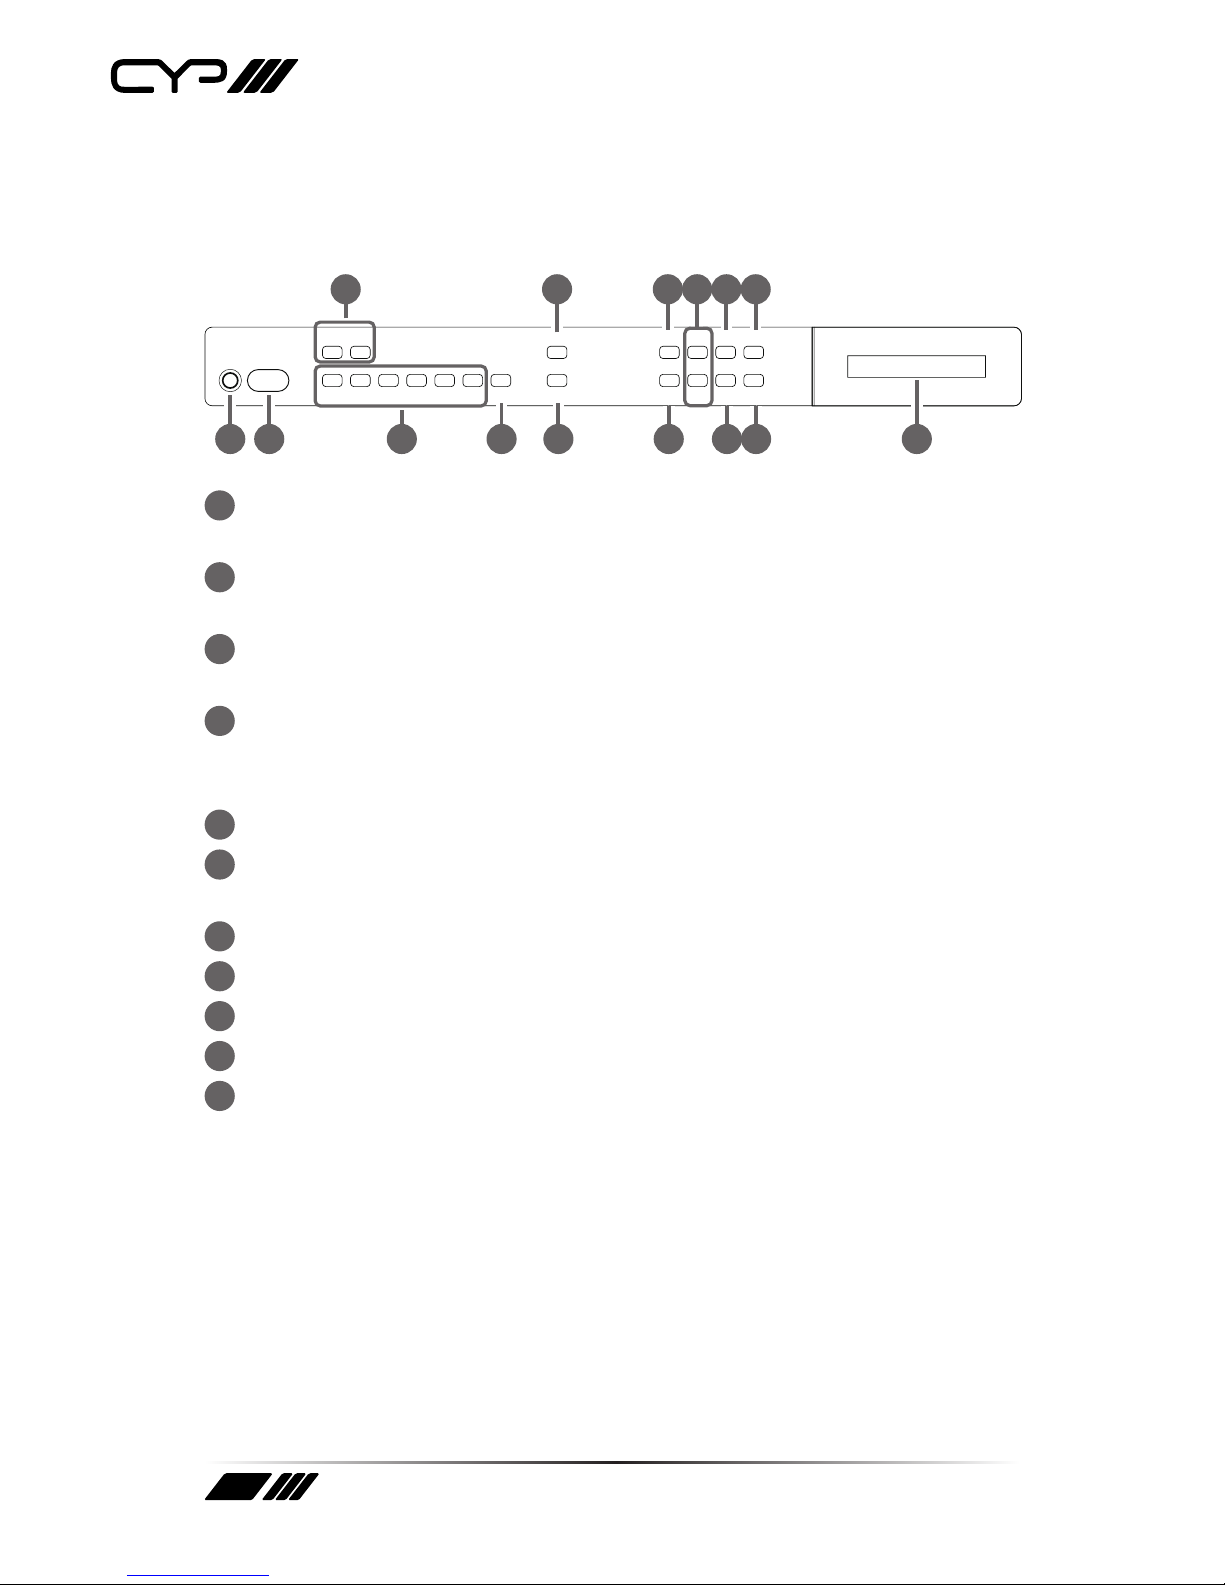
Press “PRESET”, the OLED menu will show Preset then
select IN 1~6. Preset 1~6 after the selection, press
“CONFIRM” to conrm the selection or press “CANCEL” to
cancel the selection.
12 All: (SWAP)
Press this button to select all outputs to display with an input source.
When in PIP mode, press to swap between Main video source and Sub
video source.
13 MODE: Press to switch between Preview or Matrix mode.
¾Preview mode: From MENU option select View All (1 Main
video sources and 5 Sub video sources) or PIP mode (1 Main
video sources and 1 Sub video sources).
Note: Under Preview mode, OSD display on output B only.
9View All: Press IN 1~6 or MUTE to select the Main channel.
From OLED menu select “Preview Position” for Sub
screens position.
Note: All sub screens will be displayed in order for about 0.5
second: Those screens that are not displayed will be frozen.
9PIP: Press OUT A (Main) or OUT B, then press IN1~6 or
MUTE to select Main or Sub video source. Press “ALL”
or Remote Control “ SWAP” to exchange Main/Sub
video source.
Note: When both Main and Sub select the same input source,
Sub will be muted.
¾Matrix mode: Press OUT A or OUT B or OUT A & B and then
press IN 1~6 or MUTE to select the input sources. After the
selection, press “TAKE” to conrm the selection or press
“CANCEL”to cancel the selection.
14 LOCK: Press this button to lock all button functions on the panel. Press
for 3 seconds to cancel the lock function.
15 LCM: Displays Input and Outputs selection and menu selection.

10
6.2 Rear Panel
CONTROLSERVICE
HDMI IN HDMI OUT S/PDIF OUT
AB
123456AB RS232 IR IN DC 5V
1 4 5 6 7 8
2 3
1HDMI IN: Connect from source equipments such as Blu-ray/DVD/PS3
players, Set-Top-Box or any HDMI equipped source device for input
signal sending.
2HDMI OUT: Connect to HDMI TV/display or HD Amplier for output
image and or audio display.
3S/PDIF OUT: Connect to audio sound system or Amplier for digital
output sound.
4SERVICE: This slot is reserved for rmware update use only.
5CONTROL: Connect from PC/Laptop with active internet service for
Web GUI control with RJ-45 terminated cable.
6RS232: Connect from PC/Laptop for RS-232 command sending to
control the device.
7IR IN: Connect the IR Receiver included in the package for IR signal
receive from the included remote control.
8DC 5V: Connect the adaptor with power cord included in the package
and connect to AC wall outlet for power supply.

11
6.3 OSD Menu
Main Menu Sub Menu Description Default
EDID Mode All All Input port is using
same EDID.
In menu “EDID All”, can
select suitable EDID.
All
Appoint Each Input port can
select individual EDID.
In menu “EDID IN1~6”
select suitable EDID.
Exit
EDID All Sink A Copy Output A display
EDID
8/2D/
PCM/1080p
Sink B Copy Output B display
EDID
8/2D/
PCM/720p
Standard EDID,
Content: deep
color/2D3D/audio/
native resolution
8/2D/PCM/
AC3/720p
Standard EDID,
Content: deep
color/2D3D/audio/
native resolution
8/2D/
PCM/1080p
Standard EDID,
Content: deep
color/2D3D/audio/
native resolution
8/2D/PCM/
AC3/1080p
Standard EDID,
Content: deep
color/2D3D/audio/
native resolution
8/2D/
PCM/4K2K
Standard EDID,
Content: deep
color/2D3D/audio/
native resolution
8/2D/PCM/
AC3/4K2K
Standard EDID,
Content: deep
color/2D3D/audio/
native resolution

12
Main Menu Sub Menu Description Default
8/2D/PCM/
Y420
Standard EDID,
Content: deep
color/2D3D/audio/
native resolution
8/2D/PCM/
AC3/Y420
Standard EDID,
Content: deep
color/2D3D/audio/
native resolution
Exit
EDID IN1 Same EDID All Select Input 1’s EDID Same EDID All
EDID IN2 Same EDID All Select Input 2’s EDID Same EDID All
EDID IN3 Same EDID All Select Input 3’s EDID Same EDID All
EDID IN4 Same EDID All Select Input 4’s EDID Same EDID All
EDID IN5 Same EDID All Select Input 5’s EDID Same EDID All
EDID IN6 Same EDID All Select Input 6’s EDID Same EDID All
Matrix Preset Preset 1 IN/OUT default No.1 A=1 , B=2
Preset 2 No.2 A=1 , B=2
Preset 3 No.3 A=1 , B=2
Preset 4 No.4 A=1 , B=2
Preset 5 No.5 A=1 , B=2
Preset 6 N0.6 A=1 , B=2
Exit
HDCP Input IN1 Standard/
Apple
Set IN1 in Apple/
Standard mode
Standard
IN2 Standard /
Apple
Set IN2 in Apple/
Standard mode
Standard
IN3 Standard /
Apple
Set IN3 in Apple/
Standard mode
Standard
IN4 Standard /
Apple
Set IN4 in Apple/
Standard mode
Standard
IN5 Standard /
Apple
Set IN5 in Apple/
Standard mode
Standard

13
Main Menu Sub Menu Description Default
IN6 Standard /
Apple
Set IN6 in Apple/
Standard mode
Standard
Exit
Preview Mode View All 1 Main video source
and 5 Sub video source
View All
PIP 1 Main video source
and 1 Sub video source
Exit
Preview
Position
View
ALL
Top Preview 5 Sub screens
position
Top
Right Preview 5 Sub screens
position
Bottom Preview 5 Sub screens
position
Left Preview 5 Sub screens
position
PIP Top Left Preview Sub screen
position
Top Left
Top
Right
Preview Sub screen
position
Bottom
Right
Preview Sub screen
position
Bottom
Left
Preview Sub screen
position
Exit
OSD
Transparency
0~15 Preview OSD
background
transparency
6
Exit
OSD Timeout OSD O Preview without OSD
Info
OSD Always On
5~20 Preview with OSD Info
5~20 sec and disappear
OSD Always On Preview with OSD Info
remain ON

Main Menu Sub Menu Description Default
Exit
Network Setup IP Mode DHCP , Static DHCP
IP Setup Static IP 192.168.5.83
Mask Setup Static Netmask 255.255.255.0
Gate Setup Static Gateway 192.168.5.254
Do Re-Link Re-Link.
After setup Network,
the system need to re-
link
---
Exit
Network
Status
Link Network status
DHCP,Static or Not
Linked
---
IP Get IP ---
Mask Get Netmask ---
Gate Get Gateway ---
MAC System MAC Address ---
Exit
Source
Detection
IN1 On/O , IN2
On/O
IN1 , IN2 detect source
with/without the signal
---
IN3 On/O , IN4
On/O
IN3 , IN4 detect source
with/without the signal
IN5 On/O , IN6
On/O
IN5 , IN6 detect source
with/without the signal
Exit
Sink A Info Type, Manuf. Detect and Analysis
Output A display’s EDID
Content: type(HDMI/
DVI/VGA),
Manufactory/Model
number
---
Native Content: native
resolution

Main Menu Sub Menu Description Default
Video Format Content: deep color, 2D
or 3D, 4K2K
Audio Format Content:PCM,
BitStream, HBR
Exit
Sink B Info Same Sink A
Info
Detect and Analysis
Output B display’s EDID
---
Firmware FW Version Display the model
number and FW version
---
Update FW Update
Exit
Factory Reset Do Reset Do system Reset ---
Exit
Exit
Note: Under Preview mode, OSD display on output B only.

16
6.4 Remote Control
1POWER: Press this button to switch
the system ON/OFF.
2OUT A/B: Press these buttons once a time
along with an IN buttons to select an input
source for an output display.
3MODE: Press to switch between Preview or
Matrix mode.
¾Preview mode: From MENU option
select View All (1 Main video sources
and 5 Sub video sources) or PIP mode
(1 Main video sources and 1 Sub
video sources).
9View All: Press IN 1~6 or MUTE to
select the Main channel.
From OLED menu select “Preview Position” for Sub
screens position.
9PIP: Press OUT A (Main) or OUT B, then press IN1~6 or
MUTE to select Main or Sub video source. Press “ALL” or
Remote Control “ SWAP” to change Main/Sub video
source.
¾Matrix mode: Press OUT A or OUT B or OUT A & B and then
press IN 1~6 or MUTE to select the input sources. After the
selection, press “TAKE” to conrm the selection or
press “CANCEL” to cancel the selection.
4PV DISP: Press to set ON/OFF the Preview Display.
5SWAP: In PIP mode, press to swap Main/Sub video source.
6MENU: Press to enter into the menu.
7ENTER: Press to conrm the selection.
8ALL: Press this button to select all outputs to display with an input
source.
9TAKE: Press this button to conrm the selection of an IN and an OUT
button.
10 CANCEL: Press this button to cancel the IN/OUT selection.
11 PRESET:
¾When select the MODE in Matrix mode, press “PRESET” to
switch between Normal and Preset mode.
IN 3
IN 5
MUTEENTER -
OUT A
OUT B
MODE
PV DISP. PRESET IN 4
SWAP LOCK
ALL IN 1
TAKE IN 2
CANCEL
+MENUIN 6
CR-136
1
15
14
13
2
3
4
5
6
7
8
9
10
11
12

17
9Normal mode:
Press OUT A or OUT B or ALL and then press IN 1~6 or
MUTE to select the input sources. After the selection,
press “TAKE” to conrm the selection or press “CANCEL”
to cancel the selection.
9Preset mode:
Press “PRESET”, the OLED menu will showing Preset and
select IN 1~6. After preset 1~6, press“TAKE” to conrm
the selection or press “CANCEL” to cancel the selection.
12 LOCK: Press this button to lock all button functions on the panel. Press
3 seconds to relieve the lock function.
13 +/-: Press these buttons to move up/down under menu selection.
14 IN1~6: Press the IN buttons to select an input from the 6 input
sources.
15 MUTE: Press this button to mute video and audio that OUTA/B
selected.
6.5 RS-232 Protocols
OR-HD62CD
►
◄
Remote Control
PIN Assignment PIN Assignment
1 NC 1 NC
2 Tx 2 Rx
3 Rx 3 Tx
4 NC 4 NC
5 GND 5 GND
6 NC 6 NC
7 NC 7 NC
8 NC 8 NC
9 NC 9 NC
Baud Rate: 115200bps
Data bit: 8 bits
Parity: None
Flow Control: None
Stop Bit: 1

18
6.6 RS-232 & Telnet Commands
Command Name Description Description of parameter
P0 POWER OFF NONE
P1 POWER ON NONE
IPCONFIG DISPLAY THE CURRENT
IPCONFIG
NONE
SIPADDR XXX.
XXX.XXX.XXX
SET ETHERNET IP AD-
DRESS
XXX=0~255
SNETMASK XXX.
XXX.XXX.XXX
SET ETHERNET
NETMASK
XXX=0~255
SGATEWAY XXX.
XXX.XXX.XXX
SET ETHERNET
GATEWAY
XXX=0~255
HTTPPORT N SET ETHERNET PORT
NUMBER
N=0~65535
RSTIP IP CONFIGURATION
RESET TO <DHCP>
NONE
A N SET OUTPUT A
SOURCE
N=1-6
B N SET OUTPUT B
SOURCE
N=1-6
I N SET ALL OUTPUTS
SOURCE
N=1-6
EDIDMODE N SHOW EDID MODE N=(0)All (1)Appoint
EDIDALL SHOW EDID MODE
SOURCE FOR ALL
NONE
EDIDALL N SET EDID CONTENT
FOR ALL
N=0-7
EDIDIN SHOW ALL INPUT EDID
SOURCE
NONE
EDIDIN N1 SHOW INPUT N1 EDID
SOURCE
N1=1-6

19
Command Name Description Description of parameter
EDIDIN N1 N2 SET INPUT N1 EDID
SOURCE
N1=1-6
N2=0-7
HDCPIN SHOW ALL INPUT
HDCP STATUS
NONE
HDCPIN N1 SHOW INPUT N1 HDCP
STATUS
N1=1-6
HDCPIN N1 N2 SET INPUT N1 HDCP
ON/OFF
N1=1-6
N2=(0)OFF (ON)
PRESET SHOW ALL PRESET
CONFIG
NONE
PRESET N1 SHOW PRESET N1
CONFIG
N1=1-6
PRESET N1 N2 SET PRESET N1
CONFIGURE
N1=1-6
N2=AXBX (X=1-6,M)
PVMODE SHOW PREVIEW MODE NONE
PVMODE N1 SET PREVIEW MODE N1=0-1
PVPOS SHOW PREVIEW
POSITION
NONE
PVPOS N1 SET PREVIEW
POSITION
N1=0-3
OSDTRANS SHOW OSD
Transparency
NONE
OSDTRANS N1 SET OSD Transparency N1=0-15
OSDTO SHOW OSD TIME OUT NONE
OSDTO N1 SET OST TIME OUT N1=0-17
SOURCEDET SHOW ALL INPUT
SIGNAL
NONE
SOURCEDET N1 SHOW INPUT N1
SIGNAL
N1=1-6

20
Command Name Description Description of parameter
SINKINFO SHOW ALL OUTPUT
INFORMATION
NONE
SINKINFO N1 SHOW OUTPUT N1
INFORMATION
N1=A-B
INNAME SHOW ALL INPUT
NAME
NONE
INNAME N1 SHOW INPUT N1
NAME
N1=1-6
INNAME N1 N2 SET INPUT N1 NAME N1=1-6
N2=ABCDEFGH
OUTNAME SHOW ALL OUTPUT
NAME
NONE
OUTNAME N1 SHOW OUTPUT N1
NAME
N1=A-B
OUTNAME N1 N2 SET OUTPUT N1 NAME N1=A-B
N2=ABCDEFGH
MATRIXMODE SHOW MATRIX
CURRENT MODE
NONE
MATRIXMODE N1 SET MATRIX MODE N1=0-1
VER SHOW DESCRIPT OF
UNIT
NONE
REBOOT SYSTEM REBOOT NONE
HELP SHOW COMMAND
LIST
NONE
HELP N SHOW DESCRIPT OF
COMMAND
N : command name
Note: All RS-232 commands will not execute unless followed by a carriage
return. All commands are case-sensitive.
Table of contents
Other CYP Switch manuals
Popular Switch manuals by other brands

Elster
Elster krom schroder DG C Series operating instructions

Grundig
Grundig GSS.conect SDSP 506 Assembly instruction

Linksys
Linksys SGE2000 - Cisco - Gigabit Switch Administration guide

Zamel
Zamel WZM-01 instruction manual

Ruijie
Ruijie Reyee RG-ES106D-P Hardware installation and reference guide

Endress+Hauser
Endress+Hauser Liquicap M FTI51 operating instructions