Cypress Communications 1140 User manual

IP Phone 1140
User Guide

About the IP Phone 1140
The IP Phone 1140 brings voice and data tothe desktop byconnecting
directly to a Local Area Network (LAN) through an Ethernet connection.
When you are logged on to the network, the handset and keypad of the IP
Phone operate in the same way as a standard business telephone. You
can access additional services and features through the soft keys. identifies the current
IP Phone terminal description
The IP Phone 1140 offers these features:
•Six light-emitting diode (LED) indicator lamps
— message waiting lamp
— data waiting lamp
— mute lamp
— headset lamp
— handsfree lamp
— link lamp
•volume control keys
•standard telephone dialpad
•12 feature keys
•one soft key
•five navigation keys
—up
—down
— left
— right
Page 1

About the IPPhone 1140
— send (located in the middle of the navigation key, this key is mapped
to execute the current function of the soft key)
•multifield LCD screen
— adjustable contrast
— backlight
•three audio modes
— handsfree speak and listen
— headset (autodetect support)
— handset
•one USB port
— future support for USB mouse and keyboard
•automatic network configuration
•upgradeable firmware
•wideband audio support
Page 2

About the IP Phone 1140
IP Phone 1140 components
Terminal display
The display on the IP Phone terminal has blue LED backlighting, which you
can turn on and off.
The IP Phone 1140 display has three distinct areas:
•The upper area shows line and feature key status.
•The middle area shows single-line information for items such as caller
number, caller name, feature prompt strings, user-entered digits, date
and time information, and telephone information.
•The lower area displays the labels for the soft keys.
.
Page 3

12 About the IP Phone 1140
IP Phone 1140 display
Terminal indicators
The IP Phone terminal uses light-emitting diodes (LEDs) of different colors
to indicate the current state of the terminal. This table describes each color
and its associated state.
A steady indicator means that the extension or feature beside it is active. A
flashing indicator means the line is on hold or the feature is in the process of
being programmed.
Indicator LED color Meaning
Message waiting Red (located on the top right
corner of the set) Lit when a message is waiting,
or a call is missed. The light
turns off after you retrieve your
message.
Data waiting Blue (located on the top left
corner of the set) Lit when the terminal is on an
active call.
Headset Red (located on the front, on
the headset key) Lit when the headset is in use.
Handsfree Red (located on the front, on
the handsfree key) Lit when the handsfree mode
is active.
Terminal display
The 1140 feature keys
display on the LCD screen. ns off automatically after a period
The feature key functions are:
Transfer, Conference, DND,
Voicemail, Speed Dial,
Inspect, Cell, Charge Code,
and the Auto Dial numbers.
.
Page 4

Terminal indicators 13
Indicator LED color Meaning
Mute Red (located on the front, on
the mute key) Lit when the mute feature
is active. The system
administrator can configure
the mute lamp to be steady on
or blinking.
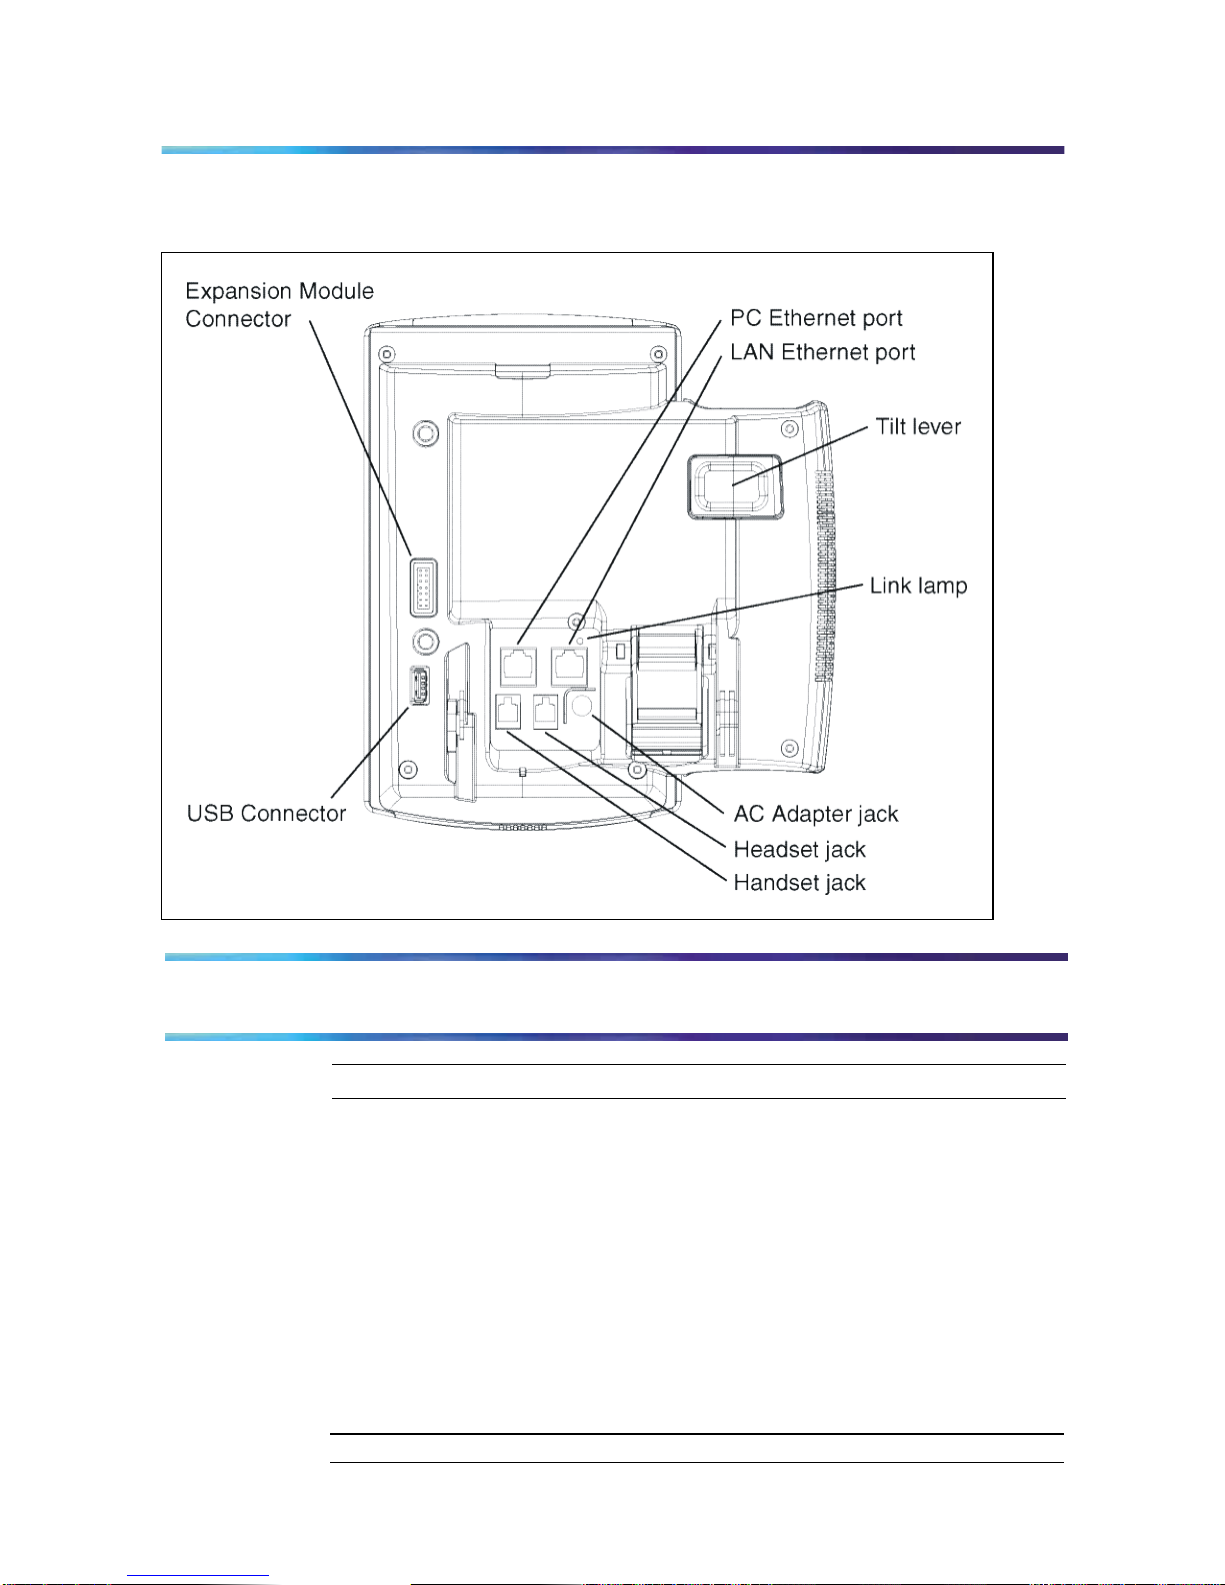
Link/Data Green (located on the back
cover near the network
Ethernet jack)
Lit when the link is alive and
flashes to indicate activity.
IP Phone 1140 Menu Systems
Use the up or down arrow on the navigation key to scroll to items.
Labels appear next tothe soft keys, inresponse toitems selected on screen.
Logging On & Logging Off
Use this item to log in and out from the IP Phone system.
See "Logging On" and "Logging Off".
Display Use this item to adjust the contrast level of the display.
See "Adjusting the contrast level of the display" (page 27.)
Feature Use the Feature menu to access these submenus:
Audio Profile
Use this item to adjust the audio profile.
Language Use the Language item to select the language used in the display.
See "Selecting the language" (page 35).
Time Use the Time menu to:
•select a time zone
•enable or disable Daylight Saving Time
•select the format used to display the time
•select the format used to display the date
•reset the time to the defaults
See "Using the Time menu" (page 40).
Display Use this item to adjust the contrast level of the display.
See "Adjusting the contrast level of the display"
Feature Use the Feature menu to access these submenus:
Language Use the Language item to select the language used in the display.
See "Selecting the Language ".
Time Use the Time menu to:
•select a time zone
•enable or disable Daylight Saving Time
•select the format used to display the time and date
•reset the time tothe defaults
See "Using the Time Menu"..
Page 5

User Use the User menu to:
•view your user name
•view your login type
•enable or disable auto login feature
•change your password
See "Using the User Menu" .
History Use History menu to:
•reset the Inbox
•reset the Outbox
See "Resetting the Inbox" and"Resetting the Outbox"...
Diagnostics Use the Diagnostics item to test the local mode.
See "Testing the Local Mode" .
Menu hierarchy
Page 6
18 IP Phone 1140 menu systems

18 IP Phone 1140 menu systems
How to use the navigation keys
The IP Phone terminal has navigation keys that you use to navigate the
menus and to help you to enter text in the display. See "IP
components" (page 11) for the location of these keys.
When the menu system is active, the navigation keys behave this way:
•up—return to the previous menu item
•down—go to the next menu item
•left/right—active when you can enter text. To move the cursor to the left,
press the left key. Press the right key to move the cursor to the right.
•send key—located in the middle of the navigation keys, press to select
the menu item 19
Connecting the IP Phone to the LAN
CAUTION
Risk of equipment damage
Do not plug the IP Phone into a regular telephone jack. This
causes severe damage to the terminal. Consult your system
administrator to ensure that you plug your telephone into a
10/100BaseT Ethernet jack.
Prerequisites
•IP Phones can be powered by an AC adapter or over a LAN. Contact
your insystem administrator to identif the correctpower option.
•See "IP Phone 1140 connectors" for the location ofthe
connectors on the back of the IP Phone.
Step Action
1Connect one end of the CAT-5 line cable to the LAN Ethernet port,
identified with a LAN icon, located on the underside of the terminal.
2Connect the other end of the CAT-5 line cable to the IP network jack.
For a terminal sharing LAN access with a PC, connect a second
CAT-5 line cable to the PC Ethernet port located on the back of the
terminal, identified by the PC icon. Connect the other end of the
cable to the Ethernet port on the computer.
3For a secure power connection, thread the cord around the strain
relief retaining hook and through the channel on the underside of
the terminal.
4Secure the terminal footstand to the terminal base.
—End—
Page 7

20 Connecting the IP Phone to the LAN
IP Phone 1140 connectors
Logging On
Step Action
1Enter your user name. Press OK.
Note: If your user name istoo long for the display (longer than 15
characters), the digits scroll to the left and an ellipsis appears to
the left of the user name.
2Enter your password. Press OK.
Note: If you make anerror, press the Clear key key to clear the feld,and then
enter your user name or password again.
You are logged on and the Menu screen appears.
—End—
Page 8

Logging Off
Step Action
1From the main menu, select Logoff.
2Press Ok.
A confirmation screen appears.
3Confirm the action.
You are logged off from the network.
—End—
Making Calls
Follow one of these procedures to make a call.
Making a call using off-hook dialing
Step Action
1Lift the handset from the cradle.
The primary extension is active and you hear a dial tone.
2Use the dialpad to enter the number.
3When the call is answered, begin speaking.
—End—
Making a call using handsfree dialing
See "IP Phone 1140 components" for the location ofthe handsfree key.
Step Action
1Press a line key.
A line is selected and you hear a dial tone.
Page 9

26 Making calls
2Use the dialpad to enter the number.
3When the call is answered, begin speaking.
4For privacy, lift the handset.
5To return to handsfree mode, press the handsfree key and place
the handset in the cradle.
The handsfree feature is active.
—End—
Making a call using predial
Step Action
1Before you press a line key or lift the handset, use the dialpad to
enter the number.
The number is entered into the terminal.
2When you want to make the call, press Ok.
The number is dialed.
3When the call is answered, begin speaking.
—End—
Editing a predialed number
Step Action
1Perform one of these actions.
•To delete numbers that appear to the left of the cursor, press
Bkspc .
•To delete numbers that appear to the right of the cursor, press
Delete .
2Use the dialpad to enter the new number.
—End—
Page 10

Answering Calls
See "IP Phone 1140 Components" forlocation ofthe handsfee and headset keys.
Answering a call
Step Action
1Perform one of these actions to answer a call:
•Lift the handset.
•To answer a call using handsfree, press the handsfree key.
•To answer a call while wearing a headset, press the headset key.
—End—
Answering a second call
Follow this procedure to answer a call when you are engaged in a call.
If another call comes in while the primary line is engaged, the phone sounds
and a message indicator icon on the display flashes. While the indicator is
flashing you have the opportunity to put the first call on hold and answer
the second call.
Step Action
1Press the hold key to put the active on hold.
2Press the line key for the second call.
The call is answered.
—End—
Ending a Call
See "IP Phone 1140 Components" forthe location ofthe Goodbye key.
Step Action
1Perform one of these actions:
•Return the handset to the cradle.
•Press the goodbye key.
The call is ended.
—End—
Page 11

While on an Active Call
Using call hold
Step Action
1To put the call on hold, press the hold key.
The call is suspended. On the display, an indicator flashes beside
the line on which the call is held.
2To retreive the call, press the key beside the flashing indicator inthe display.
—End—
Transferring a call
Step Action
1During a call, press the key to which the transfer feature is assigned.
The call is put on hold and a dial tone sounds. On the display, an
indicator flashes beside the line on which the call is held.
2Use the dialpad to enter the number to which to transfer the call.
3When that number rings or is answered, press the transfer key again.
The call is transferred.
—End—
Using conference call
If you have the multimedia seat,you can add up to 30 calls to a conference.
Step Action
1During a call, press the feature key assigned as the conference key.
The call is put on hold and a dial tone sounds. On the display, an
indicator flashes beside the line on which the call is held.
2Dial the number of the person you want to add to the call.
At this time, you can talk privately to the person you are adding, to
announce the conference.
3Press the conference key again to merge the calls.
4Repeat steps 2 and 3, to add more calls to the conference.
5If you make a mistake dialing, or a party does not want to be included
in the conference, press the extension key of the conference call
to reconnect to the conference.
6 If you hang up, the other parties will stay connected until they hang up.
—End—
Page 12

While on an Active Call35
Using the mute feature
Muting prevents the transmission of sounds through the microphone.
Step Action
1During a call, press the mute key.
2To turn off the feature, press the mute key again.
—End—
Using Call Forward
Step Action
1To activate call forward without lifting the handset, press the key to
which the forward feature isassigned.
2Use the dialpad to enter the number of the extension to which to
forward your calls.
3Press the forward key again. An icon appears beside the forward key.
4To turn off call forward, press the forward key.
The feature is deactivated and the icon disappears from the display.
—End—
Adjusting the Display Contrast Level
Step Action
1From the main menu, select and open Display.
The Contrast screen appears.
2Perform one of these actions:
•To decrease the contrast, press the left navigation key.
•To increase the contrast, press the right navigation key.
The percentage scale on the screen shows the degree of change.
The level decreases or increases each time you press the key.
3Press Ok.
The contrast level issaved.
—End—
Page 13

Using the Features Menu
When you access the Features menu, a numbered list of the features
provisioned on each key is displayed. The number displayed indicates the
key to which the feature is assigned to your line. Features are assigned by
your system administrator, so the features you have available may differ from
those described in this User Guide.
Changing the keys to which a feature is associated does not create new
functionality.
Note: Defining the key type
Each feature key can be defined in one of two ways: Central or Local. A
feature key defined as Central can have a Centrex feature, such as Call
Forward, assigned to it. A feature key defined as Local can have a directory
entry assigned to it. By default, all feature keys are defined as Central.
Step Action
1From the main menu, open the Feature menu.
A list of the feature keys and their current assignments appears.
2Select a key to change. Press Ok.
3Select Assign and Press Ok. .
If the key you selected in step 2 is assigned to a Centrex feature,
these soft key labels appear: Key Type and Autoscroll.
If the selected key is assigned to a local feature, these soft key labels
appear: Key Type and Feature.
4HighlightKey Type and press OK.
The Key Type screen appears. A check mark appears beside the
type currently assigned to the key.
5Perform one of these actions:
•To change Central to Local, select Local.
•To change Local to Central, select Central.
6Press Ok.
Page 14

Using the Features Menu
Enabling or disabling autoscroll
If autoscroll is enabled, the IP Phone automatically directs you to the screen
for the active feature. For example, if your secondary Directory Number
(DN) is configured on screen two, and you receive a call to that number, the
feature screens scroll to page two. You can answer the call immediately
without searching for the screen.
Step Action
1From the main menu, highlight the Feature menu and press Ok.
2Select a Feature and press OK. Highlight Assign and press Ok..
3From the Assign menu, select AutoScroll.Press Ok.
4Performone ofthese actions:
•To enable autoscroll, select Enable.(Recommended)
•To disable autoscroll, select Disable.
6Press Ok.
—End—
Labeling a feature key
Step Action
1From the main menu, open the Feature menu. Select a menu item.
2From the Feature menu, select and open Label.
3Press Clear to delete the current label if necessary.
4Use the dialpad to enter the new label.
5To correct the label, press Bkspc.
6When you have correctly entered the new label, press Ok.
—End—
Page 15

Enabling or disabling auto hide
.
When you enable the auto hide feature, only those features that are
available appear in the display. Feature availability depends on the state of
the terminal and administrator settings.
Step Action
1From the main menu, open the Feature menu. Select a menu item.
2Select and open Options..
3From the Options menu, select and open Auto Hide.
4Perform one of these actions:
•To enable auto hide, select Enable.(Recommended)
•To disable auto hide, select Disable.
5Press Ok.
—End—
Selecting the default line key
Step Action
1From the main menu, open the Feature menu. Select a menu item.
2From the Feature menu, select and open Options.
3From the Options menu, select and open Default Feature.
The Default Feature screen appears, showing a list of DN keys.
4Scroll through the list to select the key that you want to assign as
your default line key.
5Press Ok.
—End—
Resetting the feature key to the default settings
.
Step Action
1From the main menu, open the Feature menu. Select a menu item.
2From the Feature menu, select and open Reset.
The Reset screen appears.
3Press Yes.
—End—
Using the Features Menu Page 16

Selecting the Language
Step Action
1From the main menu, select and open Language.
A list of available languages appears.
2Scroll through the list and select your preferred language.
3Press Ok.
—End—
Using the Time Menu
Setting the time zone
Follow this procedure to select the time zone.
Step Action
1From the main menu, open the Time menu.
2From the Time menu, select and open Hours from GMT.
3Scroll through the list and select the time zone.
4Press Ok.
The time displayed changes to that of the selected zone.
—End—
Enabling Daylight Saving Time
Step Action
1From the main menu, open the Time menu.
2From the Time menu, select and open Daylight Saving.
The Daylight Saving screen appears.
3Select On.
4Press Ok.
Daylight Saving Time is enabled. The word On appears with a check
mark beside it to indicate the feature is enabled.
—End—
Page 17

60 Using the Time menu
Disabling Daylight Saving Time
Step Action
1From the main menu, open the Time menu.
2From the Time menu, select and open Daylight Saving.
3Select Off.
Daylight Saving Time is disabled. The word Off appears in the
display, with a check mark beside it.
—End—
Setting the time format
Follow this procedure to set the time format the terminal uses to display the
current time. The time format choices are:
•12-hour clock
•French
•24-hour clock
Step Action
1From the main menu, open the Time menu.
2From the Time menu, select and open Time Format.
3Scroll through the Time Format options to select the format you want.
A check mark appears beside the format currently in use.
4To enable a format, select it, and press Ok.
—End—
Setting the date format
Follow this procedure to set the date format the terminal uses to display
the current date. When month (mmm) is selected, the display shows an
abbreviated name, Oct for example, and not a number.
The date format choices are:
•ddmmm
•mmmdd
•mm/dd
•dd/mm
Page 18

Step Action
1From the main menu, open the Time menu.
2From the Time menu, select and open Date Format.
3Scroll through the Date Format options to select the format you want.
4To enable a format, select it, and press Ok.
A check mark appears beside the option to indicate that it is enabled.
The date is displayed in the selected format. You return to the
previous screen.
—End—
Resetting the default time
.
Step Action
1From the main menu, open the Time menu.
2Form the Time menu, select and open Reset.
A confirmation screen appears.
3Confirm the action.
—End—
Using the User Menu
Viewing your user name
Step Action
1From the main menu, open the User menu.
2From the User menu, select and open Username.
—End—
60 Using the Time Menu Page 19
Other manuals for 1140
2
Table of contents
Other Cypress Communications IP Phone manuals