Cyrusher K5242 LCD User manual

USERS GUIDE
K5242 LCD

CONTENT
Preface ···························································································- 1 -
1. Appearance and Dimensions·······················································- 2 -
1.1 Material and Color ·························································································································- 2 -
2. Function and Button Definition ···················································- 3 -
2.1 Function description ······················································································································- 3 -
2.2 Normal Display Content ·················································································································- 3 -
2.3 Button definition····························································································································- 3 -
3. Note for Users·············································································- 4 -
4. Installation Instruction ································································- 4 -
5. User Settings···············································································- 4 -
5.1 On / Off··········································································································································- 4 -
5.2 User interface ································································································································- 5 -
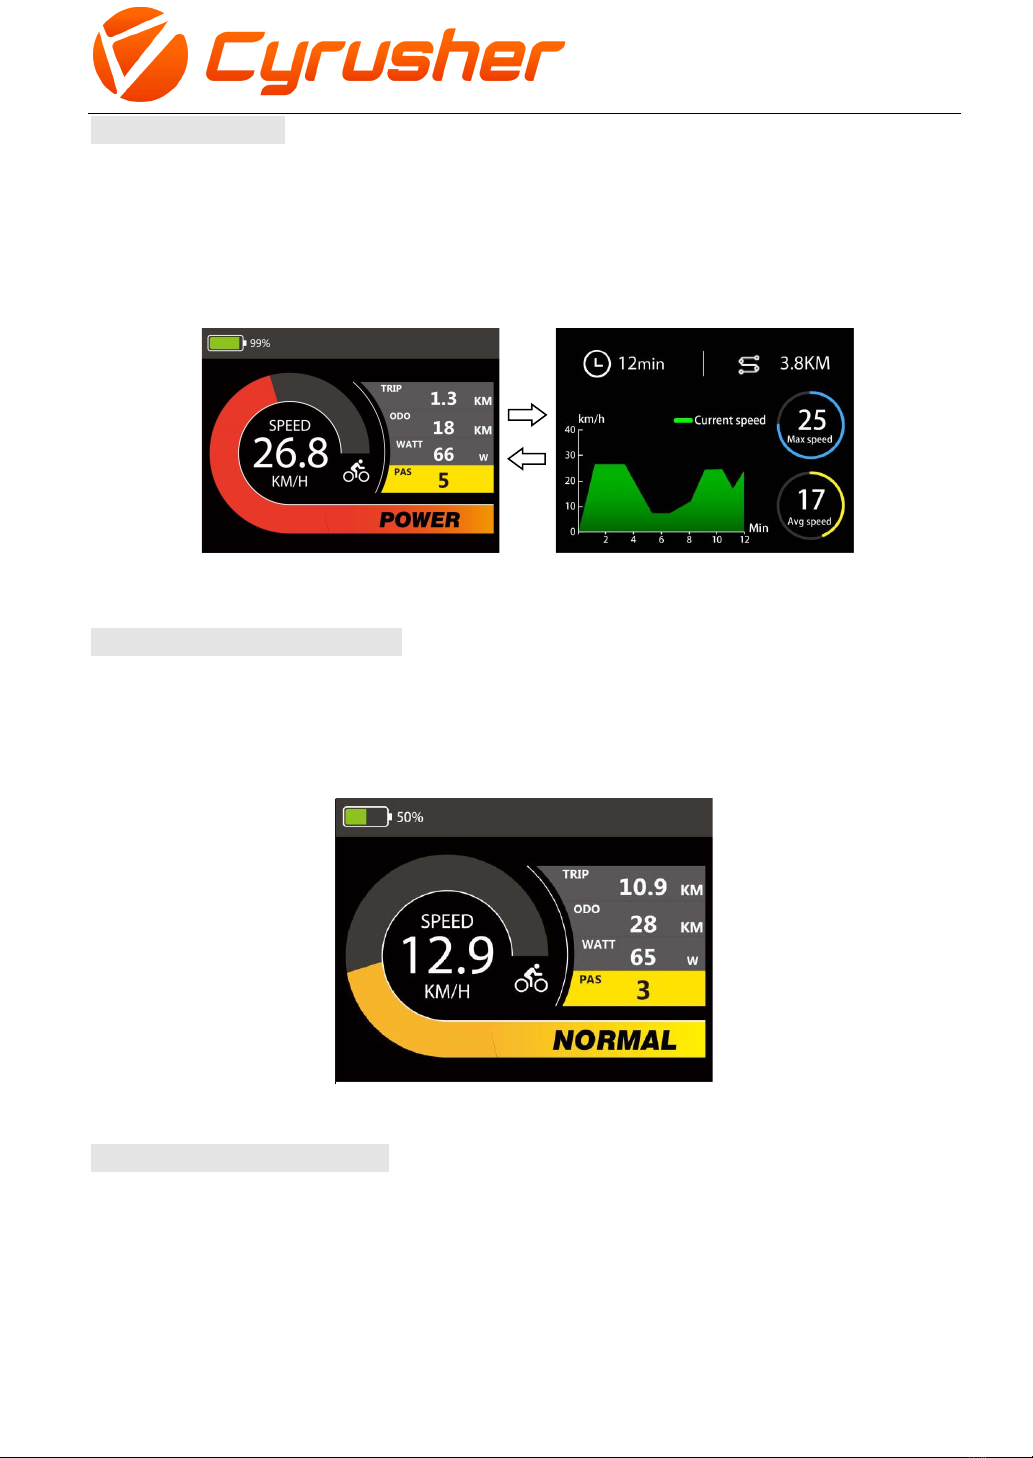
5.3 Normal display interface ················································································································- 5 -
5.4 Data statistics interface··················································································································- 5 -
5.5 Walk Assist Mode (Cruise Mode)····································································································- 6 -
5.6 Headlight On/Off ···························································································································- 6 -
5.7 PAS Level Selection ························································································································- 7 -
5.8 Battery Indicator····························································································································- 7 -
5.9 Output Power Indicator··················································································································- 7 -
5.10 Error Code····································································································································- 8 -
6. User Settings···············································································- 8 -
6.1 Wheel Size Setting ·························································································································- 9 -
6.2 Speed Limit Setting ························································································································- 9 -
6.3 Backlight Brightness Setting·········································································································- 10 -
6.4 Display Unit Setting······················································································································- 10 -
6.5 Auto Off Time Setting···················································································································- 11 -
6.6 Battery Display ModeSetting········································································································- 11 -

6.7 About Interface····························································································································- 12 -
7. Advanced Settings·····································································- 12 -
7.1 Pas Range Setting·························································································································- 13 -
7.2 Speed Sensor Setting ···················································································································- 13 -
7.3 Zero Start Setting ·························································································································- 14 -
7.4 PAS Power Sensitivity Setting ·······································································································- 14 -
7.5 Start Strength Setting···················································································································- 15 -
7.6 Pas Magnetic Number Setting ······································································································- 15 -
7.7 Current Limit Setting····················································································································- 16 -
7.8 Factory Data Reset ·······················································································································- 16 -
7.9 Speed Duty Setting (PWM)········································································································- 17 -
7.10 Driver Mode Setting···················································································································- 17 -
8. Preparation Before Startup ·······················································- 18 -
9. FAQ···························································································- 18 -
10. Quality Assurance and Warranty Scope···································- 18 -
11. Version····················································································- 19 -
Appendix 1: Error Code Definition ············································- 20 -

- 1 -
Preface
Dear user, to ensure better performance of your e-bike, please read through the K5242 product
introduction carefully before using. We will use the most concise words to inform you of all the details
(including the hardware installation, setting and normal operation use of the display) when using our
display. Meanwhile, the introduction will also help you to solve possible confusion and barriers.

- 2 -
1. Appearance and Dimensions
1.1 Material and Color
K5242 products are made of black and white PC. Under the temperature of -20 to 60℃, the shell
material can ensure normal usage and good mechanical performance.
Dimension(unit:mm)
K5242 is equipped with special button. N3 button can be installed on the left side of the handlebar or
on the right side of the handlebar. N3 button is connected with the bottom lead of k5242 display. Its
dimension is as follows:

- 3 -
2. Function and Button Definition
2.1 Function description
K5242 provides you with a variety of function modes, to meet your riding needs.
Its functions are as follows:
◆Battery power indication
◆Motor power indication
◆Speed indication
◆Distance (including single trip distance and ODO display)
◆Single riding time indication
◆Walk assist indication
◆Cruise Mode
◆Backlight setting
◆Error code indication
◆Various setting parameters
2.2 Normal Display Content
K5242 Normal Display Interface
2.3 Button definition
There are 3 buttons on K5242, In the following introduction, is named as “MODE”. is
named as “UP” and is named as “DOWN”.

- 4 -
3. Note for Users
Be care of the safety use. Don’t attempt to release the connector when battery is on power.
Try to avoid hitting.
Don’t split the waterproof sticker to avoid affecting the waterproof performance.
Don’t modify system parameters to avoid parameters disorder.
Make the display repaired when error code appears.
4. Installation Instruction
When the e-bike is powered off, you can insert the connector of display and the corresponding
connector of controller to complete the installation, and adjust the display to a suitable angle.
5. User Settings
5.1 On / Off
Long press “MODE” button then the display will work normally, and the controller will power on at the
same time.
With the display on, long press “MODE” button, the display will shut down, the display will leave off
battery, the leakage current of display on is less than 1μA. The startup logo is shown as follow:
If the e-bike is not used for more than 10 minutes, the display will automatically shut
down.

- 5 -
5.2 User interface
There are two display interfaces, including normal display interface and data statistics interface. Long
press “UP” + “MODE” button to switch from normal display interface to data statistics interface; long
press “MODE” button to switch back from data statistics interface to normal display interface.
Normal display interface Data statistics interface
5.3 Normal display interface
The normal interface can be displayed when the display starts up normally. The interface can display
real-time battery power, real-time speed (SPEED), single trip distance (TRIP), odometer (ODO), Motor
Power output (WATT) and PAS level (PAS) of the E-bike.
Normal display interface
5.4 Data statistics interface
When the speed is 0, long press “UP” + “MODE” button to switch from the normal display interface to
the data statistics interface.
The data statistics interface is used to calculate and display the data of single ride of E-bike. It includes
riding time, riding distance, max speed, Avg Speed and linear statistical chart of single riding speed.
Long press “MODE” button or when E-bike has speed, the data statistics interface will switch to the

- 6 -
normal display interface automatically.
Note: the maximum statistical time range of linear statistical chart is three hours, and the timing will
re-start again after three hours.
Data statistics interface
5.5 Walk Assist Mode (Cruise Mode)
When there is no speed, press and hold “DOWN” button for 3 seconds to enter the Walk assist mode.
The E-bike will travel at a constant speed of 6km/h. Press and hold “DOWN” button again for 3 seconds
or squeeze the brake lever to exit the walk assist mode.
When the bike is riding with a speed, press and hold “DOWN” button for 3 seconds to enter the Cruise
mode. The E-bike continues to drive at current speed, press and hold “DOWN” button again for 3
seconds or squeeze the brake lever .to exit the cruise mode.
Walk assist mode interface Cruise mode interface
Walk Assist function can only be used as pushing the e-bike by hands. Please don’t use
this function when riding.
5.6 Headlight On/Off
Long press the “UP” button, the backlight will be turned on, and the controller will be informed to turn
on the headlight. Long press the “UP” button for 2 seconds again to turn off the backlight and turn off

- 7 -
the headlight.
Headlight indicator
5.7 PAS Level Selection
Short press the "UP" or “DOWN” button to switch the PAS level, the motor output power will be
changed accordingly by the PAS level of E-bike. The default range of PAS level is 0-5 levels. Level 1 is
the lowest output level, and the level 5 is the highest output power level of the motor.
PAS level indicator
5.8 Battery Indicator
The battery power is shown as a percentage bar. When the battery is fully charged, the power bar
shows 100%
Battery indicator
5.9 Output Power Indicator
The display can show the current output power of the motor. The indicator is shown in the figure below.

- 8 -
Output Power Indicator
5.10 Error Code
When the e-bike electronic control system fails, the display will automatically indicate the error code.
For the definition of detailed error codes, see appendix 1.
Error Code indicator
The fault can only be exited when the fault is eliminated, and the E-bike cannot continue
to drive after a fault occurs.
6. User Settings
When there is no speed in the power on state, press and hold the “UP” and “DOWN” button at the
same time for 2 seconds, and the display will enter the setting interface. Press “UP” or “DOWN” button
to select display settings.

- 9 -
Setting list interface
6.1 Wheel Size Setting
Short press “MODE” button to enter the setting option. The settable values are: 16, 18, 20, 22, 24, 26,
700C, 27.5, 28 and 29 inch. Select the corresponding wheel diameter of the E-bike through “UP” and
“DOWN” button to ensure the accuracy of the speed display and mileage display. Long press “MODE”
button to return to the setting list interface.
Wheel size setting interface
6.2 Speed Limit Setting
Short press “MODE” button to enter the setting option. The optional range of the maximum speed
setting is 20Km/h to 50Km/h and 99Km. 99Km is unlimited. It can be set by “UP” and “DOWN” button.
Long press “MODE” button to return to the setting list interface.

-10 -
Speed limit setting interface
6.3 Backlight Brightness Setting
Short press “MODE” button to enter the setting option. The setting options: 1, 2 and 3 indicates the
backlight brightness, 1 is the darkest, 2 is standard brightness, 3 is the brightest. The default value is 3.
Long press “MODE” button to return to the setting list interface.
Backlight brightness setting interface
6.4 Display Unit Setting
Short press “MODE” button to enter the setting option. The setting parameters are Km/h and Mile/h.
The default Km/h unit is metric. Km/h or Mile/h can be selected by pressing “UP” and “DOWN” button.
Km/h means the unit is metric system, and Mile/h means the unit is Imperial system. Long press “MODE”
button to return to the setting list interface.

-11 -
Display unit setting interface
6.5 Auto Off Time Setting
Short press “MODE” button to enter the setting option. Press the “UP” and “DOWN” button to adjust
the auto off time. The optional range is from 5min to 60min, Default setting is 10min. long press “MODE”
button to return to the setting list interface.
Auto Off Time setting interface
6.6 Battery Display ModeSetting
Short press “MODE” button to enter the setting option. Setting options can select between percentage
and volt display, It can be set by pressing“UP” and “DOWN” button. Long press “MODE” button to
return to the setting list interface.

-12 -
Battery Display Mode setting interface
6.7 About Interface
Short press “MODE” button to enter the “About” interface, this interface shows manufacturer’s name,
software and hardware version number and other information, which is usable for later display
maintenance.
7. Advanced Settings
When there is no speed in the power on state, press and hold the “UP” and “DOWN” button at the
same time for 2 seconds, and the display will enter the setting interface. Press “UP” or “DOWN” button
to select the Advanced display settings.

-13 -
Advanced Display Setting
7.1 Pas Range Setting
Short press “MODE” button to enter the setting interface, there are 3 modes in the PAS level selection:
0-3 , 0-5, 0-9,. Switch by pressing “UP” or “DOWN” button, short press “MODE” button to confirm,
Long press “MODE” button to return to the setting list interface.
PAS Range Setting
7.2 Speed Sensor Setting
Short press “MODE” button to enter the setting interface. the setting range is from 1 to 6. It should be
set according to the number of magnets installed on the wheels of the E-bike. Press “UP/DOWN”
button to select the quantity of magnet. Long press “MODE” button to confirm and return to thesetting
selection interface.

-14 -
Speed Sensor Magnetic setting interface
7.3 Zero Start Setting
Short press “MODE” button to enter the setting interface. Press “UP/DOWN”to select Yes or No, Yes
means motor can be started at 0 speed with throttle, No means the throttle function can be used only
at an initial speed. Long press “MODE” button to confirm and return to the setting selection interface.
Zero Start setting interface
7.4 PAS Power Sensitivity Setting
Short press “MODE” button to enter the setting interface. The setting range is 3 to 24. 3 is the highest
sensitivity, 24 is the lowest. Press “UP/DOWN” button to select sensitivity value, Default setting is 3.
Long press “MODE” button to confirm and return to the setting selection interface.

-15 -
PAS Power Sensitivity setting interface
7.5 Start Strength Setting
Short press “MODE” button to enter the setting interface. The setting range is 1 to 5. 5 is the highest
start strength, 1 is the lowest, Press “UP/DOWN” button to select start strength value, Default setting
is 3. Long press “MODE” button to confirm and return to the setting selection interface.
Start Strength setting interface
7.6 Pas Magnetic Number Setting
Short press “MODE” button to enter the setting interface. The setting range is 5/8/12. It should be set
according to the number of magnets disk that installed on the E-bike. Press “UP/DOWN” button to
select value, Default setting is 12. Long press “MODE” button to confirm and return to the setting
selection interface.

-16 -
PAS Magnetic Number setting interface
7.7 Current Limit Setting
Short press “MODE” button to enter the setting option. The current limit can be set in the range of 1.0-
22.0A. Press “UP/DOWN” button to change the maximum current value of the controller. Default
setting is 22A. Long press “MODE” button to confirm and return to the setting selection interface.
Current Limit setting interface
7.8 Factory Data Reset
Short press “MODE” button to enter the setting interface. Press “UP/DOWN”to select Yes or No, Yes
means to restore all the settings to the default settings, No means not restore all the settings. Long
press “MODE” button to confirm and return to the setting selection interface.

-17 -
Factory Data Reset interface
7.9 Speed Duty Setting (PWM)
Short press “MODE” button to enter the setting option. The setting options can be set in the range of
0%-100%. Press “UP/DOWN” button to change the value of the Speed duty percentage. Long press
“MODE” button to confirm and return to the setting selection interface.
Speed Duty Setting interface
7.10 Driver Mode Setting
Short press “MODE” button to enter the setting interface. The setting options are 0, 1 and 2. Press
“UP/DOWN” button to select 0, 1 and 2 to adjust the three riding assist modes, 0 indicates only PAS
assist mode, 1 indicates only throttle mode, 2 indicates coexistence of two assisted mode. Press
“UP/DOWN” button to select value. Default setting is 2. Long press “MODE” button to confirm and
return to the setting selection interface.
Table of contents
Other Cyrusher Bicycle Accessories manuals