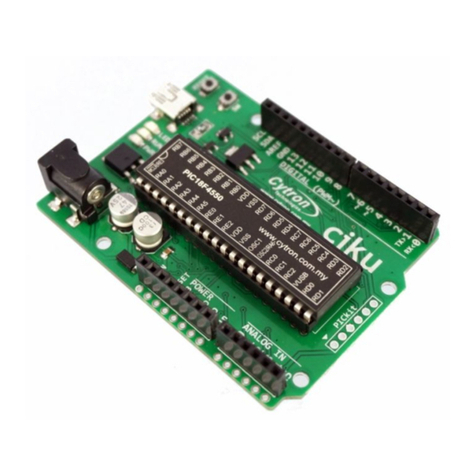
Cytron Technologies SK40C User manual

ROBOT . HEAD to TOE
Product User’s Manual –SK40C Rev2.0
INDEX
1. Introduction/Overview 3
2. Packing List 4
3. Product Specification And Limitations 5
4. Dimension 6
5. Board Layout 7
6. Hardware 12
7. Software 23
8. Getting Started 28
9. Warranty 37
Created by Cytron Technologies Sdn. Bhd. – All Rights Reserved 2

ROBOT . HEAD to TOE
Product User’s Manual –SK40C Rev2.0
1. INTRODUCTION/OVERVIEW
SK40C is another version of 40 pins PIC microcontroller start up kit. It is designed to offer an
easy to start board for PIC MCU user. However, all interface and program should be
developed by user. This board comes with basic element for user to begin project
development. It offers plug and use features. This kit is designed to offer:
●Industrial grade PCB
●Vin: 7 to 15VDC
●Every board is being fully tested before ship to customer
●Compact, powerful, flexible and robust start-up platform
●Suitable for hobbyists and experts
●Save development and soldering time
●No extra components required for the PIC to function
●All I/O pins are nicely labeled to avoid miss-connection by users
●Connector for UIC00A/B (low cost USB ICSP PIC Programmer) - simple and fast
method to load program
●Fully compatible with SK40B
●No more frustration to plug PIC out and back for re-programming
●Perfectly fit for 40 pins 16F and PIC18F PIC, the 8-bit PIC.
●With UIC00A/B, program can be loaded in less than 5 seconds
●More convenient to use and it is smaller than SK40B.
●Maximum current of 5V voltage regulator is 0.5A.
●Dimension: 85mm x 55mm
SK40C come with additional features:
●2 x Programmable switch
●2 x LED indicator
●Turn pin for crystal. User may use others crystal provided.
●LCD display (optional)
●UART communication
●USB mini B receptor on board.
●PICkit ICSP 6-pin port which can be used with UIC-A and PICkit 3
●And all the necessities to eliminate users difficulty in using PIC
Users are able to utilize the function of PIC by directly plug in the I/O components in
whatever way that is convenient to user. With UIC00A/B connector on board, user can start
developing projects and have fun with this kit right away. This kit comes WITHOUT PIC
microcontroller to provide the freedom for user to choose PIC type.
This document explains the method to use SK40C.
Created by Cytron Technologies Sdn. Bhd. – All Rights Reserved 3

ROBOT . HEAD to TOE
Product User’s Manual –SK40C Rev2.0
2. PACKING LIST
Please check the parts and components according to the packing list. If there are any parts
missing, please contact us at [email protected] immediately.
1. 1 x SK40C board with all components shown soldered
2. 1 x 16-way Header pin for LCD Display.
3. 1 x 20MHz Crystal
4. PIC MCU – Not included, please purchase separately from Cytron website
5. USB Mini-B Cable – Not included, please purchase separately from Cytron website
6. UIC00A/B – Not included, please purchase separately from Cytron website
7. User’s Manual – Not included, please download from Cytron website
Created by Cytron Technologies Sdn. Bhd. – All Rights Reserved 4

ROBOT . HEAD to TOE
Product User’s Manual –SK40C Rev2.0
3. PRODUCT SPECIFICATION AND LIMITATIONS
SK40C is designed to offer starting up platform for development, the specification of PIC
MCU used should be referred.
Absolute Maximum Rating
Symbol
Parameter
Min
Max
Unit
Vin
Input voltage to DC jack
7
15
V
Imax
Maximum output current from 5V voltage
regulator
-
0.5
A
SK40C comes with additional features of:
●2 x Programmable push button (tactile)
●2 x Programmable LED indicator
●Turn pin for crystal. User may use other crystal
●Parallel LCD pads (optional)
●4-pin UART communication port
●USB Mini-B receptor on board
●And all the necessities to eliminate user difficulty in using PIC microcontroller
Note: Only 1 power source should be provided to SK40C. Either from DC adapter,
USB port, external Vin or external 5V.
Created by Cytron Technologies Sdn. Bhd. – All Rights Reserved 5

ROBOT . HEAD to TOE
Product User’s Manual –SK40C Rev2.0
Side View
1. Connector for UIC00B Programmer
2x5 box header for UIC00A/B, USB ICSP PIC Programmer.
2. JP10 for PICkit
JP10 port reserved for PICkit programmer. User may use PICkit3 and plug to this port and
utilize the ICSP pin to load program besides using UIC00B.
3. UART connector
Reserved for UART communication. Tx and Rx pin of SK40C are connect to RC6 and RC7
respectively. Ensure PIC Microcontroller chosen has the correct UART pin (RC6 and RC7).
4. LED Indicator
2 LEDs (connected to RB6 and RB7) as active High output for PIC MCU. These LEDs are
controllable from PIC MCU.
5. Programmable Push Button
2 x Push button (Tactile switch) connected to RB0 and RB1 of PIC MCU. This is extra input
button for user. It can be programmed as input switch.
6. Reset Button
Push button with the function of Reset for PIC MCU.
7. 40-Pin IC socket for PIC MCU
40 pin IC socket for user to plug in any 40 pin PIC MCU (8-bit and 5V operated). It can either
be 16F or 18F PIC. Of course the IC package should be PDIP.Please ensure the first pin is
at the top side. Inside IC socket, there some electronics components.
8. LCD Contrast
5K of trimmer to set LCD contrast.
9. JP9 for USB
JP9 is provided for USB usage. Connect these pins if user uses USB communication. Shorting
Created by Cytron Technologies Sdn. Bhd. – All Rights Reserved 8

ROBOT . HEAD to TOE
Product User’s Manual –SK40C Rev2.0
both these pins will connect pin 18 of PIC (VUSB on PIC18F4550) to 1uF capacitor. This
setting is necessary if USB peripheral is needed.
10. JP8 for LCD Backlight
JP8 is provided for LCD Backlight. LCD will have backlight if these pins are shorted.
11. Turn pin for crystal
Turn pin is provided for crystal. 20MHz is default crystal comes with SK40C. However, the
20MHz crystal can be removed and replace with other crystal. Just remove the crystal and put
other crystal on turn pin without soldering.
12. Female Header
Female header provides connector for user to make connection between SK40C to prototype
board and utilize the I/O of PIC MCU. It is fully compatible between SK40B. 40 pins of PIC
MCU including OSC (connected to crystal) are extended out to these pin. There is an extra
pin on top of MCLR which is labeled as Vin, is connected to the input power.
13. Parallel LCD pads
Reserved for 2 x 16 character parallel LCD. User may solder 2x16 LCD at these pads if it is
needed.
14. DC power adaptor socket
DC power adaptor socket for user to plug in DC adaptor. The input voltage should within 7 to
15VDC.
15. USB Connector
A USB Mini B receptor. USB connector for communication between devices and a host
controller (usually personal computer or laptop). This function is only valid for certain model
of PIC microcontroller. Please refer to USB interface section. The USB connection also
provides 5V from USB port (computer or laptop or 5V charger) to the SK40C. The power
LED will light ON when the USB cable is connected.
16. Power indicator LED
Power indicator LED for on board power. It will light ON when the 5V voltage regulator
output power or it receives 5V from USB.
17. Toggle Switch for power supply
Toggle switch to On/Off the power supply from DC adaptor.
Created by Cytron Technologies Sdn. Bhd. – All Rights Reserved 9

ROBOT . HEAD to TOE
Product User’s Manual –SK40C Rev2.0
Table below shows pins connection for 2x16 LCD pads.
Pin
Name
Pin Function
Connection
1
GND
Ground
GND
2
VDD
Positive supply for LCD
5V
3
Con
Brightness adjust
Connected to a preset to
adjust brightness
4
RB4
Select register,select instruction or
data register
Pin RS of LCD
5
GND
Ground
GND
6
RB5
Start data read or write
Pin E of LCD
7
RD0
LCD data bus pin
Pin D0 of LCD
8
RD1
LCD data bus pin
Pin D1 of LCD
9
RD2
LCD data bus pin
Pin D2 of LCD
10
RD3
LCD data bus pin
Pin D3 of LCD
11
RD4
LCD data bus pin
Pin D4 of LCD
12
RD5
LCD data bus pin
Pin D5 of LCD
13
RD6
LCD data bus pin
Pin D6 of LCD
14
RD7
LCD data bus pin
Pin D7 of LCD
15
VDD
Backlight positive input
VDD
16
B/L
Backlight negative input
Connect to JP8
Table below shows pin connection for Turn pin of crystal oscillator
Pin
Name
Pin Function
Connection
RA6
OSC2
Crystal oscillator
Turn pin (JP7)
RA7
OSC1
Crystal oscillator
Turn pin(JP7)
Created by Cytron Technologies Sdn. Bhd. – All Rights Reserved 10

ROBOT . HEAD to TOE
Product User’s Manual –SK40C Rev2.0
Table below shows pin connection for Programmable Push button.
Pin
Name
Pin Function
Connection
RB0
SW1
Digital Input
‘SW1’ SWITCH
RB1
SW2
Digital Input
‘SW2’ SWITCH
Table below shows pin connection for UART.
Pin
Name
Pin Function
Connection
RC6
TX
Transmit Data
TX pin of SK40C UART
RC7
RX
Received Data
RC pin of SK40C UART
* For detailed connection, please refer to SK40C Rev2.0 Schematic.
Created by Cytron Technologies Sdn. Bhd. – All Rights Reserved 11

ROBOT . HEAD to TOE
Product User’s Manual –SK40C Rev2.0
6. HARDWARE
SK40C comes with UIC00A/B ICSP USB programmer connector to offer simple way for
downloading program.UIC00A/B ICSP programmer is very easy programming tool and helps
to save development time.
6.1 Loading Program Using UIC00A/B Programmer
●Connect SK40C as shown in following figure.
After plug in 40-pin PIC MCU (make sure the orientation is correct) of your choice, SK40C
should be powered by DC adaptor. Now, the hex code is ready to be loaded to SK40C. For
the usage of UIC00A/B, please refer to UIC00A/B User’s Manual.
RB7/PGD and RB6/PGC are two pins that being used in ICSP program loading, and have
been connected to UIC00A/B connector and 2 LED indicators. User is advised not to use
these pins as input, because the input device may affect the ICSP process. Even when using as
output, RB7 or RB6 pin is recommended to be used in controlling non critical device such as
LED, LCD, 7 segments or buzzer. It is recommended to isolated ICSP signals from
application circuit by using series resistor (range 220 ohm and above). Furthermore, NO
capacitance component (capacitor) should be connected to these 2 pins. Please refer to
UIC00A/B User’s Manual for further details.
Created by Cytron Technologies Sdn. Bhd. – All Rights Reserved 12

ROBOT . HEAD to TOE
Product User’s Manual –SK40C Rev2.0
6.2 Loading program using PICkit (JP10)
JP10 (PICkit port) is reserved for user to load program using PICkit2/3. This is alternative
way to load program besides using UIC00A/B. Below is some steps to load program using
PICkit.
●To use PICkit 3 as programmer, user has to solder 1x6 way right angle header pin to
JP10.
●Connect PICkit 3 at JP10. Ensure the arrow on SK40C is same with arrow at
PICkit 3.
Created by Cytron Technologies Sdn. Bhd. – All Rights Reserved 13

ROBOT . HEAD to TOE
Product User’s Manual –SK40C Rev2.0
6.3 I/O Port (to electronic components)
I/O of the microcontroller can be access through few methods:
●Connect the components that needed onto the I/O port.
●Plug the I/O pins of the Start-up Kit onto a breadboard. Then, extend the I/O port to
Input Output device using jumper wires.
Created by Cytron Technologies Sdn. Bhd. – All Rights Reserved 14

ROBOT . HEAD to TOE
Product User’s Manual –SK40C Rev2.0
The 2x16 character LCD offers character display for embedded system. It can be used to
display numerical information, text message and also special symbol. 2 x 16 LCD is not
included in SK40C packaging list. User may purchase it separately.
●Solder 16-way header pin to the LCD.
●Solder LCD on to SK40C as shown. To enable LCD backlight (optional), solder JP8
to connect the LCD B/L.
Created by Cytron Technologies Sdn. Bhd. – All Rights Reserved 16

ROBOT . HEAD to TOE
Product User’s Manual –SK40C Rev2.0
Below shows the difference between LCD with backlight and LCD without backlight.
a) With backlight
b) Without backlight
●Beside, user may also use header pin and mini jumper to connect LCD B/L. Solder
header pin at JP8 and use mini jumper to connect LCD B/L. Header pin and mini
jumper is not included in SK40C packing list. Users need to buy separately.
Created by Cytron Technologies Sdn. Bhd. – All Rights Reserved 17

ROBOT . HEAD to TOE
Product User’s Manual –SK40C Rev2.0
6.4 UART Interface
UART port is provided on SK40C for communication to microcontroller or computer. Users
need to solder 2510-04 connector to utilize the UART. 2510-04 connector is not included on
SK40C packaging list.
●Solder 2510-04 connector at UART as shown.
●Connect to other microcontroller using cable connector.
Created by Cytron Technologies Sdn. Bhd. – All Rights Reserved 19

ROBOT . HEAD to TOE
Product User’s Manual –SK40C Rev2.0
●Figure below shows an example connection of SK40C to external device via UART
port. This example connection shows UART pins of SK40C (PIC16F877A) is
connected to UART pins of SKPS. Tx and Rx pin of SK40C should be cross
connected to Tx and Rx pin of SKPS. In other words, Tx pin of SK40C should be
connected to Rx pin of SKPS, while Rx pin of SK40C should be connected to Tx pin
of SKPS. No extra component is necessary between these connections. For details
connection, please refer to sample schematic.
Created by Cytron Technologies Sdn. Bhd. – All Rights Reserved 20
Table of contents
Other Cytron Technologies Microcontroller manuals
Popular Microcontroller manuals by other brands

AMD
AMD Elan SC520 user manual

StefPro
StefPro SPK2141.01 Assembly plan

NXP Semiconductors
NXP Semiconductors LPC11E Series user manual

GigaDevice Semiconductor
GigaDevice Semiconductor GD32H7 Series Application notes

PLX Technology
PLX Technology USB3382-AIC Rapid Hardware reference manual

Silicon Laboratories
Silicon Laboratories C8051F310-TB user guide