D-Link DHP-W306AV User manual


2D-Link DHP-W306AV User Manual
Table of Contents
Product Overview ..............................................................................4
Package Contents ........................................................................................... 4
System Requirements .................................................................................... 4
Introduction ......................................................................................................5
Hardware Overview ........................................................................................7
Connections .............................................................................................7
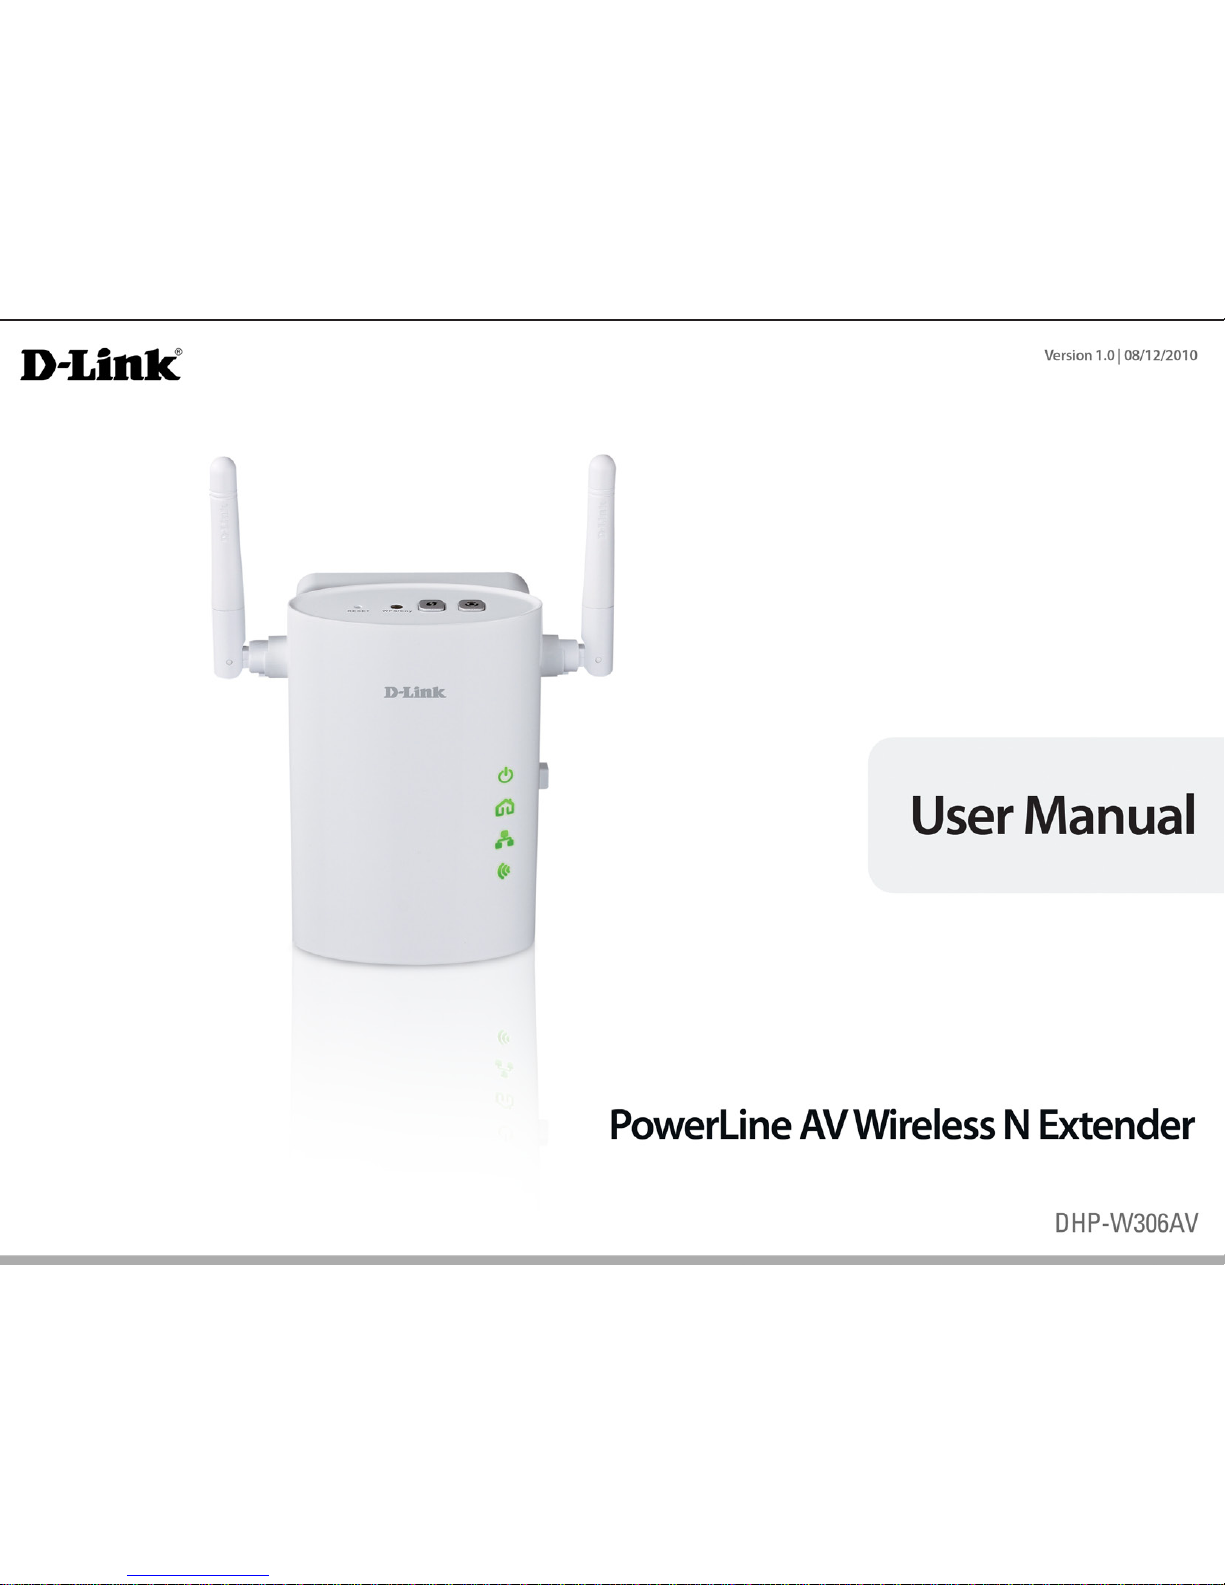
Side ..............................................................................................................8
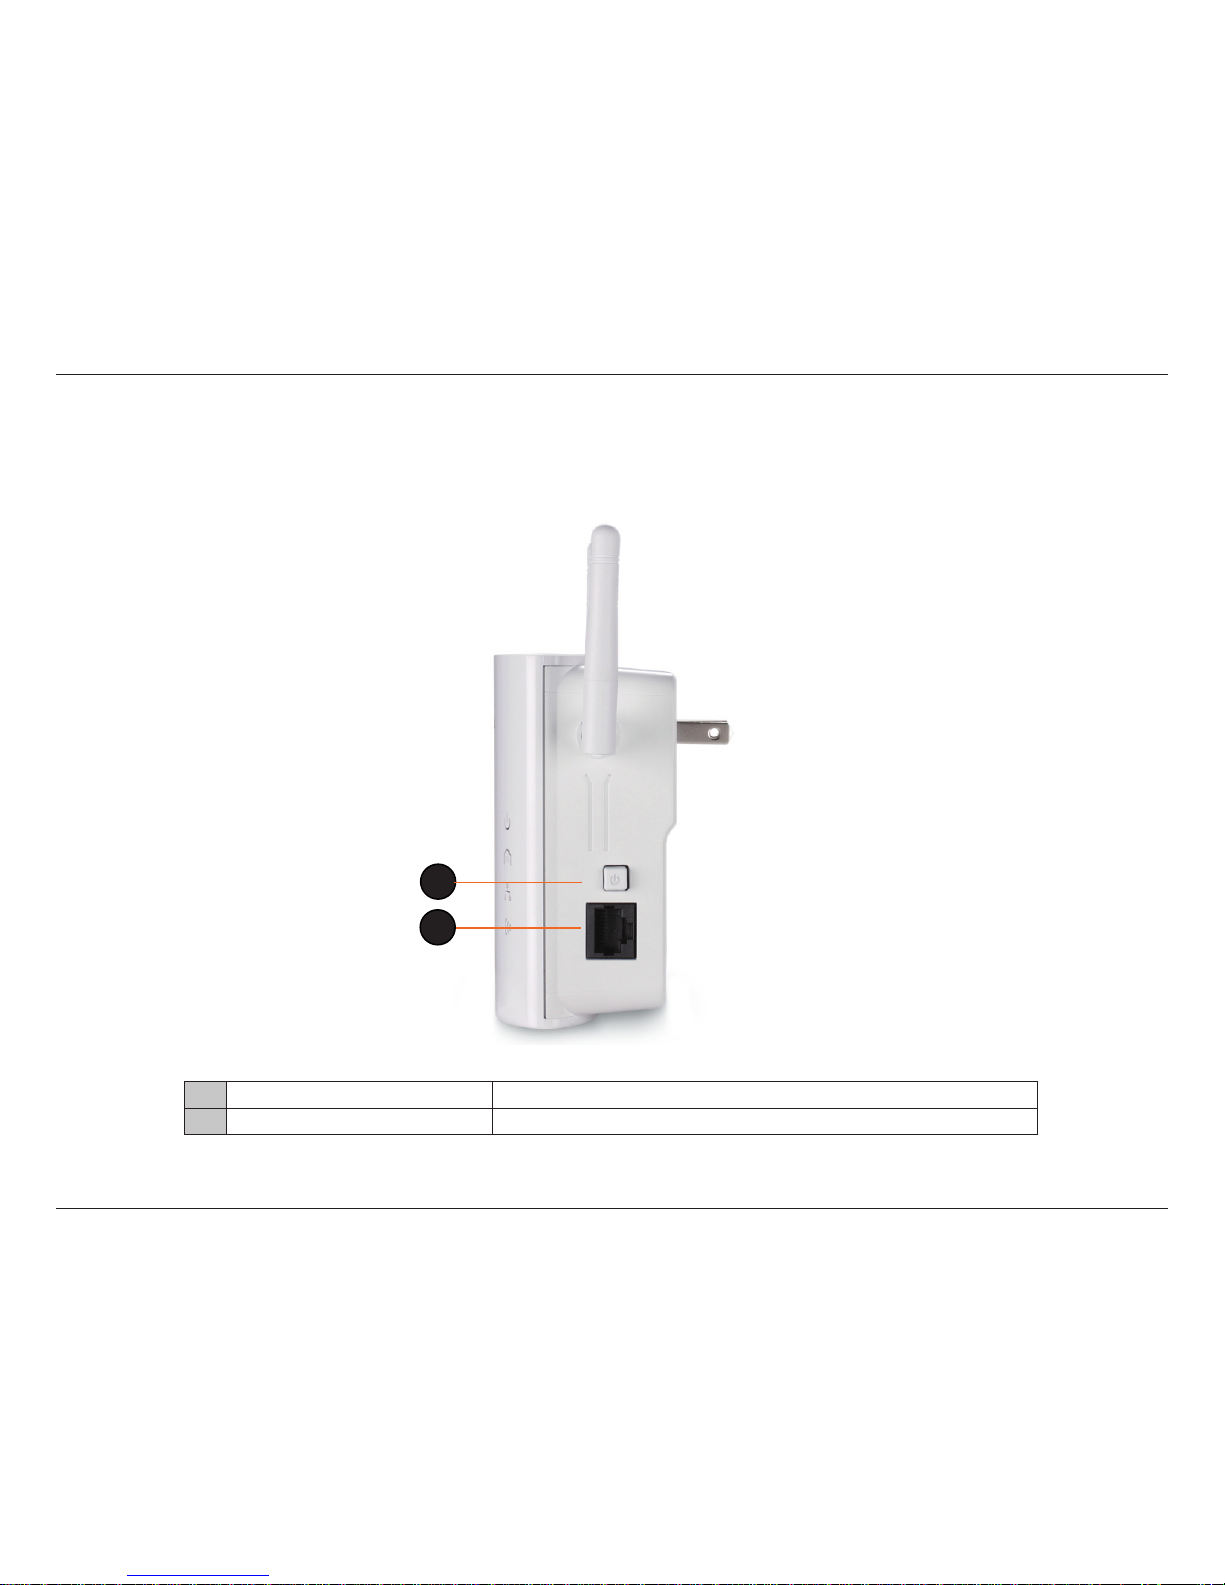
LED’s ............................................................................................................9
Hardware Installation .....................................................................10
Wireless Installation Considerations .............................................11
PowerLine Network - Quick Setup..................................................12
Encryption Button Usage ...........................................................................12
Hardware Installation - For Wireless Router ..................................13
Wireless .............................................................................................................17
Wireless Setup Wizard ...................................................................18
Wireless Setup .................................................................................21
LAN Setup - DHCP ..........................................................................23
LAN Setup - Static IP ......................................................................24
Conguration ...................................................................................25
PLC Settings ...................................................................................................25
MAC Address Filter - Static IP .....................................................28
Advanced Wireless .........................................................................29
Wi-Fi Protect Setup ........................................................................30
Add Wireless Device with WPS ........................................................31
Adding a Wireless Device Using the PIN Method ...............31
Adding a Wireless Device Using the PBC Method ..............32
User Limit ..........................................................................................33
Admin .................................................................................................34
System ................................................................................................35
Firmware ............................................................................................36
Time .....................................................................................................37
Schedules ..........................................................................................38
Device Info ........................................................................................39
Logs .....................................................................................................40
Statistics .............................................................................................41
Wireless ..............................................................................................42
IPv6 ......................................................................................................43
Help .....................................................................................................44
Wireless Security .............................................................................45
What is WEP? ...................................................................................................45
What is the WPA? ...........................................................................................46
Congure WEP ................................................................................................47
Congure WPA/WPA2 Personal ................................................................48
Connect to a Wireless Network .......................................................50
Using Windows® 7 ..........................................................................................50
Connect to a Wireless Network .......................................................53
Using Windows Vista® .............................................................................................................................................. 53
Congure Wireless Security .......................................................................55
Table of Contents

3D-Link DHP-W306AV User Manual
Table of Contents
Connect to a Wireless Network .......................................................57
Using Windows® XP .......................................................................................57
Congure WPA-PSK ......................................................................................58
Troubleshooting ..............................................................................60
Wireless Basics ................................................................................62
What is Wireless? ..................................................................................63
How does wireless work? ..................................................................63
Wireless Local Area Network (WLAN) ...........................................63
Wireless Modes ....................................................................................66
Networking Basics ...........................................................................67
Check your IP address ...................................................................67
Statically Assign an IP address ...................................................68
Technical Specications ..................................................................69
Warranty ...........................................................................................71

4D-Link DHP-W306AV User Manual
Section 1 - Product Overview
D-Link DHP-W306AV PowerLine AV Wireless N Extender
CAT5 Ethernet Cable
CD-ROM with Software and User Manual
System Requirements
Product Overview
Package Contents
• Windows® XP with Service Pack 2 / Vista® / Windows® 7
• An installed Ethernet adapter
• CD-ROM drive
Network Requirements
• IEEE 802.11n or 802.11g wireless clients
• 10/100 Ethernet clients
Browser Requirements
• Internet Explorer 6.0 or higher
• Firefox 3.0 or higher
• Safari 3.0 or higher
• Chrome 2.0 or higher
CD Installation Wizard Requirements

5D-Link DHP-W306AV User Manual
Section 1 - Product Overview
Introduction
The DHP-W306AV allows you to connect both wired and wireless computers, high-denition TVs, networking devices, and gaming consoles using
the most pervasive medium in your home - the electrical wiring. Share Internet connections and experience smooth le transfers, streaming
multimedia, online gaming and more. The PowerLine AV Wireless N Extender features easy plug-and-play installation and can be connected to
any Ethernet-enabled device.
The PowerLine AV Wireless N Extender incorporates the latest technology to deliver up to 200 Mbps over a home’s existing electrical wiring. This fast
transmission speed provides ample bandwidth suitable for streaming high-quality video HDTV signals while simultaneously providing high-speed
Internet access throughout the home. With Quality of Service (QoS) support, the performance of applications which require real-time communication,
such as VoIP phonecalls and multiplayer online games, will not be compromised even while streaming Internet TV and music.

6D-Link DHP-W306AV User Manual
Section 1 - Product Overview
DATA TRANSMISSION OVER ELECTRICAL WIRING
The D-Link DHP-W306AV PowerLine AV Wireless N Extender, compliant with the PowerLine AV standard, uses your home’s existing electrical wiring
to create a network or extend your existing network It turns every power outlet into a possible network connection to access digital media devices,
game consoles, print servers, computers, and network storage devices throughout your home. Additionally, Wireless N provides high speed transfers
without the need for unsightly network cables.
FASTER WIRELESS SPEEDS & WIDER OPERATIONAL RANGE
The Wireless N technology incorporated into the DHP-W306AV oers increased speed and range over standard 802.11g. Initial wireless setup can
be accomplished quickly, thanks to a convenient WPS button atop the device. WEP, WPA, and WPA2 encryption keep your network trac safe and
secure.
IDEAL FOR BANDWIDTH-INTENSIVE APPLICATIONS
The DHP-W306AV is capable of delivering data transfer rates of up to 200 Mbps2. This rapid transmission speed makes it ideal for bandwidth-intensive
applications, guaranteeing smooth HD video streaming, VoIP calls, and lag-free online gaming experiences. In addition, it prioritizes Internet trac,
ensuring that multimedia applications do not experience glitches while web surng and downloads are in progress. This device provides ample
network bandwidth, enabling digital home consumers to tap into existing electrical wiring for high-quality multimedia streaming.
CONVENIENT SETUP AND SECURE OPERATION
The DHP-W306AV plugs directly into a power outlet, and does not require any additional cables. Extend your home network by connecting multiple
devices in the farthest corners of your home via Ethernet cable or Wireless N. For convenient setup, wired or wireless encryption keys can be quickly
congured with the push of a button on top of the device. The adapter implements 128-bit AES data encryption to protect the network from
unauthorized wiretapping. With hassle-free plug and play installation, the DHP-W306AV is an ideal solution to create a wall-to-wall home network.
1 Power outlets and electrical wiring must all be part of the same electrical system. Certain electrical conditions in your home, such as wiring condition and conguration, may aect the performance of this product.
Additional D-Link PowerLine AV adapters are required to add new devices to the network. A minimum of two D-Link PowerLine AV Network Adapters are required to create a network. Connecting this product to a power
strip with a surge protector may adversely aect the performance of this product. For best results, plug the adapter directly into a wall outlet.
2 Maximum throughput based on theoretical transmission PHY rate. Actual data throughput will vary. Network conditions and environmental factors, including volume of trac and network overhead, may lower actual
data throughput rate. Interference from devices that emit electrical noise, such as vacuum cleaners and hair dryers, may adversely aect the performance of this product. This product may interfere with devices such as
lighting systems that have a dimmer switch or a touch-sensitive on/o feature, shortwave radios, or other PowerLine devices that do not follow the HomePlug standard.

7D-Link DHP-W306AV User Manual
Section 1 - Product Overview
Hardware Overview
Connections
1ON/OFF Turns the device ON or OFF. (standby/inactive)
2RJ-45 10/100BASE-TX Ethernet Port Connects to Digital Media Devices, PCs, Game Consoles, Network Storage Devices
1
1
2

8D-Link DHP-W306AV User Manual
Section 1 - Product Overview
Hardware Overview
Side
3
1Reset Button Press and hold the button to reset to factory default.
2WPS/Eny LED
When enabling WPS, the light will blink during broadcast. Once connected, the LED will remain lit
5 seconds and then will turn o. The LED will start blinking after the Encryption button is pushed.
The LED will turn o once the PowerLine AV is connected to a PowerLine network.
3WPS Button Press to start the WPS process. You will have 120 seconds to start the WPS process on another
wireless device.
4Encryption Button Push this button to establish a secure powerline network with other PowerLine AV devices.
2
1
4

9D-Link DHP-W306AV User Manual
Section 1 - Product Overview
Hardware Overview
LED’s
1Power LED A solid light indicates a proper connection to the power supply.
2PowerLine AV LED A solid light indicates that a powerline connection is established. The LED will blink quickly when
data is transmitted to or from another PowerLine unit.
3Ethernet LED A solid light indicates a connection to an Ethernet-enabled device. This LED blinks during data
transmission.
4Wireless LED A solid light indicates that the wireless segment is ready. This LED blinks during wireless data
transmission.
122
32
4

10D-Link DHP-W306AV User Manual
Section 2 - Installation
Hardware Installation
Power
Plug in the DHP-W306AV into an AC wall outlet.
Note: Power source is conrmed when the Power LED on the DHP-W306AV is illuminated.
Connect the Ethernet Cable
Connect one end of the supplied CAT5 Ethernet cable to the Ethernet port on the DHP-W306AV and the other end of the cable to the device’s
Ethernet interface. You can also enable wireless to connect to the Wi-Fi devices using WPS.

11D-Link DHP-W306AV User Manual
Section 2 - Installation
Wireless Installation Considerations
The D-Link wireless access point lets you access your network using a wireless connection from virtually anywhere within the operating range of
your wireless network. Keep in mind that the number, thickness and location of walls, ceilings, or other objects that the wireless signals must pass
through may limit the range. Typical ranges vary depending on the types of materials and background RF (radio frequency) noise in your home or
business. The key to maximizing wireless range is to follow these basic guidelines:
1. Keep the number of walls and ceilings between the D-Link access point and other network devices to a minimum. Each wall or ceiling can reduce
your adapter’s range from 3-90 feet (1-30 meters.) Position your devices so that the number of walls or ceilings is minimized.
2. Be aware of the direct line between network devices. A wall that is 1.5 feet thick (.5 meters), at a 45-degree angle appears to be almost 3 feet (1
meter) thick. At a 2-degree angle it looks over 42 feet (14 meters) thick! Position devices so that the signal will travel straight through a wall or
ceiling (instead of at an angle) for better reception.
3. Building materials make a dierence. A solid metal door or aluminum studs may have a negative eect on range. Try to position access points,
wireless access points, and computers so that the signal passes through drywall or open doorways. Materials and objects such as glass, steel,
metal, walls with insulation, water (sh tanks), mirrors, le cabinets, brick, and concrete will degrade your wireless signal.
4. Keep your product away (at least 3-6 feet or 1-2 meters) from electrical devices or appliances that generate RF noise.
5. If you are using 2.4GHz cordless phones or wireless products such as ceiling fans, lights, and home security systems, your wireless connection
may degrade dramatically or drop completely. Make sure your 2.4GHz phone base is as far away from your wireless devices as possible. The base
transmits a signal even if the phone is not in use.

12D-Link DHP-W306AV User Manual
Section 2 - Installation
The Eny Button is used to add a PowerLine AV device to a PowerLine network. You can allow the DHP-W306AV to join a network by pressing the
Eny Button to toggle it to the Broadcast state or Join state.
The Eny Button has 3 dierent trigger states:
Broadcast state - Enables the DHP-W306AV to provide information for another PowerLine AV device to join its PowerLine
network (works even if it is the only device existing within the network group). The rst PowerLine device will use this state
when the Eny Button is pressed.
Join State - This allows an ungrouped PowerLine AV device to join an existing PowerLine network.
PowerLine devices added after the rst device will be in the Join State when the Eny Button is pressed.
Ungroup State - Hold down the Eny Button for more than 10 seconds to detach the device from its network group.
PowerLine Network - Quick Setup
Encryption Button Usage

13D-Link DHP-W306AV User Manual
Section 1 - Product Overview
Hardware Installation - For Wireless Router
Step 1
Plug the PowerLine AV Adapter into a power outlet near your router as
illustrated in Room 1. If you have a pair, plug the second PowerLine AV Adapter
into a power outlet in a dierent room of your home as shown in Figure 1,
Room 2.
Note: Power source is conrmed when the green LED Power Indicator on the
PowerLine AV Network Adapter is illuminated.
Step 2
Connect the Ethernet cable to the PowerLine AV Adapter, and connect the
other end of the Ethernet cable to the router’s LAN as illustrated in Room 1. If
you have a pair, connect the second Ethernet cable to the second PowerLine
AV adapter. Next, connect then other end of to the PC as illustrated in Room 2.
Note: Connection to an Ethernet-enabled device is conrmed when the green LED
Ethernet Indicator on the PowerLine AV Network Adapter is illuminated.
Step 3
Plug the DHP-W306AV Extender into a power outlet in a dierent area of your home. Turn on the DHP-W306AV Extender by pushing the power
button located on the side of this unit. Connect one end of the included Ethernet cable to the Ethernet port on the DHP-W306AV and attach the
other end of the Ethernet cable to the PC as illustrated in Room 3.
5V---3A
1 2 LAN 3 4 INTERNET USB
RESET
INTERNET
Room 2
Room 3
Room 1
Figure 1
DHP-W306AV
Wireless Router Modem
Note: A minimum of two PowerLine AV Adapters are required to create a network in order for your product to work properly.
Scenario 1: If you “DO NOT” have an existing PowerLine network and would like to add a DHP-W306AV, we recommend
purchasing D-Link’s PowerLine AV Network Starter Kit (DHP-307AV) in order to create a PowerLine network.

14D-Link DHP-W306AV User Manual
Section 1 - Product Overview
Step 4
To secure PowerLine network from unauthorized users, press the ENY button on the PowerLine AV Adapter for 3 seconds. Then, press the ENY
button on the DHP-W306AV Extender for 3 seconds. This must be done within two minutes after pressing the ENY button on the rst device. The
ENY LED should blink. Both the PowerLine AV adapter and DHP-W306AV will reboot, and all LEDs will turn O and On.
Note: Network Connectivity is conrmed when the PowerLine AV LEDs indicators on both PowerLine AV Adapter and DHP-W306AV are steadily lit. Your
network is now secure.
Step 5
Open a web browser, enter http://192.168.0.50 (or http://dlinkap) and then press Enter. When the login window appears, set the user name to
Admin and leave the password box blank. Click Log In to continue the setup or run the Quick Setup Wizard included in the CD. Please refer to the
user manual for more detailed installation information and advanced features.
Note: For PowerLine Settings refer to page 25. For the Wireless Setup Wizard refer to page17. For Wireless Setup refer to page 23.

15D-Link DHP-W306AV User Manual
Section 1 - Product Overview
Scenario 2: If you have an existing PowerLine network and would like to add a DHP-W306AV Extender.
Step 1
Plug the DHP-W306AV Extender into a power outlet in a dierent area of your home. Turn on the DHP-W306AV by pushing the power button
located on the side of the unit. Connect one end of the included CAT5 Ethernet cable to the Ethernet port on the DHP-W306AV and attach the
other end of the Ethernet cable to the PC as shown in Figure 1, Room 3.
Step 2
To secure your PowerLine network from unauthorized users, press the ENY button on the PowerLine AV Adapter for 3 seconds. Then, press the ENY
button on the DHP-W306AV Extender for 3 seconds. This must be done within two minutes after pressing the ENY button on the rst device. The
ENY LED should blink. Both the PowerLine AV adapter and DHP-W306AV will reboot, and all LEDs will turn O and On.
Note: Network Connectivity is conrmed when the PowerLine AV LEDs indicators on both PowerLine AV Adapter and DHP-W306AV are steadily lit. This
will indicate that your network is now secure.
Step 3
Open a web browser, enter http://192.168.0.50 (or http://dlinkap) and then press Enter. When the login window appears, set the user name to
Admin and leave the password box blank. Click Log In to continue the setup or run the Quick Setup Wizard included in the CD. Please refer to the
user manual for more detailed installation information and advanced features.
ENY Button
WPS/ENY LED

16D-Link DHP-W306AV User Manual
Section 1 - Product Overview
Hardware Installation - For PowerLine AV Wireless Router
Scenario 1: If you have an existing PowerLine network with a PowerLine AV Wireless Router (e.g. D-Link, DHP-1320) and would like to add a DHP-
W306AV Extender.
Step 1
Plug the DHP-W306AV Extender into a power outlet in a dierent
room of your home away from the PowerLine device . Turn on the
DHP-W306AV by pushing the power button located on the side of
the unit. Connect one end of the included Ethernet cable to the
Ethernet port of the DHP-W306AV Extender and plug the other end
of the Ethernet cable to the PC as shown in Figure 2.
Step 2
To secure PowerLine network from unauthorized users, press the
ENY button on the PowerLine AV Wireless Router for 3 seconds.
Then, press the ENY button on the DHP-W306AV Extender for 3
seconds. This must be done within two minutes after pressing the
ENY button on the rst device. The ENY LED should blink. Both the
PowerLine AV adapter and DHP-W306AV will reboot, and all LEDs
will turn O and On.
1 2 3
INTERNETLAN
AR RT
USB
RESET ON/OFF AC IN
INTERNET
Room 2
Room 1
Figure 2
PowerLine AV
Wireless Router (Eg.
(DHP-1320)
Modem
DHP-W306AV
Note: Network Connectivity is conrmed when the PowerLine AV LEDs indicators on both PowerLine AV Wireless Router and DHP-W306AV are steadily lit.
This will indicate that your network is now secure.
Step 3
Open a web browser, enter http://192.168.0.50 (or http://dlinkap) and then press Enter. When the login window appears, set the user name to
Admin and leave the password box blank. Click Log In to continue the setup or run the Quick Setup Wizard included in the CD. Please refer to the
user manual for more detailed installation information and advanced features.

17D-Link DHP-W306AV User Manual
Section 3 - Conguration
Wireless
Connect an Ethernet cable from the Ethernet port on the DHP-W306AV to a computer for conguration.
If you wish to change the default settings or optimize the performance
of the DHP-W306AV, you may use the web-based conguration utility.
To access the conguration utility, open a web browser such as Internet
Explorer and enter either http://dlinkap or http://192.168.0.50 in the
address eld.
By default, Admin will be the User Name . Leave the password blank.
If you receive a “Page Cannot be Displayed” error, please refer to the
Troubleshooting section on page 60 for assistance.
If this is your rst time conguring the AP, the Wizard will assist you to
congure your DHP-W306AV.

18D-Link DHP-W306AV User Manual
Section 3 - Conguration
Wireless Setup Wizard
Click Launch Wireless Setup Wizard to congure your access point
and skip to the next page.
To set up your wireless network, click Add Wireless Device With
WPS and skip to page 31.
If you would like to enter your settings without running the wizard,
click Wireless Setup on the left side and skip to page 21.
This Wizard is designed to assist you in conguring your DHP-W306AV
as an access point.

19D-Link DHP-W306AV User Manual
Section 3 - Conguration
Select WPS as the conguration method only if your wireless
device supports Wi-Fi Protected Setup (WPS). For Manual setup,
skip to the next page.
Click Next to continue.
Please press the WPS Push Button (physical or virtual) on the
device you want to add to your wireless network to complete
the setup. In order for your network settings to take eect the
AP will reboot automatically.
When the device has nished rebooting the main screen will be
displayed.

20D-Link DHP-W306AV User Manual
Section 3 - Conguration
Select Manual as the conguration method to setup your network
manually.
Click Next to continue.
Enter a name for your wireless network (SSID).
Assign a network key as the conguration method, enter your
network key. This key must be entered on your wireless clients.
Click Next to continue.
The following screen will show you the network key to enter on
your wireless clients.
Click Save to nish the Setup Wizard.
Other manuals for DHP-W306AV
7
Table of contents
Other D-Link Extender manuals

D-Link
D-Link DAP-1820 User manual

D-Link
D-Link AirPlus G DWL-G710 User manual

D-Link
D-Link DAP-1360 User manual

D-Link
D-Link DHP-701AV User manual

D-Link
D-Link DHP-W310AV User manual

D-Link
D-Link DAP-1330 User manual

D-Link
D-Link DAP-1330 User manual

D-Link
D-Link DAP-1325 User manual

D-Link
D-Link DHP-W306AV User manual

D-Link
D-Link DAP-1620 User manual

D-Link
D-Link E15 User manual

D-Link
D-Link N300 User manual

D-Link
D-Link DAP-1360 User manual

D-Link
D-Link DHP-W312AV User manual

D-Link
D-Link DHP-W306AV User manual

D-Link
D-Link DAP-1325 User manual

D-Link
D-Link DAP-1520 Technical manual

D-Link
D-Link DRA-2060 Manual

D-Link
D-Link DHP-W306AV User manual

D-Link
D-Link DHP-W312AV User manual