D-Link TALK BOX Series User manual

ENGLISH
DVA-2800
If any of the above items are missing, please contact your reseller/retailer.
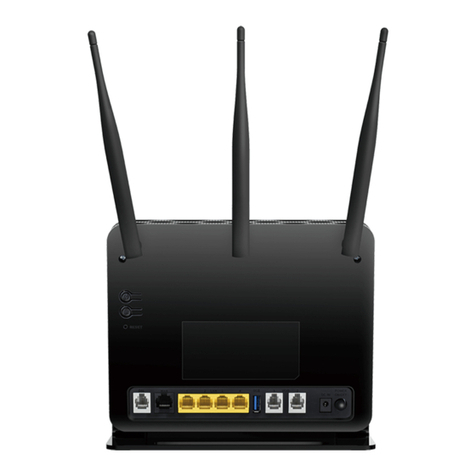
Dual Band AC1600 ADSL2+/VDSL2 Modem Router with VoIP (DVA-2800)
Power Adapter
Ethernet Cable
xDSL Microlter/Splitter
Quick Install Guide & Warranty Document
1Connect the lter to your phone socket. Then connect the provided
phone cable from the MODEM port on the Microlter to the DSL port of the
modem router.
2Connect the Ethernet cable from the LAN port of the modem router to the
Ethernet port on your computer.
3Plug the power adapter into your modem router and connect to an
available power outlet.
4
5
After the modem router has powered up, verify that the Power and
DSL LEDs are both lit.
Continue with the Conguration section.
Package Contents
QUICK INSTALLATION GUIDE Connect your Modem Router - ADSL/VDSL
Power Adapter
DVA-2800
Phone Cable
DVA-2800
Microlter
Ethernet Cable
DVA-2800
Computer
DSL Port
Minimum Requirements
Internet Provider Account Details
If you are using an Australian or New Zeleand ADSL/VDSL/NBN/UFB connection,
you will need your user name, password and any other relevant connection
details. If you do not have this information, contact your Internet provider.
VoIP Provider Account Details
If you are using an Australian or New ZeleandVoIP service, you will need your user
name, password and any other relevant connection details. If you do not have
this information, contact your VoIP provider.
Do not proceed until you have this information.
Before you Start
Internet Requirements:
• ADSL / VDSL / Cable / NBN / UFBInternet Service
Web-based Conguration Requirements:
Device with the following:
• An installed Ethernet adapter or wireless adapter
Supported Browsers:
• Internet Explorer 7 or higher
• Safari 4 or higher
• Chrome
• Firefox
Conguration
Web Browser Setup
Open a web browser (e.g., Internet Explorer, Chrome, Firefox, or Safari) and
enter ‘192.168.1.1’ into the address bar (http://192.168.1.1). The Setup
Wizard should commence straight away without requring you to log in.
Note: If you want to congure your modem
router from a wireless computer or mobile device,
connect to the router wirelessly by going to your
wireless utility on your device. The default Wi-Fi
Networks are D-Link DSL-2888A and D-Link DSL-
2888A 5Ghz.
When the Welcome screen appears, click Next to start the wizard.
Select your WAN AccessType, Country and ISP from the drop down menus.
All relevant information will auto ll. Click Next to continue
1
2
3

ENGLISH
Version 1.00(AU)_128X188 | October 27, 2016 6100000073041000
The Summary page will show the settings you have just congured.
Make sure to note down your Wi-Fi details for connecting other devices
to your router via Wi-Fi and the Device Password, as you may need it in
the future.
7
Copyright ©2016 D-Link Corporation/D-Link Australia Pty Ltd. All rights reserved. D-Link and the D-Link logo are registered trademarks
of D-Link Corporation or its subsidiaries in Australia and other countries. iPhone, iPad, and iPod touch are registered trademarks of Apple
Inc. Android is a trademark of Google, Inc. Other trademarks are the property of their respective owners. Maximum wireless signal rate
derived from IEEE Standard 802.11g and 802.11n specications. Actual data throughput will vary. Network conditions and environmental
factors, including volume of network trac, building materials and construction, and network overhead, lower actual data throughput
rate. Environmental factors will adversely aect wireless signal range. Product specications, size and shape are subject to change
without notice, and actual product appearance may dier from that depicted on the packaging. Visit www.dlink.com.au for more details.
Having trouble installing your new product? D-Link’s website contains the latest
user documentation and software updates for D-Link products. Australian and New
Zealand customers can contact D-Link Technical Support through our website.
Australia
Internet: http://support.dlink.com.au
New Zealand
Internet: http://support.dlink.co.nz
Documentation available at http://www.dlink.com.au/DVA-2800
Technical Support
Enter your User Name and Password as provided by your Internet Provider,
click Next to continue.
Enter a new Wi-Fi Network Name (SSID) as well as a Wi-Fi Password (also
known as a passphrase) for both the 2.4Ghz and 5Ghz networks available in
this modem router, click Next to continue.
4
5
Congratulations!You have completed the Modem Router installation.
6
Click Next to complete the Setup Wizard.
Enter a new Password to secure your modem router, click Next to continue.
You will be taken to the modem routers Home page that shows
the connection status and and basic connection statistics. If you
have congured your setting correctly in the Setup Wizard, your
Home page will be showing a successful Internet connection.
9
8The modem router will load your settings and reboot.You will be greeted
by a screen asking your Admin Password. Enter the router password that
you just congured during the Setup Wizard process.
VoIP Setup To enable VoIP on your modem, navigate to the Internet settings sections
and select INTERNET_VOIP under Service Type.
1
Before setting up your DVA-2800 to make VoIP phone calls, you will need to know
your user name, password and any other relvant connection details from your VoIP
Service Provider
In the VoIP settings section, there is a drop down menu that will
automatically ll in details for several main VoIP providers. Select your VoIP
Provider and then ll in your User Name and Password and click Save. To
enter details manually, sellect Other from the VoIP Provider list
2
Notes
Table of contents
Other D-Link Modem manuals

D-Link
D-Link DIM-128 - 56 Kbps Fax User manual

D-Link
D-Link DSL-200 User manual

D-Link
D-Link DWM-152 User manual

D-Link
D-Link DCM-200 User manual

D-Link
D-Link DSL-300T User manual

D-Link
D-Link DSL-302G - 8 Mbps DSL Modem User manual

D-Link
D-Link Verizon DSL-2750B User manual

D-Link
D-Link DU-562M User manual

D-Link
D-Link DWA-123 User manual

D-Link
D-Link DSL-200 User manual

D-Link
D-Link DCM-200 User manual

D-Link
D-Link WA182D1 User manual

D-Link
D-Link DCM-201 User manual

D-Link
D-Link DSL-320B User manual

D-Link
D-Link DSL-302T User manual

D-Link
D-Link DSL-G604T User manual

D-Link
D-Link DSL-360T User manual

D-Link
D-Link DSL-2740B User guide

D-Link
D-Link DWM-156 User manual

D-Link
D-Link DSL-300G+ User manual