D-Link DAS-3248 User manual
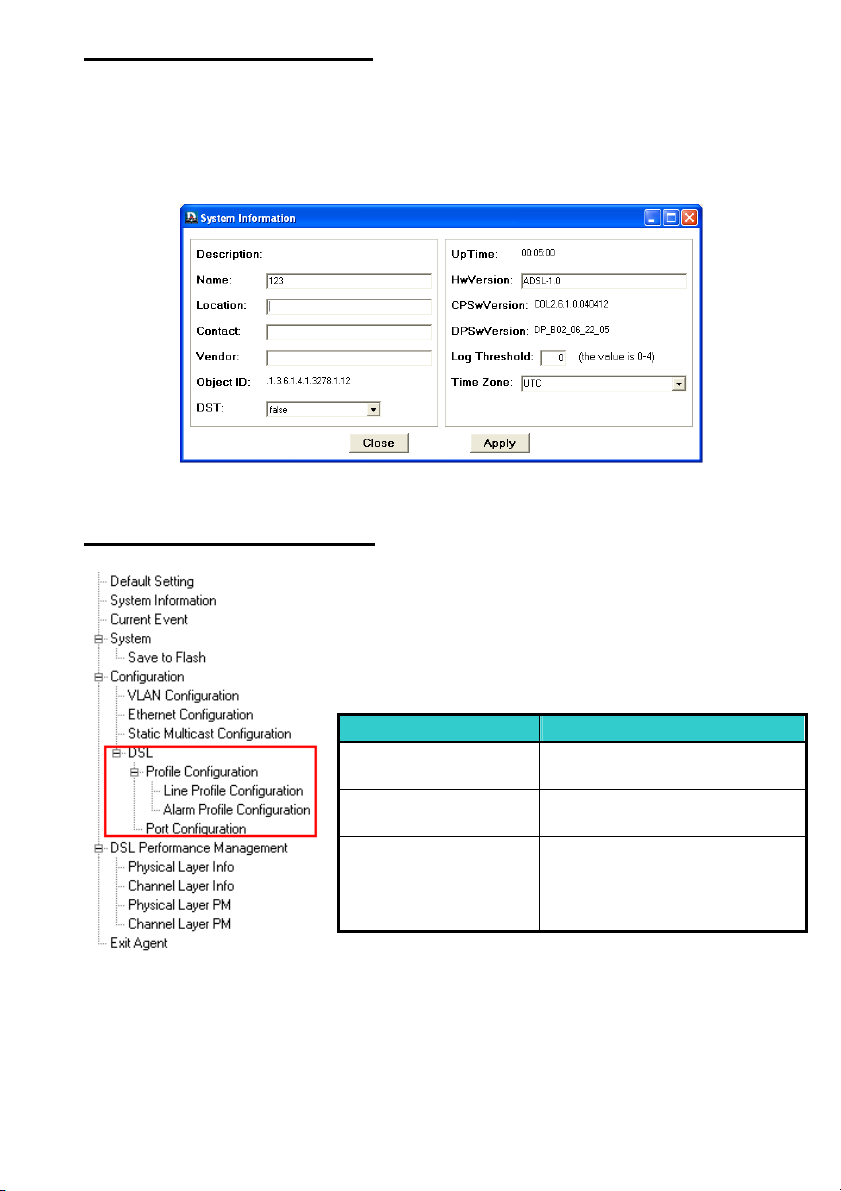
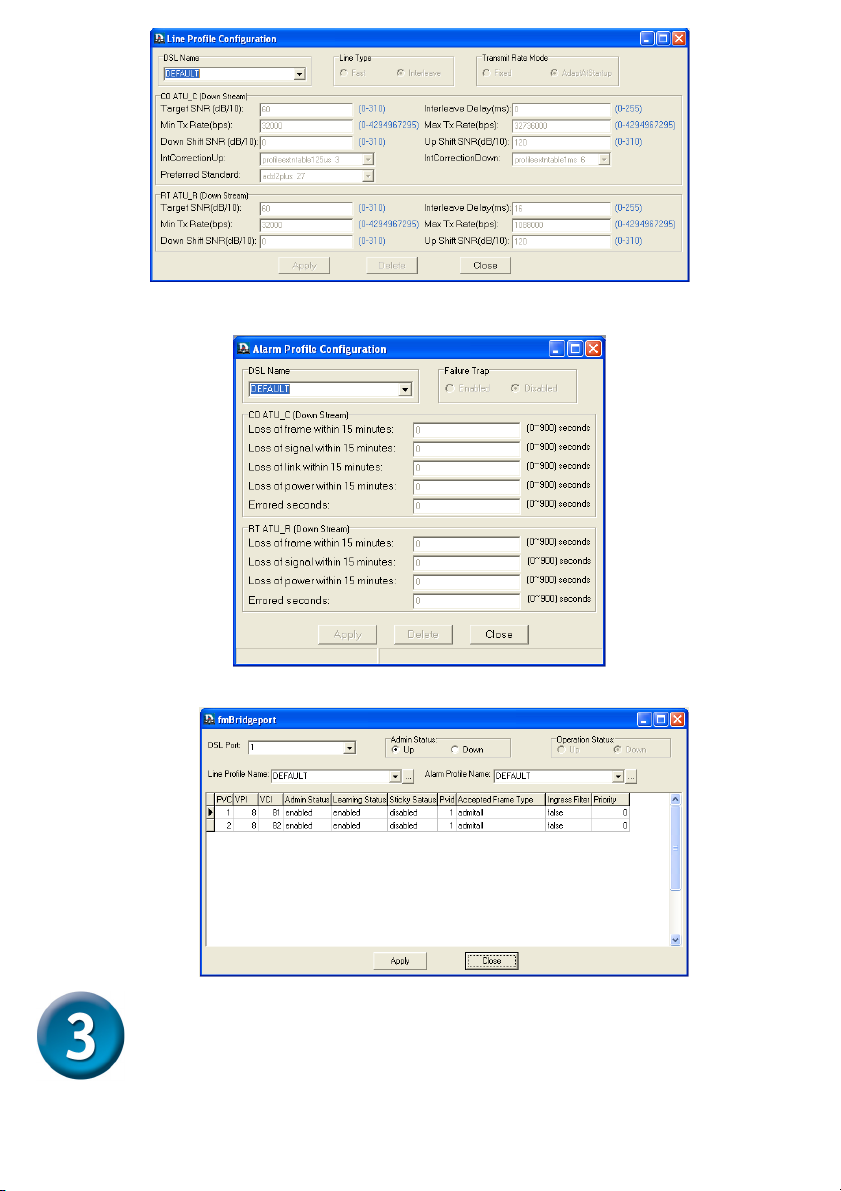
1
Before You Begin
This Quick Installation Guide gives step-by-step instructions for setting up the D-Link
DAS-3248 ADSL IP DSLAM. This Quick Installation Guide only introduces you for the main
setup procedure. For more detailed information about complete installation and
configuration, please refer to the User’s Manual on master CD included with your DLSAM.
Check Your Package Contents
If any of the above items are missing, please contact your reseller
©2004 D-Link Corporation, Inc. All rights reserved. Trademarks or registered trademarks are the property of their respective
holders. Software and specifications subject to change without notice. D-Link ADSL IP DSLAM.
• D-Link DAS-3248 ADSL IP DSLAM
• CD-ROM (containing Manual QIG, EMS and
Warranty)
•Ethernet Cable (CAT5 UTP Straight-Through)
• AC Power Cord
• RS-232 cable
DAS-3248
ADSL IP DSLAM
Using a powe
r
supply with a
different voltage rating
will damage and void
the warranty for this
product.

2
Setup the DAS-3248 ADSL IP DSLAM
The DAS-3248 can be installed in a standard 19-inch rack, by using the
mounting brackets provided. Mount the shelf on the rack using the large
screws provided. The procedure to connect and wire the system is as
follows.
Rear Panel Connection
The following figure shows the rear panel connection of DAS-3248:
Step 1: Ground the DAS-3248 by connecting a grounded wire
Step 2: Connect the ADSL line connector, a 50-pin centronic connector,
of DAS-3248 to CPE by using telco cable. Each line connector
supports 24 ports of ADSL/ADSL2/2+ for Data path from
MDF(Main Distribution Frame).
Step 3: Connect the phone connector, a 50-pin centronic connector, of
DAS-3248 to Exchange/PBX by using telco cable. phone
connector is an optional module supporting Voice path to
Exchange/PBX; it must be along with Line Connector.
Step 4: Connect the power adapter and plug it into an outlet.

3
Front Panel Connection
EMS Configuration
This section shows how to prepare the system to perform basic
communication functions through Element Management System (EMS).
Perform initial configuration procedures as follows:
1. Click the EMS button on the screen of autorun to install EMS into
your PC.
2. Before you start to connect to EMS, it is necessary that your PC’s
IP and DAS-3248’s IP are in the same group. Note: DAS-3248’s
default MGNT IP is 10.90.91.91.
3. Create management IPs into the DAS-3248 so that the authorized
IP agent can manage DAS-3248 through EMS. Connect to DAS-
3248 with RS-232 or Ethernet cable, and then write the IPs into
DAS-3248 by telnet or CLI. Input the following commands
sequentially:
a. create snmp comm community public
b. create snmp host ip 10.90.91. xxx community public, where
10.90.91.xxx is the IP of your PC.
c. create snmp traphost ip 10.90.91.xxx community public version
v1, where 10.90.91.xxx is the IP of your PC.
Note: if to use CLI, bits per second, data bits, parity, and flow
control should be set as 9600, 8, none and 1 respectively.
4. Launch the EMS and then log in with the “Admin” for both user
name and password. Click on to enter the EMS system.
Management
Station
Connect to another DAS-3248

4
5. Add the IP address of DAS-3248 into the Agent manager.
6. Then the IP address and alias name will be displayed on the
Agent Desktop. Double click the 3248’s IP address in the Agent
desktop.

5
7. After that, you could enter the main menu of EMS for your
configuration.
Default Setting
Click on the Default Setting from the DAS-3248 main menu. The
Default Setting window will be displayed.

6
Configure the System
Click on the System Information from the DAS-3248 main menu in
which some parameters related to the system are available for
configuration. The DAS-3248 System Information window will appear
as follows:
Configure DSL Profile
Click on the DSL from the Configuration menu. The
DAS-3248 DSL menu tree and related windows will
appear as follows:
Item Description
Line Profile
Configuration
To browse and create ADSL
line profiles.
Alarm Profile
Configuration
To browse and create ADSL
alarm profiles.
Port Configuration To display, modify or delete
the status of the port. It
provides the configuration of
a port’s status.

7
Line Profile Configuration window
Alarm Profile Configuration window
Port Configuration window
Advanced Setting
For more detailed information about complete configuration, please refer
to the User’s Manual on master CD

8
Technical Support
You can find software updates and user documentation on the
D-Link website.
Tech Support for customers within Australia:
D-Link Technical Support over the Telephone:
1300-766-868
Monday to Friday 8:00am to 8:00pm EST
Saturday 9:00am to 1:00pm EST
D-Link Technical Support over the Internet:
http://www.dlink.com.au
email:[email protected]
Tech Support for customers within New Zealand:
D-Link Technical Support over the Telephone:
0800-900-900
Monday to Friday 8:30am to 8:30pm
Saturday 9:00am to 5:00pm
D-Link Technical Support over the Internet:
http://www.dlink.co.nz
email:[email protected]

9
Technical Support
You can find software updates and user documentation on the
D-Link website.
Tech Support for customers within South Eastern
Asia and Korea:
D-Link South Eastern Asia and Korea Technical Support
over the Telephone:
+65-6895-5355
Monday to Friday 9:00am to 12:30pm, 2:00pm-6:00pm
Singapore Time
D-Link Technical Support over the Internet:
email:[email protected]

10
Technical Support
You can find software updates and user documentation on the
D-Link website.
Tech Support for customers within India
D-Link Technical Support over the Telephone:
+91-22-26526741
+91-22-26526696 –ext 161 to 167
Monday to Friday 9:30AM to 7:00PM
D-Link Technical Support over the Internet:
http://ww.dlink.co.in
http://www.dlink.co.in/dlink/drivers/support.asp
ftp://support.dlink.co.in

11
Technical Support
You can find software updates and user documentation on the
D-Link website.
D-Link provides free technical support for customers for the
duration of the warranty period on this product.
Customers can contact D-Link technical support through our
web site or by phone.
Tech Support for customers within the Russia
D-Link Technical Support over the Telephone:
(095) 744-00-99
Monday to Friday 10:00am to 6:30pm
D-Link Technical Support over the Internet
http://www.dlink.ru

12
Technical Support
You can find software updates and user documentation on the D-Link website.
Tech Support for customers within the U.A.E & North Africa:
D-Link Technical Support over the Telephone:
(971) 4-391-6480 (U.A.E)
Sunday to Wednesday 9:00am to 6:00pm GMT+4
Thursday 9:00am to 1:00pm GMT+4
D-Link Middle East & North Africa
D-Link Technical Support over the Internet:
http://support.dlink-me.com
email:[email protected]
Tech Support for customers within Israel:
D-Link Technical Support over the Telephone:
(972) 971-5701
Sunday to Thursday 9:00am to 5:00pm
D-Link Technical Support over the Internet:
http://www.dlink.co.il/forum
Tech Support for customers within Turkey:
D-Link Technical Support over the Telephone:
(+90) 212-289 56 59
Monday to Friday 9:00am to 6:00pm
D-Link Technical Support over the Internet:
http://www.dlink.com.tr
Tech Support for customers within Egypt:
D-Link Technical Support over the Telephone:
(202) 414-4295
Sunday to Thursday 9:00am to 5:00pm
D-Link Technical Support over the Internet:
http://support.dlink-me.com

13
Technical Support
You can find software updates and user documentation on the
D-Link website.
Tech Support for customers within South Africa
and Sub Sahara Region:
D-Link South Africa and Sub Sahara Technical Support
over the Telephone:
+27-12-665-2165
08600 DLINK ( For South Africa only )
Monday to Friday 8:30am to 9:00pm South Africa Time
D-Link Technical Support over the Internet:
http://www.d-link.co.za
email:[email protected]

14
Technical Support
You can find updates and user documentation on the D-Link website
Tech Support for Latin America customers:
D-Link Technical Support over the followings Telephones:
Argentina: 0800-666 1442 Monday to Friday 09:00am to 22:00pm
Chile: 800-214 422 Monday to Friday 08:00am to 21:00pm
Colombia: 01800-700 1588 Monday to Friday 07:00am to 20:00pm
Ecuador: 1800-777 711 Monday to Friday 07:00am to 20:00pm
El Salvador: 800-6137 Monday to Friday 06:00am to 19:00pm
Guatemala:1800-300 0017 Monday to Friday 06:00am to 19:00pm
Panama: 0800-560 0193 Monday to Friday 07:00am to 20:00pm
Peru: 0800-52049 Monday to Friday 07:00am to 20:00pm
Venezuela: 0800-100 3470 Monday to Friday 08:00am to 21:00pm
D-Link Technical Support over the Internet:
www.dlinkla.com
www.dlinklatinamerica.com
email:[email protected]
Tech Support for customers within Brazil:
D-Link Technical Support over the Telephone:
0800-7014104
Monday to Friday 8:30am to 18:30pm
D-Link Technical Support over the Internet:
www.dlinkbrasil.com.br
email:[email protected]

15
Прежде чем начать
Данное Руководство по быстрой установке предоставляет пошаговые инструкции для
настройки D-Link DAS-3248 ADSL IP DSLAM. Вруководстве приведена только
процедура основной настройки. За более подробной информацией об установке и
настройке, пожалуйста, обращайтесь кРуководству пользователя на прилагаемом к
DSLAM компакт-диске.
Проверьте содержимое комплекта
Если что-либо из перечисленного отсутствует, обратитесь квашему поставщику.
©2004 D-Link Corporation, Inc. All rights reserved. Trademarks or registered trademarks are the property of their respective
holders. Software and specifications subject to change without notice. D-Link ADSL IP DSLAM.
• D-Link DAS-3248 ADSL IP DSLAM
• CD-ROM (содержит Руководство
пользователя, EMS игарантию)
•Кабель Ethernet (прямой кабель UTP
категории 5)
• Кабель питания
• Кабель RS-232
DAS-3248
ADSL IP DSLAM
Использование
источника
питания с
другими характеристиками
инапряжением может
повлечь выход из строя
устройства ипотерю
гарантии.

16
Установка DAS-3248 ADSL IP DSLAM
DAS-3248 можно установить встандартную 19-дюймовую стойку,
используя прилагаемые монтажные уголки. Закрепите корпус
устройства спомощью больших шурупов из комплекта. Процедура
подключения разъемов икабелей описана ниже.
Подключение разъемов задней панели
На следующем рисунке показано подключение разъемов задней
панели DAS-3248:
Шаг 1: Заземлите DAS-3248, подключив заземляющий провод.
Шаг 2: Подключите разъем линии ADSL на DAS-3248 (Line), 50-
контактный разъем centronic, коборудованию пользователя
(CPE), используя кабель telco. Каждый разъем линии
поддерживает 24 порта ADSL/ADSL2/2+ для передачи
данных от основного распределительного узла MDF (Main
Distribution Frame).
Шаг 3: Подключите разъем телефонной линии на DAS-3248
(Phone), 50-контактный разъем centronic, коборудованию
внутренней АТС (Exchange/PBX), используя кабель telco.
Телефонный разъем используется дополнительно для
передачи голоса квнутренней АТС; он должен
подключаться только вместе сразъемом линии ADSL.
Шаг 4: Подключите кабель питания кустройству икрозетке сети
питания.

17
Подключение разъемов передней панели
Настройка EMS
Вданном разделе описывается, как подготовить устройство к
выполнению основных коммуникационных функций через систему
EMS (Element Management System). Выполните начальную
настройку, как указано ниже:
1. Нажмите кнопку EMS на экране автозапуска CD для установки
EMS на ПК.
2. Для подключения ксистеме EMS необходимо, чтобы IP-адреса
ПК иDAS-3248 находились водном диапазоне. Примечание:
по умолчанию IP-адрес DAS-3248 равен 10.90.91.91.
3. Задайте IP-адреса управления на DAS-3248 так, чтобы
авторизованный IP-агент мог управлять DAS-3248 через EMS.
Подключитесь кDAS-3248 через кабель RS-232 или Ethernet, а
затем задайте эти IP-адреса на DAS-3248, используя telnet или
CLI. Введите последовательно следующие команды:
a. create snmp comm community public
b. create snmp host ip 10.90.91. xxx community public, где
10.90.91.xxx – это IP-адрес вашего ПК.
c. create snmp traphost ip 10.90.91.xxx community public version
v1, где 10.90.91.xxx – это IP-адрес вашего ПК.
Примечание: для использования CLI скорость порта, биты
данных, четность иуправление потоком необходимо
установить соответственно вследующие значения: 9600, 8,
нет и1.
Станция
управления
Для подключения кдругому DAS-3248

18
4. Запустите EMS изарегистрируйтесь, используя “Admin” в
качестве имени пользователя ипароля. Нажмите для
входа всистему EMS.
5. Добавьте IP-адрес DAS-3248 вменю Agent manager.
6. Затем IP-адрес иимя DAS-3248 будут показаны вокне Agent
Desktop. Дважды щелкните на IP-адресе DAS-3248 вокне Agent
desktop.

19
7. После этого можно войти вглавное меню EMS для настройки.
Параметры по умолчанию
Нажмите на ссылку Default Setting вглавном меню DAS-3248.
Появится окно Default Setting, показывающее установленные по
умолчанию параметры.

20
Настройка системы
Выберите пункт System Information вглавном меню DAS-3248, в
котором некоторые параметры системы доступны для настройки.
Появится окно DAS-3248 System Information, как показано ниже:
Настройка профиля DSL
Нажмите на пункт DSL вменю Configuration.
Раскроется меню настройки DSL,
соответствующие данному меню окна показаны
ниже:
Пункт Описание
Line Profile
Configuration
Для просмотра исоздания
профилей линии ADSL.
Alarm Profile
Configuration
Для просмотра исоздания
профилей сигнализации об
ошибках ADSL.
Port Configuration Для просмотра, изменения
или удаления статуса
порта. Обеспечивает
настройку статуса порта.
Table of contents
Other D-Link Wireless Router manuals

D-Link
D-Link N300 User manual

D-Link
D-Link DIR-300A User manual

D-Link
D-Link DVG-5402G User manual

D-Link
D-Link DIR-803 User manual

D-Link
D-Link COVR-1900 User manual

D-Link
D-Link DGL-5500 User manual

D-Link
D-Link Wireless Router Manual

D-Link
D-Link DWR-712 User manual

D-Link
D-Link DIR-660 User manual

D-Link
D-Link DSL-2600U User manual

D-Link
D-Link DWR-932 User manual

D-Link
D-Link DWL-6720AP User manual

D-Link
D-Link DWR-953V2 User manual

D-Link
D-Link DIR-1260 User manual

D-Link
D-Link DIR-L1900 User manual

D-Link
D-Link DI-724U - Wireless 108G QoS Office Router User manual

D-Link
D-Link DIR-841 User manual

D-Link
D-Link DSL-2640B User manual

D-Link
D-Link DSL-G604T User manual

D-Link
D-Link DIR-859 User manual