Daavlin 1 Series User manual

MNL-00049 [1] Proprietary and Confidential Page 1of 19
DT Home-Control
Operation Manual
Modes of Operation
•Timed Mode

Proprietary and Confidential. Printed copies will not be updated.
MNL-00049 [1] Page 2of 19
Table of Contents
1.0 Control Type........................................................................................................ 3
2.0 Indications for Use ............................................................................................. 3
3.0 Delivery and Inspection ..................................................................................... 3
4.0 Site Selection ...................................................................................................... 4
4.1 Electrical Requirements...................................................................................................................4
5.0 Unpacking and Assembly .................................................................................. 4
5.1 Swivel Stand ....................................................................................................................................4
6.0 Lamp Inspection ................................................................................................. 4
6.1 Lamp Specification Guide................................................................................................................4
7.0 Precautions and Warnings ................................................................................ 5
8.0 Operating Specifications ................................................................................... 7
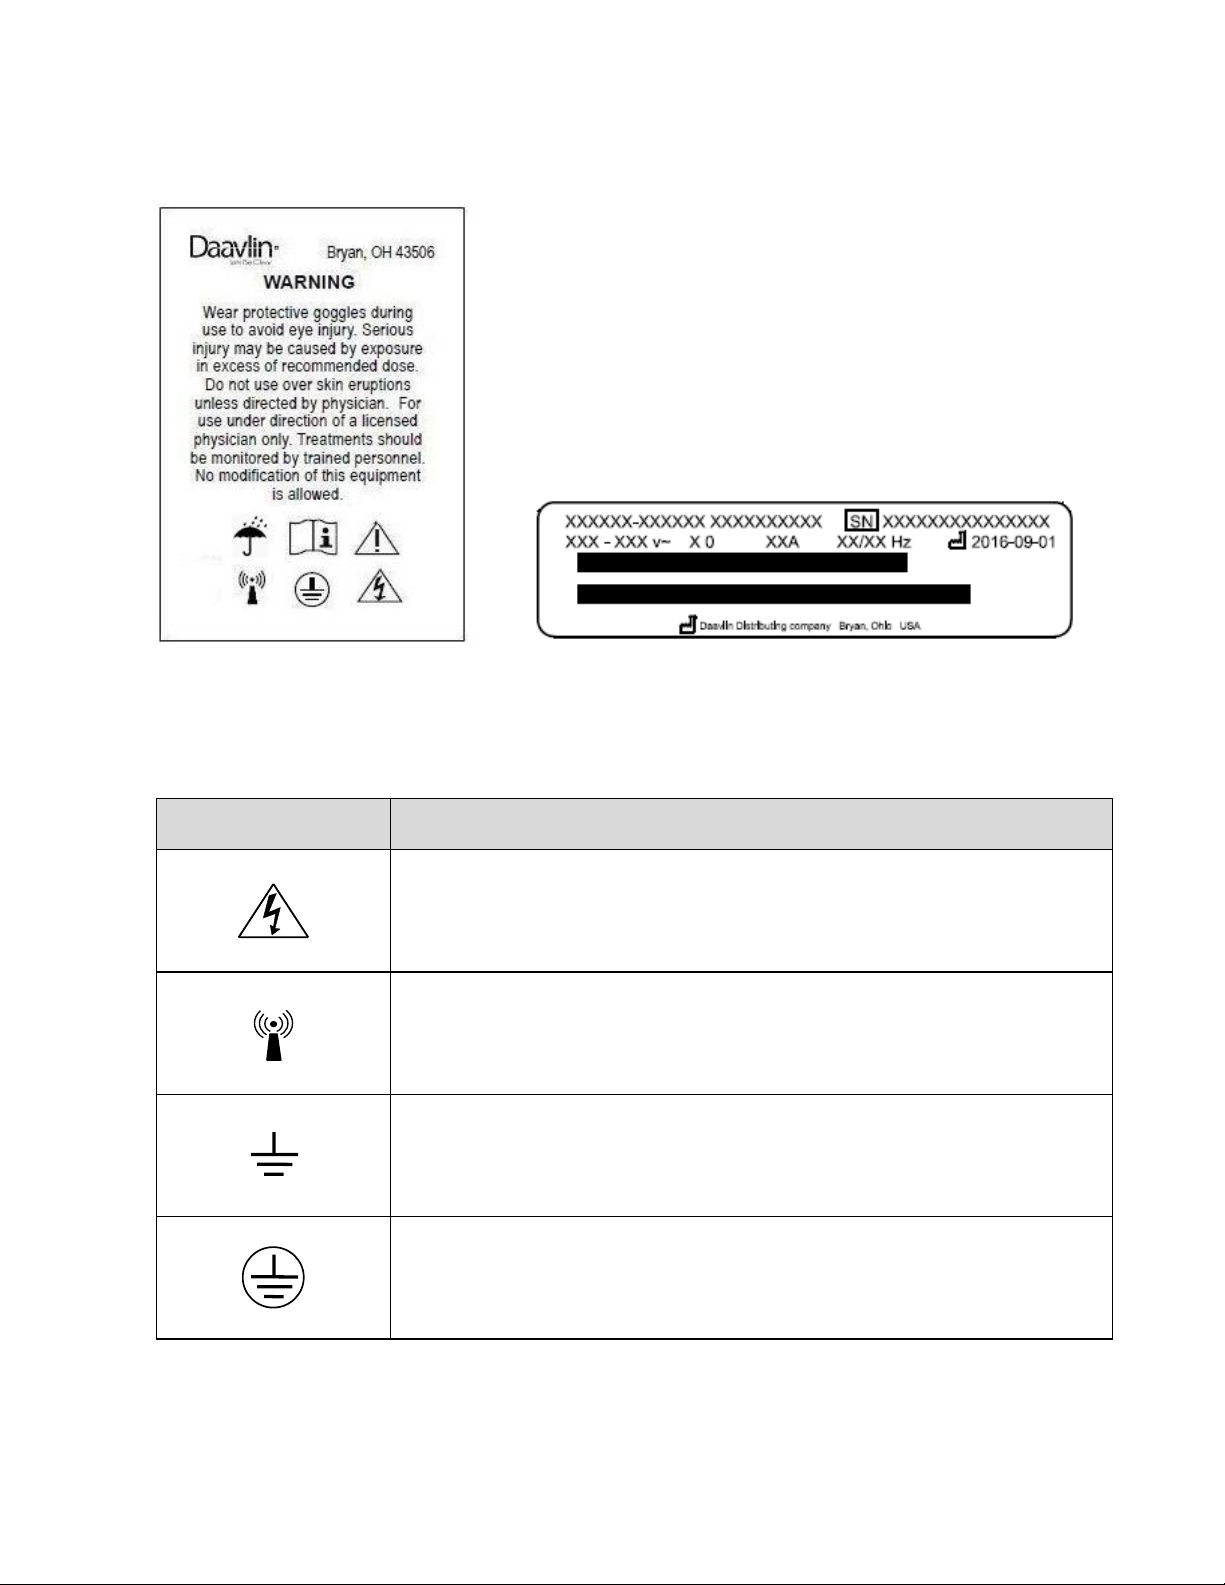
9.0 Labels and Symbols........................................................................................... 7
10.0 General Instructions........................................................................................... 9
10.1 Pre-treatment Preparations..............................................................................................................9
10.2 Unlocking the Device .......................................................................................................................9
10.3 How to Position Yourself................................................................................................................10
11.0 Setting Up a Treatment Time ........................................................................... 10
12.0 Viewing Device Code for Flex Rx .................................................................... 11
13.0 Enable/Disable/Refill FlexRX ........................................................................... 11
13.1 Refill FlexRx...................................................................................................................................12
14.0 Special Notes .................................................................................................... 12
15.0 Care of the Unit................................................................................................. 12
15.1 Recommended Maintenance Schedule.........................................................................................12
15.2 Cleaning/Disinfection .....................................................................................................................13
15.2.1 General Cleaning ................................................................................................. 13
15.2.2 Low-Level Disinfection ........................................................................................ 13
15.2.3 High-Level Disinfection........................................................................................ 13
15.3 Lamp Removal and Replacement..................................................................................................13
15.3.1 Lamp Replacement.............................................................................................. 14
15.3.2 Resetting Lamp Hours......................................................................................... 14
16.0 Environmental Specifications ......................................................................... 14
17.0 Warranty ............................................................................................................ 18
17.1 Limited Warranty Policy .................................................................................................................18
17.2 Warranty Coverage........................................................................................................................18
17.3 Customer Responsibility ................................................................................................................18
17.4 Warranty Service............................................................................................................................18
17.5 Disposal .........................................................................................................................................19
17.6 Other Services ...............................................................................................................................19
17.7 Contact Information........................................................................................................................19

Proprietary and Confidential. Printed copies will not be updated.
MNL-00049 [1] Page 3of 19
Dear Valued Customer,
Thank you for selecting a Daavlin 1 Series phototherapy unit. The use of
light for the treatment of photoresponsive skin disorders has been our business since
1981. We are proud of our tradition of innovation in the field of phototherapy and are
honored that you have chosen us for your phototherapy needs. Let’s be clear. Our
commitment to you starts…Now!
Sincerely,
The Daavlin Staff
CAUTION: Federal law restricts this device to sale by or on the order of a
physician or other practitioner licensed by the law of the state in which they
practice.
1.0 Control Type
Your 1 Series phototherapy unit is equipped with Daavlin’s DT Control System. The device was
prescribed by your doctor to function in the mode listed below:
● Timed: You control the length of each treatment, based on instructions from your doctor. See
page 14 for operating instructions that are specific to this mode of operation.
FlexRx™Your physician may have prescribed your device with FlexRx, a system that limits the
total number of exposures the device will deliver. Specific information about these systems is
provided in this manual.
2.0 Indications for Use
The 1 series Phototherapy Devices are indicated for use to treat diagnosed skin
disorders such as but not limited to, psoriasis, vitiligo, and atopic dermatitis (eczema)
under the direction of a physician. The population may range from pediatric to geriatric.
3.0 Delivery and Inspection
Upon delivery, inspect the box and its contents. If damage is discovered, save all packing
materials and call Daavlin immediately to begin the claims process. If it’s not possible to inspect
the unit before the driver leaves, we recommend that you write “Concealed damage possible.
Further inspection required” on the delivery receipt.
As part of the claims process, the delivering carrier may require that a damage inspection be
conducted. They may conduct the inspection at your home, or they may decide to collect the
package for inspection at their facilities.
Note: In addition to notifying Daavlin, the delivering carrier must also be notified of any shipping
damage within twenty-four (24) hours to protect your right to an insurance claim.

Proprietary and Confidential. Printed copies will not be updated.
MNL-00049 [1] Page 4of 19
4.0 Site Selection
A location for the device should be chosen within reach of a standard, grounded electrical outlet.
Extension cords are not recommended. It is important that the unit be properly grounded. It
should not be in a location where there is foot traffic or where water or moisture might collect. It
should be protected from access by children. Exposure to ultraviolet light over extended periods
of time may cause carpets, wall coverings and furnishings to fade.
4.1 Electrical Requirements
In the United States and Canada, the 1 Series is shipped with a standard three-pronged plug and
can be plugged into any grounded household electrical outlet installed on a standard, non-
Residual Current Device (RCD) or ground fault circuit interrupter (GFCI) breaker. Devices that
will be used overseas will be equipped with a country appropriate electrical cord and plug.
All 1 Series devices are equipped with an onboard fuse. The fuse holder is a part of the power
cord receptacle that is located on the lower left-hand side of the device. If an onboard fuse fails,
call Daavlin’s service department to determine an appropriate replacement.
5.0 Unpacking and Assembly
1. Open the top of the box and grasp both sides of the device. Pull it out of the box along
with the foam packers on each end. Remove the foam packers.
Note: Be sure to remove all of the accessories, such as the manual, power cord and
eyewear before discarding the box.
2. Plug the “D” shape male fixture into the corresponding receptacle on the lower left-hand
side of the device. Plug the unit into any grounded, household electrical outlet. The unit
is now ready for use.
5.1 Swivel Stand
An optional Swivel stand is available that facilitates the treatment of both sides of your hands, or
feet or other parts of your body. Installation instructions for this optional accessory are separate
from this manual.
6.0 Lamp Inspection
1 Series devices can be equipped with different types of lamps, each with its own effect on the
skin. It is important to check that the proper lamps are installed. Consult the Lamp Specification
Guide in section 6.1 Lamp Specification Guide. If there is any question that the device is not
equipped with the lamps that you have been prescribed, contact Daavlin immediately. Lamp code
numbers are generally located at the base of the lamp.
6.1 Lamp Specification Guide
UVA
UVA-1
Narrowband
UVB
Broadband
UVB
Blue (405)
PLL-36W/09
PLL-36W/10
PLL-36W/01
PLL-36W/-06
PLL-36W/03

Proprietary and Confidential. Printed copies will not be updated.
MNL-00049 [1] Page 5of 19
7.0 Precautions and Warnings
•To protect the eyes during operation, the operator and anyone in view of the device must wear
the provided UV blocking glasses or goggles designed to block 100% of all UVA and UVB
light from the eye area when worn. Always use Daavlin approved eyewear.
•Do not remove protective eyewear, or any other protective equipment, during treatment.
•If psoralens (photosensitizing drugs) are being used as part of your treatment (“PUVA”), your
eyes should be protected from exposure to ultraviolet (sunlight) for 24 hours after taking the
drug. Ultraviolet blocking glasses are provided with devices equipped with UVA lamps.
•Do not use over skin eruptions without express consent from the attending physician.
•If a patient experiences burning, never treat the patient until the noticeable effects of burning
subside, and always reduce the subsequent treatment time.
•To protect unaffected skin during operation, the operator, patient, and anyone in view of the
device must generously apply UV blocking skin protection to all exposed skin that the
physician does not intend to treat.
•During extremely long treatments, some surfaces may become hot. Remove any body parts
from those surfaces if it becomes uncomfortable. The unit should have a 50% duty cycle of
10 minutes on, 10 minutes off.
•Erythema can result in as little as 15 seconds of exposure, or approximately 200 millijoules of
dose to UVB light. Prior to using your home phototherapy unit, contact your prescribing
physician for specific treatment instructions and dosing information.
•Center patients between the lamps during treatment to avoid over exposure to isolated areas
of the body.
•All people and pets should leave the treatment area to avoid exposure to ultraviolet light.
•Ask your doctor about protecting areas of the body that have not been exposed to sunlight.
•Do not use this device for anything other than its intended purpose.
•This device is only to be used by authorized users.
•Do not operate this device with a damaged cord or plug.
•If appliance coupler or mains plug is used as the mains disconnect, do not position the ME
equipment so that it is difficult to operate the disconnection device.
•To avoid the risk of electric shock, this equipment must only be connected to a supply main
with protective earth.
•To prevent electric shock, remove power to the device prior to cleaning and servicing.

Proprietary and Confidential. Printed copies will not be updated.
MNL-00049 [1] Page 6of 19
•To eliminate the risk of fire when replacing the fuse, replace ONLY with a fuse of the same
type and rating.
•NO MODIFICATION OF THIS EQUIPMENT IS PERMITTED. Unauthorized modification will
void the warranty and may result in hazardous or improper device operation.
•DANGER - ULTRAVIOLET RADIATION. As with natural sunlight, overexposure can cause
eye and skin injury, and allergic reactions. Repeated exposure may cause premature aging
of the skin and/or skin cancer. ALWAYS WEAR PROTECTIVE EYEWEAR: FAILURE TO
DO SO MAY RESULT IN SEVERE ERYTHEMA OR LONG-TERM INJURY TO THE EYES.
Medications or cosmetics may increase skin sensitivity to ultraviolet radiation. Inform your
physician before using this device if you are using medications or have a history of skin
problems or sensitivity to light.
•This device should be a minimum of 12 inches (30 cm) away from RF generating equipment.
•If the device malfunctions, cease operation immediately. If the device is placed close to other
equipment, it is possible that the cause is interference by external noise sources and fields,
in which case you should follow the remedies found under section 16.0 Environmental
Specifications. If the device continues to malfunction cease operation and contact the
Daavlin Service Department.
•If necessary, operation of equipment may beterminated by disconnecting unitfrom ACmains.
This can be accomplished by unplugging the device or, if hard wired, turning off quick
disconnect.
•Prior to each use, always verify that the device is in correct working order and operating
condition and plugs, sockets, lamps, and electrical cables and connections are not worn or
damaged.
•The device should be placed a minimum of 1 inch (2.5 cm) away from surrounding walls,
devices, and furniture to ensure proper cooling airflow.
•The room that the deviceis placed in should be vented to allow free air displacement to ensure
the device and surroundings remain cool.
•Only original components and accessories should be used with the device to avoid damage.
•Before opening the device casing to perform maintenance or service, disconnect the device
from the power source.
•The device must never be directly exposed to flowing or splashing liquids of any kind. If the
device is inadvertently exposed to liquid, it must be tested for safety before being placed in
operation again.
•The device contains glass lamps. Avoid excessive force to the device to prevent lamp
damage.
•The device control system display is susceptible to damage from excessive force. Avoid
excessive force to the control system to prevent damage.

Proprietary and Confidential. Printed copies will not be updated.
MNL-00049 [1] Page 7of 19
•All treatments must be administered under the direction of a licensed physician only.
•Device is not to be used in MR environments that may include MRI, diathermy, electrocautery,
or other high frequency equipment.
•Do not treat if the lamps fail to ignite. Consult with doctor and/or contact Daavlin customer
service. (See page 21)
•If lamps turn on without treatment being started/resumed, or if lamps do not turn off when
treatment is completed, unplug the device. Contact doctor and/or Daavlin customer service.
(See page 21)
•DT Controlled Phototherapy Devices are considered CISPR Group 1, Class A devices, to be
used for prescription use only.
8.0 Operating Specifications
Ambient
Temperature:
15°C to 30°C (59°F to 86°F)
Relative Humidity:
10% to 95%, Non-condensing
Liquid Ingress
Rating:
IPX0 (This device does not have protection
against ingress of water.)
Ocular Hazard
Distance:
3 Meters (9.84 Feet)
Ambient
Luminance:
250 –500 lux
WARNING: Equipment not suitable for use in the presence of a flammable anesthetic mixture
with air or with oxygen or nitrous oxide.
9.0 Labels and Symbols
If the unit is equipped with FlexRx™exposure limiting software, there will be a label similar to the
one shown below (Figure 1 FlexRx Label) below informing you that your unit has been equipped
with this feature.
Figure 1 FlexRx Label

Proprietary and Confidential. Printed copies will not be updated.
MNL-00049 [1] Page 8of 19
A warning label (Figure 2 Warning Label) is affixed to your Daavlin phototherapy device in a
prominent and easily readable position. Please read the label carefully as it contains important
safety information.
Figure 2 Warning Label
Figure 3 Identification Label
The following table lists all of the symbols appearing on the device along with their meaning.
Table 1 Symbols
SYMBOL
DESCRIPTION
DANGEROUS VOLTAGE
NON-IONIZING RADIATION
EARTH (ground)
PROTECTIVE EARTH (ground)

Proprietary and Confidential. Printed copies will not be updated.
MNL-00049 [1] Page 9of 19
SYMBOL
DESCRIPTION
OPERATING INSTRUCTIONS
KEEP DRY
CAUTION, CONSULT ACCOMPANYING DOCUMENTS
MEDICAL DEVICE
10.0 General Instructions
10.1Pre-treatment Preparations
Before starting therapy, show your doctor these instructions. He or she is the final authority for
your treatment, and, depending upon your particular circumstances,may change these directions.
Always follow your physician’s instructions.
You may want a notebook or treatment log in which to record the date, dose, and duration of each
of your treatments along with any other notes regarding your treatment or treatment results. (For
example, forgot lip balm, put sunscreen on tender area, etc.)
Note: A free printable treatment log is available for download at www.Daavlin.com.
You will need to purchase lip balm and sunscreen with an SPF (Sun Protective Factor) of at least
30. Ask your doctor whether or not you should use an alcohol or cream-based sunscreen.
10.2Unlocking the Device
To prevent unauthorized use, the device will “self-lock” when it has not been used for three (3)
minutes. To unlock your unit:
1. Press any button to power on the device.
2. Your unit will now display the word “C0dE”.
3. The factory default key code is “0007”. Press the UP-ARROW button until your unit
displays “0007”.
4. Press the “PLAY/PAUSE” button to unlock the controller.

Proprietary and Confidential. Printed copies will not be updated.
MNL-00049 [1] Page 10 of 19
10.3How to Position Yourself
Dual Point Calibration Selection: The 1 Series has been designed to deliver accurate and
effective treatments from two distinct treatment distances. Treatments can be administered
directly on the acrylic’s surface (0 inches) or at a distance of nine inches from the acrylic (9 inches
or 23 centimeters).
The intensity or power output of the device will be much greater when treating directly on the
acrylic surface versus treating from nine inches away. For this reason, youmust select the desired
treatment distance before administering a treatment. See specific instructions under Running a
Treatment.
By selecting the treatment distance, 0 in or 9 in, you are telling the system how it should calculate
the length of the treatment based on your distance from the lamps.
Hands and Feet: (Choose 0 inches position when starting your therapy). Position the device on
a flat surface with the lamps facing up. Place your hands or feet directly on top of the plastic lamp
guard. For the best results you should position your hands, or feet, as close as possible to the
center of the fixture.
Note: When treating the hands and feet be careful not to place too much weight or pressure on
the acrylic surface. Excess pressure can cause the acrylic surface to crack and break.
Larger Area Treatment: (Choose the 9 inches position when starting your therapy). Position
the 1 Series so that the lamps are perpendicular to the surface on which the device is standing
on. Position the part of your body that you wish to treat nine (9) inches away from the lamps.
11.0 Setting Up a Treatment Time
1. Enter in your key code. Unless you have changed it, the factory default key code is “0007.”
2. Once the key code has been entered, the display should read “00:00”.
3. The currently editable character will flash on and off to signal that it is the editable
character.
4. Press the UP-ARROW button to increase the value of the flashing character by one (1).
5. Press the LEFT ARROW button to move the flashing character over by one position.
6. Once the desired time is present on the display, press the PLAY/PAUSE button to lock-in
the treatment time.
7. Press the PLAY/PAUSE button to begin the treatment.
8. Press the PLAY/PAUSE button to pause the treatment.
9. While treatment is paused or completed, press the CANCEL button to return to the
treatment menu (“00:00” displayed with the right-most character flashing).
10. After a treatment is complete, the controller will enter Standby Mode. The controller will
flash the most recently completed treatment while in standby mode.
a. To repeat this treatment: press the PLAY/PAUSE button to re-enter Time Entry
Mode. The rightmost character should now be flashing.

Proprietary and Confidential. Printed copies will not be updated.
MNL-00049 [1] Page 11 of 19
b. Press the PLAY/PAUSE button again to set the treatment time.
c. Press the PLAY/PAUSE button again to start the treatment.
EXAMPLE:
1. An example time of one minute and twenty-three seconds will be used (01:23).
2. The right most character should be flashing –press the UP-ARROW button three (3)
times. The display should now read “00:03”.
3. Press the LEFT ARROW button one (1) time and the UP-ARROW button two (2) times.
The display should now read “00:23”.
4. Press the LEFT ARROW button one (1) more time and the UP-ARROW button one (1)
more time. The display should now read “01:23”.
5. Press the PLAY/PAUSE button one time to lock in the treatment time. The flashing
character should stop flashing.
6. Now that the desired time is displayed (in this case 01:23), press the PLAY/PAUSE button
to begin treatment.
7. Pressing the PLAY/PAUSE button again will pause treatment.
8. While paused, pressing the CANCEL button will end the treatment and prompt a new
treatment.
12.0 Viewing Device Code for Flex Rx
The Device Code is predetermined by the software. To view the next code on the Digital Timer
controller:
1. Enter your Key Code to unlock the controller.
2. Simultaneously press Cancel, left, and play/pause.
3. While the screen displays “- - - 1”, press the UP-ARROW button four (4) times. The screen
should display “- - - 5”.
4. Press the PLAY/PAUSE button to enter Menu 5.
5. The value displayed (“Cxyz”) is the next generated Device Code.
a. Alternately, when all treatments have been exhausted, the display will display this
Device Code.
6. If all treatments have been exhausted and a wrong refill code is entered, the Digital Timer
Controller will flash the entered code two (2) times then display the Device Code.
13.0 Enable/Disable/Refill FlexRX
The Flex Rx exposure limiting system uses a “call and response” method. The 3-digit Device
Code (Cxyz) is randomly generated by the controller and is necessary to generate a 4-digit
Treatment Code using an algorithm controlled by Daavlin.

Proprietary and Confidential. Printed copies will not be updated.
MNL-00049 [1] Page 12 of 19
13.1Refill FlexRx
To REFILL FlexRx on the DT controller, follow the instructions below:
1. Enter your Key Code to unlock the controller.
2. Device Code ‘Cxyz’ is displayed on screen
Note: If Device Code is not displayed, there are exposures remaining and it will be
displayed once all exposures have been used. Device Code can be viewed in Menu 5
prior to all exposures being used.
3. Contact prescribing physician and provide Device Code ‘Cxyz’
4. Physician will contact Daavlin to authorize FlexRX refill
5. Daavlin Service will provide Treatment Refill Code to doctor or patient
14.0 Special Notes
1. The maximum time that can be entered is 59 minutes and 59 seconds.
2. It is not possible to enter XX:60 seconds. You must enter 1:00 minute instead.
3. If power goes off during a treatment, the system will not remember how much of the
treatment has elapsed. When poweris restored, the controller will prompt for the Key Code
and another treatment will have to be started.
a. If Flex Rx is activated and the controller loses power during a treatment, an
exposure/full treatment will be assumed, and the remaining treatments will
decrease by one (1) treatment.
4. If Flex Rx is active, the display will flash the number of treatments remaining two (2) times
after a treatment or at power up if the amount of remaining exposures is twenty (20) or
less, signaling the user to obtain a new Flex Rx Treatment code soon.
5. Per the Daavlin Flex Rx Algorithm, there are 1000 Device Codes (C000-C999), each
having five (5) four-digit Flex Rx Treatment Codes (0000-9999) that set a predetermined
amount of exposures to be allowed by the controller.
a. 0 exposures (locked), 75 exposures, 100 exposures, 250 exposures, or unlimited
exposures (unlocked).
15.0 Care of the Unit
15.1Recommended Maintenance Schedule
Item / Action
Frequency
Clean all patient contact surfaces
Between each treatment
Dusting of the unit and lamps
Once a month
Fully clean all internal reflectors,
lamps, and protective acrylic
Annually (behind the lamps)

Proprietary and Confidential. Printed copies will not be updated.
MNL-00049 [1] Page 13 of 19
Item / Action
Frequency
Replace lamps
*UVB –Every 300 hours of use.
*UVA –Every 500 hours of use.
*Blue –Every 500 hours of use.
* Lamp life will vary depending on average treatment time and other environmental conditions.
15.2Cleaning/Disinfection
15.2.1 General Cleaning
For general use, use a clean non-abrasive cloth, not paper towels, and a mild cleaning solution
such as Dawn Liquid Dishwashing Soap to gently wipe down the exterior of the device.
15.2.2 Low-Level Disinfection
To reduce micro-organisms on the patient-contacting surfaces, disinfect these surfaces between
uses of the device, including when the same patient has the device for use. For disinfection
while the same patient uses the device, we have tested several cleaners that do not degrade
the Acrylic and can be seen in Table 2 Daavlin Tested Cleaners.
Cleaner/Solution
Contact Time
Monk brand Wipes
Follow the contact time instructions
provided with the Monk brand Wipes
70% Isopropyl Alcohol
3 min
Table 2 Daavlin Tested Cleaners
1. Thoroughly wipedown the surfaces and allow contact time listed in Table 2 Daavlin Tested
Cleaners.
2. Allow to air dry and inspect for visible contaminants.
3. If contaminants remain repeat until no visible containments remain repeat steps 0 and 2.
15.2.3 High-Level Disinfection
Follow a high-level disinfection protocol between the use of the device on different patients. Use
a high-level disinfectant, such as Steris Corporation’s Resert XL-HLD, and follow the
manufacturers guidelines. See also “FDA-Cleared Sterilants and High Level Disinfectants with
General Claims for Processing Reusable Medical and Dental Devices” available at:
https://www.fda.gov/medical-devices/reprocessing-reusable-medical-devices-information-
manufacturers/fda-cleared-sterilants-and-high-level-disinfectants-general-claims-processing-
reusable-medical-and.
Note: Do not clean reflective surfaces with paper towels. They may scratch the surface.
At least once a year, we recommend that you remove the protective acrylic for a more thorough
cleaning of the lamps and reflectors. Refer to Lamp Replacement instructions, see Section 15.3
Lamp Removal and Replacement on how to remove the acrylic and lamps, as well as other
important information on how to ensure that the lamps are safely and correctly replaced.
15.3Lamp Removal and Replacement
Lamps may need to be replaced due to burnout or because their energy output has decreased to
a point that your treatments may have become excessively long.

Proprietary and Confidential. Printed copies will not be updated.
MNL-00049 [1] Page 14 of 19
DO NOT REPLACE LAMPS INDIVIDUALLY. ALL LAMPS SHOULD BE REPLACED AT THE
SAME TIME TO AVOID UNEVEN TREATMENTS OR ERYTHEMA. PLEASE CONTACT THE
DAAVLIN SERVICE DEPARTMENT PRIOR TO REPLACING THE LAMPS TO OBTAIN
IMPORTANT INFORMATION ON HOW THE OUTPUT OF THE UNIT WILL BE AFFECTED BY
THE CHANGE.
Because of differences between brands, always replace lamps with the same brand as originally
installed. Consult the 6.1 Lamp Specification Guide on page 4 for replacement lamp guidance
and contact the Daavlin service department for a lamp replacement quote. They can be reached
by dialing 1-800-322-8546 or via email at service@daavlin.com.
15.3.1 Lamp Replacement
1. First, unplug the device, then, using a Phillips head screwdriver, remove the two screws
located on each side of the device. Then,
2. Lift off the top of the device to expose the lamps.
3. On each lamp there are two clear plastic clasps that hold the lamps in position. To remove
them position both thumbs on the top of the clasp and use your index fingers to pull the
sides of the clasp outward until it releases, and the clasp can be removed.
4. On top of each lamp socket there will be a red button that, when pushed, will allow you to
remove the base of the lamp from its corresponding lamp socket. With one hand firmly
press and hold the red button down. While holding the red button down use your other
hand to carefully lift the lamp up and out of the socket.
5. With one hand near the base of the lamp and the other at the opposite end, grasp the
lamp and pull both ends upward at the same time until it clears both clasps and the lamp
holder/socket.
6. To replace the lamps in their lamp-holders, press the base of the lamp straight down. A
distinctive snapping sound will be heard which indicates that the lamp is properly seated.
7. Once reassembled, reset the lamp hours to zero.
15.3.2 Resetting Lamp Hours
When changing lamps, it is important to reset the lamp age to zero so the new lamp’s
operational hours can be tracked. Please contact the Daavlin service department for
instructions on resetting the device’s lamp hours.
16.0 Environmental Specifications
The 1 Series should be used in an electromagnetic environment as described below.
Table 3 Electromagnetic Emissions
Emissions Test
Conformity
EMC Environment Guide
RF Emission Following
CISPR 11 (EN 55011)
Group 1
Test unit only radiates RF energy for
internal use in powering lamps, and it
seems unlikely that nearby medical
devices would be affected.

Proprietary and Confidential. Printed copies will not be updated.
MNL-00049 [1] Page 15 of 19
Emissions Test
Conformity
EMC Environment Guide
RF Emission Following
CISPR 11 (EN 55011)
Class B
The 1 Series device is suitable for
healthcare environment operation in
hospitals and clinics
Limits for harmonic current
emissions following IEC 61000-
3-2
Class A
The 1 Series device is suitable for
healthcare environment operation in
hospitals and clinics
Limitation of voltage changes,
voltage fluctuations and flicker
following IEC 61000-3-3
Compliant
The 1 Series device is suitable for
healthcare environment operation in
hospitals and clinic
Table 4 Electromagnetic Immunity
Emissions Test
IEC 60601 Test Level
Actual Level
Electrostatic discharge
immunity test following IEC
61000-4-2
+/- 8kV (conductive
surfaces, coupling planes)
+/- 2kV, +/- 4kV, +/- 8kV,
and +/- 15kV (non-
conductive surfaces)
+/- 8kV (conductive surfaces,
coupling planes)
+/- 2kV, +/- 4kV, +/- 8kV, and
+/- 15kV (non-conductive
surfaces)
Radiated, radio-frequency,
electromagnetic field
immunity test following IEC
61000-4-3
80 MHz to 2.7GHz @
10.0 V/m
80 MHz to 2.7GHz @ 10.0
V/m
Electrical fast transient/burst
immunity test following IEC
61000-4-4
+/- 2kV
+/- 2kV
Surge immunity test following
IEC 61000-4-5
+/- 0.5 kV, +/- 1.0 kV, +/-
2kV
+/- 0.5 kV, +/- 1.0 kV, +/- 2kV
Conducted Immunity test
following IEC 61000-4-6
0.15 MHz to 80 MHz @
3.0 Vrms
6.765 MHz to 6.795 MHz
@6.0 Vrms
13.553 MHz to 13.567
MHz @ 6.0 Vrms
26.057 MHz to 27.283
MHz @ 6.0 Vrms
40.66 MHz to 40.70 MHz
@ 6.0 Vrms
0.15 MHz to 80 MHz @ 3.0
Vrms
6.765 MHz to 6.795 MHz
@6.0 Vrms
13.553 MHz to 13.567 MHz
@ 6.0 Vrms
26.057 MHz to 27.283 MHz
@ 6.0 Vrms
40.66 MHz to 40.70 MHz @
6.0 Vrms

Proprietary and Confidential. Printed copies will not be updated.
MNL-00049 [1] Page 16 of 19
Emissions Test
IEC 60601 Test Level
Actual Level
Power frequency magnetic
field immunity test following
IEC 61000-4-8
50 Hz, 30 A/m
50 Hz, 30 A/m
Voltage dips and interruptions
immunity test following IEC
61000-4-11
30% Reduction for 500
mS at 0 degrees,
100% Interruption for 10
mS at 0, 45, 90, 135, 180,
225, 270,315 degrees,
100% Interruption at 5000
mS at 0 degrees
30% Reduction for 500 mS at
0 degrees,
100% Interruption for 10 mS
at 0, 45, 90, 135, 180, 225,
270,315 degrees,
100% Interruption at 5000
mS at 0 degrees
Table 5 Electromagnetic Immunity
The device is intended for use in the electromagnetic environment specified below. The
customer or the user of the device should assure that it is used in such an environment.
Immunity test
IEC 60601
test level
Compliance
level
Electromagnetic environment - guidance
Conducted RF
IEC 61000-4-6
3 Vrms
150 kHz to
80 MHz
3 Vrms
Portable and mobile RF communications
equipment should be used no closer to any
part of the device, including cables, than the
recommended separation distance calculated
from the equation applicable to the frequency
of the transmitter.
Recommended separation distance
𝑑 = 1.2√𝑃
𝑑 = 1.2√𝑃80 MHZ to 800 MHz
𝑑 = 2.3√𝑃800 MHz to 2.5 GHz
where Pis the maximum output power rating
of the transmitter in watts (W) according to
the transmitter manufacturer and d is the
recommended separation distance in meters
(m).
Field strengths from fixed RF transmitters, as
determined by an electromagnetic site survey,
should be less than the compliance level in
each frequency range. a
Interference may occur in the vicinity of
equipment marked with the following symbol:
Radiated RF
IEC 61000-4-3
3 V/m
80 MHz to
2.5 GHz
3 V/m
NOTE 1: At 80 MHz and 800 MHz, the higher frequency range applies.
NOTE 2: These guidelines may not apply in all situations. Electromagnetic propagation is
affected by absorption and reflection from structures, objects and people

Proprietary and Confidential. Printed copies will not be updated.
MNL-00049 [1] Page 17 of 19
The device is intended for use in the electromagnetic environment specified below. The
customer or the user of the device should assure that it is used in such an environment.
Immunity test
IEC 60601
test level
Compliance
level
Electromagnetic environment - guidance
a. Field strength from fixed transmitters, such as base stations for radio (cellular / cordless)
telephones and land mobile radios, amateur radio, AM and FM radio broadcast and TV
broadcast cannot be predicted theoretically with accuracy. To assess the electromagnetic
environment due to fixed RF transmitters, an electromagnetic site survey should be
considered. If the measured field strength in the location in which the device is used exceeds
the applicable RF compliance level above, the device should be observed to verify normal
operation. If abnormal performance is observed, additional measures may be necessary, such
as re-orienting or relocating the device. Over the frequency range 150 kHz to 80 MHz, field
strengths should be less than 3V/m

Proprietary and Confidential. Printed copies will not be updated.
MNL-00049 [1] Page 18 of 19
17.0 Warranty
17.1Limited Warranty Policy
This Limited Warranty is provided to the original purchaser (the “Purchaser”) of the Daavlin
device (the “Equipment”). Daavlin warrants Equipment to conform with the Equipment
specifications and be free from defects in material and workmanship during the device Warranty
Period. No warranty is made as to useful lamp life or as to reduction in ultraviolet output due to
any cause. DAAVLIN MAKES NO OTHER WARRANTIES OF ANY KIND WHATSOEVER TO
PURCHASER OR ANY THIRD PARTIES WITH RESPECT TO THE EQUIPMENT AND
HEREBY EXPRESSLY DISCLAIMS ALL WARRANTIES, EXPRESS OR IMPLIED, INCLUDING
THE IMPLIED WARRANTIES OF MERCHANTABILITY AND FITNESS FOR A PARTICULAR
PURPOSE.
Product
Warranty Period
New Equipment
1 Year
Remanufactured Equipment
90 Days
Lamps
90 Days
17.2Warranty Coverage
This Limited Warranty applies only to Equipment or components found to be defective due to
materials and workmanship. This Limited Warranty does not apply when Equipment is
purchased for the purposes of renting commercially to customers for home use. This Warranty
does not apply to any Equipment which has been used, repaired or altered outside the factory in
any way so as to affect the design, or operated in any way other than in accordance with our
operating instructions. The Limited Warranty does not apply to Equipment failure or damage
caused by shipping or customer abuse, misuse, or accident, incorrect customer installation,
improper electrical service, lack of proper maintenance, and Acts of God. This Limited Warranty
does not extend to repairs made necessary by use of parts or accessories not recommended by
the manufacturer. Daavlin shall not be responsible for any indirect, incidental, special, punitive,
or consequential damages of Purchaser. Daavlin does not provide end support for Microsoft
Windows software installed on PCs that are part of a Daavlin phototherapy system.
PURCHASER’S SOLE REMEDY UNDER THIS LIMITED WARRANTY IS REPAIR OR
REPELACMENT OF THE EQUIPMENT.
17.3Customer Responsibility
In the event that warranty service is requested, the Purchaser must reasonably cooperate with
Daavlin to verify the warranty claim of the Purchaser, including conducting minor diagnostic
work. Failure to participate in diagnostic work may result in being charged for on-site service
calls. The Purchaser must allow Daavlin, at Daavlin’s option, to inspect the Equipment or
component parts on request.
17.4Warranty Service
During the warranty period, Daavlin will, at Daavlin’s option, repair or replace any Equipment or
components that appear to have been defective in material or workmanship, with new or
remanufactured materials. Daavlin may require the return of merchandise claimed to be
defective for its examination and shall be the sole judge as to whether material is in fact

Proprietary and Confidential. Printed copies will not be updated.
MNL-00049 [1] Page 19 of 19
defective under the terms of this Limited Warranty. In such situations, Daavlin will cover freight
expenses in the continental USA to ship products covered under warranty both to and from
Daavlin’s servicing center if the product fails during the first three months. If the product fails
after three months during the warranty period, the customer is responsible for in-bound freight
charges while Daavlin pays freight charges back to the Purchaser. All Equipment ships ground
unless the Purchaser covers costs for expedited shipping. Daavlin is not responsible for any
delays occurring during transport of the Equipment.
During the term of the Limited Warranty, Daavlin will, at Daavlin’s option, arrange for a qualified
service technician to repair or replace any defective systems or components as covered in
accordance with the terms and conditions of this Limited Warranty. It will be at Daavlin’s sole
discretion whether subcontractors or Daavlin employed technicians will perform the required
warranty service work. However, this Limited Warranty will be declared null and void if non-
qualified technicians perform any repair or maintenance on the Equipment unless prior written
authorization has been obtained from Daavlin. Even with Daavlin’s authorization, Daavlin shall
not be responsible or liable for any such work (in or out of warranty). Daavlin reserves the right
to bill for labor, expenses, and services for requested "warranty" service trips which result in
work not covered by this Limited Warranty. This may include, but is not limited to, a tripped
circuit breaker, an unplugged machine, or a blown fuse.
17.5Disposal
Please visit www.daavlin.com and search our FAQ section for disposal instructions for the unit
and/or all accessories.
17.6Other Services
Extended warranties are available and may be purchased from Daavlin’s aftermarket sales
department.
In the event that this Limited Warranty conflicts with other warranties included in Daavlin’s
Equipment manual, the terms and conditions of this Limited Warranty shall prevail.
17.7Contact Information
USA & Canada:
1-800-322-8546
Overseas:
1-419-636-6304
Fax:
1-419-636-1739
E-Mail:
Website:
www.daavlin.com
Daavlin Distributing Company
205 W. Bement Street
PO Box 626, Bryan, Ohio
43506
Bryan, Ohio 43506 USA
This manual suits for next models
1
Table of contents
Other Daavlin Medical Equipment manuals
Popular Medical Equipment manuals by other brands

Otto Bock
Otto Bock 1E56 Axtion Instructions for use

Guilin Woodpecker Medical Instrument
Guilin Woodpecker Medical Instrument Fi-E instruction manual

Vermeiren
Vermeiren ILLICO installation manual

Hitachi
Hitachi EUP-C524 instruction manual

Weinmann
Weinmann ULM CASE Instructions for use

Amrex
Amrex Z-STIM IF250 user guide

Chattanooga Group
Chattanooga Group INTELECT LEGEND Series user manual

MIETHKE
MIETHKE SENSOR RESERVOIR Instructions for use and Technical description

Coltene
Coltene BioSonic US100R owner's guide

Covidien
Covidien Nellcor GR101704-RR Operator's manual

ProMed
ProMed UVL-54 All-In Getting started

Invacare
Invacare 6LXO2 Service manual