Daewoo DSI-9300 User manual

Digital Satellite Receiver & VCR Combo
Instruction manual
Model: DSI-9300/ DSI-9400
DSI-9100/ DSI-9200
P/N: 97P95600D0-1C

➠
1
Video Recorder+Satellite Receiver
PRECAUTIONS AND SAFETY
Precautions
• Read this booklet carefully.
• Make sure the rating of your household electricity supply
matches that shown on the back of the VCR receiver.
• Read this page to help you set up and adjust your VCR
receiver.
• Do not put the VCR receiver in a hot or humid place (to
avoid the risk of fire and electric shock).
• Do not open the VCR receiver.
• Do not connect the VCR receiver to the power supply if
you have just moved it from a cold environment to a
warm room. This can lead to condensation inside the
video which can seriously damage the video and
cassettes. Wait around two hours to allow it to reach
room temperature.
• Make sure the video is placed at least 10cm apart from
other home appliances or obstacles to get sufficient
ventilation.
• This apparatus shall not be exposed to dripping or
splashing and no objects filled with liquids, such as
vases, shall be placed on top of the video.
• Put the video on a steady, flat surface.
• Only clean the video with a soft, lint-free cloth. Do not
use harsh or alcohol-based cleaning agents.
For your own safety!
• There are no components in this VCR receiver you can
service or repair yourself.
• Do not open the case of the VCR receiver. Only allow a
qualified engineer to repair or service your video.
• This VCR receiver is designed to work continuously.
Switching it off (onto stand- by) does not disconnect it
from the mains. To disconnect it from the mains, you
have to unplug it.
AUTOSE T
CH.
OP EJECT

➠
3
Video Recorder+Satellite Receiver
1
➠
2
Video Recorder+Satellite Receiver
CONTENTS
1GENERAL INFORMATION
MAIN FEATURES_____________________ 3
FOR YOUR SAFETY ___________________ 4
UNPACKING ________________________ 4
GENERAL OPERATION _________________ 4
COMMON INTERFACE ________________ 5
FRONT PANEL _______________________ 5
2INSTALLATION
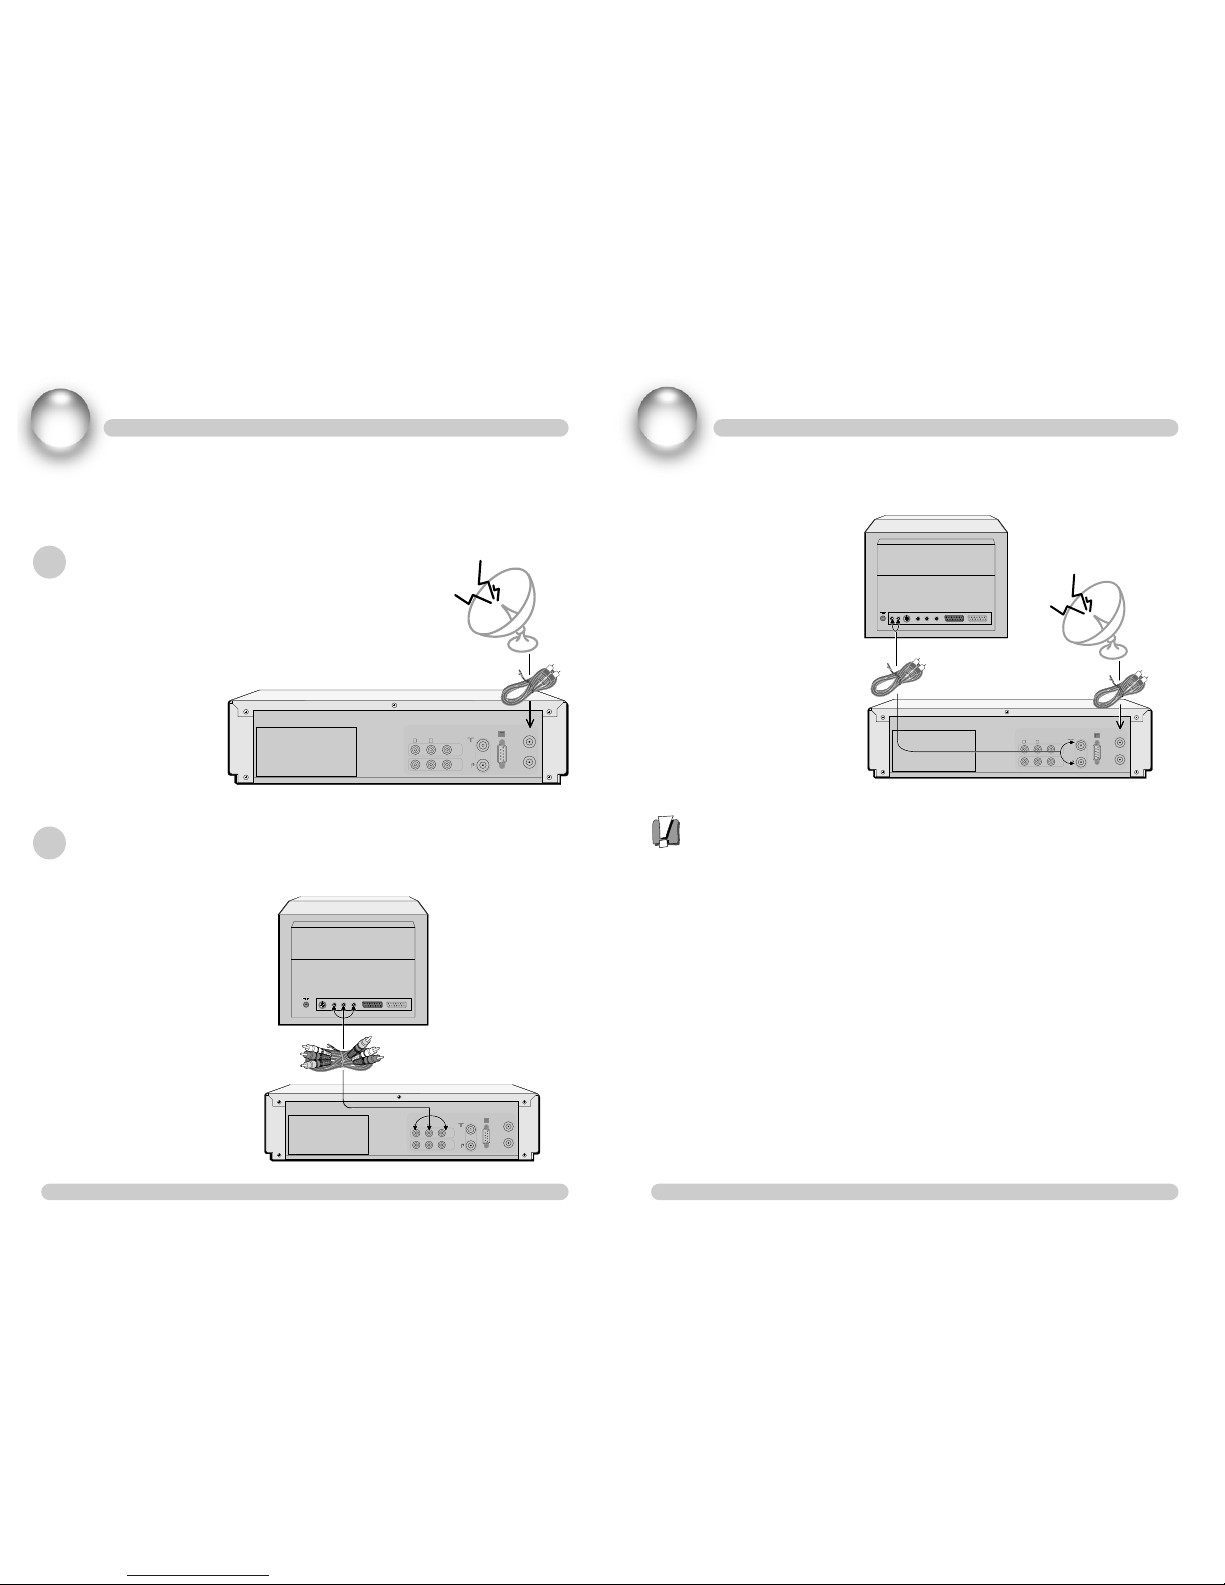
CONNECTING TO ANTENNA ____________ 6
CONNECTING TO TV __________________6
1 USING RCA SUPPORT
2 USING RF SUPPORT (Optional function)
CONNECTING TO DIGITAL AMP (Optional
function) ________________________ 8
MODES ___________________________ 9
CONNECTING YOUR VIDEO TO THE HI-FI SYSTEM,
ANOTHER VIDEO OR CAMCORDER
_________ 10
CONNECTING YOUR VIDEO TO THE PERSONAL
COMPUTER
_________________________ 11
3VCR OPERATIONS
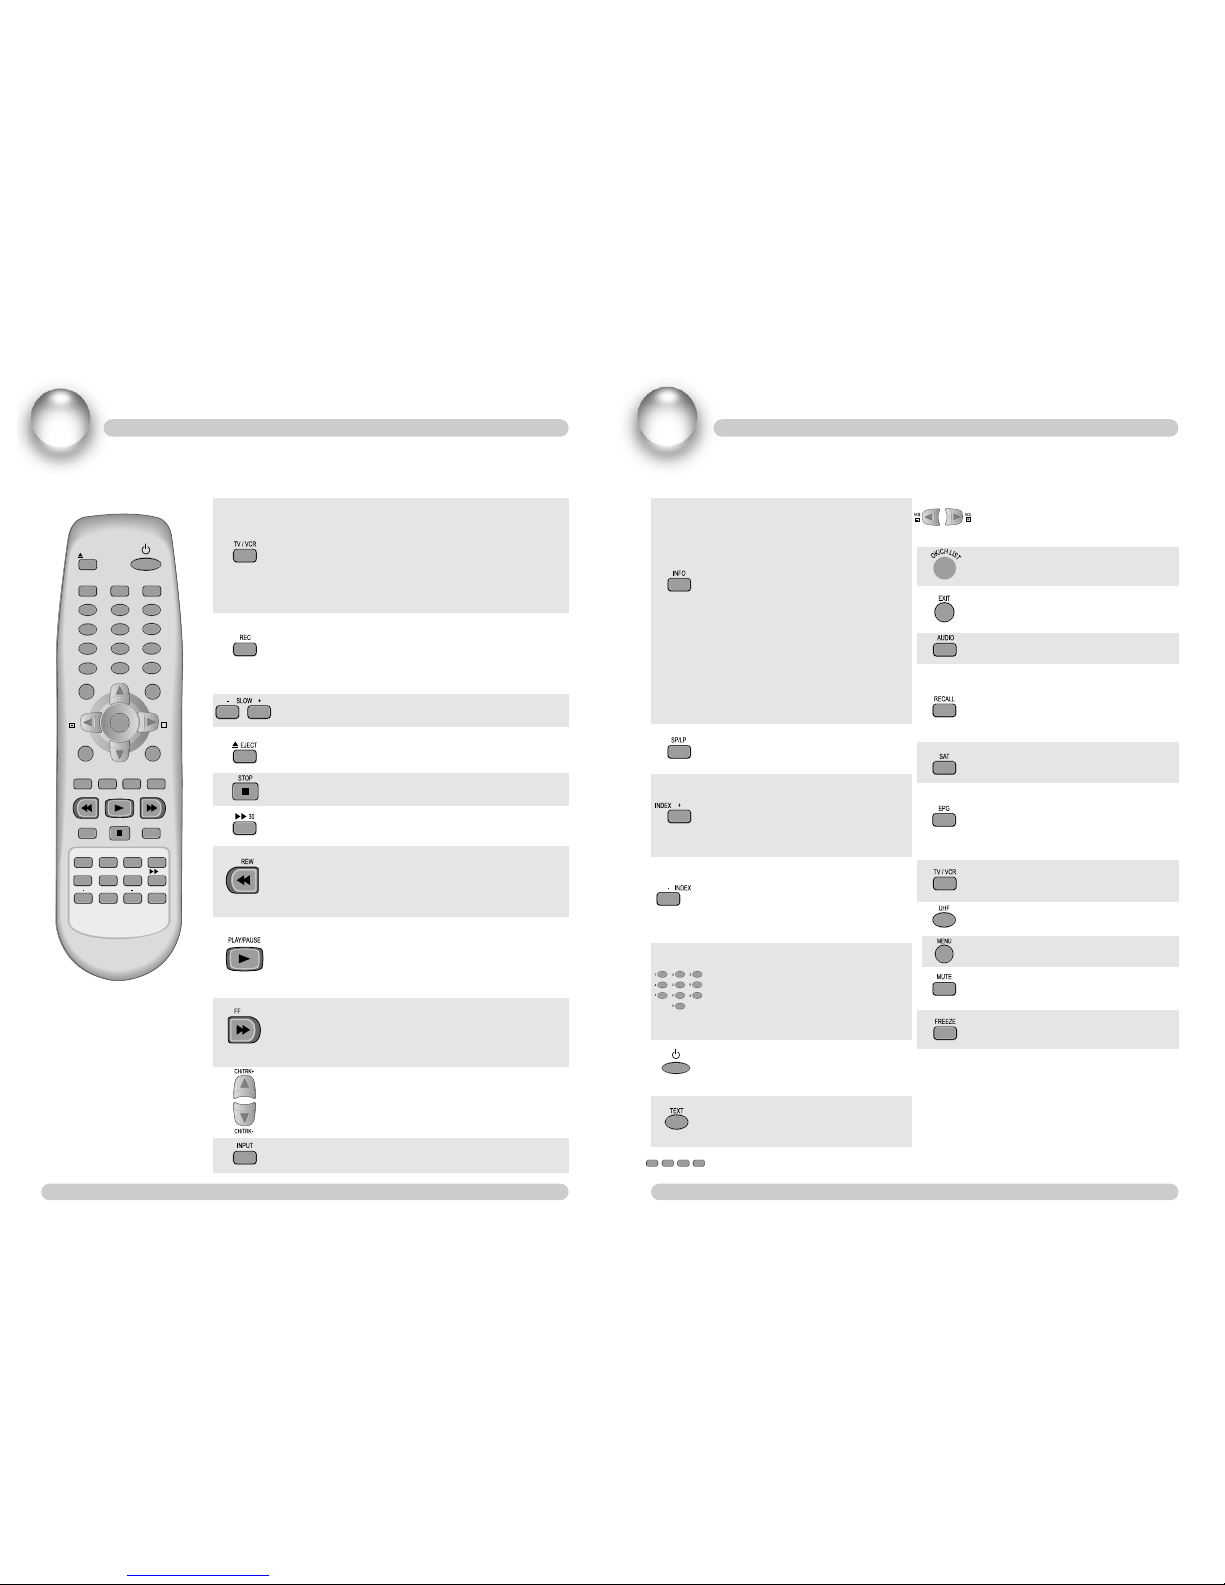
REMOTE CONTROL BUTTONS___________ 12
VCR FRONT PANEL BUTTONS __________ 14
VCR REAR PANEL BUTTONS ____________ 15
4MENU SETUP MODE
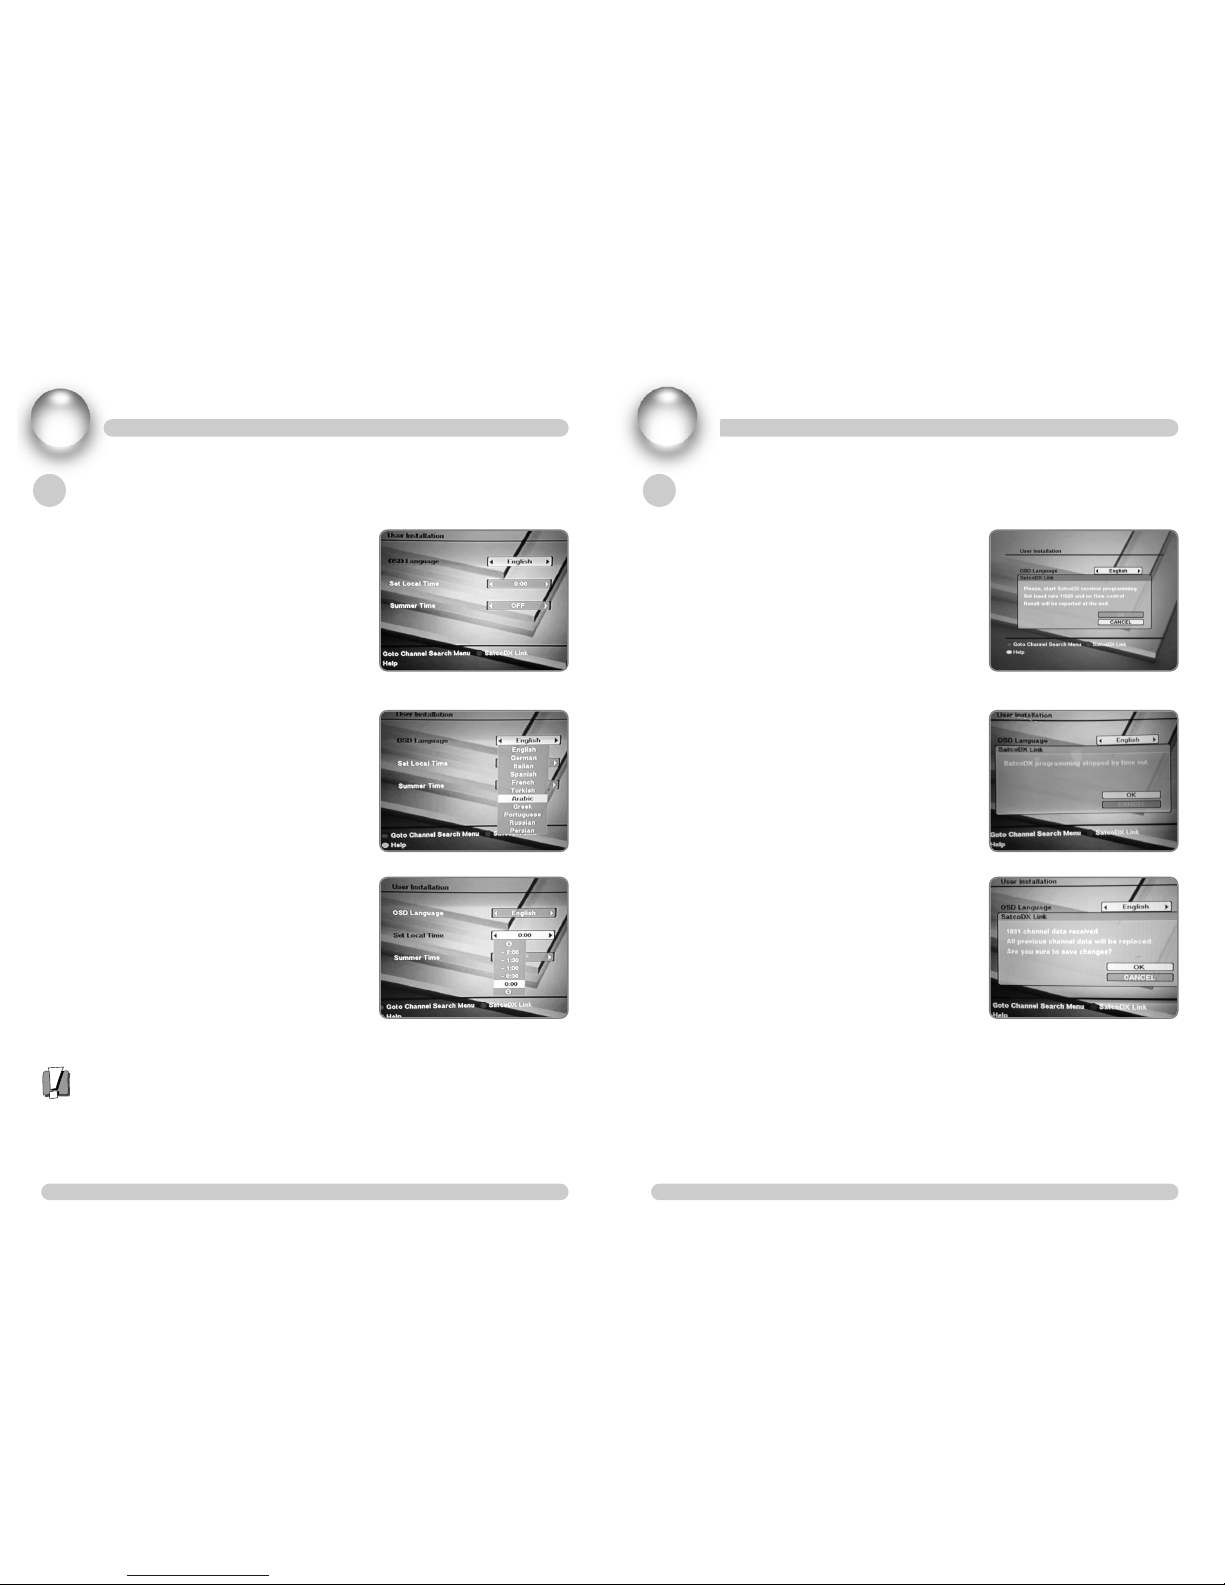
INITIAL INSTALLATION _______________ 16
SatcoDX __________________________ 17
SETTOP___________________________ 18
MAIN MENU_______________________ 19
5TUNING IN NEW STATIONS
CHANNEL SEARCH __________________ 20
SYSTEM SETTING
____________________ 22
6PLAYING CASSETTES
PLAY ____________________________ 23
STILL ____________________________ 23
VARIABLE PICTURE SEARCH____________ 24
VARIABLE SLOW MOTION _____________ 24
FINDING NEW RECORDINGS (INDEX SCAN)
__ 24
CM SKIP (COMMERCIAL SKIP) __________ 24
7RECORDING CASSETTES
TIMER RECORDING USING EPG _________ 25
SIMPLE RECORDING _________________ 26
ONE TOUCH RECORDING - OTR__________ 26
TIMER ___________________________ 27
8NORMAL TIMER RECORDING
______ 28
9VARIOUS MENU SETUP MODE
PARENTAL LOCK ____________________ 31
SYSTEM SETTING ___________________ 33
COMMON INTERFACE ________________ 33
FACTORY DEFAULT___________________33
EPG (ELECTRONIC PROGRAM GUIDE) ______34
10 TAPE CONTROL
_______________ 35
11 VCR FRONT PANEL INDICATIONS
__ 36
12 TROUBLE SHOOTING
___________ 38
13 TECHNICAL SPECIFICATION
_______ 40
Digital Satellite Receiver VCR is easy to use, and allows you to watch and record digital
programs broadcasted via satellite. This instruction manual will guide you through the initial
installation of your receiver.
It also describes how to take full advantage of a wide range of features that are easily accessible.
Read this instruction manual carefully before installing your receiver VCR.
MAIN FEATURES
• High quality Digital Video & Audio
• Fully DVB compliant
• Common Interface with 2 PCMCIA slots
• User friendly and easy-to use menu system
• Various channel editing function, on Channel Management. (favorite, move, lock, rename, delete
and sort)
• User programmable Satellite & Transponder information
• Automatic search for newly added transponder (NIT search)
• Stores up to 4000 channels
• Programmable Timer Recording :8 Events/1Month
• VISS (INDEX Search)
• LED Array Display
• OTR (Max. 10hrs/by 30min)
• Easy EPG recording
• Support software upgrading through RS-232C port
• Plug-and-play data transfer system (DSR to DSR)
• Individual channel volume saving function
• Timer function
• Automatic reserved channel moving system
• Electronic Program Guide (EPG)
• Teletext function support
• SCPC/MCPC receivable from C/Ku Band
• Multi LNB control by DiSEqC 1.0 and 22 KHz switching
• Motorized system control by DiSEqC 1.2* and USALS**.
• 256 color On-Screen-Display
• Support S/PDIF output (Optional function)
• satcoDX COMPATIBLE for auto program updating
* DiSEqCTM is a trademark of EUTELSAT.
** USALSTM is a trademark of Stab.
GENERAL INFORMATION

➠
5
Video Recorder+Satellite Receiver
GENERAL INFORMATION
1
➠
4
Video Recorder+Satellite Receiver
GENERAL INFORMATION 1
FOR YOUR SAFETY
• Allow clear space of more than 10 cm from the top, back and both sides for sufficient
ventilation.
• Do not cover the Digital Satellite Receiver nor place it on a unit that emits heat.
• Use a soft cloth and a mild solution of washing liquid to clean the casing
• Do not connect or modify cables when Digital Satellite Receiver is plugged in.
• Do not remove the cover.
• Do not allow the unit to be exposed to extreme heat, cold or humidity.
• Never allow liquid spray or other materials to come into contact with the inside of the
Digital Satellite Receiver.
• This Unit is designed for continuous operation. Switching it off does not disconnect it from
the mains(Stand-by). To disconnect it from the mains, you have to unplug the mains.
UNPACKING
. 1 x Remote Control Unit (RCU) . 1 x RCA Cable
. 2 x AAA battery (option)
. 1 x Instruction Manual . 1 x DSR
GENERAL OPERATION
Throughout this manual you will notice that the operation of your Digital Satellite Receiver VCR
is based on a series of user friendly On Screen Display menus.
These menus will help you to get the most out of your Digital Satellite Receiver VCR and guide
you through installation.
All function can be carried out by using the buttons on the remote control.
The Digital Satellite Receiver VCR is easy to use, and adaptable for future upgrades.
Note that new software may change the functionality.
If you have difficulties with the operation of your Digital Satellite Receiver VCR, please refer to
the relevant section of this manual or call your dealer or customer service center for help.
EJECT
INPUT
TV / VCR
1
4
7
2
5
8
0
3
6
9
UHF
MENU
VOLVOL
CH/TRK+
CH/TRK-
EXIT
RE
REC
SAT
AUDIO
INDEX
EPG
FREEZE
SLO +
INFO
TV/RADIO
RECALL
30
STOP
FF
SP/LP
PLAY/PAUSE
Pg UP
Pg DON
TEXT
+
+
O
K
/
C
H
L
I
S
T
COMMON INTERFACE
You can watch scrambled programs by inserting right smart card into the right CAM
(Conditional Access Module) and the CAM into the CI slot. You can see two CI slots when you
open the front door of your receiver. CAM and smart card are not included in your Receiver. If
you want to watch some scrambled programs, contact the broadcaster and he will inform you
the needed CAM and smart card.
FRONT PANEL
2 CI Slot for conditional
access module (CAM)
Changes the channel or moves to the
previous/next item in the menu
Switches between the operational mode and
stand-by mode
Opened Front Door
FRONT PANEL DISPLAY
. 1 x Aerial Cable

2INSTALLATION
➠
7
Video Recorder+Satellite Receiver
2INSTALLATION
➠
6
Video Recorder+Satellite Receiver
This section explains the connection of the Digital Satellite Receiver VCR with various Video
devices. Refer to the manuals supplied with the equipment for the installation of outdoor
equipment such as the Satellite dish. When adding a new equipment, be sure to refer to the
related parts of the manual for the installation.
CONNECTING TO ANTENNA
CONNECTING TO TV
1 USING RCA SUPPORT
RS-232C
LNB. IN
S/PDIF
AUDIO L
IN
RVIDEO
LNB. OUT
ANT
OUT
Satellite Receiver
Satellite Dish
RS-232C
LNB. IN
AUDIO L
IN
RVIDEO
LNB. OUT
ANT
OUT
S/PDIF
TV
Satellite Receiver
RCA Cable
2 USING RF SUPPORT (Optional function)
Tuning procedure when RF connections are used
1 Select a channel number on the TV that is not currently used for other TV channels.
2 Follow the instructions in your TV manual to tune the TV channel selector to UHF channel
40.
3 If you are already using this channel, select another non occupied UHF channel between 21
to 69 on the TV. And then press the [UHF] button on this set’s remote control, you can see
the default UHF channel number on the set’s front display.
4 Using the [up/down] button, you can change your set’s UHF channel. When you have
correctly changed the UHF channel number you will see the vertical lines. If there is
interference from other channels, you can set the UHF channel number by pressing [OK] or
[EXIT] button.
RS-232C
LNB. IN
AUDIO L
IN
RVIDEO
LNB. OUT
ANT
OUT
S/PDIF
TV
Satellite Receiver
RF Cable
Satellite Dish

INSTALLATION
➠
9
Video Recorder+Satellite Receiver
2INSTALLATION
➠
8
Video Recorder+Satellite Receiver
2
RS-232C
LNB. IN
S/PDIF
AUDIO L
IN
RVIDEO
LNB. OUT
ANT
OUT
Digital AMP
Satellite Receiver
Optical Cable
CONNECTING TO DIGITAL AMP (Optional function) MODES
There are two modes which you can operate the satellite receiver.
The one is ‘Menu Setup Mode’ and the other is ‘General Viewing Mode’.
On ‘Menu Setup Mode’ you can setup your satellite receiver’s basic settings.
After you setup your satellite receiver properly on ‘Menu Setup Mode’, you can watch the
programs on ‘General Viewing Mode’.
On ‘General Viewing Mode’ you can watch TV or listen the radio.
Also you can edit your channels using Sort function, setting favorite channels, Locking channels
and so on.

2INSTALLATION
➠
11
Video Recorder+Satellite Receiver
2INSTALLATION
➠
10
Video Recorder+Satellite Receiver
Connecting your video to the personal Computer
RS-232C
LNB. IN
AUDIO L
IN
RVIDEO
LNB. OUT
ANT
OUT
RS-232C
LNB. IN
AUDIO L
IN
RVIDEO
LNB. OUT
ANT
OUT
Connecting your video to the hi-fi system, another
video or camcorder

3VCR OPERATIONS
Normally in VCR mode (“VCR” icon on the front
panel lit), when your TV will show the VCR ’s
choice of output.When in TV mode (“VCR” icon
unlit) your TV will show its usual analogue
channels. Use this to watch an analogue TV
channel whilst your VCR is recording something
different.
One Touch Record. Starts an OTR to record the
current channel for 30 minutes. Each subsequent
press adds 30 minutes to the recording time, to a
maximum of 10 hours. Press STOP to end an OTR.
Slow-motion. When a tape is playing,this button
cycles through the 6 possible slow-motion speeds.
Stop /Eject. Stops a tape or ejects it if already
stopped.
Stop a tape while VCR is using.
Commercial Skip. Press then when a tape is playing
to fast-forwards 30 seconds.
Rewind. Starts the tape rewinding or playing
backwards. If already fast-backwards playing, each
subsequent press of this button changes the play
speed.
Play /Pause. Starts a tape playing, or pauses it
(freeze frame) if already playing. IF One-Touch
Recording, pressing this button pauses the
recording. Press REC to resume.
Forwards Wind. Starts the tape forwards-winding to
fast-forwards playing. If already fast-forward
playing, each subsequent press of this button
changes the play speed.
Programme Plus /Minus. Changes up or down a
channel when viewing Digital Satellite CH. Also
used for manual tracking when a tape is playing.
Audio /Video Source. Selects an external AV source
when choosing a channel to watch or record.
➠
13
Video Recorder+Satellite Receiver
3VCR OPERATIONS
Remote Control Buttons
➠
12
Video Recorder+Satellite Receiver
EJECT
INPUTMUTE
TV / VCR
1
4
7
2
5
8
0
3
6
9
UHF
MENU
VOL VOL
CH/TRK+
CH/TRK-
EXIT
RE
REC
SAT
AUDIO
INDEX
EPG
FREEZE
SLO +
INFO
TV/RADIO
RECALL
30
STOP
FF
SP/LP
PLAY/PAUSE
Pg UP
Pg DO N
TEXT
+
+
O
K
/
C
H
L
I
S
T
Display advanced information
about current CH. Turns on or off
the Tape Position information.
Display advanced information
about current CH in tape play or
REC mode. Only the tape position
itself is available when a tape is
playing (see “Tape information
display when playing a tape “
below) but more,including the tape
length and free space is shown
when the tape is stopped (see “Tape
information display when not
playing a tape ”).
Short Play /Long Play. Sets the mode
for the next One-Touch Recording.
Index Plus (Intro Scan). This winds
forwards through the tape, showing
you a few seconds of each
recording in turn. Press STOP or
PLAY to end it.
Index Minus (Intro Scan
Backwards). This winds backwards
through the tape, showing you a
few seconds of each recording in
turn. Press STOP or PLAY to end it.
For fast navigation, the numbers can
be used to enter and select channel
numbers on ANY screens showing
channel information. For two or
three digit channels, press the
buttons in succession.
Switches the system between
standby and on.
Used for digital text applications.
‘Yes ’ &‘No’ are also used to answer
on-screen questions.
Displays the programme guide.
Adjusts the volume, or moves to the
left or right item in the menu.
Confirms choices in menus or
displays programme list.
Clears on-screen information or
closes an open menu.
Selects alternative audio sound.
Switches between the current and
previously viewed channel. Also
will exit a digital text application
and return to normal viewing.
Get channel list from the selected
satellite when the channel list is on.
Get access to the TV Guide (or
Radio Guide) which provides
information on the current and next
programs on a channel.
Toggles TV/RADIO programme
mode.
Get test signal of selecting UHF CH.
Display the main menu.
Mute the sound.
Pauses freeze frame if TV or Radio
CH showing not playing.

3VCR OPERATIONS
VCR Rear Panel Buttons
➠
15
Video Recorder+Satellite Receiver
3VCR OPERATIONS
VCR Front Panel Buttons
The buttons on the front of the VCR have the same meanings as their equivalents on the
remote control.
STANDBY/ON Switches the system between standby and on.
STOP/EJECT Stop /Eject. Stops a tape or ejects it if already stopped.
REC/OTR One Touch Record. Starts an OTR to record the current channel for 30
minutes. Each subsequent press adds 30 minutes to the recording time, to a
maximum of 10 hours. Press STOP to end an OTR.
REW Rewind. Starts the tape rewinding or playing backwards. If already fast-
backwards playing, each subsequent press of this button changes the play
speed.
PLAY/PAUSE Play /Pause. Starts a tape playing, or pauses it (freeze frame) if already
playing. IF One-Touch Recording, pressing this button pauses the
recording. Press REC to resume.
FF Forwards Wind. Starts the tape forwards-winding to fast-forwards playing. If
already fast-forward playing, each subsequent press of this button changes
the play speed.
➠
14
Video Recorder+Satellite Receiver
DSI-9100/ DSI-9300
DSI-9200/ DSI-9400
RS-232C
LNB. IN
S/PDIF
AUDIO L
IN
RVIDEO
LNB. OUT
ANT
OUT
RS-232C
LNB. IN
AUDIO
IN
VIDEO
LNB. OUT
ANT
OUT
S/PDIF
DSI-9300/ DSI-9400
DSI-9100/ DSI-9200
LNB IN : Connect to
Satellite Antenna
ANTENNA INPUT
Connect Video to a TV using RCA jack,
Connect Audio L/R to TV or Audio device
Connect to TV and VCR
using a RCA cable
RF OUTPUT
Serial : Connect to a PC for S/W upgrade
LNB OUT : Loop
through

MENU SETUP MODE
➠
17
Video Recorder+Satellite Receiver
4MENU SETUP MODE
➠
16
Video Recorder+Satellite Receiver
INITIAL INSTALLATION
1
When you turn on the Digital Satellite Receiver VCR for
the first time, you can see “User Installation” menu at
first.
During the installation process, the [OK] button always
confirms a selection within these menus.
Or you can use [red] button to move to another
installation step and [yellow] button to get detailed help
for current process.
Use the [arrow] buttons to move up and down from one
line to another.
2
Select your language.
3
Set up your local time.
After you complete setting up this menu, you can go to
the “Channel Search” menu by pressing the [red] color
button or press [exit] button to go to the main menu.
And you can choose your setup step.
Channel Search is the minimum setup process to watch the
TV or Radio programs. So this precess must be done to
watch any programs.
SatcoDX
This product supports the channel update function of SDX
(SatcoDX Industry Standard Protocol) compatible product.
This function enables users to download their own channel
list from PC to settop box by the program called "World of
Satellites" distributed by SatcoDX.
USERS MUST PREPARE FOR THE FOLLOWINGS TO DO
THIS.
- Windows compatible PC with serial connection
terminal(Com Port)
- 9 pin female to female Null-Modem serial cable
THIS FUNCTION CAN BE USED AS FOLLOWS;
(PC means its operation from PC and Settop means its
operation from satellite receiver)
PC
1
Download and install "World of Satellites" from the
homepage of SatcoDX (www. satcodx. com)
2
Run "World of Satellites" program after understanding
its using method and connect the serial cable between
PC and Settop Box.
3
Configure the channel list you want and choose
"Program Receiver" menu and open "SatcoDX Receiver
Programming Wizard" dialog. The dialog set-up is as
follows;
Serial Port : The number of the port connected to serial
cable
Baud Rate : 11520
Flow Control: None
4

➠
18
Video Recorder+Satellite Receiver
MENU SETUP MODEMENU SETUP MODE
➠
19
Video Recorder+Satellite Receiver
44
MAIN MENU
1
You can always change your menu settings on Main
Menu easily.
2
You can check your receiver's version by pressing [red]
color button on main menu.
At the ‘software Stand’, 4th and 5th digits express the
Firmware Version. Likewise other products, higher number
is the recent version.
SETTOP
1
Enter "User Installation" menu and press the [Green] button on remote control and open
"SatcoDX Link" dialog.
Upon opening the dialog, Settop Box starts waiting the data transmission from PC and if this
doesn’t occur after some time, it will inform the users of time out.
2
Click "Program Receiver" button to make the transmission started before the Settop dialog is
Timeout.
3
If the data transmission is made in normal way, "SatcoDX Link" dialog will not be changed
unless there is any transmission error. In case of transmission error or timeout, recheck the
connection status of cable or PC set-up and restart the whole process from beginning.
4
If the data transmission is successfully made, "SatcoDX Link" dialog will display how many
channels have been transmitted. The number of transmitted channel may be less than that
in the channel list of PC and this is because Settop ignores the information on data channel
and analog channel. When user push [OK] button and check if the data has been saved or
not, all the satellite information and channel information seen before are deleted and its
channel information will be restructured with the data transmitted through SatcoDX. If user
wants to go back to the shipping status at the factory, "Factory Default" function can be
used.
5
The channel information transmitted by using "World of Satellites" doesn’t include the
detail set-up of each satellite. Therefore, user should enter "Channel Search" menu and
change the LNB and DiSEqC set-up of each satellite appropriately and finally, check if
transponder signal has been received or not by signal bar for the purpose of seeing its
transmitted channel more conveniently.

5TUNING IN NEW STATIONS
antenna position because the antenna will move according to the satellite position
and your position.
5SEARCH OPTION
This unit includes common interface function. So you
cannot watch scrambled channels if you insert suitable
cam module and smart card. If you may not want to
search scrambled channels, you can skip the scrambled
channels by checking [FTA Only] options on Channel
Search option.
63-WAYS OF SEARCHING CHANNEL
If you choose [Search SAT], the receiver will search
channels from the selected satellite on current menu.
If you choose [Search Multi-SAT], the receiver will
search channels from the whole enabled satellite.
In case the satellite you want to receive is not on the sat-
list, you can manually search by choosing [TP search].
Before you do the [TP search], check the frequency and
symbol rate of the TP which you want to search channels
from. On [TP search] process all we need are just the frequency and symbol rate.
The satellite name is meaningless.
➠
21
Video Recorder+Satellite Receiver
5TUNING IN NEW STATIONS
Channel Search
1Before you search the channels you must choose at least
one satellite and enable it. Press [MENU] and select
“Channel Search” with [SELECT].
2Then choose the right LNB for the selected satellite.
3In case you are using a dual LNB or two antennas
connected to a 22KHz tone switch, you can switch
between both LNB or antennas by pressing the [red
color] button of the remote control.
4If you have installed Diseqc Motorized system, choose
the right one, move it to the right position following the
instructions below.
DISEQC 1.2 :
If you want to move the antenna to the west or east
position, press [left/right] button on your remote control
on ‘Position’ menu, until you see the yellow signal
strength bar. And set the position (press [OK] key). The
position will be stored. Then you can load the saved
antenna position after you changed the antenna position
on other satellite antenna position setting.
USALS :
If you have USALS system, you have to input your
position. And “send command” will move the antenna
to the correct position. You don’t have to save the
➠
20
Video Recorder+Satellite Receiver

PLAYING CASSETTES
➠
23
Video Recorder+Satellite Receiver
5TUNING IN NEW STATIONS
➠
22
Video Recorder+Satellite Receiver
6
SYSTEM SETTING
You can make misc settings on System Setting menu.
“Start on channel” Feature allows you to setup the first
shown channel when you power on the satellite receiver.
Optional :
If your set has RF Output, you may show 2 additional
menus related to RF channel selection.
Default UHF channel is 40.
Play
1Push the cassette smoothly and squarely into
the cassette bay, with its windows pointing up.
2Press [PLAY/PAUSE] to start playback.
3Press [STOP] to stop playback.
4Press [FF] or [REW] to fast forward or rewind the cassette from stop.
5Press [STOP/EJECT] to eject the cassette in Stop mode.
• When you load a protected cassette such as pre-recorded film playback will start
automatically.
• When you are playing tapes of poor quality or tapes which have been recorded on
another machine, you can use the [PR+] or [PR-] buttons while the cassette is
playing to reduce horizontal interferences stripes.
• Playing NTSC tapes on PAL TV: If you play cassettes which have been recorded on
the NTSC colour system (as used in the USA), you can watch the pictures on most
PAL TVs.
On older TVs, some black lines may appear at the top and bottom of the screen.
The picture may also roll up or down. To prevent these problems adjust the V-
HOLD knob on your television.
NTSC : National Television Systems Committee.
Still
1Press [PLAY/PAUSE] in Playback mode to still picture from playback.
2Press [PLAY/PAUSE] to switch back to normal playback.
• After approximately five minutes on still, the cassette will automatically switch to
normal playback.

➠
25
Video Recorder+Satellite Receiver
➠
24
Video Recorder+Satellite Receiver
7RECORDING CASSETTES
Timer recording using EPG
The Digital satellite receiver provides an automatic system which makes it easier to set the
timer recording. EPG are shown in TV or Radio programme guides.
1Insert an appropriate tape and position it correctly,
ready for recording. Press the [EPG] button and the
EPG menu will appear.
2Press the [GREEN] button to show VCR record
Timer set.
3Press the [OK] or [RED] button to enter the Edit
Entry. The Channel, Date, Start and Stop time will
then be filled in for the programme you have
chosen.
4If you wish to change any of the settings:
• Move the select bar to the setting you want to
change using the […] or [†] buttons.
• Change the setting using the [œ] or [√] buttons,or
the number buttons [0] to [9]. (For detailed
descriptions of all the settings and how they can be changed, please see the Normal
timer recording section.)
5When all the settings are correct, select the [OK]
button. If you insert invalid data, you will see
message box.
6The Timer List screen will then be shown with your
new timer highlighted.
7Press the [ ] button to put your video into standby.
Your video will not record unless you do this. You can switch the video on again if
you want to set the timer to record another programme. Remember to put your
video back into standby when you have finished setting the timer.
• If the broadcasting station doen’t send the EPG data signal, there can be the channel
without EPG data
6PLAYING CASSETTES
Variable picture search
1Keep pressing [FF] to vary the forward search speed.
2Keep pressing [REW] to vary the rewind search speed.
Pressing the above buttons will vary the search speed in two speeds.
3Press [PLAY] to switch back to normal playback.
Variable slow motion
1Starting from playback you can keep pressing [SLOW-] or [SLOW+] to control slow
motion speed in six steps.
2Press [PLAY] to switch back to normal playback.
Finding new recordings (index scan)
The video index search system allows you to find the beginning of any recording you have
made on your video. Your video automatically records index marks on the tape whenever a
recording is started.
1Press [INDEX +] or [INDEX –] to search forwards or backwards.
The video will now wind to the beginning of a recording, play it for about 6
seconds, then wind on to the next one.
2When you see the recording you want to watch, press [PLAY].
CM skip (commercial skip)
1If you press [√√30] on the remote control during playback mode, tape advances for 30
seconds segment.

➠
27
Video Recorder+Satellite Receiver
➠
26
Video Recorder+Satellite Receiver
7RECORDING CASSETTES
Recording cassettes
• If you want to use the video’s timer to record a programme, the clock, date and
stations must be set correctly.
• Load a cassette with its safety tab in place and with enough free tape for the
recording.
Simple recording
1Load a cassette with its safety tab in place.
2Press [PR+] or [PR-] to choose the station you want to record.
Press [SP/LP] if you wish to double the length of the cassette’s recording time.
For example, on an E-240 cassette you can record for up to four hours when SP is
displayed, or up to eight hours when LP is displayed.
3Press [REC] to start your recording.
4Press [STOP] if you want to stop the recording for a short while.
5Press [REC] to continue recording.
6Press [STOP] to stop your recording.
One touch recording-OTR
1Press [PR+] or [PR-] to choose the station you want to record.
2Every time you press , the recording time will increase by 30 minutes. It is possible
to record for up to 10 hours if there is enough room on the cassette.
7RECORDING CASSETTES
• If your timer list is full then you will not be able to set a new timer and a message
will be shown. See Managing your timers for how to delete a timer to make space
for a new timer.
• If you decide that you do not want to set a timer afterall you can press the [GREEN]
button at any time.
• You can only set a timer up to approximately 1 month in advance.
• A timer cannot be longer than 12 hours in length.
TIMER
The "TIMER" menu allows you to program the timer in various ways.
The Digital Satellite Receiver VCR displays the time information given by the
satellite. So there may be a slight difference between the actual time and the Digital
Satellite Receiver's time.
1EASY TIMER
To activate the Timer, set the "Enable" box to YES and
enter the desired time.
Select Turn On Time and Turn Off Time, and the
channel you want to view from the Turn On Channel.
2ADVANCED TIMER
The advanced Timer allows you to program the various
timer functions.
You can select the type of timer from Daily, Weekly,
Monthly and One Time.
The “Turn On” Channel feature allows you to choose
the channel with the set up timer. The receiver will
show the channel, when it comes to the set up time.

➠
29
Video Recorder+Satellite Receiver
➠
28
Video Recorder+Satellite Receiver
8NORMAL TIMER RECORDING
8
You can then change the settings as follows:
• Enable
- Press the [LEFT] or [RIGHT] button to select [YES] or [NO].
- Select [YES] allows you to timer recording.
• Record Channel
- Press the [UP] or [DOWN] button and then select channel to want timer
recording.
- If you change to TV or Radio channel, press the [TV/RADIO] button in the
channel list.
- You can press the [OK] button to see channel list.
- Or, you can enter a channel number directly by pressing the [0 ] to [9 ] buttons.
- Or, you can edit the channel number by pressing the [Green ] button. A flashing
yellow cursor will be then shown. Pressing the [Up ] or [Down ] buttons will then
change the channel number appropriately. Press the [Green ] button again to
finish the edit.
- Or,you can press the [AV ] button to select an AV input. Each press of the button
will pick the next input in turn.
• Date or Day
- You can press the [Right ] or [Select ] buttons to move the date on by one day.
Press the [Left ] button to move the date back one day. Note, the day is shown
next to the date for your information.
- Or, you can enter the day part of the date directly by pressing the [0] to [9 ]
buttons. Note, the month and year are determined for you automatically.
- Or, you can edit the day part of the date by pressing the [Green ] button.
A flashing yellow cursor will then be shown. Pressing the [Up ] or [Down ]
buttons will then change the date appropriately. Press the [Green ] button again
to finish the edit.
• Start Time / End Time
- You can press the [OK] button to move the time on by numeric keypad dialog.
- Or, you can enter the time directly by pressing the [0] to [9] buttons. Note, to
enter 1.00am you must press ‘ 0100 ‘.
NORMAL TIMER RECORDING
Insert an appropriate tape and position it correctly, ready for recording.
In the menu select the [On/off timer & Record timer] and then [VCR record timer] to
show VCR record timer set.
This screen lists all the timers that have been set. You may set up to a maximum of 8
timers.
If necessary, move the highlight bar using the [UP] and [DOWN] buttons until a
timer slot with ‘select bar’ is highlighted.
Press the [RED] or [OK] button to take you to the TIMER SET screen.
The current date and time are shown at the top of the screen.
You can select ENABLE, CHANNEL, OFTEN, DATE, DAY, START, END TIME and
TAPE SPEED.
Move the select bar to the setting you want to change using the [UP] or [DOWN]
buttons.

➠
31
Video Recorder+Satellite Receiver
8
➠
30
Video Recorder+Satellite Receiver
VARIOUS MENU SETUP MODE
NORMAL TIMER RECORDING 9
PARENTAL LOCK
This function allows you to lock a channel with your password.
In order to prevent your children or any other person from accessing these channels,
you can also protect your installed data and information using Install Lock.
1HOW TO CHANGE THE PASSWORD
1) Enter the current password.
2) Select Parental Lock to ON to activate the function.
3) Enter a new password.
4) Confirm your new password by entering the new
password again.
Note: Default password is 0000
Warning: Do not forget your password.
If you miss your password, you can use Masterkey (1250)
2HOW TO USE PARENTAL LOCK
1) If you have activated the parental lock function, you
must choose the channels you want to lock.
2) Press [OK], then the lock symbol will appear.
3) Exit from this menu, and press the [ ] button on the
remote control or the front panel.
To activate the Parental Lock function, you must switch
the Digital Satellite Receiver to stand-by mode at least once.
Turn on the Digital Satellite Receiver, and select a channel which is locked.
To watch the channel, enter your password.
• Often
You can press the [Left ], [Right ] or [OK] buttons to change how often you want the
timer to repeat. The choices are:
- Once : the timer will not repeat.
- Daily: the timer will repeat at the same time each day.
- Weekly: the timer will repeat on the same day of each week.
• Speed
You can press the [Left ] or [Right ] buttons to change what tape mode is used for you
recording. The choices are:
- SP: your recording will be made using Standard Play.
- LP: your recording will be made using Long Play.
When all the settings are correct, select the [OK] button.
The TIMER LIST screen will then be shown with your new timer highlighted.
Press the [Standby] button to put your video into standby. Your video will not record
unless you do this.
You can switch the video on again if you want to set the timer to record another
programme. Remember to put your video back into standby when you have finished
setting the timer.

➠
33
Video Recorder+Satellite Receiver
9
➠
32
Video Recorder+Satellite Receiver
VARIOUS MENU SETUP MODE
9
3HOW TO USE INSTALL LOCK
1) Enter the current password.
2) If you select Parental Lock to ON, install Lock is changed to ON. (If you don’t want
to set the Install Lock ‘ON’, you just change the Install Lock from ‘ON’ to ‘OFF’.)
3) Enter a new password.
(If you do not want to change the password, skip step 3 and go to 5)
4) Confirm your new password by entering the new password again.
5) Exit from this menu, and press the [ ] button.
6) Turn on the Digital Satellite Receiver, and press the [MENU] button.
7) Select any menu, and press [OK].
8) The Enter Password box will appear.
9) Enter the password to access the menu.
VARIOUS MENU SETUP MODE
SYSTEM SETTING
You can make disc settings on System Setting menu.
“Start on channel” Feature allows you to setup the first
shown channel when you power on the satellite
receiver.
Optional :
If your set has RF Output, you may show 2 additional
menus related to RF channel selection. Default UHF
channel is 40.
COMMON INTERFACE
You can see Slot A, Slot B and the types of the inserted
CAM (Conditional Access Module). You can explore
the sub-menu of the CAM by selecting the slot and
pressing [OK] button. Each kind of CAM has its own
sub menu. So, if you have any questions about the
CAM sub-menu, contact your CAM provider.
FACTORY DEFAULT
The factory default menu will allow you to make the
whole settings to the factory default mode, and will
reboot the receiver. Just press [red] color button on your
remote control. The whole settings and channels you
searched before will be lost.

➠
35
Video Recorder+Satellite Receiver
9
➠
34
Video Recorder+Satellite Receiver
10 TAPE CONTROL
Tape Remain
If known, the tape length is minutes will be displayed to popup
menu. (e.g. E240 for a 4 hour tape of E180 for a 3hour tape.)
Also, amount of tape remaining will be shown in the form
‘hours: minutes: seconds’ and the current position of the tape
will be indicated by selecting tape remain.
Go To Zero
To find the 0;00;00 counter position on the tape, select [Go to
zero]
Counter Reset
You can reset the counter to 0;00;00 selecting [Counter Reset].
VARIOUS MENU SETUP MODE
EPG (ELECTRONIC PROGRAM GUIDE)
The Digital Satellite Receiver provides an EPG function
for you to get access to the TV Guide (or Radio Guide)
which provides information on the current and next
programs on a channel.
To access to the EPG, press the [EPG] button on your
remote control, and the EPG menu will appear.
If there is any EPG data, you can see the channel list on
the left, the program schedule, and time will be
displayed.
If you press [√] button, you will see the next EPG and
the details if that exist.
If you press [œ] button, you will see the previous EPG.
The time will be displayed in relation to the program
schedule.
If there are detailed information for the schedule items,
you will see the message "Press 'OK' for Detailed info".
Then press [OK] to see the detailed information.

➠
37
Video Recorder+Satellite Receiver
11
➠
36
Video Recorder+Satellite Receiver
VCR FRONT PANEL INDICATIONS
The six small icons on the left and right of the front panel indicate the following:
Tape inserted. Flashes as a tape is being ejected or if there is no tape or a write-
protected tape inserted when a recording begins.
VCR mode (when lit)or TV mode (when unlit).
Timer recording(s) programmed. Flashes if a timer recording cannot start because the
VCR is not in Standby.
Long Play mode (when lit) or Short Play mode (when unlit). During tape playback this
shows the speed of the recording on tape. During recording this shows the speed of
the recording. At other times this shows the speed selected for the next OTR.
Recording in progress.
The following will also appear on the front panel:
---- VCR is starting up. Please wait.
--:-- VCR ready for use. Please press [ ] on the remote control to start.
Clock VCR is in Standby and showing the current time. The display is dimmed to save
power.
STOP The tape has stopped.
EJCT The tape is ejecting.
PLAY The tape is playing. Flashes when auto-tracking is happening.
STILL The tape is playing and in Pause (freeze frame) mode.
SLOW The tape is playing and in slow-motion mode.
SCH The tape is playing fast-forwards.
SCH- The tape is playing backwards.
IND+ The tape is searching forwards for the next recording.
IND- The tape is searching backwards for the previous recording.
REC Recording in progress
RECP One-Touch Recording paused.
OTR Countdown One-Touch Recording time remaining in hours and minutes or minutes
and seconds.
ERR A tape or VCR mechanism fault has been detected. See the Troubleshooting Guide
for more help.
When you press any remote control button,you will see the a dot blink briefl that the VCR has
seen the remote control command.
11 TAPE INFORMATION DISPLAY
This manual suits for next models
3
Table of contents
Other Daewoo Receiver manuals

Daewoo
Daewoo DCR-9130 SERIES User manual

Daewoo
Daewoo DSD-9250E User manual

Daewoo
Daewoo DSD-9251MA User manual

Daewoo
Daewoo DSD-9280M User manual

Daewoo
Daewoo DSD-9502 Series User manual

Daewoo
Daewoo DR-C912B User manual

Daewoo
Daewoo DSD-9251MAV User manual

Daewoo
Daewoo DSA-9310E User manual

Daewoo
Daewoo DSD-9230E User manual

Daewoo
Daewoo DSI-9100 User manual