manuals.online logo
Brands
  1. Home
  2. •
  3. Brands
  4. •
  5. Daktronics
  6. •
  7. Recording Equipment
  8. •
  9. Daktronics Sportsound SSR-AM User manual

Daktronics Sportsound SSR-AM User manual

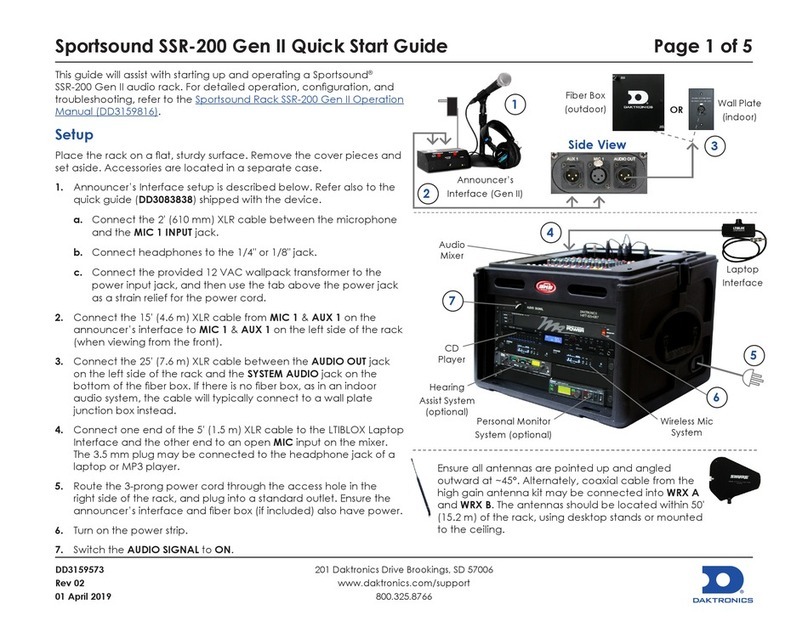
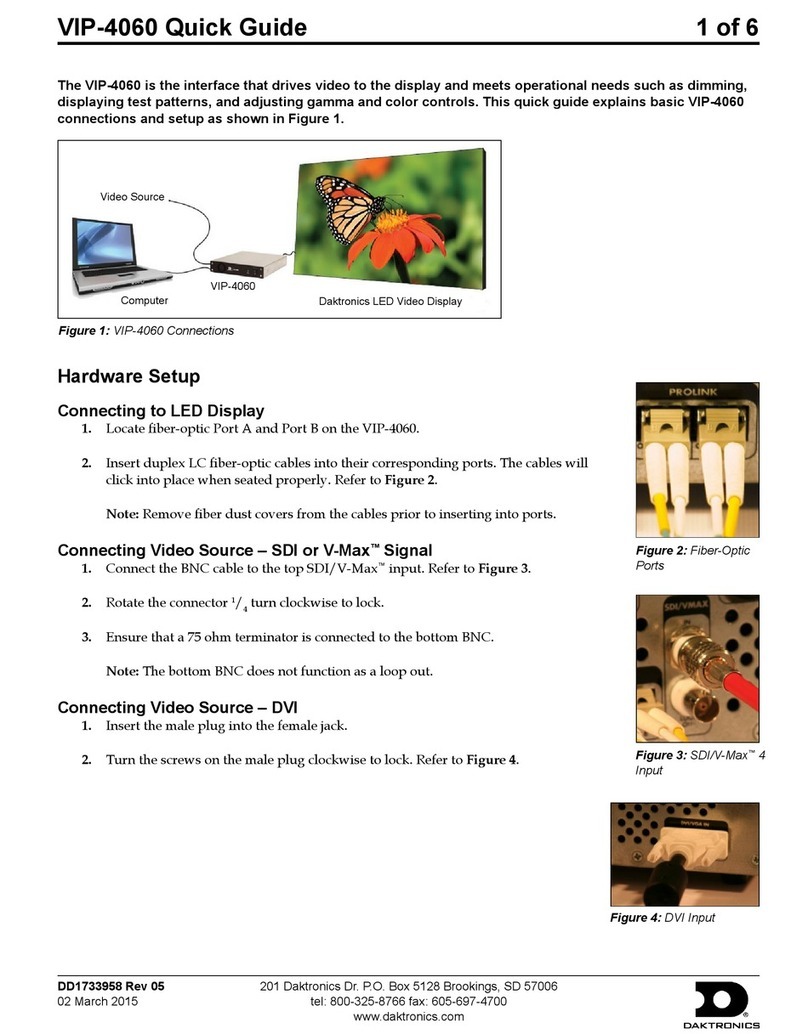
Sportsound SSR-AM Quick Guide
DD3638236
Rev 01
25 June 2018
201 Daktronics Drive Brookings, SD 57006
www.daktronics.com/support
800.325.8766
Page 1 of 4
1. Announcer’s Mixer (part # A-3505912)
2. Single-Muff Headset with XLR & 1/4" Cable (part # A-2382)
3. 6' 1/8" Music Input Cable (part # W-3511512)
4. Power Supply (included with Announcer’s Mixer;
part # A-3838825 may be ordered as a replacement)
5. 12' XLR Output Cable (part # W-1750)
1
2
2
4
5
3
OR OR
Fiber Box
(outdoor)
Wall Plate
(indoor)
Sub Mixing
Console
Sportsound SSR-AM Quick Guide
DD3638236
Rev 01
25 June 2018
201 Daktronics Drive Brookings, SD 57006
www.daktronics.com/support
800.325.8766
Page 2 of 4
1. CONTINUOUS – Press this button to activate the microphone. The
button illuminates when the microphone is live. Press this button
again to deactivate the microphone and turn off the indicator.
2. MOMENTARY – Hold down this button to activate the
microphone. Release this button to deactivate the microphone.
Note that the CONTINUOUS button lights while the MOMENTARY
button is pressed.
3. BASS CUT – This switch can increase speech intelligibility. Use a
pen or small pointed object to toggle the switch in/out (on/off).
4. MIC VOLUME – Turn this knob clockwise to increase and counter-
clockwise to decrease the microphone volume.
5. MIC LEVEL – Pay attention to these LED indicators when adjusting
the mic volume. While speaking into the mic, the LEDs should be
green, or occasionally amber.
6. OUTPUT LIMITING – This blue LED illuminates when the built-in
limiters are activated. If this LED is on frequently, try reducing the
mic or music volume levels.
7. MUSIC VOLUME – Turn this knob clockwise to increase and
counter-clockwise to decrease the music volume.
8. MUSIC LEVEL – Pay attention to these LED indicators when
adjusting the music volume. While music is playing, the LEDs
should be green, or occasionally amber.
9. MUSIC INPUT – Connect to a music source (iPod, mp3 player,
smartphone, etc.) via provided 1/8" stereo cable.
10. PHONES VOLUME – Turn this knob clockwise to increase and
counter-clockwise to decrease headphone volume.
11. POWER – This green LED illuminates when the unit has power.
1 2
3 4 7 105 86 119
Mixer Operation
Ensure the LEVEL LEDs remain green or amber.
If the red LED illuminates, reduce the music level!
Remember: Bad input = bad output. No adjustment on the mixer
can make a poor source sound better. For best results, use high-
quality audio les, and set the device to near full volume.
Good
OK
Bad!
Sportsound SSR-AM Quick Guide
DD3638236
Rev 01
25 June 2018
201 Daktronics Drive Brookings, SD 57006
www.daktronics.com/support
800.325.8766
Page 3 of 4
DIP Switch Settings
1. N/A (Not Used)
2. MUSIC IN PHONES:
ON (default) = mic and music
signals go to phones out jacks
OFF = only mic signal goes to
phones out jacks
3. LIMITER ON/OFF:
ON (default) = output level is limited to protect the sound system
OFF = output level is not limited – improper use can damage
sound system!
4. LIMIT THRESHOLD:
+4 (default) = allows the sound system to reach full output while
protecting against improper use and large signal spikes
-6 = reduces the output capability while providing the greatest
protection against improper use of the sound system
5. DUCKER ON/OFF:
ON (default) = music level automatically reduces when mic signal
is sensed; music level gradually goes back up when mic is off
OFF = music will not change volume level when speaking into mic
6. DUCKING LEVEL:
-15dB (default) = the mic will be louder than the music, but music
can still be heard in the background
-70dB = music will be completely quiet when the mic is active
7. N/A (Not Used)
8. PHANTOM POWER:
ON (default) = supplies 12VDC to mic input to power condenser
microphones; the provided headset requires phantom power
OFF = select when using dynamic microphones
1. POWER INPUT – Connect included 12 VAC wallpack transformer.
Use the tab above the power jack as a strain relief for the cord.
2. CHASSIS GND LFT – This switch can reduce the humming effect of
a ground loop. Use a pen or small pointed object to toggle the
switch in/out (on/off).
3. SETUP SELECTOR – These DIP switches are factory set for the most
common operation requirements, but they can be changed if
needed. Refer to DIP Switch Settings at right for more information.
4. OUTPUT PAD – Enable this setting ONLY IF the mix output is going
into another mixing console. If the mix output is going directly to
a sound system, leave this switch off (default). Use a pen or small
pointed object to toggle the switch in/out (on/off).
5. MIX OUTPUT – XLR output jack to audio system (or another mixer)
6. PHONES OUT – 1/4" & 1/8" jack for headset and/or headphones
7. MIC INPUT – XLR input jack for headset (or optional microphone)
1 2 3 4 5 76
Sportsound SSR-AM Quick Guide
DD3638236
Rev 01
25 June 2018
201 Daktronics Drive Brookings, SD 57006
www.daktronics.com/support
800.325.8766
Page 4 of 4
Microphone Best Practices
• Position headset microphones as close to the mouth as
comfortable.
• Keep handheld microphones 4-6 inches (102-152 mm) from the
mouth (about the width of a hand).
“P-pops” are loud sounds created by the release of breath when
saying letters like “p” or “b”. To avoid P-pops, keep handheld
microphones below the mouth, angled toward the nose at a 45°
angle. Do not point the front of the mic straight at the mouth.
• The softer or louder the speaker’s voice, move the microphone
closer or further away, respectively.
• Never hit or intentionally blow into a microphone as it could quite
easily be damaged.
Feedback
Feedback is a high-pitched noise caused when the sound through a
speaker is picked up again by the microphone. If there is feedback in
the system, it can be removed/reduced with the tips below:
• Practice proper microphone placement. The mic should be as
close as possible to the mouth. Use a headset whenever possible.
• Ensure the headset microphone is facing away from the sound
system. For example, if the speaker cabinet is in the left endzone,
the microphone should be worn on the left side of the head.
• Make sure to use the windscreens on the microphones.
• Try a different mic. Cardioid mics will have a higher gain before
feedback than Omni-directional mics. However, Cardioid mics
will have more wind noise versus Omni-directional. When it comes
to choosing between wind noise or feedback, it’s the lesser of
two evils to listen to wind noise.
Troubleshooting
Symptom/Condition Potential Solution
Mixer does not power on
Check the wallpack transformer/
voltage. If transformer is bad,
replace it. If transformer is good,
mixer may need to be replaced.
Contact Daktronics.
Buzzing in system
Check cable paths and move
away from any power or
scoreboard signal runs.
Humming in system Enable the ground lift (GND LFT)
switch.
Music reduces in level, then
comes back
Disable DUCKER ON/OFF DIP
switch #5.
Audio sounds distorted
Ensure the clip (OL) LED is not
illuminating, and reduce volume
levels as needed. Also ensure
the OUTPUT LIMITING LED is not
continuously illuminated.
Sound system does not get loud
enough
Ensure LIMITER ON/OFF DIP switch
#3 and LIMIT THRESHOLD DIP
switch #4 are set as desired.
Cannot hear music in
headphones
Ensure MUSIC IN PHONES DIP
switch #2 is enabled. Ensure
headphone cable is fully seated
in the PHONES OUT jack.
Headset microphone does not
work
Ensure PHANTOM POWER DIP
switch #8 is enabled.
Other Daktronics Recording Equipment manuals

Daktronics Sportsound Rack SSR-100 User manual

Daktronics

Daktronics Sportsound Rack SSR-100 User manual

Daktronics VIP-4060 User manual

Daktronics

Daktronics VIP-4060 User manual

Daktronics SPORTS WIRE 4000 INTERFACE User manual

Daktronics

Daktronics SPORTS WIRE 4000 INTERFACE User manual

Daktronics LiveBook GFX User manual

Daktronics

Daktronics LiveBook GFX User manual

Daktronics Sportsound SSR-300 User manual

Daktronics

Daktronics Sportsound SSR-300 User manual

Daktronics Sportsound SSR-200 User manual

Daktronics

Daktronics Sportsound SSR-200 User manual

Daktronics DM-100 Gen III User manual

Daktronics

Daktronics DM-100 Gen III User manual

Daktronics 5000 Series User manual

Daktronics

Daktronics 5000 Series User manual

Daktronics Sportsound Gen II User manual

Daktronics

Daktronics Sportsound Gen II User manual

Daktronics SPORTSOUND SSR-100 GEN II User manual

Daktronics

Daktronics SPORTSOUND SSR-100 GEN II User manual

Popular Recording Equipment manuals by other brands

EMS EC-63-0001 installation guide

EMS

EMS EC-63-0001 installation guide

Rane MQ 15 Operating and service manual

Rane

Rane MQ 15 Operating and service manual

midiplus AKM320L owner's manual

midiplus

midiplus AKM320L owner's manual

Festo FSS-12-C operating instructions

Festo

Festo FSS-12-C operating instructions

Mitsubishi MAC-397IF-E installation manual

Mitsubishi

Mitsubishi MAC-397IF-E installation manual

ADS Technologies USBAV-711-EF Hardware and software manual

ADS Technologies

ADS Technologies USBAV-711-EF Hardware and software manual

Rebis Audio RA226 user guide

Rebis Audio

Rebis Audio RA226 user guide

Focusrite Saffire 6 USB user guide

Focusrite

Focusrite Saffire 6 USB user guide

Steren 200-387 instruction manual

Steren

Steren 200-387 instruction manual

Musicom Lab EFX MkIII+ user manual

Musicom Lab

Musicom Lab EFX MkIII+ user manual

Pioneer EQ-6000 Service manual

Pioneer

Pioneer EQ-6000 Service manual

Sony PCMD1 - Professional XLR Microphone Preamp operating instructions

Sony

Sony PCMD1 - Professional XLR Microphone Preamp operating instructions

TC Electronic Mastering 6000 Basic operation

TC Electronic

TC Electronic Mastering 6000 Basic operation

Yamaha CDR200t user guide

Yamaha

Yamaha CDR200t user guide

BSS Audio FCS 966 user manual

BSS Audio

BSS Audio FCS 966 user manual

Teac CD-RW890MK2 Quick-start recording guide

Teac

Teac CD-RW890MK2 Quick-start recording guide

Roland MPU-101 Booklet

Roland

Roland MPU-101 Booklet

MINDPRINT T.R.I.O. manual 

MINDPRINT

MINDPRINT T.R.I.O. manual 

manuals.online logo
manuals.online logoBrands
  • About & Mission
  • Contact us
  • Privacy Policy
  • Terms and Conditions

Copyright 2025 Manuals.Online. All Rights Reserved.