Daktronics DM-100 Gen III User manual

Conguring the DM-100 Gen III for Gilbarco
G-Site/Passport Interface Quick Guide
DD2294804
Rev 04
05 October 2021
201 Daktronics Drive
Brookings, SD 57006-5128
www.daktronics.com/support
800.325.8766
Page 1 of 10
Handheld Controller Use and Setup
The rst time you use your DM-100 handheld controller you may need to set the function to GAS PRICE
as described below.
LCD Screen Action/Information Shown
CURRENT FUNCTION
GAS PRICE
For indoor installation only: Plug the wall pack transformer into a 120 VAC power
outlet, and connect it to the DM-100.
This display appears briey.
CHANGE FUNCTION?
PRESS SET FUNCT
If GAS PRICE is shown on the bottom line of the LCD during startup, do nothing.
The controller automatically defaults to previous Gas Price settings.
If a function other than GAS PRICE is shown on the bottom line of the LCD during
startup, press the SET FUNCTION key while the second LCD prompt is displayed.
SELECT FUNCTION
GAS PRICE {}
Press the Up and Down Arrow keys until the gas price option is shown.
Press the ENTER key to accept.
Menu
1. Press the MENU key.
2. Press the Up and Down Arrow keys to select between
Diagnostics Menu or Display Menu.
Diagnostics Menu
Press the MENU key followed by ENTER to select the Diagnostics Menu.
Display Status
1. Press the MENU key followed by ENTER to select the Diagnostics Menu.
2. Press ENTER to open the Display Status menu item.
LCD Screen Action/Information Shown
DISPLAY STATUS
ENT TO SELECT
DISPLAY STATUS
GET STATUS
SELECT DISPLAY
SIGN 1 LINE 1 }
Press ENTER to get display status.
Press the Down Arrow key to move to another sign and line number.
Press ENTER to view Display Status menu items:
• Driver Firmware Version
• Dim Level
• Dimming Mode (Automatic or Manual)
• Light Sensor Status
• Com1 Device Detection
Menu Items
Diagnostics Menu Display Menu
Display Status Price Options
Detect Displays Conguration
Test Patterns POS Settings
COM Diagnostics POS Price Offset
About Modem
DIAGNOSTICS MENU
ENT TO BEGIN

Conguring the DM-100 Gen III for Gilbarco
G-Site/Passport Interface Quick Guide
DD2294804
Rev 04
05 October 2021
201 Daktronics Drive
Brookings, SD 57006-5128
www.daktronics.com/support
800.325.8766
Page 2 of 10
Detect Displays
1. Press the MENU key followed by ENTER to select the Diagnostics Menu.
2. Press the Down Arrow key to reach Display Detection.
LCD Screen Action/Information Shown
DETECT DISPLAYS
ENT TO BEGIN
DETECTING
DISPLAYS...
DETECTED SIGN X
LX
Press ENTER to begin the display detection process.
The screen will cycle through all the displays it has detected.
Test Patterns
1. Press the MENU key followed by ENTER to select the Diagnostics Menu.
2. Press the Down Arrow key to reach Test Patterns.
LCD Screen Action/Information Shown
TEST PATTERNS
ENT TO START
ENTER CYCLE BITS
CLEAR TO EXIT
ENTER DIAGNOSTIC
CLEAR TO EXIT
ENTER CYCLE NUMS
CLEAR TO EXIT
Press ENTER to enter the test patterns menu.
Press ENTER to start the CYCLE BITS test pattern. Each digit will turn on its
segments one at a time.
Press the Down Arrow key to move to the next test pattern.
Press ENTER to start the DIAGNOSTIC test pattern. Each price display will
cycle through the following information:
• L.XX – where “XX”is the line number
• A.XX – where “XX” is the hardware address
• d.X – where “X” is the dimming mode (A for automatic, F for “xed” or
manual dimming)
• t.XX – where “XX” is the internal sign temperature in °C.
Press the Down Arrow key to move to the next test pattern.
Press ENTER to start the CYCLE NUMS test pattern. Each digit will display
numbers 0-9 in sequence.
Press CLEAR at any time to exit the test pattern menu.

Conguring the DM-100 Gen III for Gilbarco
G-Site/Passport Interface Quick Guide
DD2294804
Rev 04
05 October 2021
201 Daktronics Drive
Brookings, SD 57006-5128
www.daktronics.com/support
800.325.8766
Page 3 of 10
COM Diagnostics
1. Press the MENU key followed by ENTER to select the Diagnostics Menu.
2. Press the Down Arrow key to reach COM Diagnostics.
LCD Screen Action/Information Shown
COM DIAGNOSTICS
ENT TO SELECT
DIAGNOSTICS
POS PORT MONITOR
DIAGNOSTICS
COM PORT TESTS
DIAGNOSTICS
POS STATUS
Press ENTER to access COM port diagnostics.
There are three menu choices described below:
• PoS Port Monitor
• COM Port Tests
• PoS Status
Press the Up and Down Arrow keys to select the appropriate menu choice.
DIAGNOSTICS
POS PORT MONITOR
USE POS DEFALTS?
1-YES 2-NO
INCOMING DATA...
Press ENTER to begin the PoS Port Monitor.
Press 1 to use the PoS default settings, or press 2 to enter the settings.
Note: If 2 is pressed, see below for settings to select.
The LCD will display INCOMING DATA...(data received from the PoS)
Press ENTER to exit.
SELECT BAUD RATE
1200 {
SELECT STOP BITS
1 {
Press the Up and Down Arrow keys to select the appropriate baud rate, and
then press ENTER.
Press the Up and Down Arrow keys to select the appropriate stop bits, and
then press ENTER.
DIAGNOSTICS
COM PORT TESTS
SELECT TEST }
RS232 COM0
SELECT TEST {}
RS232 COM0]COM1
SELECT TEST {}
RS232 COM1
SELECT TEST {
CURRENT LOOP
Press ENTER to test the operation of the DM-100 COM ports and/or cables.
These tests are useful for determining if the ports themselves are operational
and if cables are good.
Press the Up and Down Arrow keys to select the appropriate test, and then
press ENTER.
• RS232 COM0 – Checks for a “loopback” jumper on pins 2 & 3 of the top-
left connector (FAIL if a loopback is not detected).
• RS232 COM0->COM1 – Checks for transmit and receive connections
between the top-left and top-right connectors (FAIL if the ports are not
connected together).
• RS232 COM1 – Checks for a “loopback” jumper on pins 2 & 3 of the top-
right connector (FAIL if a loopback is not detected).
• CURRENT LOOP – Checks for “loopback” jumpers on the left connector
between pins 6 & 8 and 5 & 9 (FAIL if jumpers not detected).
Press ENTER to exit.

Conguring the DM-100 Gen III for Gilbarco
G-Site/Passport Interface Quick Guide
DD2294804
Rev 04
05 October 2021
201 Daktronics Drive
Brookings, SD 57006-5128
www.daktronics.com/support
800.325.8766
Page 4 of 10
LCD Screen Action/Information Shown
DIAGNOSTICS
POS STATUS This menu is only used for internal Daktronics testing purposes.
About
1. Press the MENU key followed by ENTER to select the Diagnostics Menu.
2. Press the Down Arrow key to reach About.
LCD Screen Action/Information Shown
ABOUT
ENT TO VIEW
ABOUT ] FIRMWARE
DD-2256160 4.8
ABOUT ] FUNCTION
GAS PRICE
Press ENTER to view the About menu.
The DM-100 toggles between Firmware and Function information.
Press ENTER at any time to exit the About menu.
ABOUT
ENT TO VIEW

Conguring the DM-100 Gen III for Gilbarco
G-Site/Passport Interface Quick Guide
DD2294804
Rev 04
05 October 2021
201 Daktronics Drive
Brookings, SD 57006-5128
www.daktronics.com/support
800.325.8766
Page 5 of 10
Display Menu
1. Press the MENU key.
2. Press the Down Arrow key to reach Display Menu.
3. Press ENTER to select the Display Menu.
Price Options
1. Press the MENU key.
2. Press the Down Arrow key to reach Display Menu, and then press ENTER.
3. Press ENTER to open the Price Options menu item.
LCD Screen Action/Information Shown
PRICE OPTIONS
ENT TO SELECT
ACTIVE PRICES
123 {}
ACTIVE PRICES
23 {}
ACTIVE PRICES
1 3 {}
ACTIVE PRICES
3 {}
ACTIVE PRICES
12 {}
ACTIVE PRICES
2 {}
ACTIVE PRICES
1 {}
SET HOLD TIME
3.0*
Press ENTER to select the price options menu item.
The ACTIVE PRICES menu is used to select how many “price types” each
display will show, and a hold time for each price type.
This works with the PoS Price Offset (p.7) menu. VAL1, VAL2, and VAL3 are
the adjustments to be applied when showing price 1, 2, and 3, respectively.
Note: This is for use with CASH/CREDIT displays to show up to 3 different price
types. If there is no CASH/CREDIT display, the ACTIVE PRICES menu
selection should be set to “1” to only show one price.
Press the Up and Down Arrow keys to cycle between the active price
choices:
• 123
• _23
• 1_3
• _ _3
• 12_
• _2_
• 1_ _
Press ENTER to select the desired number of active prices.
Use the number keypad to enter a hold time in seconds for each active
price to be displayed.
Press ENTER to save the active prices and hold time.
DISPLAY MENU
ENT TO BEGIN

Conguring the DM-100 Gen III for Gilbarco
G-Site/Passport Interface Quick Guide
DD2294804
Rev 04
05 October 2021
201 Daktronics Drive
Brookings, SD 57006-5128
www.daktronics.com/support
800.325.8766
Page 6 of 10
Conguration
1. Press the MENU key.
2. Press the Down Arrow key to reach Conguration.
3. Press ENTER to open Conguration.
LCD Screen Action/Information Shown
CONFIGURATION
LINE MAPPING }
SELECT DISPLAY
ADDRESS XX {}
ENT TO COMMIT
ADD XX LIN 0X {}
Press ENTER to begin editing line information.
Note: The line in Edit mode ashes and shows its line information
(L01, L02, etc.)
Press the Up and Down Arrow keys to move to another sign and line number.
Press ENTER.
Press the Up and Down Arrow keys to change the Line Number.
Press ENTER to accept the Address and Line assignments.
CONFIGURATION
STYLE {
SELECT STYLE
NO TAILS 9/10 {}
SELECT STYLE
TAILS 9/10 {}
SELECT STYLE
NO TAILS 9 {}
SELECT STYLE
TAILS 9 {}
Press ENTER to change the appearance of numbers six and nine (6 and 9).
Figure 1 shows examples.
Note: For Domestic displays with a 9/10 digit, the number “3” must show in
the rst column for the desired format. For International displays, make
sure the number “4” appears in the rst column for the desired format.
Press the Up and Down Arrow keys to toggle through the choices:
• Remove tails on sixes and nines, and show 9/10 on the display.
• Show tails on sixes and nines, and show 9/10 on the display.
• Remove tails from sixes and nines and show only a 9 on the display.
• Show tails on sixes and nines, and show only a 9 on the display.
Press the ENTER key to view the change.
Press the SET FUNCTION key to save selection.
No Tails and 9/10 Tails and 9/10 No Tails and 9 Tails and 9
Figure 1: Digit Conguration Styles

Conguring the DM-100 Gen III for Gilbarco
G-Site/Passport Interface Quick Guide
DD2294804
Rev 04
05 October 2021
201 Daktronics Drive
Brookings, SD 57006-5128
www.daktronics.com/support
800.325.8766
Page 7 of 10
PoS Settings
1. Press the MENU key.
2. Press the Down Arrow key to reach Display Menu, and then press ENTER.
3. Press the Down Arrow key to reach PoS Settings.
LCD Screen Action/Information Shown
POS SETTINGS
ENT TO MODIFY
POS INTERFACE
GSITE/PASSPORT}
LINE 1
Price Cat: 1
Press ENTER to modify the PoS settings.
Use the Up and Down Arrow keys to select GSITE/PASSPORT.
Press ENTER.
Each price in the Gilbarco G-Site/Passport interface is identied by price
category which corresponds to the price assigned to a particular grade/
service level/price level.
Use the Up and Down Arrow keys to select a price category for line 1, and
then press ENTER.
Pressing ENTER when the price category displayed is NONE causes the price
sign to ignore PoS data for the line. This may be useful for conguring some
lines of a display to receive manual price changes only.
Complete the steps above for each display line.
PoS Price Offset
1. Press the MENU key.
2. Press the Down Arrow key to reach Display Menu, and then press ENTER.
3. Press the Down Arrow key to reach PoS Price Offset.
LCD Screen Action/Information Shown
POS PRICE OFFSET
ENT TO MODIFY
LN1 PRICE OFFSET
VAL1 +.00 {}
Press ENTER to modify the PoS price offset.
Use the Up and Down Arrow keys to select the amount to offset the price
(in cents).
Press ENTER to move to the next value to offset.
Complete the steps above for each value of every line. Up to three offset
values (VAL1, VAL2, VAL3) may be congured. The adjustments are applied
when showing price 1, 2, and/or 3 as described in Price Options (p.5).
Note: This is for use with CASH/CREDIT displays. If there is no CASH/CREDIT
display, “VAL1” should be set to “+.00”.
PRICE OFFSETS
NOT ALLOWED
If this message appears, a PoS interface has not been properly congured.
Refer to PoS Settings (p.7) to ensure the correct PoS interface is selected.

Conguring the DM-100 Gen III for Gilbarco
G-Site/Passport Interface Quick Guide
DD2294804
Rev 04
05 October 2021
201 Daktronics Drive
Brookings, SD 57006-5128
www.daktronics.com/support
800.325.8766
Page 8 of 10
Modem
1. Press the MENU key.
2. Press the Down Arrow key to reach Display Menu, and then press ENTER.
3. Press the Down Arrow key to reach Modem.
LCD Screen Action/Information Shown
MODEM
ENT TO SELECT
Modem Select:
Enabled
Modem Select:
Disabled
Save? ENTER:YES
CLEAR: NO
Press ENTER to adjust cellular modem support.
Use the Up and Down Arrow keys to select whether to enable or disable the
modem.
Press ENTER.
Press ENTER again to save the selection or press CLEAR to cancel.
Dimming
1. Press DIMMING on the keypad. The current setting is shown on the bottom line of the LCD.
The dimming level of the display is adjusted in one of two ways:
• Automatic Dimming uses a light sensor inside each display to detect the level of ambient light at
the display location and dim the LED brightness accordingly.
• Manual Dimming retains the same LED brightness level regardless of the level of light detected
at the display.
2. Refer to the following tables to set the dimming level:
LCD Screen Action/Information Shown
DIMMING
AUTOMATIC }
Press the Down Arrow key to toggle through dimming settings:
• Automatic – The display automatically dims based on the light detected
at the display.
• Manual – The display dimming level is set manually. Once set, this value
remains the same regardless of the light level detected at the display.
• Blank Sign – Briey clears all content from display.
When AUTOMATIC dimming is selected, the following prompt appears:
LCD Screen Action/Information Shown
SET AUTO DIMMING
MAX INTENSITY?
Press the ENTER/EDIT key to edit the maximum intensity that the display uses
in full-bright modes (during daylight hours).
Press CLEAR to keep the current auto dimming maximum setting.

Conguring the DM-100 Gen III for Gilbarco
G-Site/Passport Interface Quick Guide
DD2294804
Rev 04
05 October 2021
201 Daktronics Drive
Brookings, SD 57006-5128
www.daktronics.com/support
800.325.8766
Page 9 of 10
The following prompt is shown for both MANUAL and AUTOMATIC dimming selections:
LCD Screen Action/Information Shown
INTENSITY XX {}
ENTER TO SET
XX – Current intensity (2-64)
Max Intensity – 64
Press the Up and Down Arrow keys to modify the display’s current intensity.
Note: The DM-100 must be communicating with the display.
Press ENTER to accept this intensity.
When manual dimming mode is selected, this is the display’s new intensity.
When automatic dimming mode is selected, the display illuminates in full-
bright mode, which is the maximum intensity level.
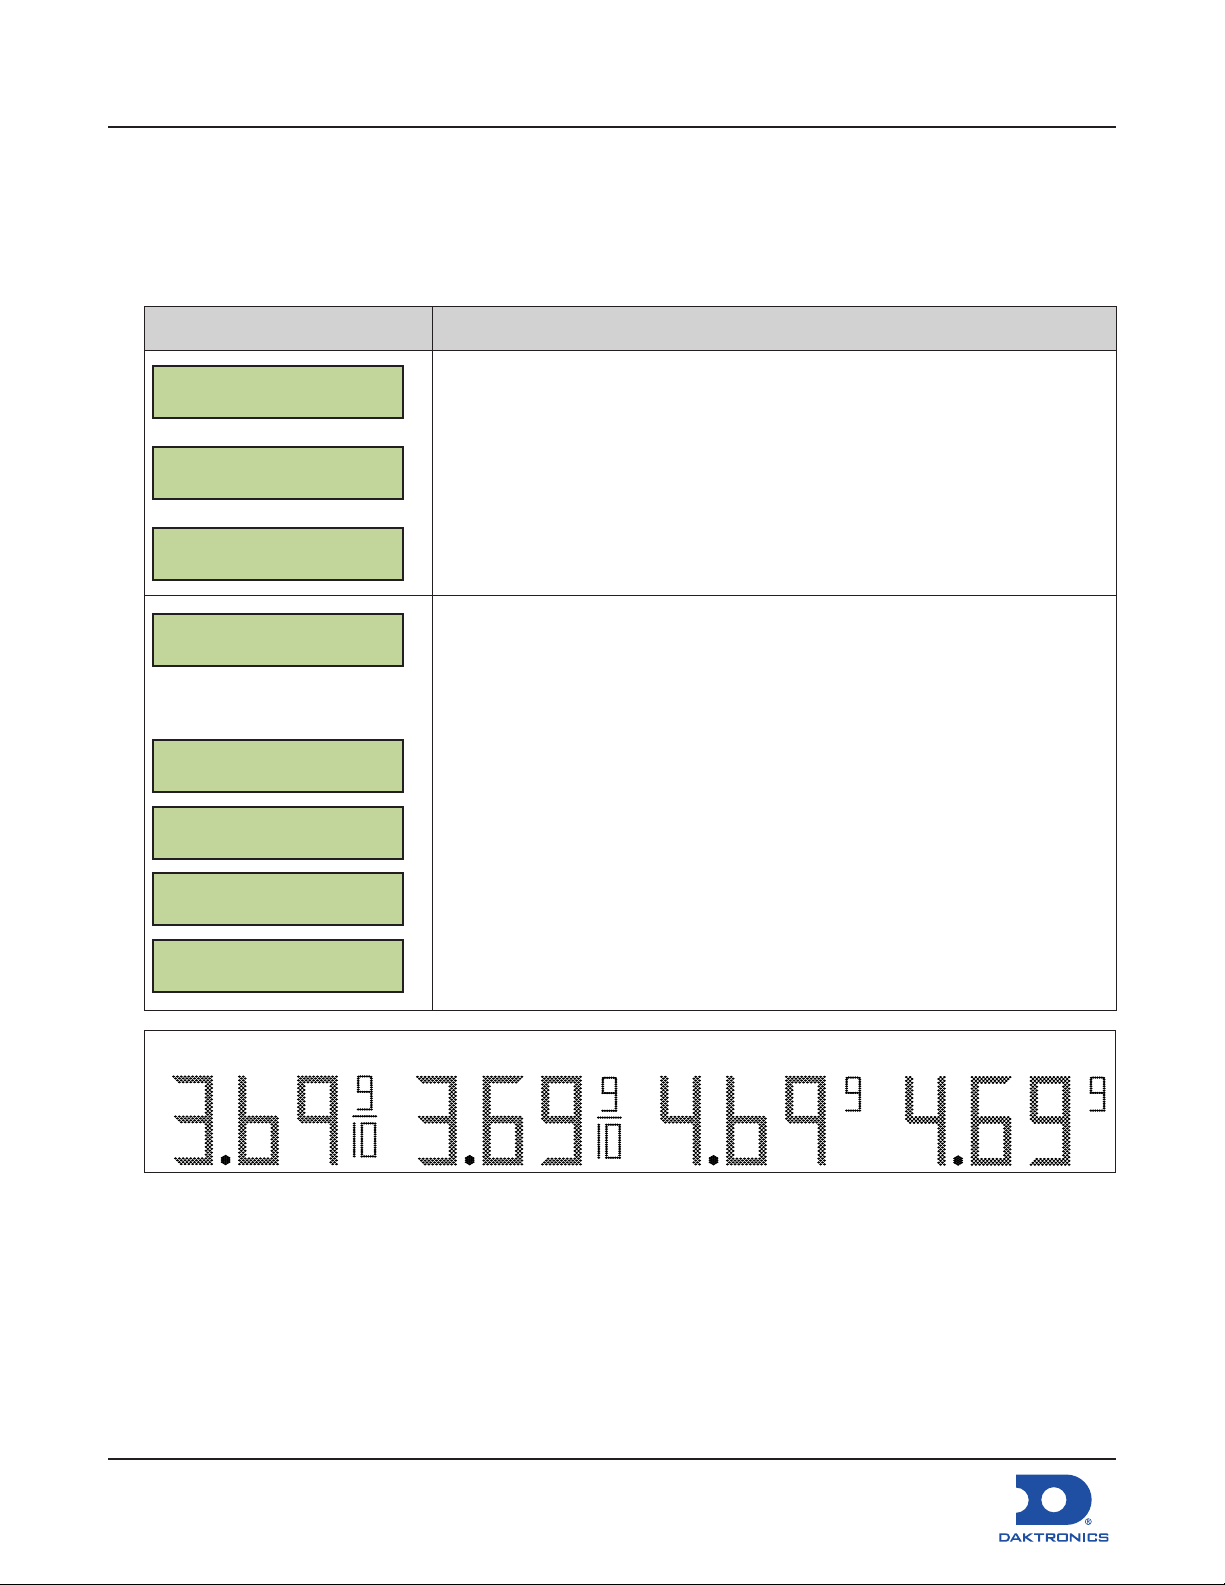
Set Petroleum Prices
Each line automatically updates when the price is changed in the PoS system. The following error
appears when attempting to edit prices that are congured for PoS control:
LCD Screen Action/Information Shown
THIS PRICE POS
CTRLD. OVERRIDE?
To manually edit the price, press ENTER.
To cancel, press CLEAR.
Update the Display
1. After connecting to the display with the handheld controller, press UPDATE DISPLAY to show the new
sequence on the display.
2. This button also allows for a preview of the new sequence on the LCD.
Multi-Pylon Troubleshooting Steps
Complete the following steps – that may correct communication errors – before calling service/support:
1. Locate the breaker panel for each pylon.
2. Power down each pylon (in no particular order).
3. Power down control equipment.
4. Verify all equipment is powered off.
5. Power up all pylons while DM-100 remains off.
Note: To ensure proper addressing, the pylon with communications tied to it (Host) should be
powered up last. The additional pylons (Clients) are to be powered up rst and in any order.
6. Allow about 30 seconds for the pylons to boot up.
7. Power up the DM-100 handheld controller.
Note: Do not press any buttons on the DM-100 while displays and controller are booting up.
8. Allow time for DM-100 to boot up and initialize all pylons.
a. About 1 minute for each wirelessly connected pylon
b. About 1 minute total for a direct-wired pylon system

Conguring the DM-100 Gen III for Gilbarco
G-Site/Passport Interface Quick Guide
DD2294804
Rev 04
05 October 2021
201 Daktronics Drive
Brookings, SD 57006-5128
www.daktronics.com/support
800.325.8766
Page 10 of 10
9. On the DM-100, press Menu > Detect Displays to verify all networks and displays are detected.
10. Verify all displays and lines are detected.
11. Manually send the current prices to the display(s) from the DM-100.
12. Verify that the DM-100 states “Sequence Sent” then “Display Response”.
Use the following as a guide for some Point of Sales Systems:
1. Verify the ICON on the PoS register does not say, “Price sign is off-line”, if it does, connect the PoS to
the DM-100.
2. Manually send the current prices to the display(s) from the DM-100. (Override the PoS)
3. Press the Update Display button on the DM-100.
4. Verify DM-100 states “Sending Sequence” then “Display Response”.
5. Re-send current prices from PoS system.
6. Verify price change with PoS.
7. The price on the display should change within one minute.
Notes:
Some states only allow one price change per day. The procedure above allows system verication without
actually changing the display’s price. If allowed, test the entire system by sending a penny increase to one of
the displays and verify change. Return to correct price.
To retain price updates, you must wait 3 minutes before powering down the displays. Any changes
made to the displays require a 3-minute power on time to commit to memory.
For More Information
Contact Daktronics Customer Service:
United States & Canada:
1-800-DAK-TRON (325-8766)
Outside the U.S. & Canada:
+1-605-275-1040
For additional information and assistance, contact Gilbarco at 336-547-5000.
Other manuals for DM-100 Gen III
1
Table of contents
Other Daktronics Recording Equipment manuals

Daktronics
Daktronics LiveBook GFX User manual

Daktronics
Daktronics VIP-4060 User manual

Daktronics
Daktronics Sportsound SSR-200 User manual

Daktronics
Daktronics Sportsound Rack SSR-100 User manual

Daktronics
Daktronics Sportsound SSR-300 User manual

Daktronics
Daktronics 5000 Series User manual

Daktronics
Daktronics SPORTSOUND SSR-100 GEN II User manual

Daktronics
Daktronics Sportsound Gen II User manual

Daktronics
Daktronics SPORTS WIRE 4000 INTERFACE User manual

Daktronics
Daktronics Sportsound SSR-AM User manual