dellonda DG177 User manual

Model No. DG177
Thank you for purchasing a Dellonda product. Manufactured to a high standard, this product will,
if used according to these instructions, and properly maintained, give you years of trouble free performance.
DG177 Issue:1 07/12/2021
www.dellonda.co.uk
Dellonda Folding Parasol/Gazebo/Patio
Outdoor Infrared Heater Three Panels
Electrical Safety
• WARNING! It is the responsibility of the owner and the operator to read, understand and comply with the following:
• You must check all electrical products, before use, to ensure that they are safe. You must inspect power cables, plugs, sockets
and any other connectors for wear or damage. You must ensure that the risk of electric shock is minimised by the installation of
appropriate safety devices. A Residual Current Circuit Breaker (RCCB) should be incorporated in the main distribution board. You must also read
and understand the following instructions concerning electrical safety.
• Ensure that cables are always protected against short circuit and overload.
• Regularly inspect power supply cables and plugs for wear or damage and check all connections
to ensure that none are loose.
• IMPORTANT: Ensure that the voltage marked on the appliance matches the power supply to be
used and that the plug is tted with the correct fuse - see fuse rating at right.
• DO NOT use worn or damaged cables, plugs or connectors. Have any faulty item repaired or
replaced immediately by a competent electrician.
• This product is tted with a BS1363/A 13 Amp 3 pin plug. If the cable or plug is damaged during use,
switch off the electricity supply and remove from use.
• Replace a damaged plug with a BS1363/A 13 amp 3 pin plug.
• If in doubt contact a qualied electrician.
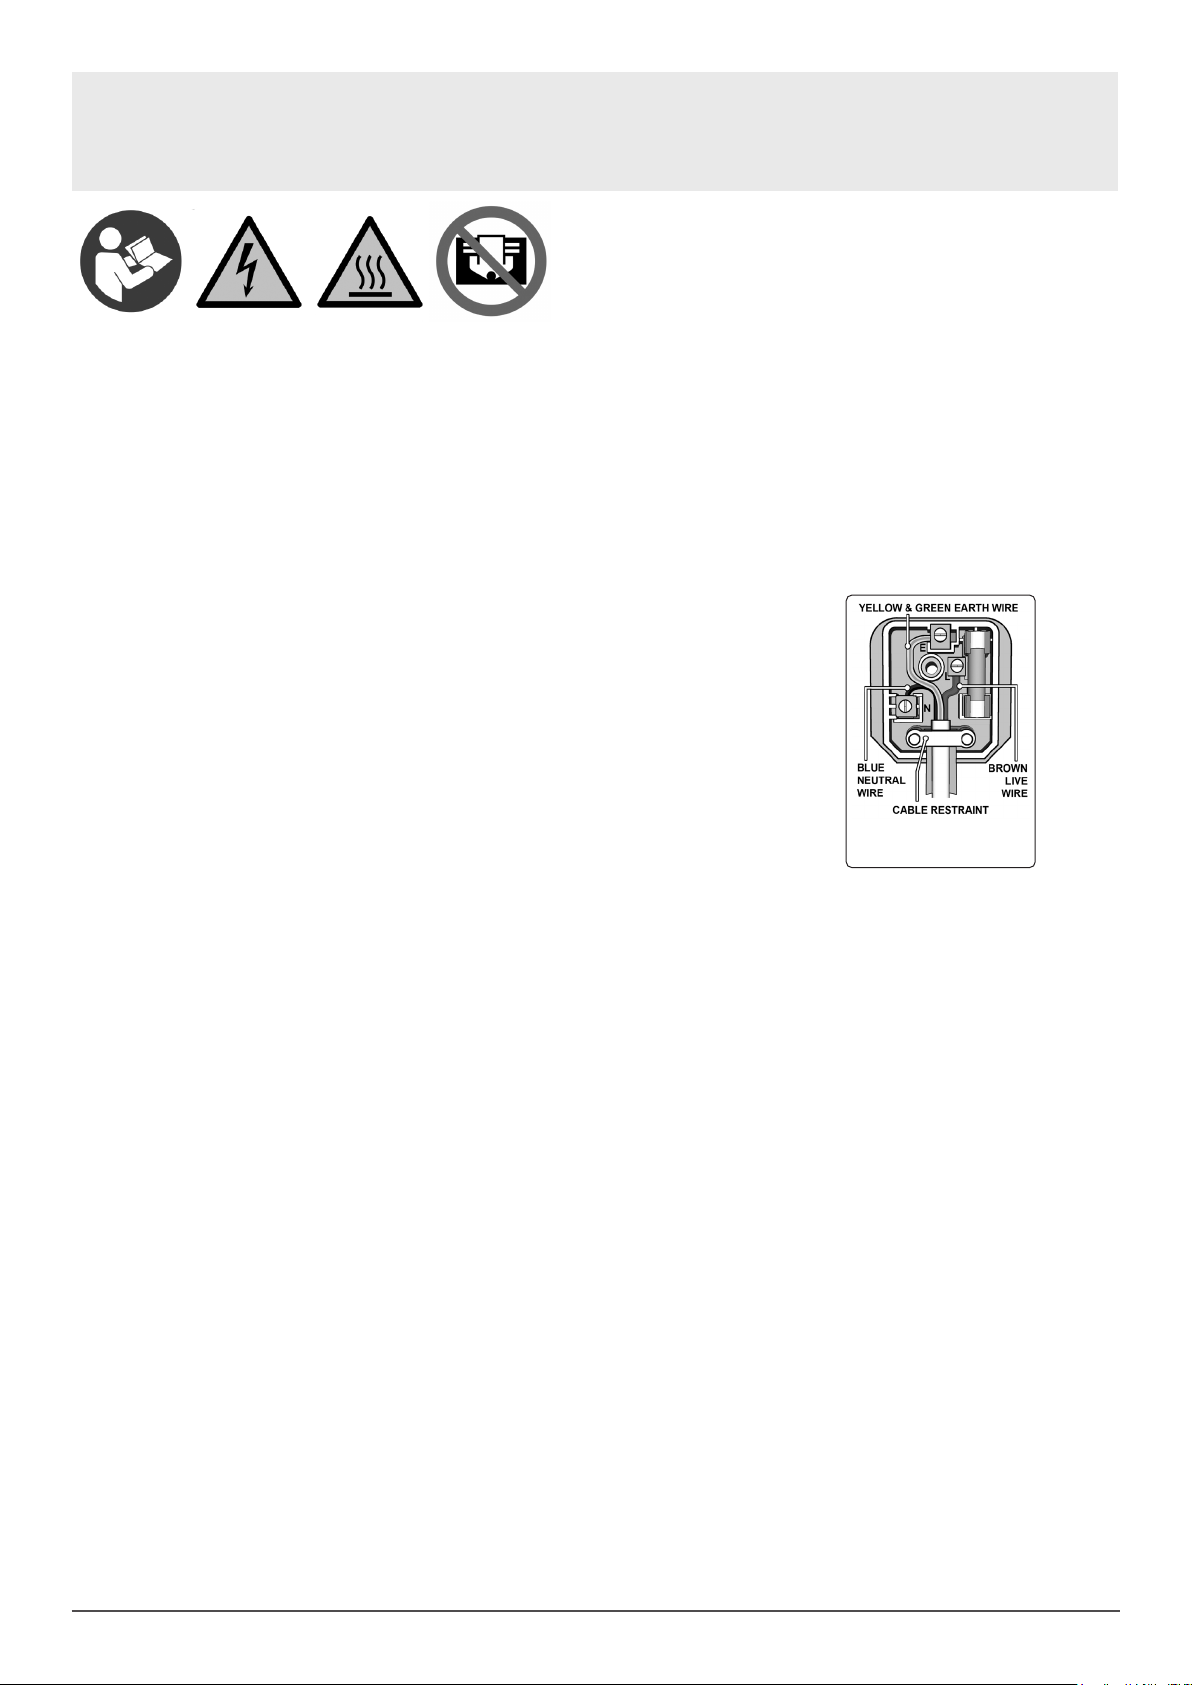
• Ensure that the cable outer sheath extends inside the cable restraint and that the restraint is tight.
• Dellonda recommend that repairs are carried out by a qualied electrician.
• Fit a new plug according to the following instructions (UK only).
• a) Connect the GREEN/YELLOW earth wire to the earth terminal ‘E’.
• b) Connect the BROWN live wire to the live terminal ‘L’.
• c) Connect the BLUE neutral wire to the neutral terminal ‘N’.
General Safety
• WARNING! This product is for outdoor use only.
• WARNING! Ensure the heater is disconnected from the mains supply before performing any cleaning or maintenance.
• WARNING! Ensure the heater is at least 1m from any object, 500mm from the ceiling and 1800mm from oor level.
• WARNING! This heater is not equipped with a device to control the room temperature. Do not use this heater in small spaces when
they are occupied by persons not capable of leaving the area on their own, unless constant supervision is provided.
• WARNING! If a fuse blows, ensure it is replaced with an identical fuse type and rating.
• WARNING! Never touch the element directly with ngers. Use a soft cloth, otherwise the tube may get damaged.
• WARNING! In order to avoid overheating, do not cover the heater.
• Familiarise yourself with the applications and limitations of the heater.
• Ensure the heater is in good condition before use. If in any doubt do not use the unit and contact your supplier.
• Only use recommended attachments and parts. Using unauthorised parts may be dangerous and will invalidate your warranty.
• Check that element guards are in place, undamaged and rmly attached.
• Keep curtains, furnishings or any combustible material well away from the heater or it’s installation location.
• Keep children and unauthorised persons away from the heater, as it gets very hot.
• Disconnect from mains and allow to cool before moving or attempting any cleaning or maintenance.
• DO NOT USE WITH AN EXTENSION CABLE.
• DO NOT use this heater with timers or other devices which switch the heater on automatically.
• DO NOT immerse the heater in water.
• DO NOT locate the heater below the power outlet.
• DO NOT move the heater whilst in operation or even when still warm.
• DO NOT use the heater to perform a task for which it has not been designed.
• DO NOT use this heater with a programmer, timer, separate remote-control system or any other device that switches the heater on
automatically, since a re risk exists if the heater is covered or positioned incorrectly.
• DO NOT use this heater in the immediate surroundings of a bath, a shower or a swimming pool.
• NOTE: Two dark points may exist on the surface of the heating element, or the surface of the heating element may turn white during the rst
few minutes of operation. This is normal and will not affect the performance of the heater.
• CAUTION: Some parts of this product can become very hot and cause burns. Particular attention has to be given where children and
vulnerable people are present.
• NOTE: Children of less than 3 years should be kept away unless supervised continuously.
Children aged from 3 years and less than 8 years shall only switch on/off the appliance provided that it has been placed or installed
in its intended normal operating position and they have been given supervision or instruction concerning use of the appliance in a safe way and
understand the hazards involved. Children aged from 3 years and less than 8 years shall not plug in, regulate and clean the appliance or perform
user maintenance.
Important Information
Please read these instructions carefully. Note the safe operational requirements, warnings & cautions. Use the product correctly and with care
for the purpose for which it is intended. Failure to do so may cause damage and/or personal injury and will invalidate the warranty. Keep these
instructions safe for future use.
1
www.dellonda.co.uk
Refer to
instruction
manual
Electrical shock
hazard
Hot surfaces DO NOT cover
Recommended fuse rating
13 Amp
• NOTE: This appliance can be used by children aged from 8 years and above and persons with reduced physical, sensory or mental
capabilities or lack of experience and knowledge if they have been given supervision or instruction concerning use of the appliance
in a safe way and understand the hazards involved. Children shall not play with the appliance. Cleaning and user maintenance
shall not be made by children without supervision.
About the Product
Outdoor infrared heater is the perfect companion for your parasol or gazebo all year round. A totally dry heat, no condensation, no gas, no fumes
and no smell. Heats an area of up to 10m². Outdoor use only (IPX3). Features extra long 5m cable.
• SPECIFICATION
• Model no: ................................................................... DG177
• Heated Area: ................................................................. 10m²
• Product Dimensions (W x D x H): ........ 485 x 455 x 140mm
• Power: ......................................................................... 1350W
• Supply: ........................................................................... 230V
• Cable Length: .................................................................... 5m
• IP Rating: ........................................................................ IPX3
Assembly
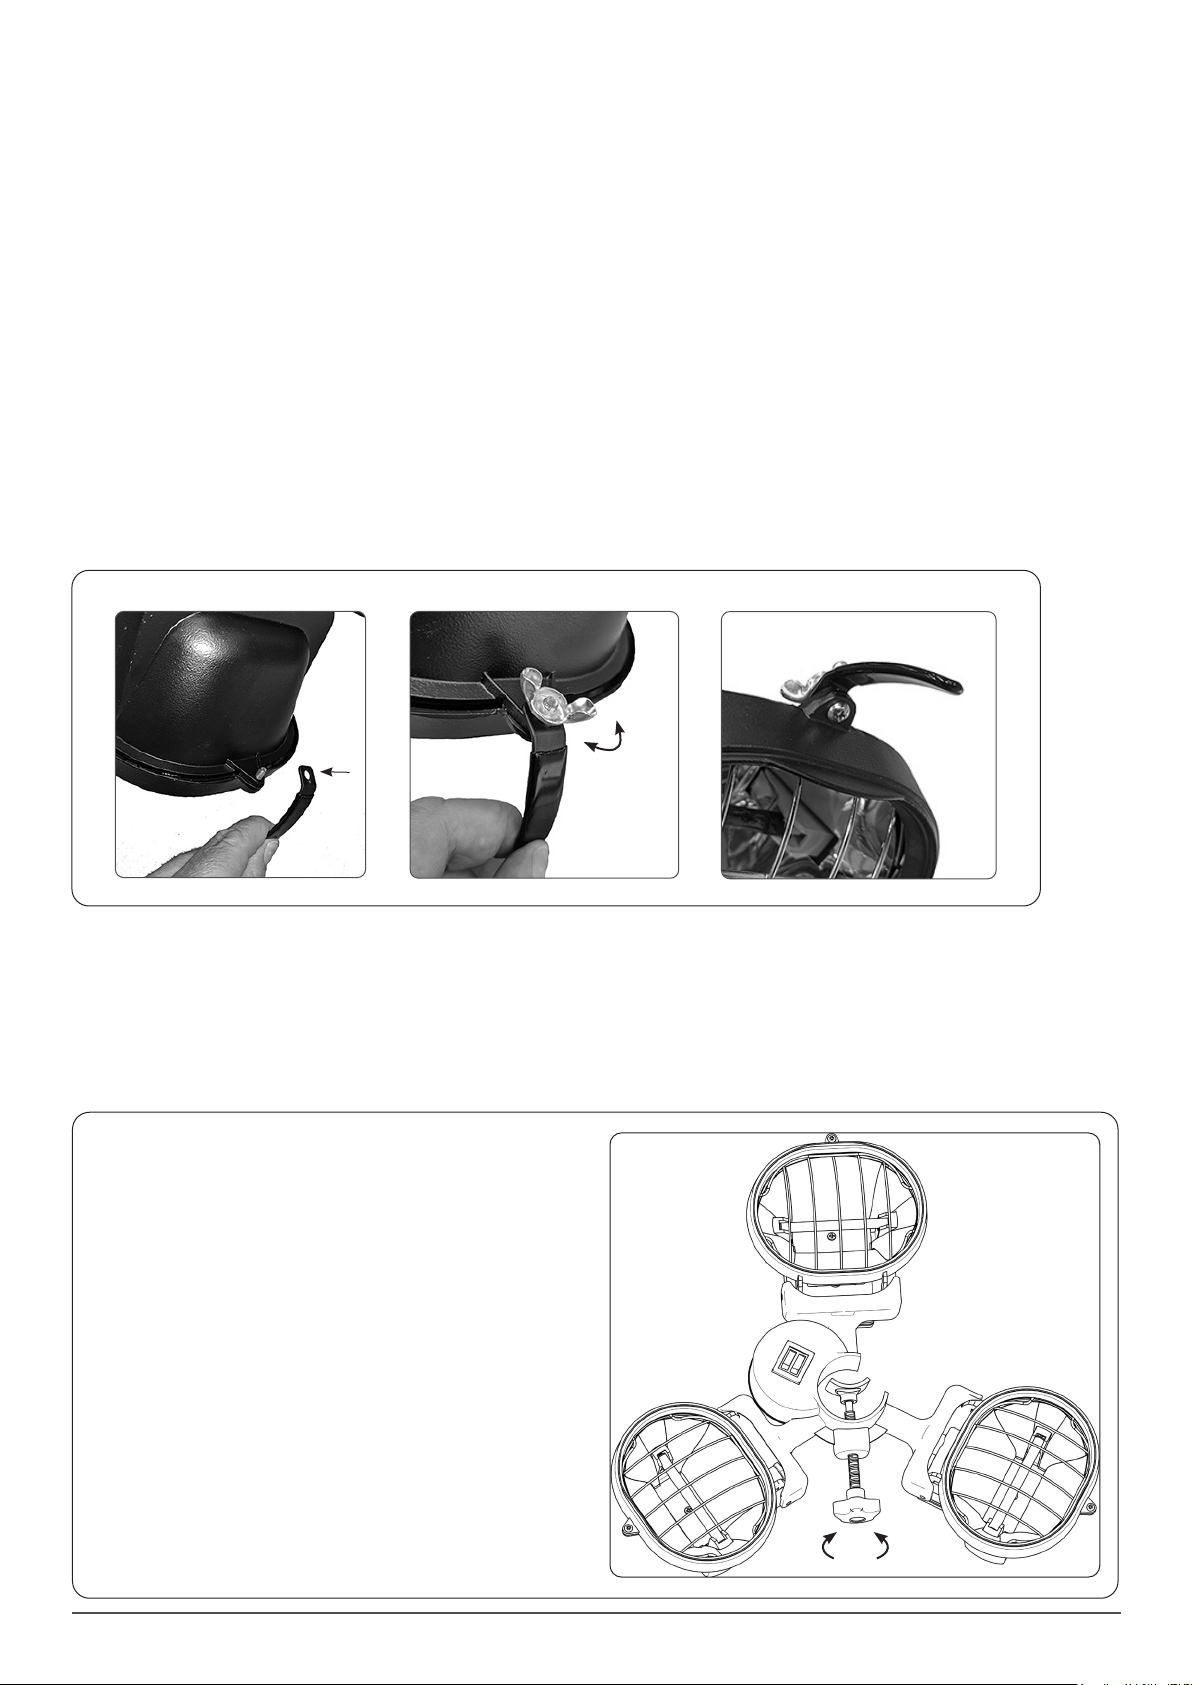
To attach the tilt handles to the heads of your heat lamp it is best to do this prior to tting to your parasol. Unpack the parasol light and lay it face
down on a sheet of cardboard. Follow the illustration to simply t the tilt handles.
2
www.dellonda.co.uk
Step 1:
Ensure that the parasol or pole to be afxed to is stable using a suitable
base or xing.
Loosen the pole clamp to allow the parasol lamp to be mounted onto the
pole then screw the pole clamp back up ensuring that the heat lamp is at
least 1.8 metres above ground level.
Hook the tilt handle onto the protruding screw in the back of the lamp head (1), Tighten down with the wing nuts provided (2).
1. 2. 3.
Installation
The heater must be installed no less than 1 metre from side walls and no less than 1.8 metres from ground level. When choosing the mounting
position it is very important to ensure the lights are NOT pointed towards any combustible materials or surfaces (refer to safety section for specic
dimensions). To adjust the lamps themselves loosen the wing nut connecting the lamp to the support bracket, set the heater to the desired position
using the tilt handle and re-tighten take care to ensure that no cables are trapped, stretched or under pressure. Never adjust your heater when it is
hot!
• WARNING! Ensure that the supply cable is well positioned and will not come into contact with the reector of the heater or that it does not trail
into the heated area.
Operation
• Connect the 3pin mains plug into a suitable RCD protected outdoor weatherproof socket.
• The parasol heater has two on/off switches and these operate as one pair and one single lamp, turn on both switches to illuminate all three
elements.
• Always make sure you turn off your lamps when they are not required.
Changing a heating element
• WARNING! Always ensure the appliance is switched off and disconnected from the mains power source before attempting maintenance.
• When handling the element bulb ensure you are wearing clean lint free gloves, if your skin does come into contact with the element ensure it is
cleaned thoroughly with something like methylated spirit and dried with a clean cloth.
3
www.dellonda.co.uk
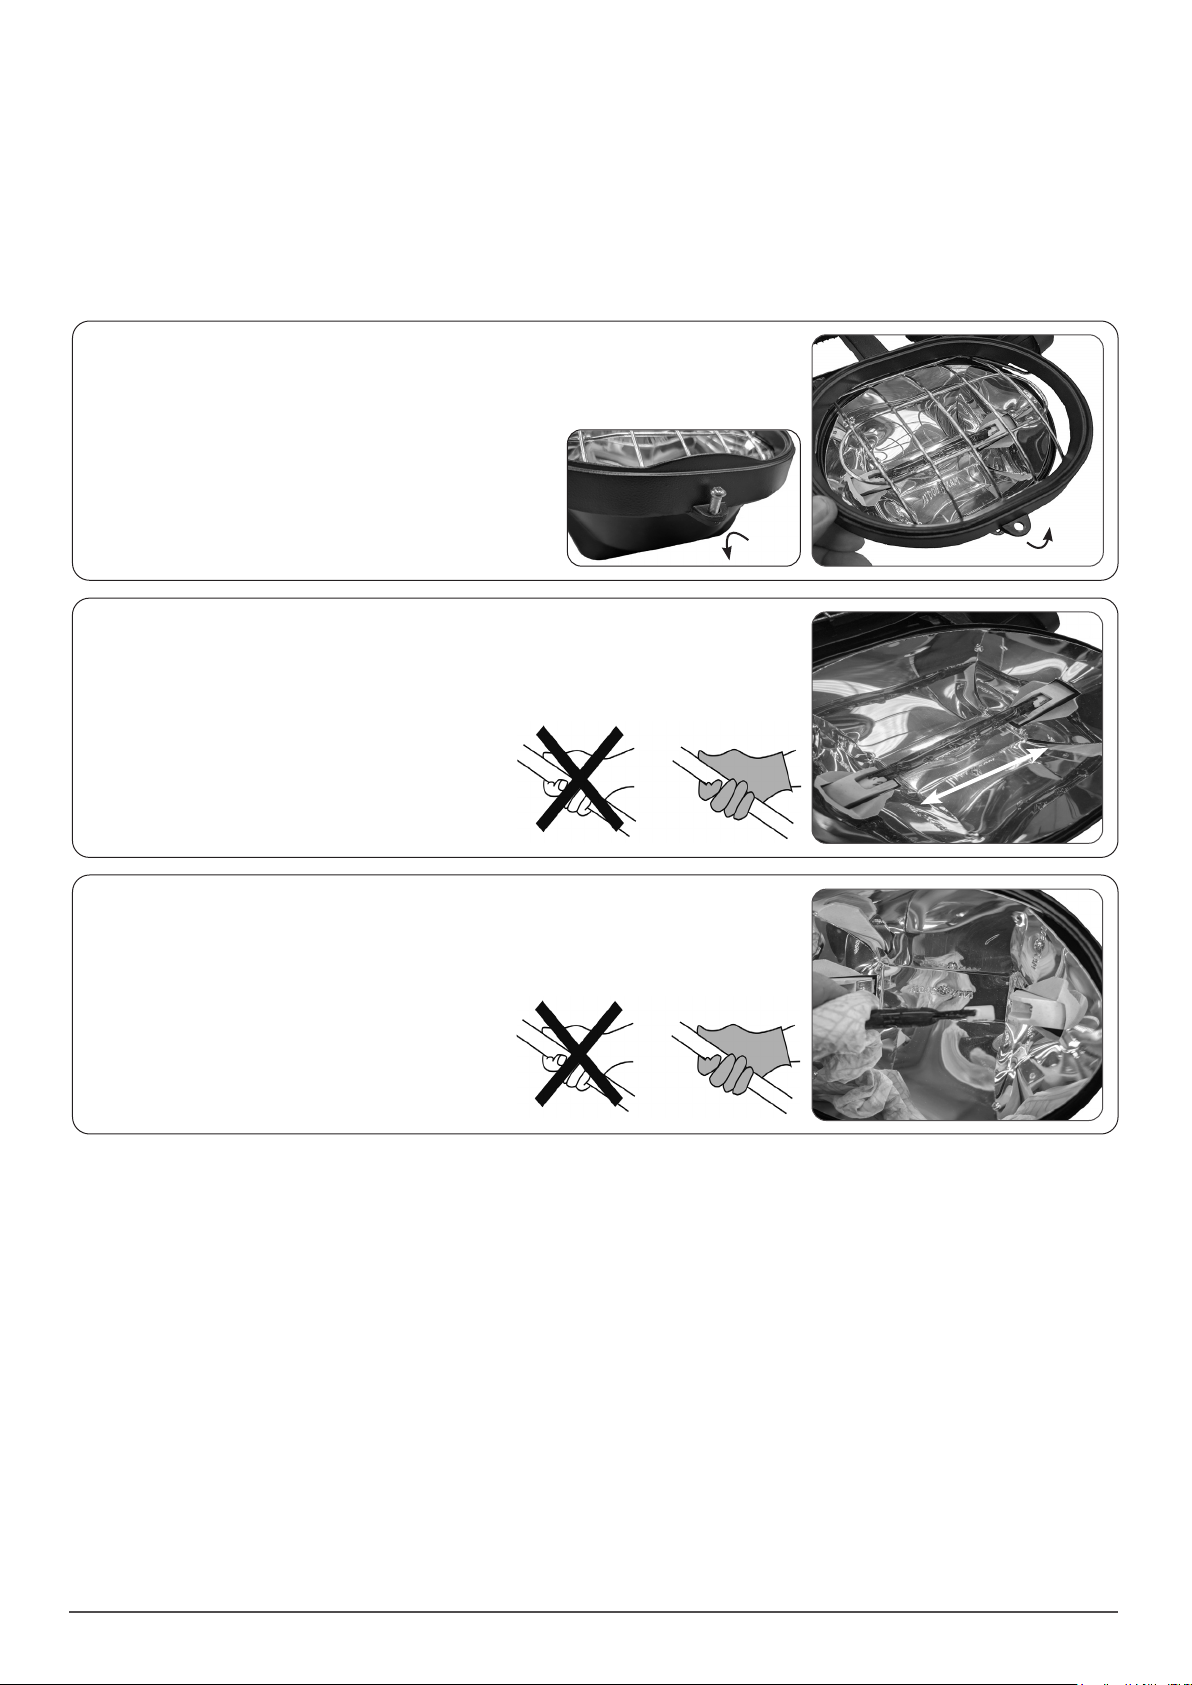
Step 1:
When the lamp is cool and unplugged unscrew the wing nut holding on the tilt handle and the using a
cross head screwdriver remove the screw from the front hinging frame hinge open the grill cover on
the heater head (keep the screw, wing nut and tilt handle in a safe
place ready for reassembly).
Step 2:
When you have clear access to the old element gently hold and push the lamp towards one of the
lamp holders (these are sprung and allow the other end of the element to come away) tilting it away
and remove from the housing.
DO NOT handle the elements without gloves or a lint free
cloth as it could compromise the component.
Step 3:
With gloves or holding the new element with a clean lint free cloth reverse the process you have just
undertaken to install a new element into your parasol lamp.
The new heating element must be installed within 4° of
horizontal along it’s length, make sure the element is well
seated in the lamp holder and you have a good contact.
Ensure the safety grill is fully installed before switching the
lamp back on.
Maintenance
• WARNING! Disconnect from the mains power supply before undertaking any cleaning or maintenance.
• DO NOT touch your lamp until it has fully cooled down.
• Regular and careful cleaning helps your infrared heater operate efciently. To clean your heater follow steps below. Unplug from the mains for
your safety before cleaning the appliance.
• Make sure the heater is cool before continuing.
• To keep the heater clean, the outer shell maybe cleaned with a soft, damp cloth. You may use a mild detergent if necessary. After cleaning, dry
the unit with a soft cloth.
• WARNING! DO NOT let liquids enter the heater.
• DO NOT use alcohol, gasoline, abrasive powders, furniture polish or rough brushes to clean the heater. This may cause damage or deterioration to
the surface of the heater.
• DO NOT immerse the heater in water.
• Wait until the heater is completely dry before use.
Troubleshooting
• If heater will not turn on. Check the cable is plugged into an electrical outlet, if not, plug in.
• Check if electricity to the building is working.
• Bulb is lit, but no heat: Bulb is damaged. Contact your supplier to source a replacement.

Dellonda Limited
Kempson Way, Suffolk Business Park, Bury St Edmunds, Suffolk. IP32 7AR
Note: It is our policy to continually improve products and as such we reserve the right to alter data, specifications and component parts without prior
notice.
Important: No Liability is accepted for incorrect use of this product.
Warranty: Guarantee is 12 months from purchase date, proof of which is required for any claim.
Environment Protection, Waste Electrical and Waste Electronic Equipment Regulations
(WEEE)
Recycle unwanted packaging materials. When this product is no longer required, or has reached the end of its useful life, please dispose
of in an environmentally friendly way. Drain any uids (if applicable) into approved containers, in accordance with local waste regulations.
It is our policy to continually improve products and we reserve the right to alter data, specications and parts without prior notice. No
liability is accepted for incorrect use of this product. Guarantee is 12 months from purchase date, proof of which is required for any claim.
Table of contents
Other dellonda Heater manuals


Popular Heater manuals by other brands


Clarke
Clarke DEVIL 371PC Operating & maintenance instructions

GSi
GSi TopDry 2000 Series installation manual

Vortice
Vortice THERMOLOGIKA SOLEIL PLUS Instruction booklet

Hornbach
Hornbach 10530794 operating manual

Temp-Heat
Temp-Heat THP-750 Installation and service manual

RADSON
RADSON COSMOLEDO E Instruction