Delta DOR 920 User manual

After Sales Support
Now you have purchased a Delta product you can rest assured in
the knowledge that as well as your 3 year parts and labour warranty
you have the added peace of mind of dedicated helplines.
DOR 920 LCD OIL FILLED RADIATOR WITH LCD
Instruction Manual
AFTER SALES SUPPORT
UK / N.IRELAND HELPLINE NO 0151 649 1500
REP. IRELAND HELPLINE NO 1890 946 244
MODEL NUMBER: 3337

Read the complete operating manual with due care and keep it in a safe place.
If you give the machine to any other person, hand over this operating manual as well!
Contents
05 Safety regulations
06 Layout
06 Assembly
06 Technical data
06 Proper use
06 Starting up
08 Storage
08 Maintenance and cleaning
08 Ordering spare parts
08 Waste disposal
HELPLINE No. UK / N.IRELAND 0151 649 1500 REP. IRELAND HELPLINE NO 189 094 6244
Model Number: 3337 02

HELPLINE No. UK / N.IRELAND 0151 649 1500 REP. IRELAND HELPLINE NO 189 094 6244
Model Number: 3337 03
1
2 3
1
3
12
8
1
7
3
4
6
5
5

HELPLINE No. UK / N.IRELAND 0151 649 1500 REP. IRELAND HELPLINE NO 189 094 6244
Model Number: 3337 04
4
15
4
3
2

HELPLINE No. UK / N.IRELAND 0151 649 1500 REP. IRELAND HELPLINE NO 189 094 6244
Model Number: 3337 05
Congratulations on choosing to buy a Delta®
product. By doing so you now have the assurance
and peace of mind that comes with purchasing a
product made by one of Europeʼs leading
manufacturers.
All products brought to you by Delta® are
manufactured to the highest standards of
performance and safety, and, as part of our
philosophy of customer service and satisfaction, are
backed by our comprehensive 3 Year Warranty
Please fill in and return the Warranty Card to the
address provided.
We hope you will enjoy using your purchase for
many years to come.
Before you work with this oil filled radiator, carefully
read the following safety regulations and the
operating instructions.
If you give the equipment to any other persons, give
them the operating instructions as well.
Keep these instructions in a safe place.
Packaging:
Your equipment is packaged to protect it from
damage in transit. Packaging is raw material and can
therefore be reused or returned to the raw material
system.
1. Safety regulations
Please read the operating instructions carefully and
observe the information provided. It is important to
consult these instructions in order to acquaint
yourself with the equipment, its proper use and
safety regulations.
Keep the instruction manual in a safe place for later
use.
앬Read the operating instructions before using the
appliance for the first time. The appliance may
only be used as described. Any other use is not
permitted.
앬Keep the instructions in a safe place and give
them to third parties if necessary.
앬Check that the appliance has been delivered in
perfect condition. If it has suffered any damage,
do not connect the appliance to the power
supply.
앬Check the appliance, particularly the mains lead,
for signs of damage every time before use. If you
find signs of damage, contact your customer
service.
앬Place the mains cable so that there is no danger
of tripping over the cable.
앬Do not guide the mains cable over hot parts of
the appliance during operation.
앬Never use the mains cable to pull the power plug
out of the socket-outlet! Never use the mains
cable to carry the appliance or try to move the
appliance by pulling the mains cable.
앬Never jam the mains cable between objects, or
pull the cable over sharp edges, or place the
cable over hot plates or open flames.
앬Not suitable for commercial purposes.
앬Use the appliance in enclosed, dry areas only.
앬Never open the appliance or touch live parts –
danger of fatal accident!
앬Never immerse the appliance in water – danger
of fatal accident!
앬Do not place the appliance near wet rooms or
wet areas (bathroom, shower room, swimming
pool, etc.). It must not be possible for the control
elements to be touched by a person in a shower,
a vessel filled with liquid or the bathtub.
앬Never use the appliance with wet hands.
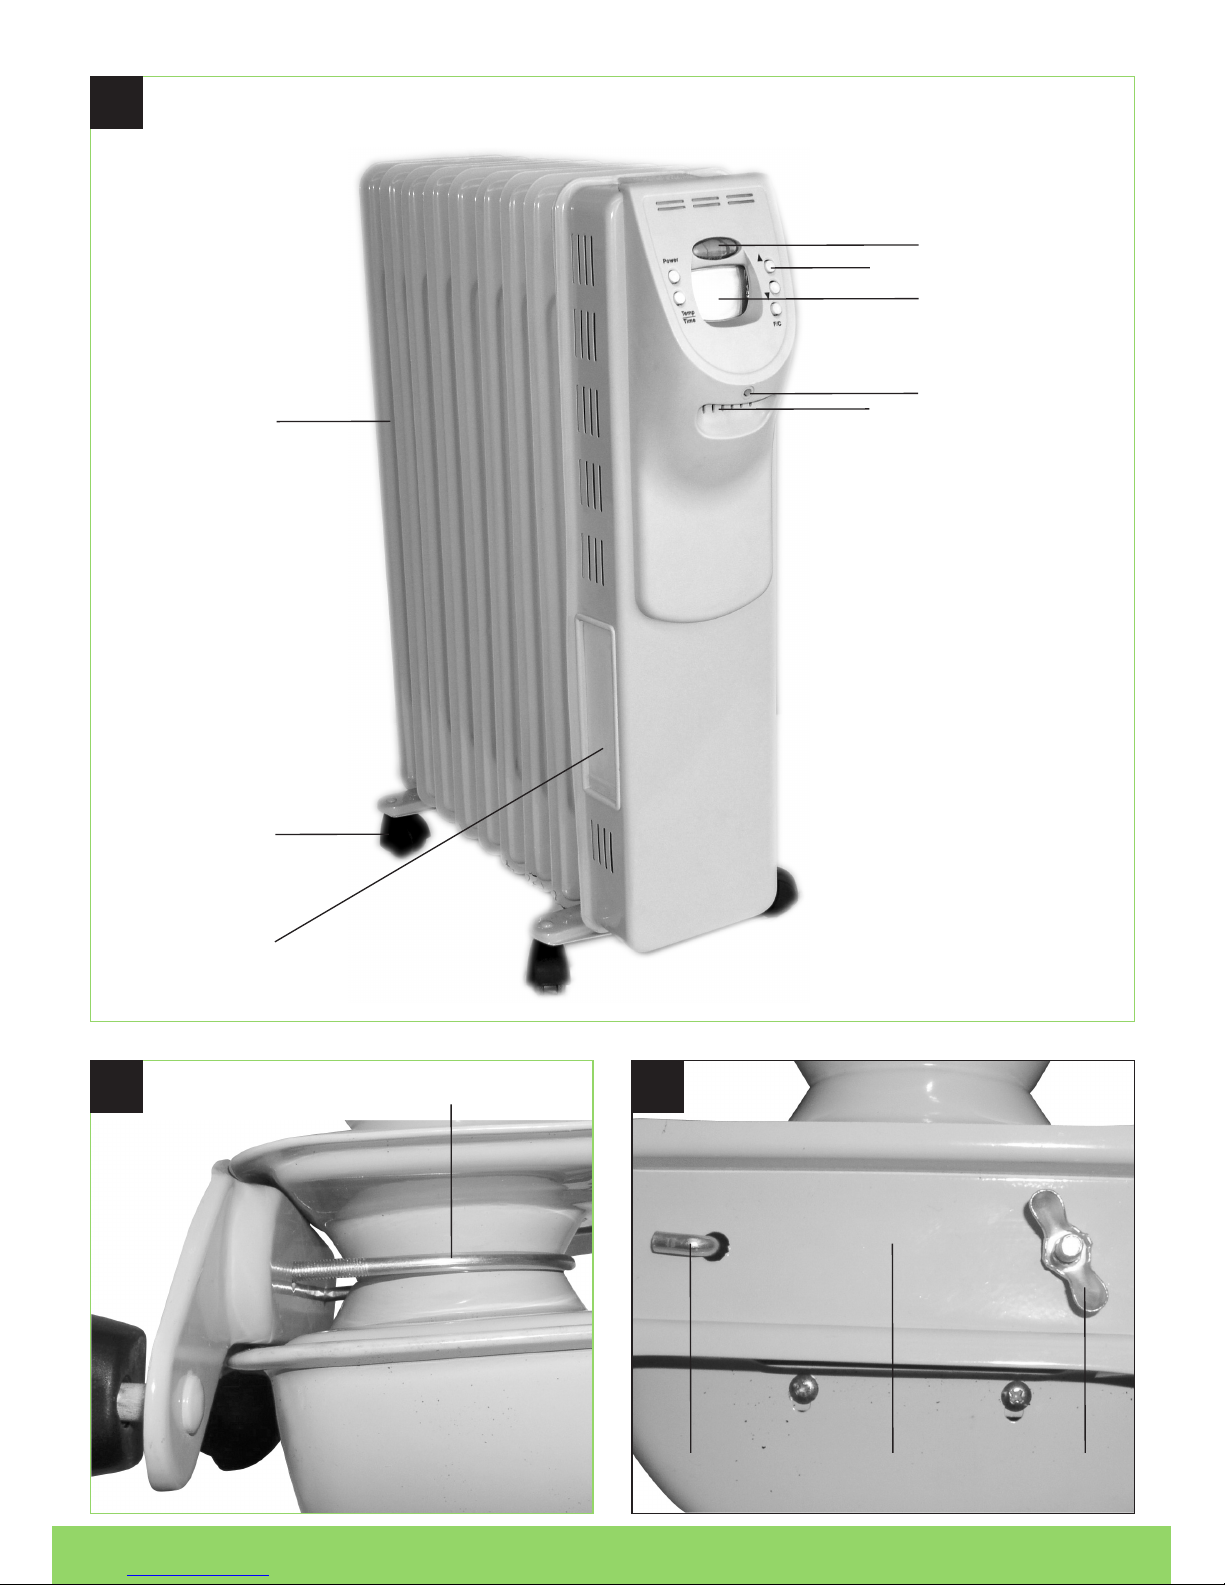
앬The radiator may only be used in an upright
position and with mounted guide rollers.
앬Do not cover the appliance and place no objects
or clothing on or between the heating ribs. Under
no circumstances are you to restrict the air
circulation around the heating ribs through
curtains, furniture or similar objects - fire hazard!
앬Connect the device to an earthed socket outlet
only!
앬If the radiator is damaged due to toppling or
otherwise or if the power cable is damaged,
contact an authorized professional or the
customer service responsible for your country.
앬Position the appliance in such a way that the
mains plug is accessible at all times.
앬If the appliance is not used for a lengthy period
of time, disconnect it from the mains supply.
앬Do not position the appliance directly below a
socket.
앬For supervised operation only.
앬If the radiator topples, disconnect the mains plug
from the supply, wait until it has cooled and then
place it upright again.
앬Caution! The heating ribs become hot during
operation.
앬Never position the appliance on deep pile
carpets.
앬Do not use the appliance in rooms in which
inflammable materials (for example solvents,

HELPLINE No. UK / N.IRELAND 0151 649 1500 REP. IRELAND HELPLINE NO 189 094 6244
Model Number: 3337 06
etc.) or gases are used or stored.
앬Keep highly inflammable substances and gases
away from the appliance.
앬Do not use in areas where there is a fire risk (for
example wooden sheds).
앬Only use the radiator with its mains lead fully
extended.
앬Maintain a minimum distance of 50 cm from
objects, walls, etc.
앬Not suitable for installation on permanently
installed electrical cables.
앬Important! Do not insert any foreign objects in
the applianceʼs openings.
- Danger of electric shock and damage to the
appliance.
앬Keep children and people on medication or
under the influence of alcohol away from the
appliance.
앬Maintenance and repair work may only be
carried out by authorized trained personnel.
앬Important! Do not cover the appliance – fire risk!
Pay attention to the symbol on the appliance.
앬Do not use in bathroom or areas likely to be wet
or damp.
앬This heater is filled with a precise quantity of
special oil. Repairs requiring opening of the oil
container are only to be made by the
manufacturer or his service agent who should be
contacted if there is an oil leak.
2. Layout (Fig. 1)
1 Heating ribs
2 Control lamp
3 Indicator panel
4 LCD display
5 Temperature sensor
6 Recessed grip
7 Storage compartment for mains lead
8 Castors
3. Assembly
3.1 Fitting the castors (Fig. 2 – 3)
Important! To prevent damage, place the radiator
upside down on a soft surface (for example a
carpet).
Slide the fastening bar (1) under the radiator
element, engage it in the mounting (2) and secure
it with the wing nut (3). Repeat the above on the
last space between the ribs.
4. Technical data:
Rated voltage: 230 V ~ 50 Hz
Output: 2000 W (1000 W/2000 W)
Thermostat control: Electronic
Heating ribs: 9
Protection class: I
Mains lead: 3 x 1 mm2x 1,7 m
5. Proper use
The appliance is designed only for private use, not
for commercial heating purposes.
6. Starting up
Important! Before using the appliance for the first
time, check that the voltage supply is the same as
the voltage details set out on the data plate.
Read the safety instructions listed in section 1.
Note! The actual room temperature is not indicated
correctly for the first 20 or so minutes after the heater
is switched on.
Note! The electronic room temperature control will
switch the heater on and off automatically to maintain
the room temperature at an almost constant level.
However, this presupposes that the radiator has
sufficient output to cover the heating requirements
for the room.
6.1 Function switch (Fig. 4)
Switch the device on and off with the red main
switch.
Button 1: Switches the device on and off, switches
on heat setting 1 or heat setting 2.
Button 2: Sets the desired room temperature, the
switch OFF time and the switch ON time.
Button 3: Changes over from “°F“ (degrees
Fahrenheit) to “°C“ (degrees Celsius).
Button 4: Decreases the desired room temperature,
the switch OFF time and the switch ON time.

HELPLINE No. UK / N.IRELAND 0151 649 1500 REP. IRELAND HELPLINE NO 189 094 6244
Model Number: 3337 07
Button 5: Increases the desired room temperature,
the switch OFF time and the switch ON time.
6.1.1 Continuous operation
앬Press button 1 (Power) once when the appliance
is off. The appliance switches on and runs in
heat setting 2 (SS). The temperature displayed
equals the room temperature measured by the
appliance.
앬Press button 1 a second time and the appliance
switches to heat setting 1 (S); press it again and
the appliances switches to “OFF”.
Note: When the appliance is switched on it will run
continuously until it is switched off again manually as
previously described.
6.1.2 Switching on and off by the room
temperature control
앬Switch on the appliance as previously described.
앬Press the button 2 until the “Thermometer“
symbol flashes in LCD display.
앬Set the desired room temperature with the button
4 or 5.
앬The “Thermometer” then symbol with a steady
light and the room temperature measured by the
appliance is indicated.
앬When the room temperature rises above the
desired level, the appliance switches off the
heater and the temperature indicator flashes.
When the room temperature drops below the
desired level, the heater switches on again. The
temperature indicator shows the measured room
temperature.
Example: with a desired room temperature of 21°C
the appliance switches off at 22°C and on at 20°C.
6.1.3 Programming the switch OFF time
When the appliance is running (the control lamp is
on) you can set a switch OFF time for the heater
from 1h to 10h. The appliance then switches off
automatically once the set time has elapsed.
Note: Set the desired room temperature as
previously described in section 6.1.2. When the
desired temperature is reached the appliance will
switch off the heater, and when the temperature
drops below the desired level it will switch the heater
on again, even if the set OFF time has not yet
elapsed.
앬Press button 2 until “AUTO OFF” flashes in the
LCD display.
앬Set the desired switch OFF time with the button
4 or 5.
앬“AUTO OFF” light will remain steady and the set
OFF time is indicated. The appliance shows the
time remaining up to the end of the set OFF time.
6.1.4 Programming the switch ON time
When the appliance is running (the control lamp is
on) you can set a switch ON time for the heater from
1h to 10h. The heater then switches on when the set
time has elapsed. If no switch OFF time was
programmed yet (see 6.1.3) the appliance will switch
off automatically after 10h. The heater can be
switched off manually at any time with the button 1
(Power).
Note: Set the desired room temperature as
previously described in section 6.1.2. When the
desired temperature is reached the appliance will
switch off the heater, and when the temperature
drops below the desired level it will switch the heater
on again.
앬Press button 2 until “AUTO ON” flashes in the
LCD display.
앬Set the desired switch ON time with the button 4
or 5.
앬“AUTO ON” then shines with a steady light and
the set switch ON time is indicated. The
appliance switches on the heater after the set
switch ON time has elapsed.
앬The display switches to “AUTO OFF“ and “10
HR“.
앬The appliance switches off automatically after
10h.
앬As long as the heater is running you can set the
switch OFF time manually as described in
section 6.1.3.
6.2 Programming examples
6.2.1 Automatic switch ON time
앬Set the automatic switch OFF time “AUTO OFF“
to 3 hours (see 6.1.3).
앬Set the automatic switch ON time “AUTO ON“ to
2 hours (see 6.1.4).
Result:
The appliance switches on the heater after 2 hours
have elapsed and switches off after a further 3 hours
in heating mode.
6.2.2 Automatic switch OFF time
Set the automatic switch OFF time “AUTO OFF“ to
7 hours (see 6.1.3).

HELPLINE No. UK / N.IRELAND 0151 649 1500 REP. IRELAND HELPLINE NO 189 094 6244
Model Number: 3337 08
Result:
The appliance switches off after 7 hours have
elapsed.
6.2.3 Temperature indication in °C / °F
Press button 3 (F/C) to select between degrees
Celsius °C and degrees Fahrenheit °F for the
temperature indication in the LCD display. Press
button 3 repeatedly until the desired indication
appears.
7. Storage
If the radiator is not used for a lengthy period of time,
the mains lead must be stored in full in the
compartment provided for it. The radiator has to be
stored in a dry place, covered if possible.
8. Maintenance and cleaning
앬Maintenance and repair work may only be
carried out by an authorized electrical servicing
contractor or the customer service responsible
for your country.
앬Check the mains lead at regular intervals for
signs of defects or damage. A damaged mains
lead may only be replaced by an electrician or
the customer service responsible for your
country in compliance with the relevant
regulations.
앬Important: Disconnect the mains lead before
cleaning – danger of electric shock.
앬Use a damp cloth to clean the casing.
앬The ribs are filled with a special oil. Repairs that
necessitate the oil seal to be opened may only
be carried out by the customer service
responsible for your country. If oil leaks from the
appliance, return it to the customer service
responsible for your country for examination.
9. Ordering spare parts
Please provide the following information on all orders
for spare parts:
앬Model/type of machine
앬Article number of the machine
앬ID number of the machine
앬Number of the required spare part
For our latest prices and information please go to
www.isc-gmbh.info
10. Waste disposal
Defective devices must be disposed of properly.
Please contact the customer service center
responsible for your country.
Accessories and packaging should be disposed of in
an environment-friendly fashion, i.e. by taking them
to a recycling depot. Plastic parts are coded for
purposes of separation when recycling.

WARRANTY CERTIFICATE
The product described in these instructions comes with a 3 year manufactures
warranty covering defects. This 3-year manufactures warranty period begins
with the passing of risk or when the customer receives the product.
For warranty claims to be accepted, the product has to receive the correct
maintenance and be put to the proper use as described in the operating
instructions.
The 3 year warranty does not affect your statutory rights.
Please note the details for contacting the customer service center
responsible for your region or the service address listed below.
This warranty applies in the UK and Ireland and supplements local
consumer protection regulations.
Technical changes subject to change
Einhell UK Ltd
Unit 5 Morpeth Wharf
Twelve Quays
Birkenhead, Wirral
CH 41 1LF
Helpline-No.: GB 0151 649 1500
IRL 189 094 6244
HELPLINE No. UK / N.IRELAND 0151 649 1500 REP. IRELAND HELPLINE NO 189 094 6244
Model Number: 3337 09

The reprinting or reproduction by any other means, in whole or in part,
of documentation and papers accompanying products is permitted only
with the express consent of ISC GmbH.
For EU countries only
Never place any electric tools in your household refuse.
To comply with European Directive 2002/96/EC concerning old electric and electronic equipment and its
implementation in national laws, old electric tools have to be separated from other waste and disposed of
in an environment-friendly fashion, e.g. by taking to a recycling depot.
Please contact your retailer or local authority for details of recycling schemes which operate in your area.
:
HELPLINE No. UK / N.IRELAND 0151 649 1500 REP. IRELAND HELPLINE NO 189 094 6244
Model Number: 3337 10


EH 09/2007
Table of contents
Other Delta Heater manuals