manuals.online logo
Brands
  1. Home
  2. •
  3. Brands
  4. •
  5. Delta
  6. •
  7. Test Equipment
  8. •
  9. Delta UNOKIT2 User manual

Delta UNOKIT2 User manual

0
Delta Electronics, Inc.
UNOKIT2
2nd Generation UNO Sensor Calibration System
User Manual v1.0
JERRY.HSIAO 蕭令彥
DELTA ELECTRONICS, INC.
1
[Revision History]
Date
Version
Description
2024/01/05
1.0
Release the first version.
2
[Overview]
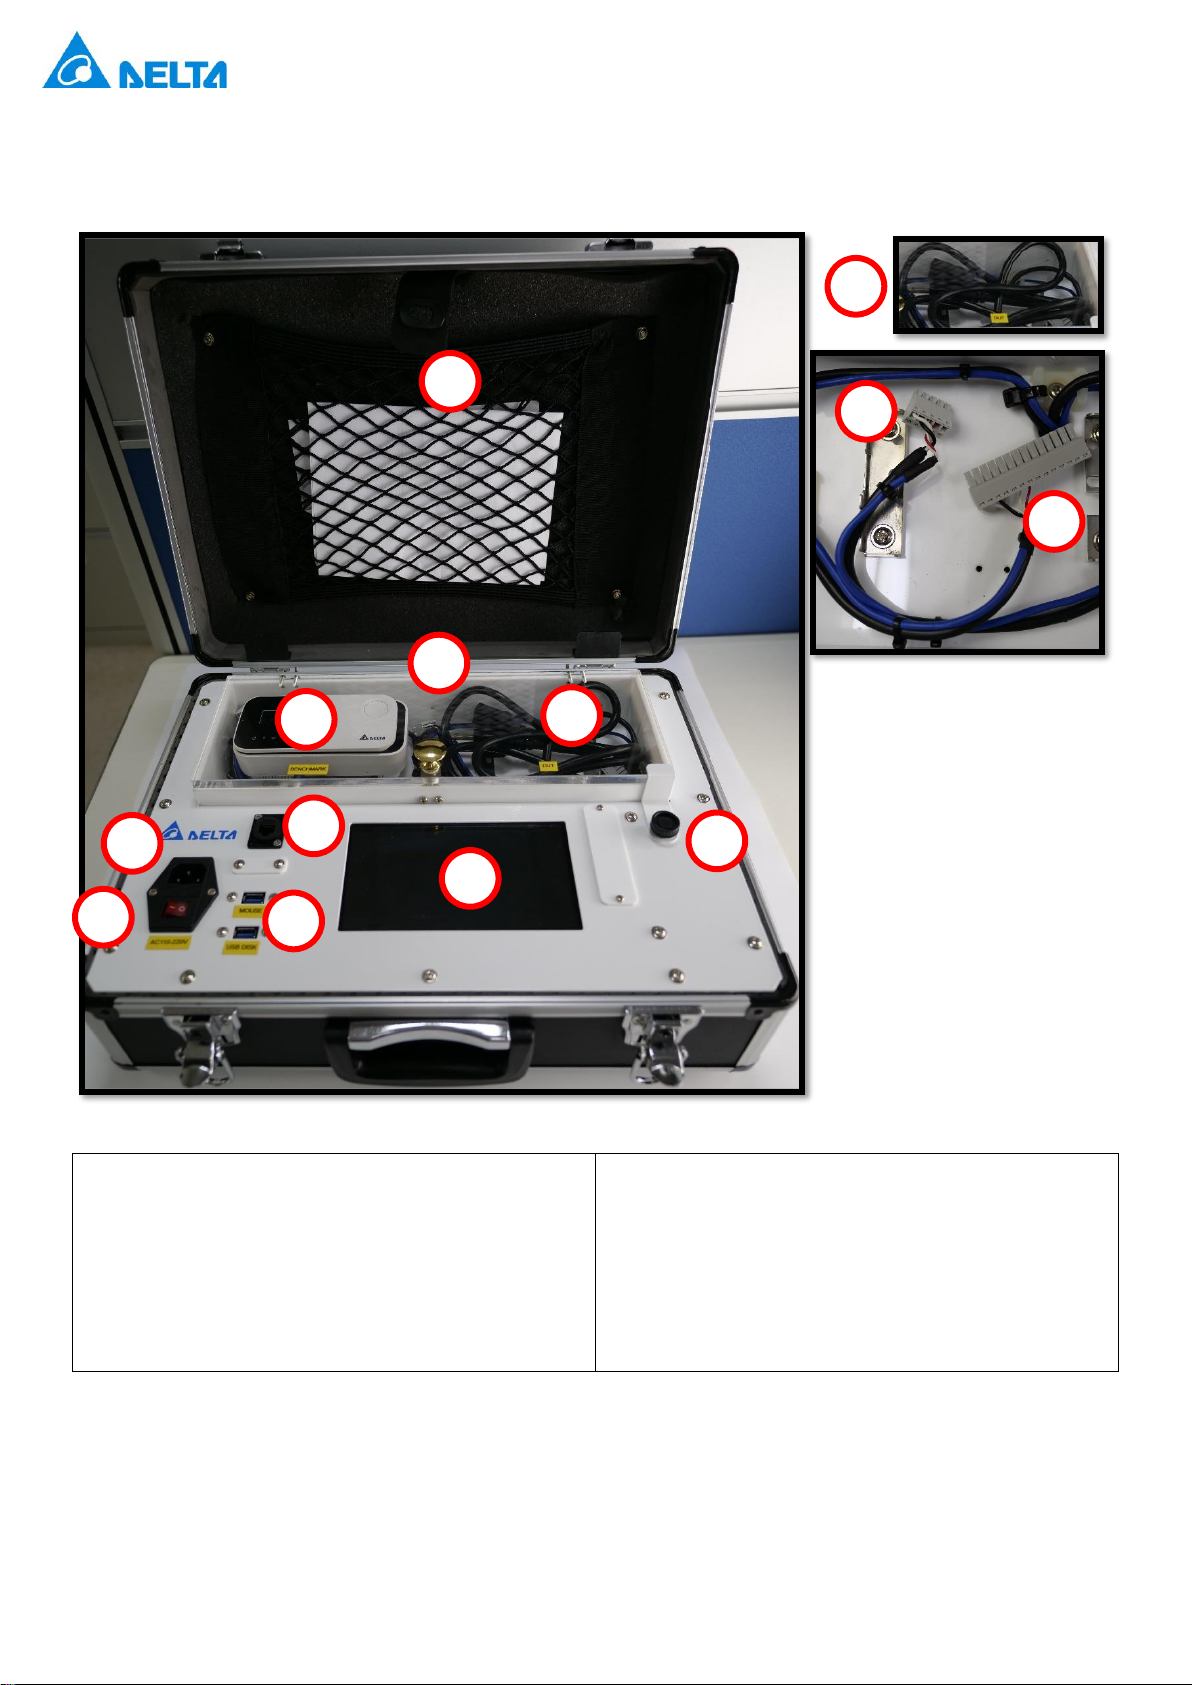
UNOKIT is the official calibration tool for the UNO Sensor (multi-in-one air quality detector)
devices. It allows for the calibration of sensor module readings on the test UNO Sensor device
by comparing them with the readings of the UNO Sensor benchmark, ensuring the accuracy
of the sensor readings.
The UNOKIT supports the following models of UNO Sensor devices: UNOnext series and
UNOlite series. The sensor modules can be calibrated are listed.
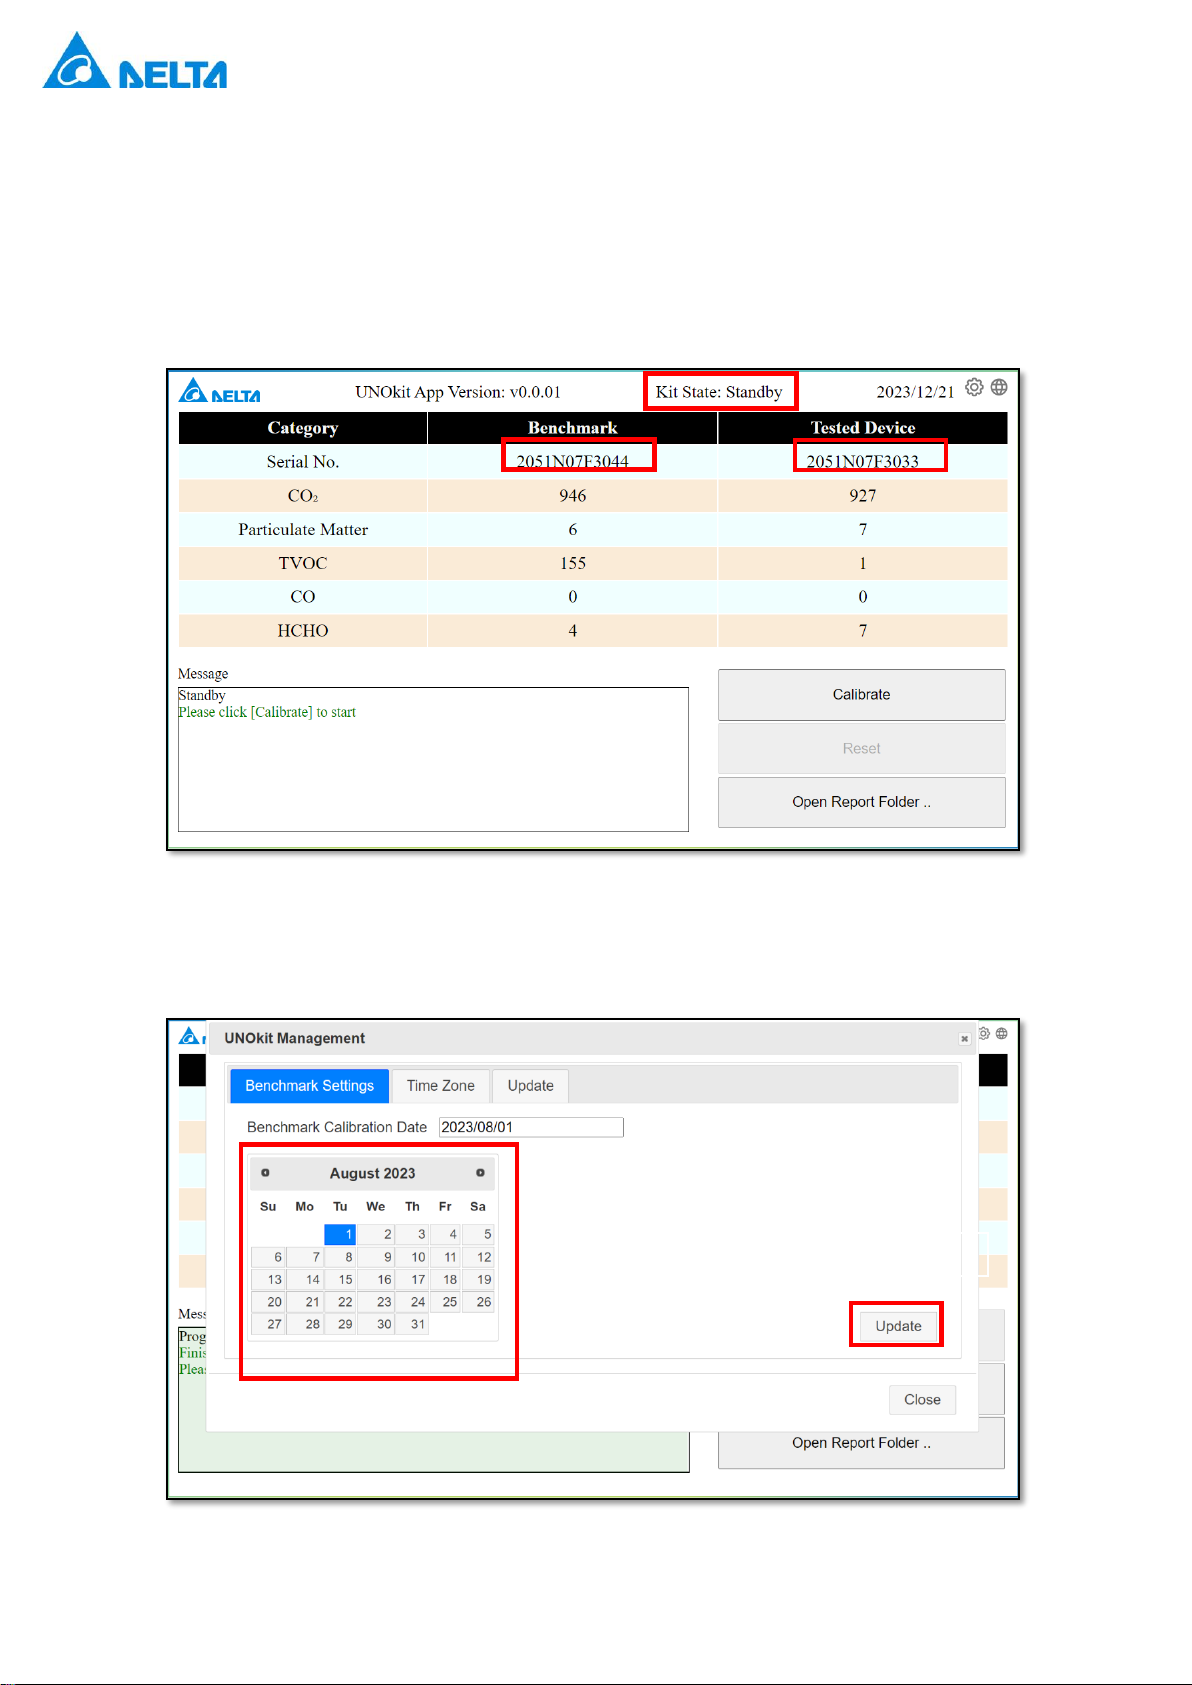
⚫Carbon Dioxide (CO2)
⚫Particulate Matter (PM1/PM2.5/PM10)
⚫Total Volatile Organic Compounds (TVOC)
⚫Carbon Monoxide (CO)
⚫Formaldehyde (HCHO)
* The calibration of the test device will be performed based on the sensor combination of the benchmark, typically
UNO-9SW, which includes carbon dioxide (CO2), particulate matter (PM2.5/PM10), total volatile organic
compounds (TVOC), carbon monoxide (CO), and suspended, formaldehyde (HCHO).
* After calibration, sensor readings of the test device will be within the valid range of sensor readings of the
benchmark but may not be identical totally.
3
[Contents]
A. Storage Bag
B. Calibration Chamber
C. Safety Clasp *
D. Power Cord *
E. Benchmark Installation *
F. Test Device (DUT) Installation *
G. Power Supply: AC100V-240V
H. Power Switch
I. Ethernet Port for Engineering Use
J. USB Port: MOUSE / USB DISK
K. Display LCD
* The power cord is recommended to be stored inside the calibration chamber when not in use.
* The safety clasp can be used to quickly detach terminal connectors.
* There are two sets of terminal cables for both benchmark and the test device. The 14-pin cable is for use with
the UNOnext series (L), while the 5-pin cable is for use with the UNOlite series (M).
A
B
C
E
F
G
H
I
J
K
D
L
M
4
[Installation Guide]
1. Counter-clockwise release the safety clasp and open the calibration chamber.
2. Ensure all dip switches on the Benchmark are down, then install it on the left and the test device (DUT) on
the right. Connect the UNOnext with the 14-pin cable and the UNOlite with the 5-pin cable. Close the
chamber to complete the installation.
All dips of benchmark need
to be pulled down.
UNOnext
UNOlite
Benchmark
DUT
1
5
3. Connect the power cord, and then connect the USB mouse. * Please prepare your own USB mouse.
4. Power on.
* The benchmark does not need to be removed after installation unless there is a need for replacement.
* After installing the benchmark, please go to [System Settings] and update the [Time Zone] and [Benchmark
Calibration Date] for the first-time use.
6
[User Interface Guide]
A. UNOKIT App Version
B. UNOKIT Status
C. Current Date
D. UI Language Settings
E. System Settings
F. Connection Status and Sensor Values of
Benchmark and Test Device
G. Message Box
H. Buttons of Calibrate / Reset /Open Report
C
E
D
A
B
F
G
H
7
[Calibration Process]
1. Follow the installation guide to set up the benchmark, test device and mouse and power UNOKIT on. After
the system starts up, the UNOKIT status will display 'Standby,' and the serial numbers of the benchmark and
test device and sensor readings of mounted sensors should both be displayed correctly. * If there is an error
message, please follow the instructions.
2. For the first-time use or when replacing the standard machine, please set the [Benchmark Calibration Date]
according to the benchmark information.
1. Choose Date
2. Click to Update
8
3. After the sensor readings mounted on benchmark and test device are displayed (not --), click on [Calibrate],
and UNOKIT will start the calibration process.
UNOKIT will perform the following actions: [Warmup] →[Analyze] →[Calibrate] →[Finish]. The message
block will also be keeping update according to the progress.
Note: If the sensor readings persistently do not display, it may indicate that the benchmark or test device lacks
this module, or the module is malfunctioning.
4. When the calibration process is finished, the UNOKIT status will display [Finish], and the information for the
benchmark and test device will be updated to their final states. At this point, the report has been generated.
9
5. If any errors occur during the process, the message block will display a red warning. Please follow the
message instructions to resolve the issue, then click [Reset] / [Next] or reboot UNOKIT.
Note: In some case, errors are discovered after [Finish] stage, a fail-calibration report also be generated.
6. After calibrating the test machine, you can refer to the [Installation Guide] to replace it with the next one and
click [Reset] or [Next]. Then, repeat steps 1 to 4 for a new round of calibration. Or refer to [Retrieve Report]
to get report. * No need to restart UNOKIT power after replacing the next test device.
7. After completing all calibrations and retrieving the reports following the next section, please remove the test
device, turn off the power, and store the power cord.
10
[Retrieve Report]
1. Click on [Open Report Folder ...], and the screen will display the report storage directory. All calibration
reports are PDF file, the filename format is
[Calibration Date]_[SN of Test Device]_[PASSED/FAILED].pdf
. e.g.,
20231215_2321L0170099_PASSED.pdf.
2. Insert the USB flash disk into [USB DISK], and the LCD will display a permission allow window. Select [Open
File Manager], click [OK], and the USB flash disk directory will appear.
11
3. Move the PDF file from the report directory to the USB flash disk directory. Select the PDF file, right-click,
choose [Cut], and then go to the flash disk directory, right-click, and select [Paste].
4. Click the [Eject USB Drive] button and eject the USB flash disk.
12
[System Settings (UNOKit Mangement)]
◼Benchmark Calibration Date: If a benchmark replacement is performed, please update the calibration date
according to the information of the new benchmark.
◼Time Zone: Please set the time zone correctly to ensure the accuracy of the report date. (e.g. +0800 ➔
Taiwan).
1. Choose Date
2. Click to Update
2. Click to Update
1. Choose Time Zone
13
◼System Update: When UNOKIT is connected to the internet and can access the external network, it can
perform system updates. * This operation should be carried out as instructed by an engineer.
14
[Common Errors]
Error
Description
alert_check_fail
Calibrate fail, please re-calibrate
alert_cmd_fail
Unknown failure, please re-calibrate
alert_dut_decline
Sensor offset is too large, reset or replace it
alert_dut_err
Sensor error, reboot or replace it
fatal_alert_bad_env
Bad environment for calibration, change place and then recalibrate
fatal_alert_bench_err
Benchmark sensor error, please reboot or replace Benchmark
fatal_alert_bench_offline
Benchmark is offline, please re-connect and reset
fatal_alert_disk_full
Disk is full, please delete extra reports
fatal_alert_dut_changed
Tested device is changed, please reset
fatal_alert_dut_offline
Tested device is offline, please re-connect and reset
fatal_alert_modbus_fail
COM port error, try to reboot UNOkit
fatal_alert_no_bench
Benchmark not detected (0xDO)
fatal_alert_no_dut
Tested device not detected
fatal_alert_no_target
No target item
fatal_alert_unknown_dut
Unknown Test device (SN, Model, Ver)
fatal_alert_bench_invalid_fw
Please update the benchmark firmware
fatal_alert_dut_invalid_fw
Please update the test device firmware

Other Delta Test Equipment manuals

Delta CS-AIP-35 User manual

Delta

Delta CS-AIP-35 User manual

Delta MS-ACT50-4K User manual

Delta

Delta MS-ACT50-4K User manual

Delta PFM907 User manual

Delta

Delta PFM907 User manual

Delta CS-HB-30H User manual

Delta

Delta CS-HB-30H User manual

Delta CS-H9-70HG User manual

Delta

Delta CS-H9-70HG User manual

Delta DH-PFM905-E User manual

Delta

Delta DH-PFM905-E User manual

Popular Test Equipment manuals by other brands

Chauvin Arnoux C.A 10001 user manual

Chauvin Arnoux

Chauvin Arnoux C.A 10001 user manual

Hantek DSO 1062B user manual

Hantek

Hantek DSO 1062B user manual

Presys PCON-Y18-LP Technical manual

Presys

Presys PCON-Y18-LP Technical manual

METREL EurotestXC instruction manual

METREL

METREL EurotestXC instruction manual

Martel TC100 manual

Martel

Martel TC100 manual

Agilent Technologies Infi niium 9000 Series Quick demo guide

Agilent Technologies

Agilent Technologies Infi niium 9000 Series Quick demo guide

AFL ROGUE cB1 Quick reference guide

AFL

AFL ROGUE cB1 Quick reference guide

PCB Piezotronics 301A03 Installation and operating manual

PCB Piezotronics

PCB Piezotronics 301A03 Installation and operating manual

Microflex Pulse Scope Installation, operation and specification manual

Microflex

Microflex Pulse Scope Installation, operation and specification manual

IDEAL INDUSTRIES LANTEK 6 Basic user manual

IDEAL INDUSTRIES

IDEAL INDUSTRIES LANTEK 6 Basic user manual

ODA LP Series user manual

ODA

ODA LP Series user manual

Hanna Instruments Total Chlorine Checker quick start guide

Hanna Instruments

Hanna Instruments Total Chlorine Checker quick start guide

ELIT EuroMaster AutoEv user manual

ELIT

ELIT EuroMaster AutoEv user manual

Testec SI7000 Series instruction manual

Testec

Testec SI7000 Series instruction manual

Veeder-Root VaporTEK Installation, Setup and Troubleshooting Manual

Veeder-Root

Veeder-Root VaporTEK Installation, Setup and Troubleshooting Manual

Saluki DSO2000 user manual

Saluki

Saluki DSO2000 user manual

Kzyee KM50 owner's manual

Kzyee

Kzyee KM50 owner's manual

Textron Tempo 525N-30 operating manual

Textron

Textron Tempo 525N-30 operating manual

manuals.online logo
manuals.online logoBrands
  • About & Mission
  • Contact us
  • Privacy Policy
  • Terms and Conditions

Copyright 2025 Manuals.Online. All Rights Reserved.