Denjoy TieApex User manual

Rev. 09/23/20 VER SMS-DY20180102RPFP-EN
USER MANUAL
TieApex
Apex Locator
*The unit must be installed by a qualified engineer.
*Only for use by dental professionals.
*Read this operation manual carefully before installation or operation.

1

Rev. 09/23/20 VER SMS-DY20180102RPFP-EN
1
Contents
SECTION 1: GENERAL INTRODUCTION
SECTION 2: MAIN TECHNICAL INDEX
SECTION 3: COMPONENTS
SECTION 4: FUNCTIONS
SECTION 5: OPERATION
SECTION 6: SAFETY PRECAUTIONS
SECTION 7: MANTENANCE & SERVICE
SECTION 8: TOUBLESHOOTING GUIDE
SECTION 9: ENVIRONMENTAL REQUIREMENTS
SECTION 10: PACKING LIST
SECTION 11: WARRANTY
REMARKS:
The pictures here are for reference only.
Real products shall prevail. The parameters and pictures in
this manual are subject to change without prior notice.

Rev. 09/23/20 VER SMS-DY20180102RPFP-EN
2
SECTION 1: GENERAL INTRODUCTION
1.1. CONTACT INFORMATION
Apex Locator is manufactured by: DENJOY DENTAL CO., LTD
Address: F4, Building A4, Lugu Medical Device Park, No.229
Guyuan Road, Changsha, 410205 P. R. China
Website: www.denjoy.cn
E-mail: [email protected]
Manufacturing:
Company name: DENJOY DENTAL CO., LTD
Address: F4, Building A4, Lugu Medical Device Park, No.229
Guyuan Road, Changsha, 410205 P. R. China
Please contact sales distributor from whom you have purchased this
device for user’s record and further after-sale service.
1.2. PRODUCT DESCRIPTION

Rev. 09/23/20 VER SMS-DY20180102RPFP-EN
3
Thank you for purchasing our apex locator.
Model: TieApex
Trade Name: FreePex
For optimum safety and performance, read this manual carefully
before use for operation instruction, care and maintenance. Please
keep this user’s manual for future reference.
Our company will take the responsibility for the security, reliability,
capability under the following conditions:
1.The installation, debugging, maintenance should be adjusted by
the approbatory technician by our company or obtained related
nation quality level license professions.
2. The power supply our device use is suitable for national regulation
and our FreePex’s requirement.
3. The operation of our device should be operated by licensed
professions; the operator should be specialized in medical applied skill.
The whole operation process should according to user’s manual
strictly.
Working Principle:
FreePex apex locator adopts the most up-to-date multi-frequency,
ARM, DSP and auto-calibration technology. And the accuracy can
reach 95% or more in clinical cases.
Product application range and features
FreePex apex locator is a kind of highly precise device used for
determining the position of apex of root canal.
Features:
1. Self-Calibration, 98.4% accuracy.
2. Beeps determine the apex location.
3. Adjustable display of apical constriction .
4. Built-in buzzer with adjustable volume.
5 New probe cable with long operating life.
6. Ergonomic design, adjustable viewing angle.

Rev. 09/23/20 VER SMS-DY20180102RPFP-EN
4
7. Multi-frequency circuit technology and foldable body.
8. Power-saving , timing automatism power off function.
9. Built-in high-capacity lithium battery and low power consumption
1.3. SYMBOL DESCRIPTIONS
The following symbols may appear in this manual, on the label, or on
it’s accessories. Some of the symbols represent standards and
compliances associated with apex locator and its use.
Caution: Consult accompanying documents
Date of manufacture.
Manufacturer
Specifies serial number
Type BF applied part
Refer to instruction manual / booklet
Direct current
Sterilizable up to the temperature specified at
most
The device should not be used after the end of
the shown or the day
Rev. 09/23/20 VER SMS-DY20180102RPFP-EN
5
DISPOSAL: Do not dispose this product as unsorted
municipal waste. Collection of such waste
separately for special treatment is necessary.
Alarm indicator displayed on the LCD screen
Battery indicator displayed on the LCD screen
SECTION 2: MAIN TECHNICAL INDEX
1. Classification: Internally powered equipment
2. Degree of protection against electric shock
---Type BF applied part
3. Degree of protection from ingress of liquids: None
4. Operation mode: Continuous
5. Display mode: LED Display
6. Charger:
Input voltage: AC 100-240V, 50/60Hz , 0.2A
Chargeable battery: 3.7V, 800mAh
7. Dimension: 120×110×25mm
8. Weight: about 420g
9. Indication range and accuracy
Indication range: from 1.0 to ov
Accuracy: 95% or more
Rev. 09/23/20 VER SMS-DY20180102RPFP-EN
6
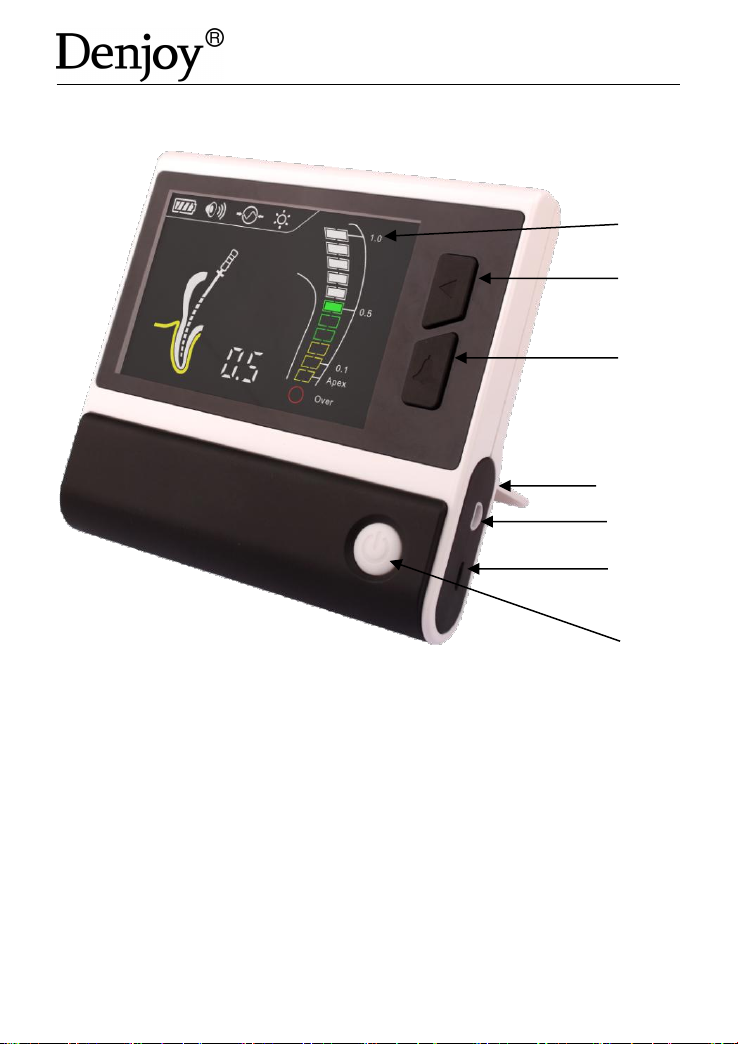
SECTION 3: COMPONENTS
1 Power On/Off 2 Charger Socket
3 Cable Socket 4 Supporter
5 Sound Adjustment Button
6 Apical Constriction Area Adjustment
7 LCD Display
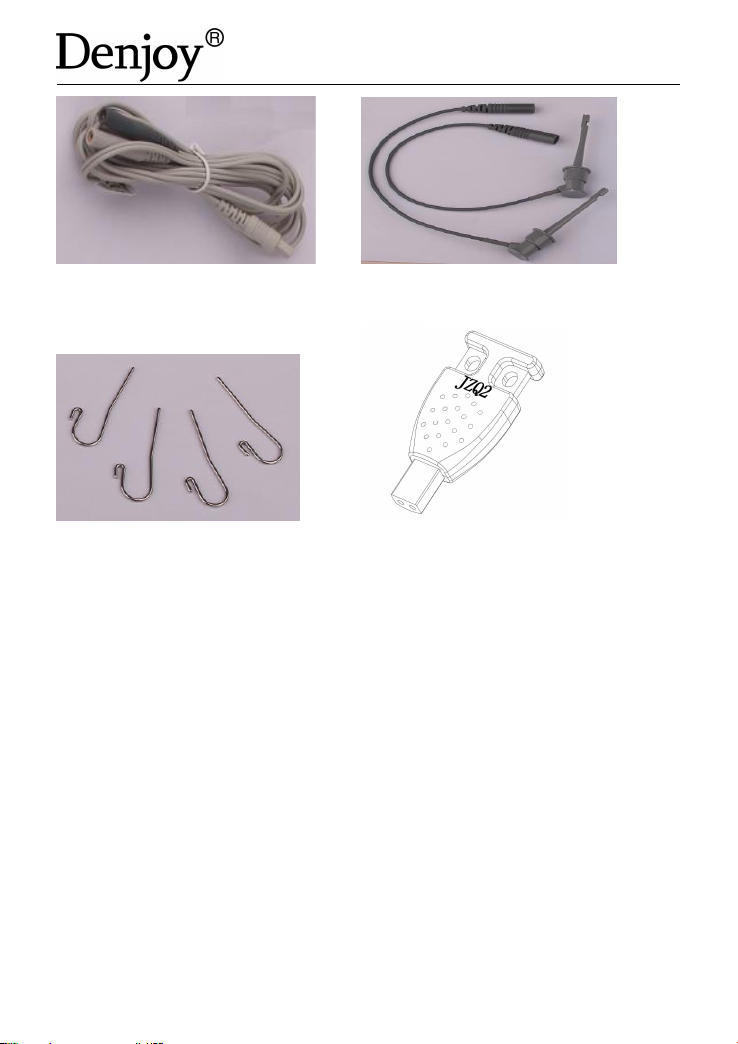
Main Accessories
2
5
6
4
3
7
1
Rev. 09/23/20 VER SMS-DY20180102RPFP-EN
7
SECTION 4: FUNCTIONS
LCD Description:
a. Green WL Bar: Represents approaching apical constriction of
apex of root-canal.
b. Yellow WL Bar:Reach apical constriction of root-canal.
c. Red Bar: File over the apex.
d. Digit Display: the distance between the file and apex.
Note: The display on the front panel 1.0, 0.5, etc. does not indicate to
the apical distance unit is 1.0mm, 0.5mm it prompts the operator
which is close to the root canal apical needle.
Probe Cable
Calibrator
File Holder
Mouth Hook
Rev. 09/23/20 VER SMS-DY20180102RPFP-EN
8
SECTION 5: OPERATION
5.1. The plug of the probe cable should be completely inserted into
the socket on the right side of the main body.
5.2. Extended pressing power on/off button. Extended pressing power
on/off button for 2 seconds to turn on/off the device.
5.3. Please connect the file holder to probe cable and insert the
mouth hook into the interface, then hang it up at any side of the
sufferer's mouth.
5.4. Clip the metal part of the endodontic file with the holder. Then
insert the endodontic file into the root-canal with the file holder.
5.5. Hang the mouth hook up at any side of the patient’s mouth, insert
the file into the teeth, when the endodontic file reaches the position
which the number indicated in the color screen is 0.5. Then please
fasten the file with the rubber positioning ring on the reference point of
the tooth crest. And this means that the file has reached the position
of the apical constriction. (Generally we suggest to use 0.5 for
measurement the length of root canal).Note: Please do not make the
measurement when in charge.
5.6. IMPORTANT STEP
Deciding the working length of root canal
Measure the distance from the bottom of rubber positioning ring to
the tip of the file. Note down this number. So this number need to

Rev. 09/23/20 VER SMS-DY20180102RPFP-EN
9
minus 0.1-0.5mm is the most suitable working length of root-canal.
REMARKS: The working length of root canal varies from each other for
the reason of different shapes of teeth and root-canal.
5.7. After operation, please switch off the device. If the dentists forgot
to switch off the device, the device will automatically be power off.
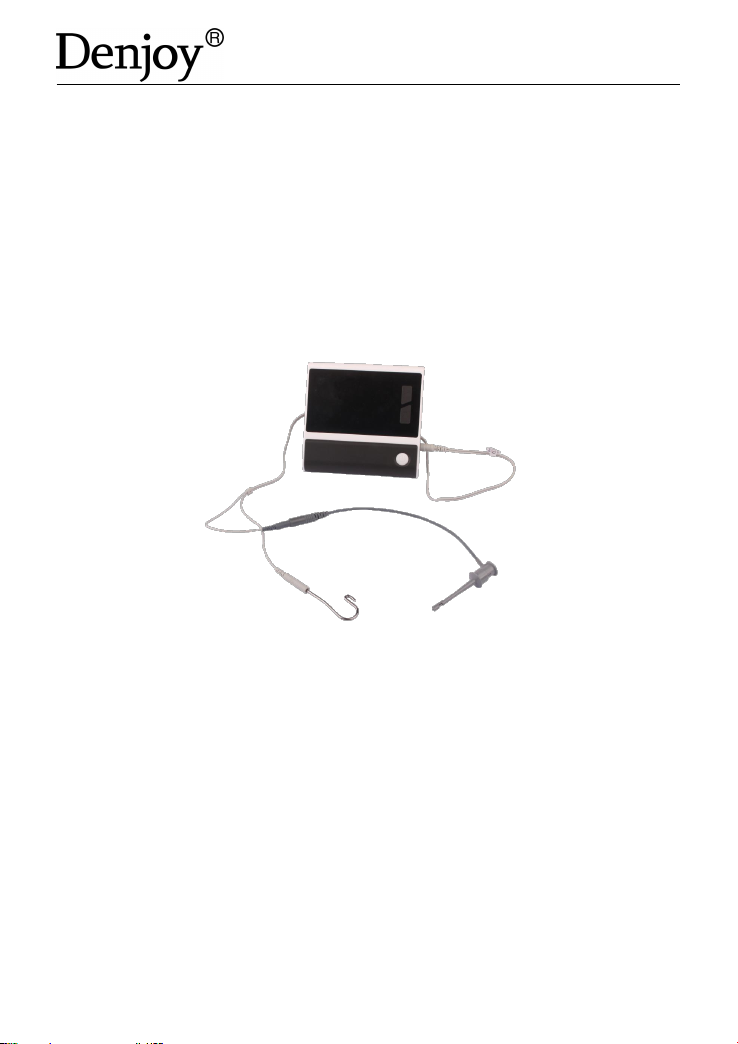
Self-Calibration:
Insert the calibrator test instrument into the socket, if the LCD shows 0.5,
it means that the control part (mainbody) work normally.
Insert the probe cable into the cable socket, then connect the file
holder, mouth hook and calibrator as a circle. if the LCD shows 0.5, it
means that the accessories work normally. Please see the image
below.
For ACCURATE MARESUREMENT:
● Make sure that stainless hook entirely contact patient’s mouth
mucosa.
● Check all connections
● Make sure that when the device is switched on, the device can
complete self-checking procedure automatically and successfully.

Rev. 09/23/20 VER SMS-DY20180102RPFP-EN
10
When following situations appear, please use paper point part to
make root canal dry to increase accuracy of measurement.
● It will cause bad electrical conduction between root canal and
metal or dental crown if overfull liquid.
Other problems need to check:
● Make sure that endodontic file was getting through the top hole of
the root canal, the loose file will lead to measure incorrectly.
● If the diameter of apical is more than 0.4mm, it will affect the
accuracy.
● Complicated root canal environment also will affect the accuracy.
● Make sure that the battery is not too low, or it will lead to faulty
measurements.
● Avoiding endodontic file and probe contacting metal prosthesis, or
it will form the earth current and lead to inaccurate indicating root tip.
● If the root canal is too dry, please inject the NaOCI into the apical
foramen.
SECTION 6: SAFETY PRECAUTIONS
CAUTIONS:
6.1. Before operation, you have to read user manual carefully.
6.2. Like all of the other electric facilities, this device has an
electromagnetism disturbance. When there is a patient who is now
using the cardiac pacemaker, or there is an electronic operation,
please don't put the machine around. The cardiac pacemaker
sufferer, viz. the serious cardiac pulse abnormality sufferer, is forbidden
to use this machine.
6.3. Please put in the battery before use. Make sure that the power
of the battery is in sufficient supply to guarantee the correct
measurement result.
When change the battery, do not mix the old battery with the new
one and mix the alkali battery with the manganic one.
Please take off the battery in the event of longtime nonuse or long

Rev. 09/23/20 VER SMS-DY20180102RPFP-EN
11
–distance transit.
6.4. Please use the file with the resin handle rather than mental one.
Even when using the file with the resin handle, please notice that the
fingers should be avoided touching the mental part of file.
6.5. Please clip the upper portion of the file rather than the down
portion with the holder, other wise, the metal part of the holder and
the resin part of the file would be damaged. The damaged holder will
affect the measure result.
6.6. When the file accidentally touches the inner part of the
root-canal, the reading of scale will get a bit abnormality, then will get
right automatically a few seconds later.
6.7. The device is not suitable for use in the presence of flammable
anesthetic mixtures with air or with oxygen or nitrous oxide.
6.8. The enclosure of the main body of device is not designed to
give any protection against ingress of water. Please keep the device
away from any harmful ingress of water.
SECTION 7: MANTENANCE & SERVICE
7.1. MANTENANCE
The device is maintained free of charge and doesn't require any
routine maintenance within warranty period. The device cannot be
repaired.
Do not modify and disassemble the device.
This device described below has been fully inspected and
confronts to the current products specification.
This device is guaranteed for its designated use, against original
defects in materials and workmanship for a period of 12 months from
date of purchase.
Products warranty or service will not be extended if (1) the product
is repaired, modified, misused, disassembled, or using the parts are not
provided by the manufacturer, (2) The serial number of the product is
defaced or missing.
Expected life time: 5 years.
7.2. CLEANING AND DISINFECTION

Rev. 09/23/20 VER SMS-DY20180102RPFP-EN
12
MAIN BODY CLEANING INSTRUCTION
When the surface of main body is polluted, please rub the surface
with dry soft cloth ONLY.
REMARKS: Any liquid lotion like ethanol, banana oil and light oil are not
allowed.
PROBE CABLE CLEANING INSTRUCTION
Please wipe the probe cable with the soft cloth stained with ethanol
and reuse it after it is completely dry.
MOUTH HOOK AND FILE HOLDER DISINFECTION INSTRUCTION
The front part of the file holder, which is easily get polluted with rubbish
and liquid medicine, should be disinfected by the ethanol.
Mouth hook and file holder should be disinfected at temperature
135℃for 10 minutes and disinfection by autoclave is preferred. The
disinfection can be repeated 200 times. The effect of repeated
disinfection on the product has been verified and has no effect on the
performance and normal use of the product.
SECTION 8: TOUBLESHOOTING GUIDE
Question: After switch on, the LCD screen has no reaction.
Answer:
a. Check that the power of the battery is in sufficient supply.
b. Check that hold the power on/off key for at least 2 seconds.
c. Check that the device can not be switched on when charging.
Question: No alarm sound
Answer:
a. Check the sound adjustor button of panel on top of unit.
b. The file has not reached the point less than 2.0 at which the
machine will give an alarm.

Rev. 09/23/20 VER SMS-DY20180102RPFP-EN
13
Question: NO changes or incorrect reading on the LCD screen
Answer:
a. Do not clip the file with the holder firstly and switch on the device
secondly.
b. Remember to hang mouth hook up at any side of the sufferer's
mouth.
c. Check probe cable connections both at unit and at AC outlet to
be sure they are properly seated.
d. The mental part of the file holder may be polluted or corroded.
Question: The device can’t be charged normally.
Answer:
a. The charger is not connected properly.
b.The charger is broken.
c. The battery is broken.
Question: Error Code E1
Answer: calibration error, please restart the device.
Question: Error Code E2
Answer: Short circuit indication for accessories.
SECTION 9: ENVIRONMENTAL REQUIREMENTS
OPERATING CONDITIONS
Ambient temperature: 5℃~ 40℃
Relative humidity range: ≤80%
Atmospheric pressure: 70kPa~ 106kPa
STORAGE AND SHIPPING CONDITIONS
Ambient temperature: -40℃~ 55℃
Relative humidity range: ≤80%
Atmospheric pressure: 50kPa ~ 106kPa
Equipment is not suitable for storage in the presence of sunlight, rain,
dust, corrosive gasoline and volatile without poor ventilation.

Rev. 09/23/20 VER SMS-DY20180102RPFP-EN
14
Transportation is applicable to all common methods.
SECTION 10. PACKING LIST
Mainbody
1pc
Probe Cable
1 pc
File Holder
2 pcs
Mouth Hook
4 pcs
Probe Needle
2 pcs
Calibrator
1 pc
Charger
1 pc
User manual
1 pc
SECTION 11:WARRANTY
The device is maintained free of charge and doesn't require any
routine maintenance within warranty period.
Do not modify and disassemble the device.
This instrument described below has been fully inspected and
confronts to the current products specification.
This instrument is guaranteed for its designated use, against original
defects in materials and workmanship for a period of 12 months from
date of purchase.
Products warranty or service will not be extended if (1) the product
is repaired, modified, misused, disassembled, or using the parts are not
provided by the manufacturer, (2) The serial number of the product is
defaced or missing.
The guarantee for accessories is 6 months. All accessories of the
device are damaged or needed to be renewed, the user can
purchase from the manufacturer.
WARNING
Disposal
Do not dispose of electrical appliances as unsorted municipal waste,
use separate collection facilities. Contact your local government for
information regarding the collection systems available. If electrical
appliances are disposed of in landfills or dumps, hazardous

Rev. 09/23/20 VER SMS-DY20180102RPFP-EN
15
substances can leak into the groundwater and get into the food
chain, damaging your health and well-being.
Battery Disposal: Recycle or dispose of the lithium battery in
accordance with all federal, state and local laws. To avoid fire and
explosion hazard, do not burn or incinerate the battery.
Lithium battery is intended to be changed only by service personnel
using a tool. Replacement by inadequately trained personnel could
result in burn or explosion hazard.
The device is not suitable for use in the presence of flammable
anesthetic mixtures with air or with oxygen or nitrous oxide.
The device is not repairable and contains no user serviceable parts.
No modification of this equipment is allowed.
The user must check that the equipment functions safely and see that
it is in proper working condition before being used.
The manufacturer does not require such preventive inspections by
other persons.
Please contact sales representative from whom you have bought this
device for user’s record and further after-sale service.
Table 1
Guidance and manufacturer’s declaration - electromagnetic
emissions
The [TieApex] is intended for use in the electromagnetic environment
specified below. The customer or the user of the [TieApex] should
assure that it is used in such an environment
Emissions test
Compliance
Electromagnetic
environment - guidance

Rev. 09/23/20 VER SMS-DY20180102RPFP-EN
16
RF emissions
CISPR 11
Group 1
The [TieApex] uses RF
energy only for its internal
function. Therefore, its RF
emissions are very low and
are not likely to cause any
interference in nearby
electronic equipment.
RF emissions
CISPR 11
Class [B]
The [TieApex] is suitable for
use in all establishments
other than domestic and
those directly connected to
the public low-voltage power
supply network that supplies
buildings used for domestic
purposes.
Harmonic
emissions
IEC 61000-3-2
Class A
Voltage fluctuations/
flicker emissions
IEC 61000-3-3
Complies
Table 2
Guidance and manufacturer’s declaration - electromagnetic
emissions
The [TieApex] is intended for use in the electromagnetic
environment specified below. The customer or the user of the
[TieApex] should assure that it is used in such an environment
Immunity Test
IEC
60601
Test level
Compli
ance
level
Electromagnetic
environment -
guidance
Electrostatic
±8 kV
±8 kV
Floors should be

Rev. 09/23/20 VER SMS-DY20180102RPFP-EN
17
discharge (ESD)
IEC 61000-4-2
contact
±15 kV air
contact
±15 kV
air
wood, concrete or
ceramic tile. If
floors are covered
with synthetic
material, the
relative humidity
should be at least
30 %
Electrical fast
transient/burst
IEC 61000-4-4
Power
supply
lines :±2
kV
input/outp
ut lines :
±1 kV
Power
supply
lines:±2
kV
input/out
put
lines:±1
kV
Mains power
quality should be
that of a typical
commercial or
hospital
environment.
Surge
IEC 61000-4-5
line(s) to
line(s):±1
kV.
line(s) to
earth :±2
kV.
100 kHz
repetition
line(s) to
line(s) :
±1 kV.
line(s) to
earth:±2
kV.
100 kHz
repetitio
Mains power
quality should be
that of a typical
commercial or
hospital
environment.

Rev. 09/23/20 VER SMS-DY20180102RPFP-EN
18
frequency
n
frequen
cy
Voltage dips, short
interruptions and
voltage variations on
power supply input
lines
IEC 61000-4-11
0%
0.5
cycle
At 0º,
45 º,
90 º,
135 º,
180 º,
225 º,
270 º
and
315 º
0% 1
cycle
And
70%
25/30
cycles
Single
phase:
at 0
0%
300
cycle
0% 0.5
cycle
At 0º,
45 º, 90
º, 135 º,
180 º,
225 º,
270 º
and
315 º
0% 1
cycle
And
70%
25/30
cycles
Single
phase:
at 0
0%
300
cycle
Mains power
quality should be
that of a typical
commercial or
hospital
environment.
Table of contents
Other Denjoy Medical Equipment manuals


Popular Medical Equipment manuals by other brands

Moller Medical
Moller Medical Liposat power Instructions for use

Aulisa
Aulisa Guardian Angel Rx Guardian Angel Rx Lite GA2000... Instructions for use

Apollo
Apollo Bariatric Professional APH188 user manual

METRADO
METRADO Gluceone user guide

Rossmax
Rossmax SB210 user manual

HemoCue
HemoCue Hb 301 operating manual


