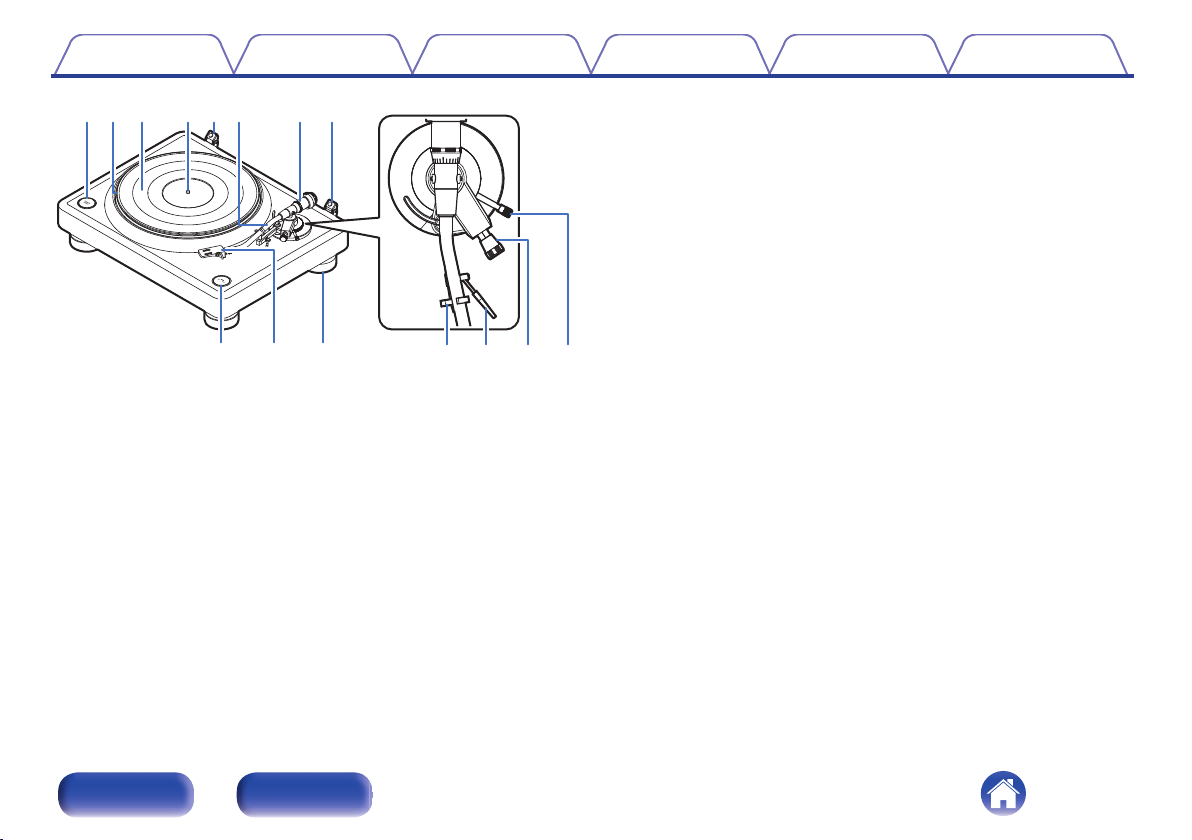
Denon DP-3000NE User manual

Cautions on handling 3
About care 3
About condensation 3
About lubricating 3
Accessories 4
Part names and functions 6
Front 6
Rear 8
Preparations
Assembly 10
Mounting the platter 11
Mounting the counterweight 11
Mounting the cartridge 12
Mounting the head shell 14
Attaching the dust cover 15
Mounting the subweight 15
Adjustments 16
Adjusting the height of the insulators 16
Adjusting the stylus pressure 17
Adjusting anti-skating 20
Adjusting the height of the tone arm 21
Connections
Connecting amplifier that have a phono input 24
Connecting the power cord 25
Playback
Record playback 26
Record playback 26
Stopping playback 28
Tips
Contents 29
Troubleshooting 30
Power does not turn on 31
Power cannot be turned off 31
No sound comes out 31
Hum noise is heard 32
Audio skips, scratches or is distorted 32
Howling is produced 33
The tone arm stops moving halfway 33
The platter does not rotate at the set speed 33
Appendix
Specifications 34
Contents Preparations Connections Playback Tips Appendix
2
Front Rear

Cautions on handling
About care
0Clean the cabinet and dust cover with the wiping cloth. Follow the
instructions when using a chemical cleaner.
0Benzene, paint thinner or other organic solvents as well as insecticide
may cause material changes and discoloration if brought into contact
with the unit, and should therefore not be used.
About condensation
If there is a major difference in temperature between the inside of the unit
and the surroundings, condensation (dew) may form on the operating
parts inside the unit, causing the unit not to operate properly. If this
happens, let the unit sit for an hour or two with the power turned off and
wait until there is little difference in temperature before using the unit.
About lubricating
The motor does not require lubricating. Do not lubricate this unit.
Contents Preparations Connections Playback Tips Appendix
3
Front Rear

Thank you for purchasing this Denon product. To ensure proper operation, please read this owner’s manual carefully before using the product.
After reading this manual, be sure to keep it for future reference.
Accessories
Check that the following parts are included with the product.
Quick Start Guide Safety Instructions Platter Platter mat
Dust cover Power cord
(for Europe model)
Power cord
(for North America model)
Power cord
(for Japan model)
Audio cable Earth wire Head shell
(with lead wire)
Overhang gauge
Contents Preparations Connections Playback Tips Appendix
4
Front Rear

qrewutty
oiQ
0Q1 Q2 Q3 Q4
ASTART/STOP button
Starts and stops the platter. (v p. 26)
BPlatter
Attached by mounting on the center spindle on the main unit.
(v p. 11)
CPlatter mat
Mounted on top of the platter. (v p. 11)
DCenter spindle
Place the platter and records so that it comes out through the center.
EHinge for attaching the dust cover
Used to attach the included dust cover. (v p. 15)
FTone arm
0The counterweight is mounted on the back. (v p. 11)
0The head shell is attached to the tip. (v p. 14)
0The sub weight is mounted on the back. (v p. 15)
GCounterweight
Attached to the back of the tone arm to adjust stylus pressure.
0“Mounting the counterweight” (v p. 11)
0“Adjusting the stylus pressure” (v p. 17)
HSPEED 33/45 button
Set the correct speed for the record you are playing. (v p. 26)
IHead shell
Mount a commercial cartridge to the head shell and then mount the
head shell at the tip of the tone arm. (v p. 12)
JInsulator
The height of the insulator can be adjusted. (v p. 16)
KArmrest
Rest the tone arm here when it is not in use for record playback.
LLifter lever
Raises and lowers the tone arm. Lowering the lever slowly lowers the
tone arm to place the stylus without damaging it or the record to be
played. (Factory default setting: lowered position)
MAnti-skating knob
Adjusts anti-skating. (v p. 20)
NArm height adjustment knob
Adjust the height of the tone arm according to the cartridge and head
shell you are using. (v p. 21)
Contents Preparations Connections Playback Tips Appendix
7
Front Rear

Rear
wqe
APHONO OUTPUT connectors
Connect equipment such as an amplifier with a PHONO input terminal.
(v p. 24)
BSIGNAL GND terminal
Use the included earth wire, even when connecting this unit to
amplifiers with grounded connections. (v p. 24)
CAC inlet (AC IN)
Used to connect the power cord. (v p. 25)
Contents Preparations Connections Playback Tips Appendix
8
Front Rear

oContents
Assembly
Mounting the platter 11
Mounting the counterweight 11
Mounting the cartridge 12
Mounting the head shell 14
Attaching the dust cover 15
Mounting the subweight 15
Adjustments
Adjusting the height of the insulators 16
Adjusting the stylus pressure 17
Adjusting anti-skating 20
Adjusting the height of the tone arm 21
Contents Preparations Connections Playback Tips Appendix
9
Front Rear

Assembly
Mount these included parts on the main unit before use.
Make sure to perform setup on a stable, even surface to prevent the influence of vibration or slanted angles on record playback.
Center spindle
Platter mat
Platter
Tone arm
Counterweight
Head shell
NOTE
0Make sure the power cord is not connected from this unit to a wall socket during assembly.
Contents Preparations Connections Playback Tips Appendix
10
Front Rear

Mounting the platter
1Mount the hole in the center of the platter on the center
spindle.
NOTE
0Make sure there are no foreign objects around the center spindle before
mounting the platter.
0The platter is heavy. Handle it with care.
0Take care not to get your fingers caught when mounting.
2Mount the platter mat on the platter.
0Mount the mat with the side featuring the DENON logo facing down.
Mounting the counterweight
1Insert the counterweight into the shaft on the back of
the tone arm, and turn it in the direction of the arrow
while gently pushing it.
0
0
Stylus pressure adjustment ring
0Mount the counterweight so that its stylus pressure adjustment ring is facing
the front.
NOTE
0It should be mounted carefully to avoid applying excessive force because the
thread of the counterweight is delicate.
Contents Preparations Connections Playback Tips Appendix
11
Front Rear

Mounting the cartridge
1Attach the head shell to the cartridge (not included)
loosely.
0Refer to the display or manual of the cartridge you are using and
ensure that the lead wire is correctly connected to the terminal of
the cartridge.
0To adjust to overhang, temporarily fix the cartridge so that it can
be moved.
Nut
Washer
(Mylar film)
Screw
Terminal
Cartridge
Tip
Lead wire
・Red (R)
・Green (ER)
・Blue (EL)
・White (L)
NOTE
0Use the included screws, nuts, washers and screwdriver.
0Do not touch the stylus.
0If the lead wire on the head shell is disconnected, connect the tip of the lead
wire to the terminal, as shown below.
0The included lead wires can be replaced with commercially available lead
wires.
Red (R)
Green (ER)
White (L)
Blue (EL)
Contents Preparations Connections Playback Tips Appendix
12
Front Rear

2Adjust the overhang and then securely fasten the
cartridge to the head shell.
AMount the overhang gauge (included) to the head shell.
Head shell mount surface
2 inches
(50 mm)
BAdjust the position of the cartridge so that the stylus is at the 2
inches (50 mm) point of the overhang gauge.
02 inches (50 mm) :This is the distance at which the stylus tip
traces the left and right channels with optimum balance
according to the positioning of the platter and tone arm.
(overhang value)
CTighten the screws with a screwdriver to secure the cartridge to
the head shell.
NOTE
0Mount the cartridge with no tilt or floating so that the stylus tip can trace the groove
on a record correctly.
floating
tilt
Contents Preparations Connections Playback Tips Appendix
13
Front Rear

Mounting the head shell
1Insert the head shell into the tip of the tone arm.
0Insert the head shell with its guide pin facing up and aligned with
the hole on the top of the tone arm.
Guide pin
2Turn the lock nut in the direction of the arrow to secure
the head shell.
Lock nut
NOTE
0Do not touch the stylus.
0Keep the head shell and the tone arm terminal clean. If they are dirty, this may
affect the sound quality. Regular cleaning is recommended.
Contents Preparations Connections Playback Tips Appendix
14
Front Rear

Attaching the dust cover
1Insert the edges of the hinges on the main unit into the
hinge slots of the dust cover.
0To remove the dust cover, open the dust cover all the way and then pull it in the
opposite direction to that indicated by the arrows.
Mounting the subweight
If your cartridge and head shell are too heavy to keep the tone arm parallel
to the record with the counterweight alone, attach the included subweight
to the tone arm to keep it balanced.
1Mount the subweight behind the counterweight by
inserting it in the screw hole at the back of the tone
arm.
0Refer to “Suitable cartridge weight” (v p. 35) for details on the weight range of
cartridges compatible with each of the weights.
Contents Preparations Connections Playback Tips Appendix
15
Front Rear

Adjustments
Tone arm
Counterweight
Lifter
Lifter lever
Anti-skating knob
Arm height
adjustment knob
Armrest
Platter
Insulator
Head shell
NOTE
0Make sure the power cord is not connected from this unit to a wall socket when
performing adjustments.
Adjusting the height of the insulators
1Turn the insulators to adjust their height so that the
turntable is placed level.
Increases the height Reduces the height
NOTE
0Do not overtighten the insulators as overtightening may result in damage.
0A commercial spirit level can be used for more accurate adjustment.
Contents Preparations Connections Playback Tips Appendix
16
Front Rear

Adjusting the stylus pressure
To enable the record stylus to follow the grooves of the record and pick up
sound (vibrations), it is necessary to apply a constant pressure (stylus
pressure) to the record from the stylus tip. A suitable stylus pressure value
is specified for each cartridge. If the stylus pressure is higher or lower than
the specified value, not only will the record playback sound be distorted
and the stylus jump, but the record stylus may wear out faster and the
record may become damaged. Therefore, make sure to adjust the stylus
pressure to the suitable value.
1Pull the anti-skating knob in the direction of the arrow.
This turns the anti-skating function off.
0.5
2Lower the lifter lever.
3Remove the tone arm from the arm rest.
4Holding the finger lift of the headshell, move the tone
arm over the platter.
Finger lift
NOTE
0For a cartridge with a removable stylus cover, remove the stylus cover.
Contents Preparations Connections Playback Tips Appendix
17
Front Rear

5Turn twist the counterweight so that the tone arm is
floating parallel to the platter.
0Perform adjustment by turning the counterweight gradually while
periodically removing your hand to check the position.
Keep it parallel
NOTE
0Make sure the stylus does not touch the platter mat or the main unit.
0Adjustments can also be made by sliding part of the counterweight. Loosen
the counterweight screw with the included screwdriver and slide the
counterweight. After adjusting, tighten the screw to secure the
counterweight.
Screw
0
0If your cartridge and head shell are too heavy to keep the tone arm parallel
to the record with the counterweight alone, attach the included subweight to
the tone arm. (v p. 15)
Contents Preparations Connections Playback Tips Appendix
18
Front Rear

6Return the tone arm to the armrest.
7Holding the counterweight with a finger so that it does
not move, turn the stylus pressure adjustment ring so
that its “0” mark is lined up with the line on the tone
arm.
0
Stylus pressure
adjustment ring
8Turn the counterweight in the direction of the arrow to
set the right cartridge stylus pressure.
0
0Refer to the manual of the cartridge you are using for details on the right
cartridge stylus pressure.
Contents Preparations Connections Playback Tips Appendix
19
Front Rear

Adjusting anti-skating
Anti-skating adjustment is performed to counter the force which pulls the
stylus tip inside due to the record rotation.
1Turn the anti-skating knob and set the same number as
the cartridge stylus pressure.
0.5
2Push the anti-skating knob in the direction of the arrow.
This turns the anti-skating function on.
0.5
0If the stylus pressure of your cartridge is higher than 3.0 g , set “3”.
0This will not affect the sensitivity of the arm because the anti-skating function of
this unit is performed by a magnetic system that does not come into contact with
the shaft of the tone arm.
Contents Preparations Connections Playback Tips Appendix
20
Front Rear
Other manuals for DP-3000NE
1
Table of contents
Other Denon Turntable manuals

Denon
Denon DP-29F User manual

Denon
Denon DP-400 User manual

Denon
Denon DP-500M User manual

Denon
Denon DP29F - DP 29F Turntable User manual

Denon
Denon DP-200USB User manual

Denon
Denon DP-29F User manual

Denon
Denon DJ-VL12 User manual

Denon
Denon DP-67L User manual

Denon
Denon DP-300F User manual

Denon
Denon DP-3000NE User manual

Denon
Denon DP-35F User manual

Denon
Denon DP-37F User manual

Denon
Denon DP-300F User manual

Denon
Denon DBT-3313UD User manual

Denon
Denon DVD-1730 User manual

Denon
Denon DN-C615 User manual

Denon
Denon DP-200USB User manual

Denon
Denon DP-29F User manual

Denon
Denon DP-450USB User manual

Denon
Denon DP-29F User manual