Denver DHD-160 User manual

CAUTION
RISK OF ELECTRIC SHOCK
DO NOT OPEN
The lightning flash with an arrowhead symbol within an equilateral triangle
is intended to alert the user to the presence of uninsulated "dangerous
voltage" within the product's enclosure that may be of sufficient magnitude
to constitute a risk of electric shock to persons.
The exclamation point within an equilateral triangle is intended to alert the
user to the presence of important operating and maintenance (servicing)
instructions in the literature accompanying the appliance.
WARNING:
DO NOT EXPOSE THIS APPLIANCE TO RAIN OR MOISTURE, DUE TO THE HIGH RISK OF FIRE
OR ELECTRIC SHOCK, DO NOT OPEN THE CABINET DANGEROUS HIGH VOLTAGES ARE
PRESENT INSIDE THE ENCLOSURE. ONLY QUALIFIED SERVICE PERSONNEL SHOULD
ATTEMPT THIS.
CAUTION:
TO PREVENT ELECTRIC SHOCK, MATCH WID
user can
Play the title o
FULLY
INSERT.
This Digital Video Disc Player employs a Laser System. To prevent direct exposure
to the laser beam, do not try to open the enclosure. Visible laser radiation emits when
open and interlocks are defeated. Use of controls or adjustments or performance of
procedures other than those specified herein may result in hazardous radiation
exposure.
To ensure proper use of this product, please read this owner manual carefully and
retain for future reference. Should the unit require maintenance, contact an authorized
service location, or contact our company office. Only qualified service personnel should
remove the cover.
DO NOT STARE INTO B E A M.
FCC NOTICE: This equipment has been tested and found to comply with the limits for a Class B digital
device. Pursuant with the FCC Rules, Part 15. These limits are designed to provide
reasonable protection against harmful interference in a residential installation.
This equipment generates, uses and can radiate radio frequency energy and,if not
installed and used in accordance with the instructions,may cause harmful interference
to radio communication,However,this is no guarantee that interference will not occur
in a particular installation.If this equipment does cause harmful interference to radio or
television reception,which can be determined by turning the equipment off and on,the
user is encouraged to try to correct the interference by one of the following measures:
- Reorient or relocate the receiving antenna.
- Increase the separation between the equipment and receiver.
- Connect the equipment into an outlet on a circuit different from that to which the
receiver is connected.
WARNING: Changes or modifications made to this equipment, not expressly approved by us or
parties authorized by us will void all the manufacture warranties.
To assure continued compliance,(example-use only shielded interface
cables when connecting to computer or peripheral devices).Any changes or
modifications not expressly approved by the party responsible for compliance
FCC Caution:
Safety Precautions
1

Safety Information
CAUTION: Use of controls or adjustments or performance of procedures other than those
specified herein may result in hazardous radiation exposure.
1.
2.
3.
4.
5.
6.
7.
8.
9.
10.
11.
12.
Please carefully study this manual and always keep it available. There are, however, some installation and
operation precautions which you should be aware of.
Read Instructions - All the safety and operating instructions should be read before the product is operated.
Retain Instructions - The safety and operating instructions should be retained for future reference.
Heed Warnings - All warnings on the product and in the operating instructions should be adhered to.
Follow Instructions - All operating and use instructions should be followed.
Cleaning - Unplug this product from the wall outlet before cleaning. Do not use liquid cleaners or aerosol
cleaners. Use a damp cloth for cleaning.
Attachments - Do not use attachments not recommended by the product manufacturer as they may cause
hazards.
Water and Moisture - Do not use this product near water - for example, near a bath tub, wash bowl, kitchen
sink, or laundry tub; in a wet basement; or near a swimming pool; and the like.
Accessories - Do not place this product on an unstable cart, stand, tripod, bracket, or table. The product
may fall, causing serious injury to a child or adult, and serious damage to the product. Use only with a cart,
stand, tripod, bracket, or table recommended by the manufacturer, or sold with the product. Any mounting of
the product should follow the manufacturer instructions, and should use a mounting accessory recommended
by the manufacturer.
A product and cart combination should be moved with care. Quick stops, excessive force, and uneven
surfaces may cause the product and cart combination to overturn.
Ventilation - Slots and openings in the cabinet are provided for ventilation and to ensure reliable operation
of the product and to protect it from overheating, and these openings must not be blocked or covered. The
openings should never be blocked by placing the product on a bed, sofa, rug, or other similar surface. This
product should not be placed in a built-in installation such as a bookcase or rack unless proper ventilation is
provided or the manufacturer instructions have been adhered to.
Power Sources - This product should be operated only from the type of power source indicated on the
marking label. If you are not sure of the type of power supply to your home, consult your product dealer or local
power company. For products intended to operate from battery power, or other sources, refer to the operating
instructions.
Grounding or Polarization - This product may be equipped with a
polarized alternating current line plug (a plug having one blade wider
than the other). This plug will fit into the power outlet only one way.
This is a safety feature. If you are unable to insert the plug fully into
the outlet, try reversing the plug. If the plug should still fail to fit,
contact your electrician to replace your obsolete outlet. Do not defeat
the safety purpose of the polarized plug. Alternate Warnings - This
product is equipped with a three-wire grounding-type plug, a plug
having a third (grounding) pin. This plug will only fit into a grounding
type power outlet. This is a safety feature, If you are unable to insert
the plug into the outlet, contact your electrician to replace your
obsolete outlet. Do not defeat the safety purpose of the grounding-type plug.
EXAMPLE OF
AS PER NA
ANTENNAGROUNDING
TIONALELECTRICALCODE
FIGURE A
GROUND
CLAMP
ELECTRIC
SERVICE
EQUIPMENT
ANTENNA
LEAD
WIRE
ANTENNA
DISCHARGE UNIT
(NEC SECTION 810-20)
GROUNDING CONDUCTORS
(NEC SECTION 810-21)
GROUD CLAMP
POWER SERVICE GROUNDING
ELECTRODE SYSTEM
NEC-NATIONALELECTRICALCODE
(NEC ART 250, PART H)
S2898A
2

Safety Information
13.
14.
15.
16.
17.
18.
19.
20.
21.
22.
23.
Outdoor Antenna Grounding - If an outside antenna or cable system is connected to the product, be sure the
antenna or cable system is grounded so as to provide some protection against voltage surges and built-up
static charges. Article 810 of the National Electrical Code, ANSI/NFPA 70, provides information with regard to
proper grounding of the mast and supporting structure, grounding of the lead-in wire to an antenna discharge
unit, size or grounding conductors, location of antenna-discharge unit, connection to grounding electrodes,
and requirements for the grounding electrode.
Lightning - For added protection for this product during a lightning storm, or when it is left unattended and
unused for long periods of time, unplug it from the wall outlet and disconnect the antenna or cable system. This
will prevent damage to the product due to lightning and powerline surges.
Power Lines - An outside antenna system should not be located in the vicinity of overhead power lines or
other electric light or power circuits, or where it can fall into such power lines or circuits. When installing an
outside antenna system, extreme care should be taken to keep from touching such power lines or circuits as
contact with them might be fatal.
Overloading - Do not overload wall outlets, extension cords, or integral convenience receptacles as this
can result in a risk of fire or electric shock.
Object and Liquid Entry - Never push objects of any kind into this product through openings as they may
touch dangerous voltage points or short-out parts that could result in a fire or electric shock. Never spill liquid
of any kind on the product.
Servicing - Do not attempt to service this product yourself as opening or removing covers may expose you
to dangerous voltage or other hazards. Refer all servicing to qualified service personnel.
Damage Requiring Service - Unplug this product from the wall outlet and refer servicing to qualified service
personnel under the following conditions:
a. When the power-supply cord or plug is damaged.
b. If liquid has been spilled, or objects have fallen into the product.
c. If the product has been exposed to rain or water.
d. If the product does not operate normally by following the operating instructions. Adjust only those
controls that are covered by the operating instructions as an improper adjustment of other controls may
result in damage and will often require extensive work by a qualified technician to restore the product to
its normal operation.
e. If the product has been dropped or damaged in any way, and
f. When the product exhibits a distinct change in performance - this indicates a need for service.
Replacement Parts - When replacement parts are required, be sure the service technician has used
replacement parts specified by the manufacturer or have the same characteristics as the original part.
Unauthorized substitutions may result in fire, electric shock, or other hazards.
Safety Check - Upon completion of any service or repairs to this product, ask the service technician to
perform safety checks to determine that the product is in proper operating condition.
Wall or Ceiling Mounting - The product should be mounted to a wall or ceiling only as recommended by the
manufacturer.
Heat - The product should be situated away from heat sources such as radiators, heat registers, stoves or
other products (including amplifiers) that produce heat.
3

Table of Contents
What's in the box..............................5
Putting the batteries in the remote
control.............................................5
Using the remote control................5
Remote control.................................6
Front Panel...................................7
Display.........................................7
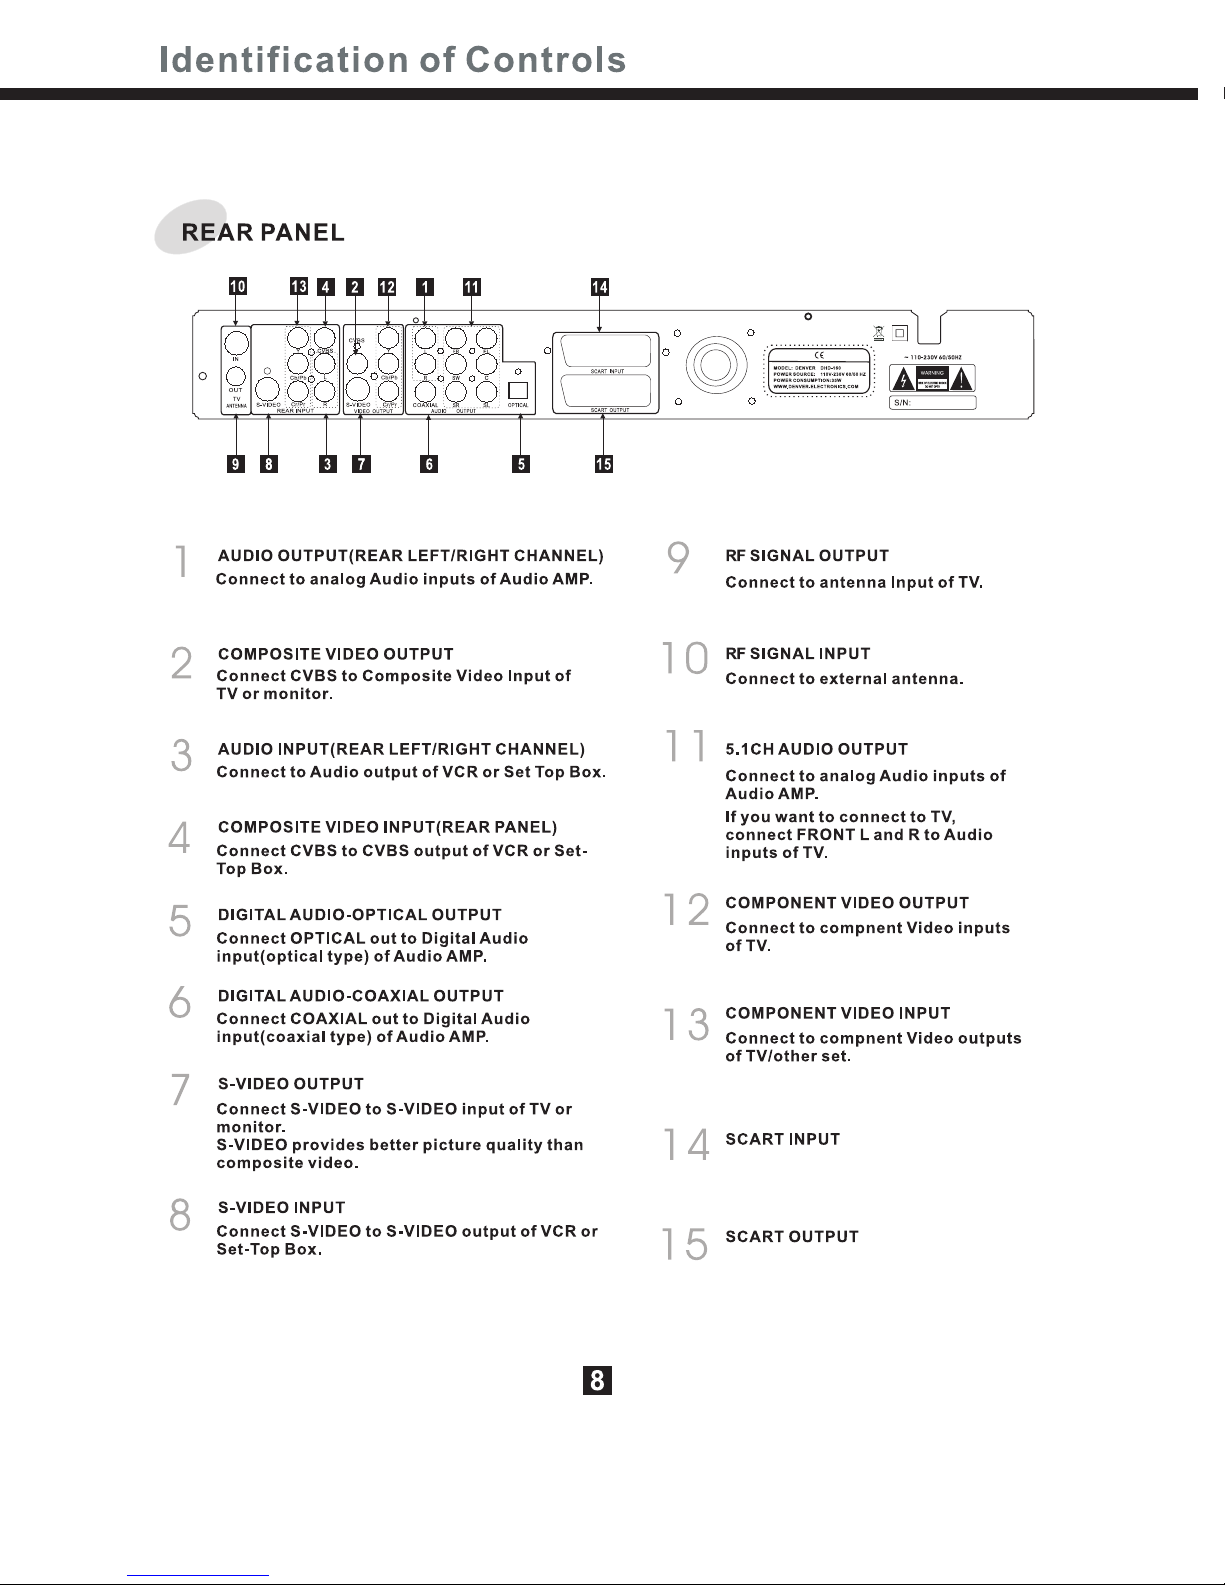
Rear Panel...................................8
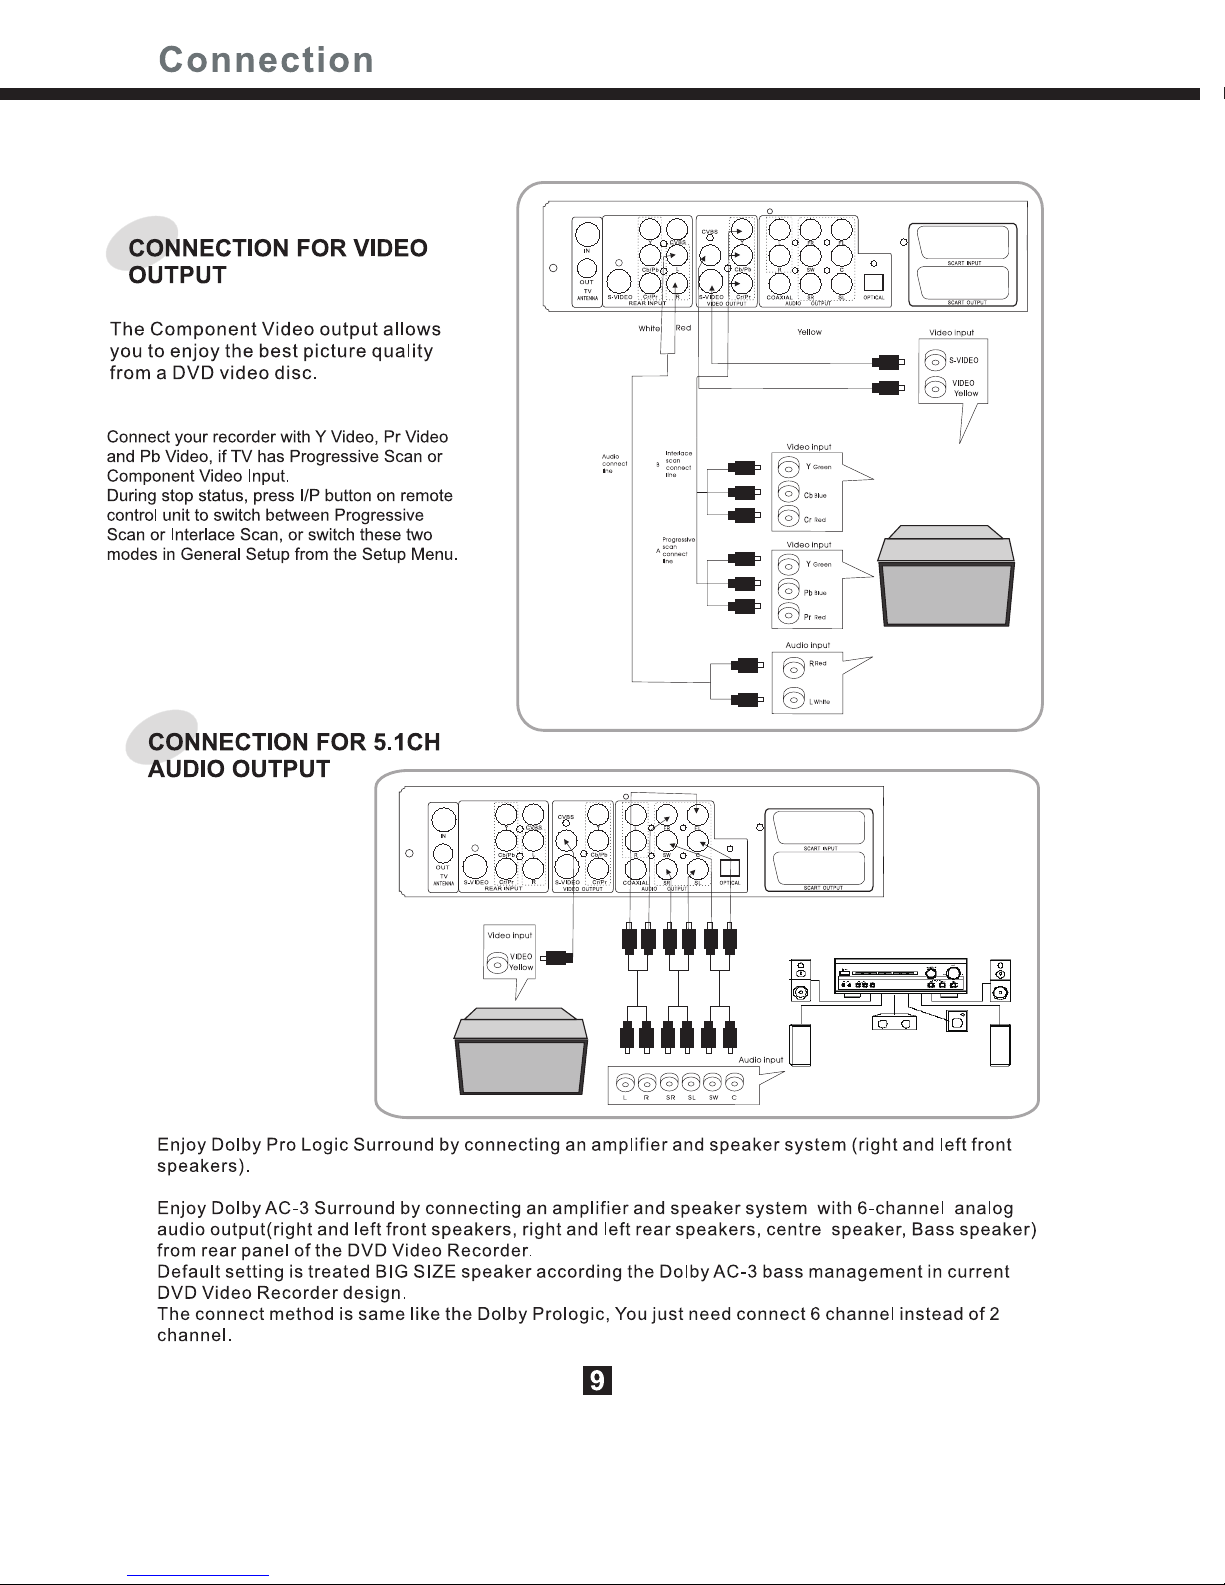
Connection For Video Output............9
Connection For Audio Output............9
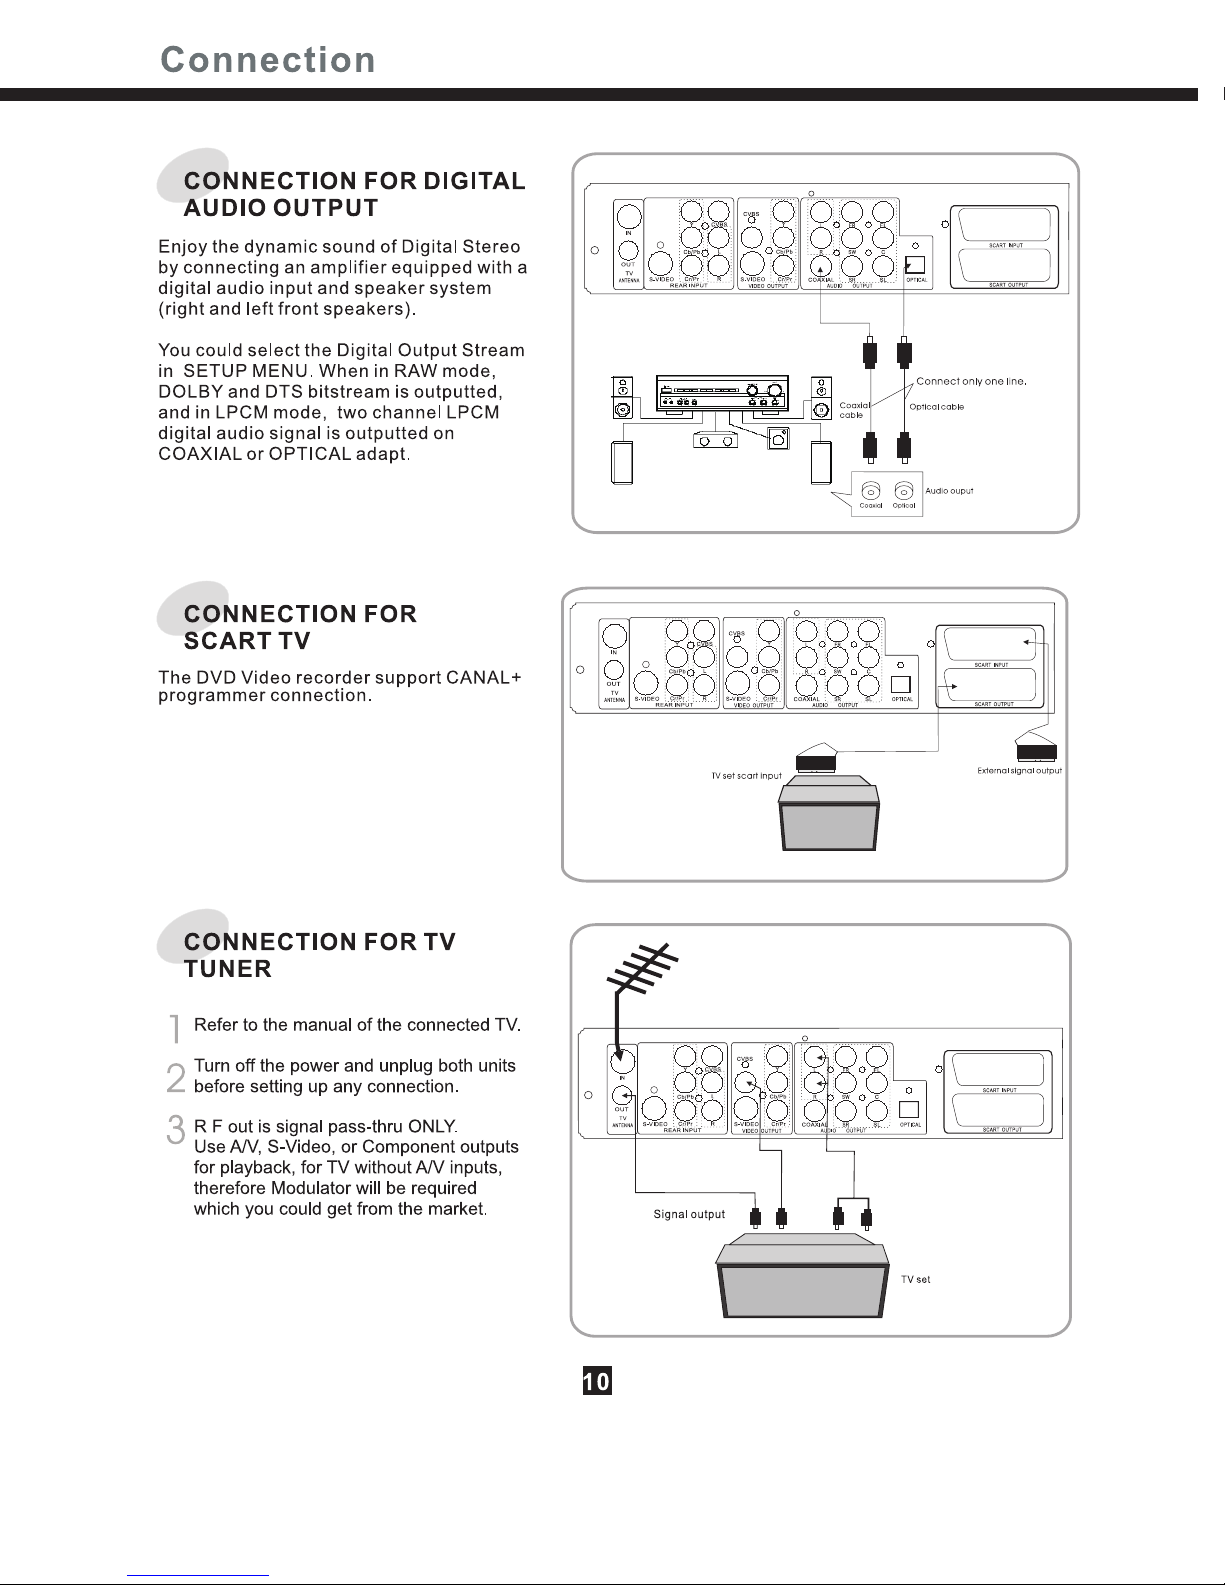
Connection For TV Tuner and SCART
Out...............................................10
Connection For AV Signal................11
Play DVD+RW or DVD+R Disc.........12
General Features............................13
Fast Forward/Backward..................14
Skip Forward/Backward..................14
Slow Forward.................................14
Frame by Frame Playback...............14
ZOOM Screen................................14
Repeating a Title, Chapter...............15
Selecting Audio Languages..........15
A-B Repeat....................................15
Switching the Camera Angle............15
Direct Search.................................16
Selecting Subtitles..........................16
Channel Search...........................19
Normal Recording........................19
One-Touch Record.......................20
Timer Record...............................21
Clock Setup.................................21
Editing a DVD+RW or DVD+R
disc.............................................22
Play disc......................................22
Erase disc...................................22
Rename disc................................22
Record a new title.........................23
Lock disc.....................................23
Finalize disc................................23
Editing a title of DVD+RW or
DVD+R........................................24
Chapterediting.........................25
Chapterhide or Unhide..................25
Title icon (Index picture)...............25
Time Shift....................................26
Recording to DVD.........................27
Recording Quality.........................27
Recording Source........................27
Chapter Markers..........................27
Timer Recording..........................28
Dubbing..................................28
HDD Title List...............................29
Sorting....................................29
Playback from HDD......................30
HDD Edit.....................................30
Split........................................30
Change index picture....................31
Rename......................................31
Lock/Unlock.............................31
Protect/Unprotect.....................31
Specifications..............................32
Troubleshooting........................33
Setting the Parental Lock................17
Using the Setup Menu.....................18
Before You Start
Control& Display
Connection
Basic Playback
Advanced Playback
Recording Options
Editing
Recording/Time Shift
HDD Recording
Additional Information
4

1
2
3
Before You Start
What's in the box
Please confirm that the following accessories are
in the box when you open it.
Accessories
OPEN/CLOSE
DV
Manual
Remote control
Operating instruction
(this manual)
Audio/video cable
AA dry cell batteries 2
Putting the batteries in the
remote control
Open the battery
compartment cover on the
back of the remote control.
Insert two AA/R03
batteries into
the battery compartment
following the indications
(+, -) inside the
compartment.
Close the cover.
Keep in mind the following when using
the remote control :
Make sure that there are no obstacles
between the remote and the remote sensor
on the unit.
Remote operation may become unreliable if
strong sunlight or fluorescent light is shining
on the unit's remote sensor.
Remote controllers for different devices can
interfere with each other. Avoid using
remotes for other equipment located close to
this unit.
Replace the batteries when you notice a fall
off in the operating range of the remote.
Incorrect use of batteries can result in
hazards such as leakage and bursting.
Please observe the following:
Don't mix new and old batteries
together.
Don't use different kinds of battery
together-although they may look similar,
different batteries may have different
voltages.
Make sure that the plus and minus ends
of each battery match the indications in
the battery compartment.
Remove batteries from equipment that
isn't going to be used for a month or more.
When disposing of used batteries,
please comply with governmental
regulations or environmental public
instruction's rules that apply in your
country or area.
Using the remote control
NOTE:
5
OPEN/CLOSE
STANDBY
GOTO CLEAR
ADD/
ENTER
SETUP
DISCOPER
P/N
TITLE MENU
HDD
AUDIO
MUTE
SUBTITLE
ANGLE
TIMER
I/P
ZOOM
USB DVD
CH+
CH-
VOL+
VOL-
SOURCE REC
NAVIGAT
REPEAT
SLOW
RETURN
EDIT
DHD-160

THE INSTRUCTIONS BELOW DESCRIBE THE
FUNCTIONS OF THE REMOTE CONTROL.
REMOTE CONTROL
Control & Display
6
OPEN/CLOSE
STANDBY
GOTO CLEAR
ADD/
ENTER
SETUP
DISC OPER
P/N
TITLE MENU
HDD
AUDIO
MUTE
SUBTITLE
ANGLE
TIMER
I/P
ZOOM
USB DVD
CH+
CH-
VOL+
VOL-
SOURCE REC
NAVIGAT
REPEAT
SLOW
RETURN
EDIT
1
2
3
4
5
6
7
8
9
10
11
12
13
14
15
16
17
18
19
20
21
22
29
30
31
32
33
34
35
36
37
38
39
40
28
27
26
25
24
23
1.STANDBY
2. NUMERIC BUTTONS
3. GO TO
4. ADD/CLEAR
5.
6. PAUSE
7.
8. ENTER
9. DIRECTION BUTTONS
10. SETUP
11. TITLE
12. MENU
13. SOURCE
14. USB
15. TIMER
16. EDIT
17. SLOW
18. RETURN
19. CHANNEL+
20. PAL/NTSC
21. CHANNEL-
22. INTERLACE/PROGRESSIVE SCAN
23. OPEN/CLOSE
24. PREVIOUS
25. STOP
26. NEXT
27. PLAY
28. NAVIGAT
29. ANGLE
30. SUBTITLE
31. REC
32. DVD
33. DISC OPER
34. HDD
35. ZOOM
36. REPEAT
37. VOLUME+
38. AUDIO
39. VOLUME -
40. MUTE
FAST BACKWARD
FAST FORWARD
HDD+ReWritable
DHD-160

1
2
3
4
5
6
7
8
STANDBY
9
10
11
12
13
14
15
16
17
18
19
20
REC
PBC
TVTS
SVCD
MP3
1
234
5
6
7
8
910
11 12
13 14
RECORD
STOP
PLAY
AUDIO L INPUT
AUDIO R INPUT
COMPOSITE VIDEO INPUT
USB INPUT
OPEN/CLOSE
DV Signal Input
CHANNEL+
CHANNEL-
SKIP BW
SKIP FW
TV LED
PAUSE
SOURCE
DV LED
REC LED
Front Panel
Display
1
2
3
4
5
6
7
DVD Indicator
SVCD/VCD/CD Indicator
Mp3 Indicator
TIMER Recording Indicator
TV Signal Indicator
RECORD Indicator
8
9
10
11
PBC Indicator
PLAY Indicator
ROTATION
PAUSE Indicator
Chapter Indicator
12
13
14
OPERATING Information
DOLBY DIGITAL Indicator
DTS Indicator
Lighting when playing DVD.
Lighting when playing SVCD/VCD/CD.
Lighting when playing Mp3
Lighting when timer recording is on.
Indicates title, chapter and track number and time, Tvchanel.
Indicates DOLBY Digital 5.1CH playback.
Rotates when the disc is spinning.
Control & Display
7
10 97812 6
2534
11
113
14
15 16
DVR-1029 DVD Recorder
Ch
Ch
SOURCE
REC
DVD+ReWritable
STANDBY
DV
REC
TV
S-Video
DHD-160
17 18 19 20
USB
USB LED
160G HDD
21 S-VIDEO INPUT
21


Basic Playback
Play DVD+RW Or DVD+R Disc
1
Index Picture Screen
Description:
1. The name of the pre-recorded.
The default is TITLE.
2. The date of the record.
4. The record quality
.
5. Length of the record.
Press the OPEN/CLOSE button.
The index pictures will appear on the screen as below.
The arrow of UP/DOWN in the title pictures means previous or next page in the DVD title details.
(The first page of the title include some DISC recording state at present.)
1. TITLE
01/01/2004
SP 00:00:20
1. TITLE
01/01/2004
SP 00:00:20
1.
2.
3.
4.
12:03:07
2. TITLE
01/01/2004
SP 00:00:20
12:03:07
3. TITLE
01/01/2004
SP 00:00:20
12:03:07
12:03:07
5.
3. The time of the record.
This will open the disc tray and allow for the placement of a playable disc
with the playback side down.
Use direction keys ( ) toUP/DOWN/RIGHT/LEFT
highlight the item you desired.
Press or to start playback of the title you selected.ENTER PLAY
,
Stop playback
Note:
When top picture is highlighted, press the previous index pictures will display
on the screen.
When it reaches the first one, if press again, the Index Picture Screen can only
be updated.
When bottom picture is highlighted, press the next index pictures will
display on the screen.
When it reaches the last one, if press again, the Index Picture Screen can
only be updated.
UP ARROW,
UP ARROW
DOWN ARROW,
DOWN ARROW
Press the button once to stop the player; press the button to resume playing.
To playback from the start, press the button twice then press the button.
STOP PLAY
STOP PLAY
After finishing playback of all titles contained on a DVD+RW or DVD+R disc, it will return to
the Index Picture Screen.
1. TITLE
01/01/2004
00:00:20SP
Insert a DVD+RW or DVD+R disc.
2
3
4
5
12

All playback operation can be realized by the navigation.
During playback,press , the time information is displayed, press again, the
control bar will displayed.
NAVIGAT NAVIGAT
Control bar is a collection of icons. Those icons are presentations of commands or information that
needed to finish a function. The details of every functions see below:
.
Press again to cancel the control bar.NAVIGAT
Press to highlight one icon and press to enter it, press to
select a item, press Press to return to the left icon.
UP/DOWN RIGHT UP/DOWN
ENTER. LEFT
Play
01/02
01/15
02/02-CHI
Off
01/01
00:01:22-01:29:52
DVD
MODE Normal
TRICK mode
TITLE
CHAPTER
AUDIO
SUBTITLE
ANGLE
T-TIME
Play
01/02
01/15
02/02-CHI
Off
01/01
00:01:22-01:29:52
DVD
Basic Playback
GENERAL FEATURES
MODE: Set your preferable playback mode
such as PROGRAM, SHUFFLE and
various repeat mode.
TITLE: Select to choose an available title by
inputting numbers.
TRICK mode:
Control playback by various setting
such as FAST FORWARD, FAST
BACKWARD, PAUSE, STOP, etc.
CHAPTER: Select to choose an available chapter
by inputting numbers.
AUDIO: Select your desired audio
setting, if available.
ANGLE: Select your desired camera
angle, if available.
SUBTITLE: Select to choose an available
subtitle by inputting numbers.
Display the current time and
the total time of disc
Press the third time, the on-screen-display will disappear.NAVIGAT
TIME:
1
2
3
4
13

Advanced Playback
Fast Forward/Backward
Press or button during play mode.
Each time you press button, playback
speed changes as :FF2,FF4,FF16,FF32
1
.
Press PLAY to resume normal playback.
Press button to resume normal
playback.
PLAY
2
Skip Forward/Backward
Use this function to move to the next or
previous chapter for DVD, track for VCD and
Audio CD.
Press button during play mode. The
DVD Recorder starts playing the previous
chapter or track.
1
Press button during play mode. The
DVD Recorder starts playing the next
chapter or track.
2
Use this function to play the DISC contents
in slow forward. During searching, audio will
be muted.
Slow Forward(DVD/VCD)
Press button during play mode.
The disc contents is played slowly forward.
SLOW
Each time you press button,
playback speed changes as below.
SLOW
Press button to resume normal
playback.
PLAY
Frame by Frame Playback
(DVD/VCD)
1
2
3
1
2
3
There is no sound when viewing Frame
playback or Slow playback.
Mp3 CD and Audio CD do not have Frame
Playback and Slow Playback feature.
Press during normal
playback to pause playback and press
to resume normal playback.
PAUSE/STEP
PLAY
Press during normal
playback.
One frame is advaned each time you press
.
PAUSE/STEP
PAUSE/STEP
Note:
Zoom Screen
Press button during playback.
The picture is zoomed.
ZOOM
Enlarges DVD/VCD screen image up to 2
times.
1
Each time you press button, the
zoom mode will be changed :
ZOOM
2
Youcanmovetheimagebyusing,,,
Button.
To cancel the zoom mode, press
button repeatedly until the player resume
to normal playback.
ZOOM
3
4
14

Repeating a Title, Chapler
Advanced Playback
Use this button to repeat the chapter/title for
DVD or track/disc for VCD and Audio CD.
Press button during playback.
The repeat information is displayed on the
top of screen.
REPEAT
1
Each time you press button, the
repeat mode is changed as follows.
REPEAT
2
With some DVD discs, there may be times
when repeat playback is not possible.
Note:
A-B Repeat
Use this function to repeat playback of a
selected segment. This is very useful for
studying foreign languages because it repeats
the selected segment until canceled.
Press button at the point of where
repeat play is to start.
A-B
The starting point of your selected segment is
set up.
Press button again at the point where
repeat play is to end.
A-B
The ending point is set up and the segment is
played repeatedly from A to B.
To cancel the A-B repeating, press
button once more.
A-B
The playing state changes to normal.
We recommend you set up the desired
segment within
a minimum 5 seconds for smooth repeat play.
Note:
1
2
3
Switching the Camera Angle
When a DVD contains recorded multiple angles
of a scene, you can select the Angle function.
Press button during playing.
Available angles of the current scene will
be displayed on the top of screen and the
angle is changed.
Each time you press button, the
angle is changed.
ANGLE
ANGLE
1
2
You can only change the angle for DVDs that
provide multiple angles of scenes.
The angle function will not work on DVD video
discs that do not contain recorded multiple
angles.
The number of angles varies from disc to disc.
Note:
It is possible to change the audio language to a
different language from the one selected at the
initial settings. This operation works only with
discs on which multiple audio languages are
recorded.
If the loaded disc supports multiple audio
languages, you can select the audio language.
Selecting Audio Languages
Press button during playback.
The audio information is displayed on the
top of screen.
AUDIO
Each time you press button, the
audio language is changed.
AUDIO
Language function is a disc dependent. In this
case, the language should be selected via the
disc menu.
1
2
Note:
15

Advanced Playback
You can select a specific chapter or title to
play.
Also you can move to a specific time in a track
or title.
Press button during playback.
The playback information appears on TV
screen.
Each time you press button, the
search mode is changed as follows.
GOTO
GOTO
Title Search
Chapter Search
Time Search
Select TITLE by pressing GOTO button.
Enter the title number by using numeric 0 to
9 button.
Press button to confirm. It starts to
play back from the specified title.
Select CHAPTER by pressing
button.
Enter the chapter number by using numeric
0 to 9 button.
Press button to confirm. It starts to
play back from the specified chapter.
Select TIME by pressing button.
Enter the time by using numeric to
button.
For example, if you want to go to 0:31:25,
press the numeric buttons in this order
(0,3,1,2,5)button.
Press button to confirm. It starts to
play back from the specified time.
ENTER
GOTO
ENTER
GOTO
09
ENTER
1
2
3
Direct Search Selecting Subtitles
It is possible to change the subtitle language
to a different language from the one selected
at the initial settings. This operation works
only with discs on which multiple subtitle
languages are recorded.
If the loaded disc supports multiple subtitles,
you can select the subtitle language.
Press button during playing.
The subtitle is displayed on the bottom
of screen.
SUBTITLE
1
2Each time you press button,
the subtitle language is changed.
SUBTITLE
SUBTITLE: 01/07 ENG
SUBTITLE: 02/07 GER
SUBTITLE: 03/07 SPA
SUBTITLE: 04/07 FRE
SUBTITLE: 05/07 CHI
SUBTITLE: 06/07 HUN
SUBTITLE: 07/07 HIN
OFF
DV Function
Connect DV with this recorder through
DV terminal.
16
Press the button once to change
the signal source to DV monitor state.
USB
Press the button to play.PLAY
1
2
3
USB Function
YoumustputtheUdiscintotheUSB
interface on the main unit.
If the U-Disc recognized by the system,
the bottom corner of the screen will
appear USB symbol.
Then press the USB button twice on the
remote control, and you can read the
content of the U disc.
1
3
2
This system can support most USB disc.
Support JPG\MP3 file playback of the USB only.
Can support CARDREADER function.
Note:

Setting the Parental Lock
DVD equipped with the parental lock function are rated according to their content. The contents
allowed by a parental lock level and the way a DVD can be controlled may vary from disc to disc.
For example, if the dise allows it, you could edit out violent scenes unsuitable for children and
replace them with more suitable scenes, or lock out playback of the disc all together.
YOU CAN USE THE PARENTAL LOCK FUNCTION ONL LOCK FEATURE
Press STOP button twice during playback.
Press SETUP Button during stop status.
Highlight the icon by pressing button.PREFERENCES UP/DOWN
TO CHANGE YOUR PASSWORD:
Highlight and press to save yourOK ENTER setting.
Press SETUP button to exit setup, press PLAY button to start.
1. Follow step 1-8 to select"New".
2. Enter new password.
3. Re-enter to confirm your new password.
4. Highlight OK and press ENTER to save it.
5. Press SETUP button to exit.
Enter Password
OK
OK Cancel
Input your password by numbers, highlight OK ENTERand press to confirm.
.
Press , the sub-menu of Set RatingENTER Level appears, use to select one rating,UP/DOWN
press to confirm it.ENTER
The pre-set password is 3308
Use the direction button to select Rating level,press button to confirm.ENTER
1
2
4
5
6
7
8
The menu appears on the TV screen.
4. Use UP/DOWN to select Rating Level, press
Parental Level
Change Password
Reset to Factory
NO PARENTAL
ON
SYSTEM SETUP PREFERENCES-
1
Screen saver
17
Enter Password here
OK
OK

Using the Setup Menu
This player allows you to customize the performance to your personal
preferences.
SETUP MENU
RECORDING VIDEO AUDIO LANGUAGE DATE/TIME PREFERENCES CLOCK
DISPLAYING THE SETUP MENU SCREEN
The SETUP Preferences.The selected category will provide you the setting details using the
succeeding screen.
Main Page
SPDIF Output
LPCM Output
RECORD SETUP
Auto Chapter Marker
Record Quality
On*
Off
VIDEO Setup
TV Display
Video Output Format
PAL
NTSC *
RAW
LPCM
Language Setup
System Language
Audio language
Subtitle language
Disc Menu language
* Factory defaults
English
Swedish
Off
English
Chinese
......
English*
Chinese
......
English*
Chinese
......
Downmix
TV Type
HQ
LP
SP
SLP
APS
SCAN *
Preferences Setup
Parental Level
Change Password
Reset to Factory
Screensaver
Date/Time Setup
Date-Time Setting
Program
Irelond
United kingd
Germany
France
.......
1. Press key to access
the setup menu.
SETUP
2. Press direction keys to
(Highlight) a item, then
press to confirm.ENTER
3. Press or return key to
exit setup menu.
SETUP
RECORDING
VIDEO
AUDIO
LANGUAGE
DATE/TIME
PREFERENCES
Modify Channel
Program Table
Timer Setting Menu
Country Selection
5min
10min
20min
30min
off
SP+
EP
*
EDIT *
SORT *
OK *
4:3LB
4:3PS
16:9WS
Interlaced
Progresive
*
AUDIO Setup
Dynamic Range
Speaker Setup
*
LPCM 48K
LPCM 96K
*
Full
off *
3/4
1/2
*
Date (mm/dd/yy)
Time (hh:mm)
Auto
Manual
*
P001......
P002......
......
NO PARENTAL
1G
2
3PG
4PG13
5
6PG-R
7 NC17
8 ADULT
*
OK *
OK *
ON
OFF *
OK *
TimeShift Setup
Refresh
Preserve
*
Time shift buffer mode:
Hard disk Info
Space Management
Emply hard disk
Erase optical disc
Show *
Automatically
Manually *
GO! *
OK *
TIME SHIFT
18
Geman
Danish
Spanish
Portuguese
Italian
Finnish

Recording Options
To record TV programs, you should search TV
channels first.
Press to access the setup menu.SETUP
Press to highlight the icon
and press to setup it.
UP/DOWN
PLAYBACK ENTER
Use the button to highlight
and press button to confirm.
RIGHT/LEFT APS
ENTER
It will search channels automatically.
During auto-searching, press to cancel
searching.
STOP
To browse the found channels, first press
to -Modify Channel Information,
press to enter the modify menu,
and you can also input numbers and press
.
UP/DOWN
ENTER
ENTER
If you want to skip one channel, use
to highlight the skip space of
the corresponding channel, and press
to confirm.
UP/DOWN
ENTER
Press again to exit.SETUP
Note:
For PAL-I/D/K/B/G/L TV system ,the channel
numbers 1-199.Different audio frequency adapt
to different system.
Press RETURN or UP to return to the main
control bar.
In PAL TV system setup menu, you could
use to highlight the
option, press you could
modify the turns of each channel according
you favorite.
UP/DOWN Program
Table ENTER
Make connections illustrated as page 9-11
Insert a recordable DVD+RW or DVD+R
disc into the recorder.
Press to access the Control
Bar
NAVIGATION
DVD
Normal
A-B Repeat
Chapter Repeat
MODE
Press to highlight the MODE
icon, and press and
to select the record way for the new record
event. You could select different mode
according different DVD+R or DVD+RW
discs.
UP/DOWN
SELECT UP/DOWN
CHANNEL SEARCH
NORMAL RECORDING
Press to highlight the
SOURCE icon, and press and
to select the input source which
you have connected as step 1.
UP/DOWN
ENTER
UP/DOWN
1
2
3
4
5
6
7
1
2
3
4
5
19
The menu appears on the TV screen.
4. Use UP/DOWN to select Rating Level, press
OFF
SCAN
SCAN
SYSTEM SETUP PLAYBACK-
1
Auto Chapter Marker
Record Quality
APS
Modify Channel
Program Table
Timer Setting Menu
Country Selection
SP
EDIT
SORT
OK
Irelond
Normal
Trick mode Stop
Title 07/07
Chapter 01/01
Audio 01/01-OTH
Subtitle Off
Angle 01/01
T-Time 0:04:20/5:27:31
Title Repeat
Disc Repeat

NORMAL RECORDING
Recording Options
Front CVBS: Front Audio/Video Input (on the
front panel)
Rear CVBS: Rear Audio/Video Input (on the
rear panel)
Rear S-VIDEO: Rear S-Video (on the rear
panel)
Each channel (you can select it by pressing
CHANNEL+/- or input the assigned number of
the channel to select your desired one directly.
DV: Digital Video (on the front panel)
YUV: YPbPr/YCbCr (on the rear panel)
Tuner: TV (on the rear panel)
Press to highlight the
QUALITY icon, and press and
to select the record quality, after
your selection, press to confirm it.
RIGHT/LEFT
ENTER
UP/DOWN
ENTER
HQ :
SP :
EP :
SLP :
High Quality, you can record for up
to 1 hour in a blank disc.
Standard Play, you can record for up
to 2 hours in a blank disc.
Extended Play, you can record for up
to 4 hours in a blank disc.
Super Long Play, you can record
for up to 6 hours in a blank disc.
The selection of record quality is worked
according the RECORD MODE selection.
Note:
Press to select TRICK icon,
and press and to
select .
UP/DOWN
ENTER UP/DOWN
RECORD
If you want to stop recording, press STOP.
If the DVD+RW or DVD+R is new, it will
take about three minutes to stop.
Note:
For a new DVD+R/RW, it will take about
30 minutes to format it before recording.
Generally, it takes more time and no more
than 5 minutes to rename the disc if press
stop button to stop the recording
operation.
""
ONE-TOUCH RECORD
During normal recording, press ,
the recorder will enter the record mode.
RECORD
You maybe could not enter the record
state for the difference between disc
format and TV format. Please change
another disc or change the signal input
format.
Note:
The record time will extend for another
30 minutes with each press.
The length of recording time is determined
by disc capacity and record quality.
With your setting, if it will exceed the
capacity of the disc, OTR will be
cancelled, and switched to normal record.
If you want to stop recording, press .STOP
1
2
3
6
7
8
20
Table of contents
Other Denver DVD Player manuals

Denver
Denver DVD-948 User manual

Denver
Denver DWM-100 USB BLACK User manual

Denver
Denver DVU-1008 User manual

Denver
Denver DVH-1019 MK2 User manual

Denver
Denver DVD-7779 MK2 User manual

Denver
Denver DVU-1112 User manual

Denver
Denver DVD-7779 MK2 User manual

Denver
Denver DVD-7742 User manual

Denver
Denver DVD-438 User manual

Denver
Denver LDD-2258MC User manual

Denver
Denver DVH-7786 User manual

Denver
Denver DVH-7781 MK2 User manual

Denver
Denver DVH-1243 User manual

Denver
Denver DVD-766 User manual

Denver
Denver DWM-100 USB BLACK User manual

Denver
Denver DVH-1238 User manual

Denver
Denver DVH-7769 BLACK User manual

Denver
Denver MT-769 User manual

Denver
Denver DVD-958KM User manual

Denver
Denver DVH-1239 User manual