Desa 000-12 User manual

Portable Infra-Red Heater for Nonresidential Space Heating
Owner’s Manual
MODEL
TC110
8,000-12,050 BTU
TC111
8,000-24,000 BTU
FOR YOUR SAFETY
If you smell gas:
1. Shut off gas to appli-
ance.
2. Extinguish any open
ame.
FOR YOUR SAFETY
Do not store or use gaso-
line or other ammable
vapors and liquids in the
vicinity of this or any other
appliance.
WARNING CARBON MONOXIDE HAZARD
This appliance can produce carbon mon-
oxide which has no odor.
Using it in an enclosed space can kill you.
Never use this appliance in an enclosed
space such as a camper, tent, car, or home.
Save this manual for future reference.
For more information, visit www.desatech.com
klsuiejlboeklhikokle ,,;log;e;;pdl;lklsuiejlb
kfdsfghfghfdg hlkrjty reti4mfifjeocmazn
klsuiejlb oeklhikokle, ,;log;e;;pdl;lklsuiejl
b
kfdfgs dfgh yurrtllcvbjerg mazn bwsjdsg
g
;
e
klsuiejlb oeklhikokle,, ;log;e;;pdl;lklsuiejlb
kfdsfgh hlkrjty reti4m fifjeocmazn
klsuiejlb oeklhikokle,,;log;e;;pdl;lklsuiejlb
kfdsfghfghfdg hlkrjtyreti4m fifjeocmazn
kfdsfgh fghfdghlkrjty reti4mfifjeoc mazn
klsuiejlboeklhi kokle ,,;log;e;;pdl;lklsuiejlb
kfdsfghfghfdghlkrjtyreti4m fifjeocm azn
klsuiejlb oeklhikokle,,;log;e;;pdl;lklsuiejlb
kfdsfgh fghfdghlkrjty reti4m fifjeoc mazn
klsuiejlb oeklhikokfdfgsdfghyurrtllcvbj erg
klsuiejlb oeklhikokle, ,;log;e;;pdl;lklsuiejlb
kfdsfghfghfdghlkrjty reti4m fifjeocm azn
klsuiejlb oeklhikokle,,;log;e;;pdl;l klsuiejlb
kfdsfghfghfdghlkrjtyreti4m fifjeocmazn
klsuiejlbkfdfgsdfghyurrtllcvb jerg mazn
Two Burner Tank
Top Shown With
Tank Stabilizer

www.desatech.com 118127-01B2
IMPORTANT: Read and understand this manual before
assembling, starting or servicing heater. Improper use
of heater can cause serious injury. Keep this manual for
future reference.
GENERAL HAZARD WARNING:
Failure to comply with the precautions and instructions
provided with this heater, can result in death, serious
bodily injury and property loss or damage from hazards
of re, explosion, burn, asphyxiation, carbon monoxide
poisoning, and/or electrical shock.
Only persons who can understand and follow the instruc-
tions should use or service this heater.
If you need assistance or heater information such as an in-
structions manual, labels, etc. contact the manufacturer.
SPECIFICATIONS
TABLE OF CONTENTS
Specications ...................................................... 2
Safety Information ............................................... 3
Assembly Instructions.......................................... 4
Operating Instructions ......................................... 5
Maintenance and Storage ................................... 6
Servicing.............................................................. 7
Technical Service................................................. 7
Replacement Parts.............................................. 7
Illustrated Parts Breakdown and Parts List.......... 8
Warranty and Repair Service ............................ 10
SINGLE BURNER MODELS
• Rating: 8,000 - 12,050 Btu/hr (2.3 - 3.5 kW)
• Type of Gas: Propane/LP Only
• Ignition: Match Light
• Gas Supply Pressure to regulator:
Max - Tank Pressure, Min - 20 psi (1.37 bar)
• Regulator Outlet Pressure:
10 - 18 psi (0.68 bar - 1.2 bar)
• Minimum Ambient Temp. Rating:
0° F (-17.8° C)
• Fuel Consumption per 20 lb. Cylinder:
36 hours
DOUBLE BURNER MODELS
• Rating: 8,000 - 24,000 Btu/hr (2.3 - 7.0 kW)
• Type of Gas: Propane/LP Only
• Ignition: Piezo or Match Light
• Gas Supply Pressure to regulator:
Max - Tank Pressure, Min - 20 psi (1.37 bar)
• Regulator Outlet Pressure:
10 - 18 psi (0.68 bar - 1.2 bar)
• Minimum Ambient Temp. Rating:
0° F (-17.8° C)
• Fuel Consumption per 20 lb. Cylinder:
18 hours

www.desatech.com
118127-01B 3
SAFETY INFORMATION
WARNING:Thisproductcon-
tainsand/orgenerateschemicals
known to the State of California
to cause cancer or birth defects,
or other reproductive harm.
WARNING: Not for home or
recreational vehicle use.
WARNING: Fire, burn, inhala-
tion, and explosion hazard. Keep
solid combustibles, such as build-
ing materials, paper or cardboard,
a safe distance away from the
heater as recommended by the
instructions.Neverusetheheater
inspaceswhichdoormaycontain
volatile or airborne combustibles,
orproductssuchasgasoline,sol-
vents,paintthinner,dustparticles
or unknown chemicals.
ASPHYXIATION HAZARD
• Do not use this heater for heating human
living quarters.
• Do not use in unventilated areas.
• The ow of combustion and ventilation
air must not be obstructed.
• Proper ventilation air must be provided
to support the combustion air require-
ments of the heater being used.
• Refer to the specication section of the
heater’s manual, heater data plate, or
contact DESA Industries to determine
combustion air ventilation requirements
of the heater.
• Lack of proper ventilation air will lead
to improper combustion.
• Improper combustion can lead to carbon
monoxide poisoning leading to serious
injury or death. Symptom of carbon mon-
oxide poisoning can include headaches
dizziness and difculty in breathing.
1. Keep children and animals away from
heater.
2. Never operate heater while sleeping or
unattended.
3. Check the heater thoroughly for damage.
Do not operate a damaged heater.
4. Do not modify the heater or operate a
heater which has been modied from its
original condition.
5. Use only propane/LP gas.
6. Use only vapor withdrawal propane/LP
supply. If there is any question about vapor
withdrawal, ask your propane/LP dealer.
7. For outdoor use only. Area must be well
ventilated. Provide minimum openings of
1 sq ft (0.093 m²) near the oor and 1 sq
ft. (0.093 m²) near the ceiling. Do not use
inside house, camper, tent, vehicle, or any
type of unvented or enclosed area.
8. Use heater in areas free from open
ames, combustible vapors, and dust.
9. Do not use heater in basement or below
ground level.
10. Before connecting heater to the propane/LP
tank, make sure the heater regulator knob is
in the "OFF" position. Always connect and
light heater in areas free of open ames.
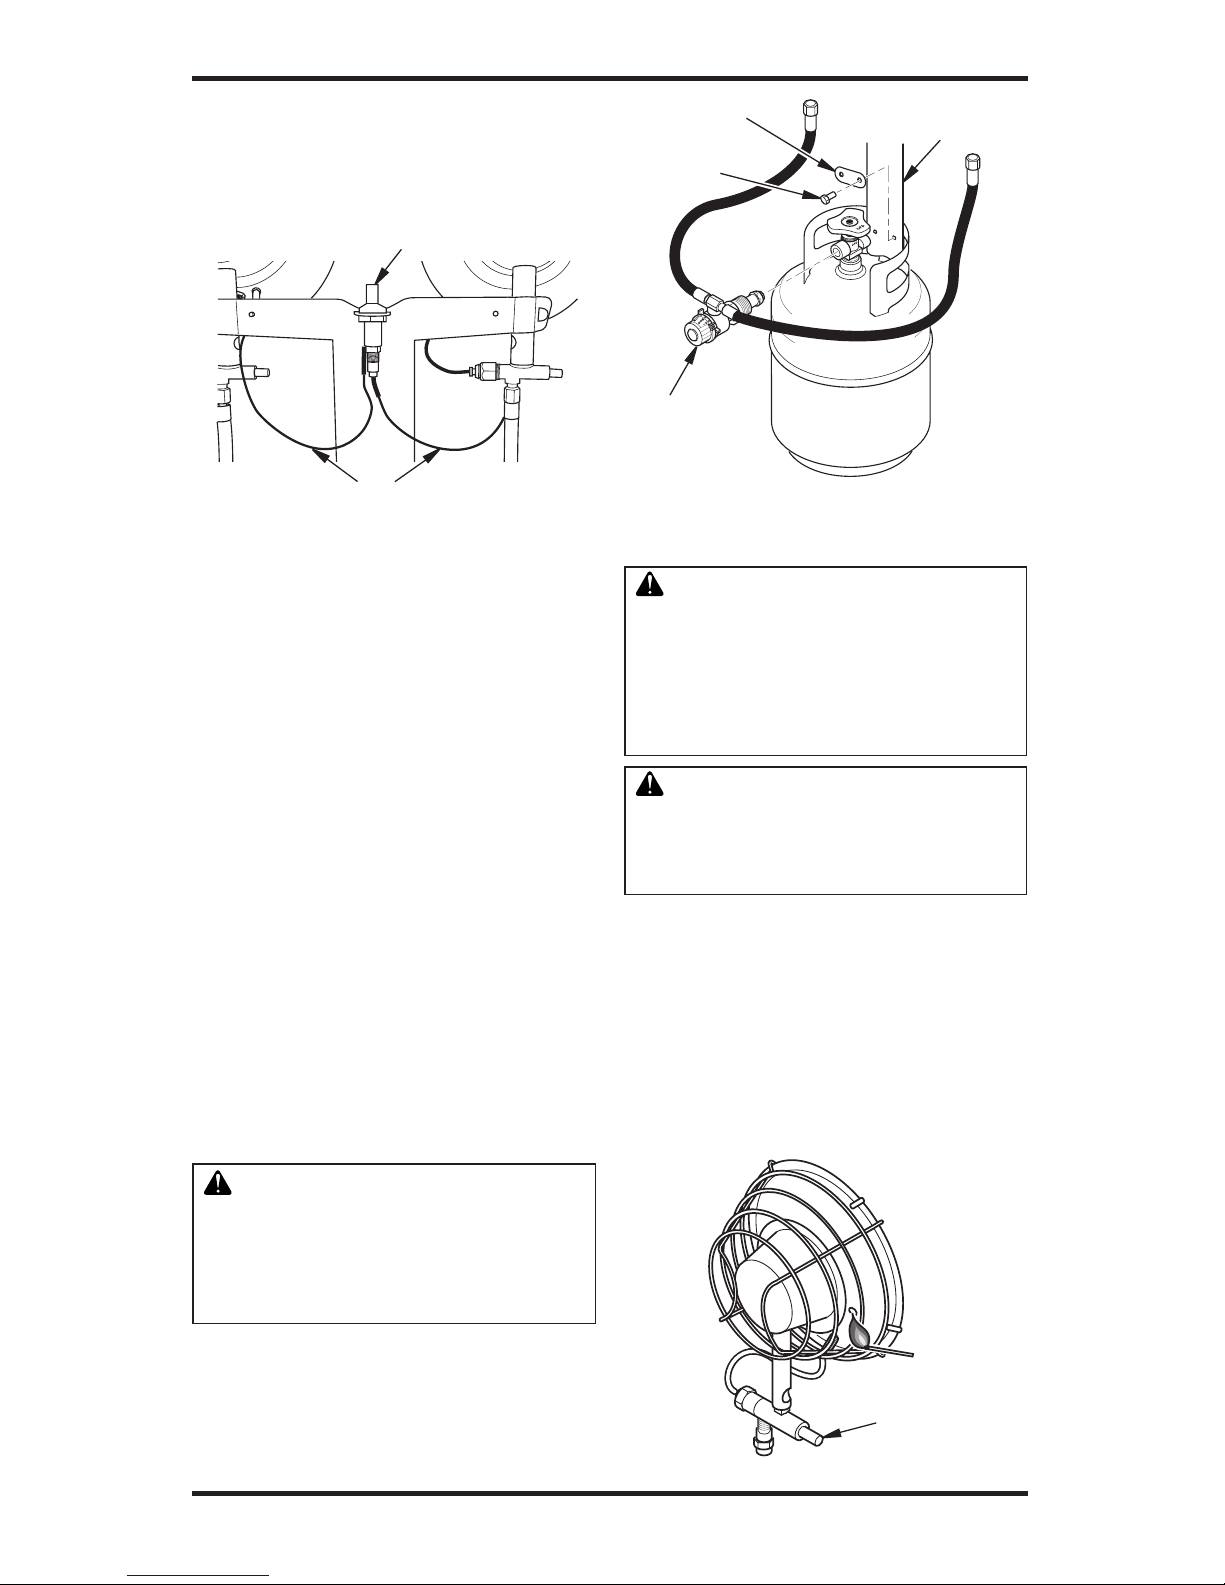
11. Mount the propane/LP cylinders vertically
(shutoff valve up). Secure them from fall-
ing or being knocked over and protect
them from damage.
12. IMPORTANT: Use only the hose and regula-
tor assembly provided with the dual burner
tank top heater. Inspect the hose assembly
before each use. If there is excessive abra-
sion or wear, or hose is cut, replace with
hose assembly listed on parts list before
using heater. The hose and regulator must
be protected from damage.
13. The heater burner must be at least 2 ft.
(0.61 m) above the oor. Always attach
to propane/LP tank in an upright position.
Never operate a heater on its side or at-
tach to propane/LP tank in a horizontal
position. This could lead to dangerous
are-ups or re. Do not direct heat toward
propane/LP cylinders.
14. Maintain minimum clearance from normal
combustible materials (like paper) as fol-
lows: Sides 3 ft. (0.91 m); Top and Front 5
ft. (1.5 m). Locate 10 ft. (3 m) from canvas
or plastic tarpaulins or similar coverings
and secure them to prevent apping or
movement due to wind action.
15. If at any time gas odor is detected, IMME-
DIATELY DISCONTINUE operation until
the source of gas has been located and
corrected.
16. Install the heater such that it is not directly
exposed to water spray, rain, dripping
water and/or wind.
17. Operate only on a stable, level surface.

www.desatech.com 118127-01B4
Figure 3 - Attaching Burner Head
Assembly to Support Arm
18. Do not attempt to light one burner off of
the other. Use one match per burner.
19. Do not overlap or point burners at each
other.
20. Do not raise burner heads and cover air
inlet holes in mixing tube with burner head
bracket.
21. Wing nuts and burner heads become
very hot during operation. Do not attempt
to adjust burner position while heater is
operating. Allow 15 minutes to cool.
22. For use with 20 lb. propane cylinders only.
23. Due to the high surface and exhaust
temperatures, adults and children must
observe clearances to avoid burns or
clothing ignition.
24. Do not move, handle or service while hot
or burning. Do not attach or remove a hot
or operating heater from the propane/LP
tank. Severe burns may result.
25. Before each use, check heater for leaks.
Never use an open ame to check for
leaks. Apply a mixture of liquid soap and
water to all joints. Bubbles forming show
a leak. Correct all leaks.
26. Keep all connections and ttings clean.
Make sure propane/LP tank valve is clean.
Check "O" ring on heater inlet fuel valve
connector for damage before each use.
Replace if worn or damaged.
27. The LP gas cylinder must be constructed
and marked in accordance with the speci-
cations for the LP gas cylinders of the
US Department of Transportation (DOT)
or Transport Canada.
28. Use only in accordance with local codes
or, in the absence of local codes, with the
CAN1- B149 Installation Code.
29. Storage of heater is permissible only if
the cylinder is disconnected and removed
from heater.
30. Always remove heater from propane tank
after each use. Always store propane
tank outdoors in a well ventilated space
out of the reach of children. Never store
propane tank in a building, garage, or any
other enclosed area. Never store propane
tank near high heat, open ame, or where
temperatures exceed 100° F (38° C).
ASSEMBLY INSTRUCTIONS
2 BURNER MODELS ONLY
1. Inspect the heater components for pos-
sible shipping damage. If any is found, im-
mediately notify the dealer. Check to make
sure that all components are included with
your heater (see pages 8 and 9).
SAFETY INFORMATION
Continued
Figure 1 - Installing Piezo Ignitor
Piezo Ignitor
Piezo
Mounting
Nut
Burner
Support
Bracket
Figure 2 - Attaching Burner Hoses to
Regulator
Burner Head
Assembly
Support
Arm
Burner Head
Mounting Bracket
Brass Screw
Slot
Air Hole
2. Insert the piezo ignitor into the bracket
on the burner support bracket as shown
in Figure 1. Tighten the piezo mounting
nut. Do not over tighten the nut.
3. Connect the burner hoses together as
shown in Figure 2. Wrench tighten to
insure leak tight connection.
4. Mount the burner assembly onto the sup-
port arm using the burner head mounting
brackets and brass screws as shown in
Figure 3. Place side of bracket into the slot
on support arm. Secure with screw. Make
certain that the air holes on the sides of
the burner tube are not blocked. Securely
tighten the burners into place.

www.desatech.com
118127-01B 5
OPERATING INSTRUCTIONS
1. Check heater for damage. If heater is
damaged, promptly inform dealer where
you bought heater.
2. Follow all of the safety and operating
precautions.
3. Check the "O" ring on the POL before
each use. Replace the "O" ring if there is
any sign of wear or damage.
4. Make sure heater regulator knob is in the
"OFF" position.
5. 2 Burner Models Only Attach the heater
to the guard on the propane/LP cylinder
with the support arm on the inside of the
guard and bolts through two holes in the
guard (see Figure 5). Tighten the support
arm bracket into place using the wing nuts
provided.
6. For All Models Connect the POL tting at
regulator to the propane/LP cylinder by
rotating the POL nut counter clockwise
into the propane/LP cylinder's valve outlet
and securely tighten with a wrench.
WARNING: Attach heater in
upright position. Never attach
heater in a horizontal position.
This could lead to dangerous
are-ups or re.
7. Securely tighten all gas connections.
8. Open the cylinder's gas valve and check
all connections for leaks. Apply mixture
of liquid soap and water to gas joints.
Bubbles forming show a leak that must
be corrected. DO NOT USE A FLAME.
Figure 4 - Attaching Electrode Wires to
Piezo Ignitor
Piezo Ignitor
Electrode Wires Figure 5 - Attaching Support Arm and
Regulator to Propane/LP Tank
Regulator
Support
Arm
Bolt
Support Arm
Bracket
Red Button
on Safety
Valve
TO START HEATER
WARNING: When lighting the
heater DO NOT look over top of
heater (reector). Stand to the
sideoftheheaterduringignition.
Do not stand or have any part of
your body in front of the heater.
WARNING: MAKE SURE
THERE IS NO OPEN FLAME IN
THE AREA. Fully open the valve
on the propane/LP cylinder.
Read all lighting instructions before attempting
to ignite heater.
1. Turn the heater regulator knob counter-
clockwise to the "HI" position.
2. Repeatedly push and release the piezo
ignitor (dual burner), or place a lighted
match near the face of the heating ele-
ment (mesh screen) of the burner you are
lighting, using the hole located on the side
of the reector. See Figure 6.
Figure 6 - Lighting Heater With a Match
5. Attach the electrode wires to the piezo
ignitor as shown in Figure 4.
SAFETY INFORMATION
Continued

www.desatech.com 118127-01B6
CAUTION: Do not light at the
orice.
3. Depress the red button on the safety valve
admitting gas to the burner (see Figure 6,
page 5).
WARNING:Donotdepressred
valve button before repeatedly
activating the piezo or inserting
match.
4. When the gas on the face of the mesh
screen lights, continue to hold the valve
button depressed for 30 seconds, then
release.
5. If ame goes out, wait 5 minutes and
repeat the lighting procedure.
6. If heater will not light after repeated tries,
do not attempt to repair heater. Return
heater to nearest authorized service cen-
ter or to manufacturer of this product.
7. For dual burner models, repeat steps 1
through 4 to ignite the other burner.
8. After both burners or single burner, are
lit, turn the heater regulator knob to the
desired heat setting (LOW, MED, HI).
TO STOP HEATER
1. Securely close valve on the propane/LP
cylinder.
2. Turn the heater regulator knob to the
"OFF" position. Wait 15 minutes for the
heater to cool down before handling
heater.
3. Always remove the heater from the pro-
pane/LP tank after each use. Do not store
the heater while attached to propane/LP
tank. Remove the heater from the pro-
pane/LP tank by turning the fuel connector
nut clockwise. Always store propane/LP
tank outdoors. Never store propane/LP
tank in an enclosed area.
OPERATING INSTRUCTIONS
Continued
TO RESTART HEATER
1. Securely close valve at propane/LP
cylinder.
2. Wait 5 minutes.
3. Restart following To Start Heater proce-
dure, page 5.
MAINTENANCE AND
STORAGE
1. Inspect heater before each use. Check
connections for leaks. Apply mixture of
liquid soap and water to connections.
Bubbles forming show a leak that must
be corrected. Correct all leaks at once.
Have heater inspected at least annually
by a qualied service person.
2. Before each use, check the soft "O" ring
seat at the bullnose of the POL tting. If
the "O" ring is cut, scuffed, or otherwise
damaged, replace it with part number
LPA2025.
3. Inspect hose/regulator assembly before
each use. If hose is highly worn or cut,
replace.
4. Turn off the gas at the propane/LP gas
supply cylinder when the heater is not
in use.
5. When the heater is to be stored, the
connection between the propane/LP gas
supply cylinder and the heater must be dis-
connected and the cylinder removed from
the heater and stored out of doors and in
accordance with Chapter 5 of the standard
for CAN1-B149 Installation Code.

www.desatech.com
118127-01B 7
SERVICING
A hazardous condition may result if a heater
is used that has been modied or is not func-
tioning properly. When the heater is working
properly:
• The emitter screen is glowing bright
orange-red.
• There are no ames above the burner.
• The ame is burning on the surface of the
screen and not inside the burner (ash-
back).
• There is no strong disagreeable odor, eye
burning or other physical discomfort.
• There is no smoke or soot internal or ex-
ternal to the heater.
• There are no unplanned or unexplained
shut downs of the heater.
The parts lists and exploded view show the
heater as it was constructed. Do not use a
heater which is different from that shown. In
this regard, use only the hose, regulator and
cylinder connection tting (called a POL t-
ting) supplied with the heater. IMPORTANT:
For this heater, the regulator must be set as
shown in Specications, page 2. If there is
any uncertainty about the regulator setting,
have it checked.
TECHNICAL SERVICE
A heater which is not working right must be
repaired, but only by a trained, experienced
service person. To nd the service center
closest to you, or if you have further ques-
tions about this heater, contact DESA Heat-
ing Products’ Technical Service Department
at 1-866-672-6040. When calling, please
have your model and serial numbers of your
heater ready.
You can also visit DESA Heating Products’ Tech-
nical Service web site at www.desatech.com.
You may also obtain in-warranty or out-of-
warranty service by taking the product to your
local service center.
REPLACEMENT PARTS
WARNING: Use only original
replacement parts. This heater
must use design-specic parts.
Do not substitute or use generic
parts. Improper replacement
parts could cause serious or fa-
tal injuries. This will also protect
your warrantycoverageforparts
replaced under warranty.
PARTS UNDER WARRANTY
Contact authorized dealers of this product. If
they can’t supply original replacement part(s),
call DESA Industries at 1-416-255-5333.
When calling DESA Industries, have ready
• your name
• your address
• model number of your heater
• how heater was malfunctioning
• purchase date
In most cases, we will ask you to return the
part to the factory.
PARTS NOT UNDER WARRANTY
Contact authorized dealers of this product. If
they can’t supply original replacement part(s),
call DESA Industries’ Parts Department at
1-416-255-5333.
When calling DESA Industries, have ready:
• model number of your heater
• the replacement part number

www.desatech.com 118127-01B8
ILLUSTRATED PARTS BREAKDOWN
MODELS
TC110 AND TC111
2
1
2
3
4
6
75
8
18
9
10
11
12
17
13
14
15
1
16
16

www.desatech.com
118127-01B 9
2
12
13
14
1
16
PARTS LIST
This list contains replaceable parts used in your heater. When ordering parts, follow the
instructions listed under Replacement Parts on page 7 of this manual.
KEY
NO. PART NO. DESCRIPTION QTY.
1114092-01 Burner Head Assembly • • 1-2
2100911-01 Grille • • 1-2
3097159-05 Piezo Ignitor • 1
4 102334-01 Nut, Piezo • 1
5114095-01 Support Arm • 1
6114099-01 Burner Head Mounting Bracket • 2
7 114145-01 Brass Screw • 2
8114093-01 Hose Assembly • 2
9 114096-01 Support Arm Bracket • 1
10 114098-01 Fitting • 1
11 114097-01 Fitting • 1
12 LPA2025 POL Excess Flow/Regulator • • 1-2
13 114100-01 Thermocouple • • 1-2
14 100898-01 Thermocouple Nut • • 2-4
15 114094-01 Electrode Assembly (Round) • 1
114094-02 Electrode Assembly (Flat) • 1
16 116995-01 Rear Guard • • 1-2
17 115063-01 Wing Nut • • 2
18 115062-01 Shoulder Bolt 5/16-18 x 1.25 • • 2
PARTS AVAILABLE - NOT SHOWN
101834-03 Instruction Hang Tag • 1
101834-04 Instruction Hang Tag • 1
099720-01 Tank Stabilizer • • 1
LPA5050 Replacement Screen Assembly • • 1-2
MODELS
TC110 AND TC111
Dual Burner
Single Burner

WARRANTY INFORMATION
KEEP THIS WARRANTY
Model
Serial No.
Date of Purchase
Propane Infra-Red Tank Top Heater Limited Warranty
DESA Industries warrants this product and any parts thereof, to be free from defects in materials
and workmanship for one (1) year from the date of rst purchase when operated and maintained in
accordance with instructions. This warranty is extended only to the original retail purchaser, when
proof of purchase is provided.
This warranty covers only the cost of parts and labor required to restore the product to proper operating
condition. Transportation and incidental costs associated with warranty repairs are not reimbursable
under this warranty.
Warranty service is available only through authorized dealers and service centers.
This warranty does not cover defects resulting from misuse, abuse, negligence, accidents, lack of
proper maintenance, normal wear, alteration, modication, tampering, contaminated fuels, repair
using improper parts, or repair by anyone other than an authorized dealer or service center. Routine
maintenance is the responsibility of the owner.
This Express Warranty Is Given In Lieu Of Any Other Warranty Either Expressed Or Implied, Including
Warranties Of Merchantability And Fitness For A Particular Purpose.
DESA Industries assumes no responsibility for indirect, incidental or consequential damages. Some
provinces do not allow the exclusion or limitation of incidental or consequential damages. These
limitations or exclusions may not apply to you. This Limited Warranty gives you specic legal rights
and you may also have other rights which vary from province to province.
82 Akron Road
Toronto, Ontario
M8W 1T2
415-255-5333
www.desatech.com
118127-01
Rev. B
05/06

Manual del propietario del calentador portátil de infrarrojos
para calefacción ambiental no residencial
MODELO
TC110
8,000-12,050 BTU
TC111
8,000-24,000 BTU
ADVERTENCIA
PELIGRO DE MONÓXIDO DE CARBONO
Este aparato puede producir monóxido de carbono,
el cual no tiene olor.
Utilizarlo en un espacio cerrado le puede ocasionar
la muerte.
Nunca utilice este aparato en espacios cerrados
tales como casas móviles, tiendas de campaña,
autos o residencias.
Guarde este manual para referencias futuras.
Para obtener más información visite www.desatech.com
klsuiejlboeklhikokle,,;log;e;;pdl;l klsuiejlb
kfdsfghfghfdg hlkrjty reti4mfifjeocmazn
klsuiejlb oeklhikokle,, ;log;e;;pdl;lklsuiejl
b
kfdfgs dfghyurrtllcvbjerg mazn bwsjdsg
g
;
e
klsuiejlb oeklhikokle,, ;log;e;;pdl;lklsuiejlb
kfdsfgh hlkrjty reti4m fifjeocmazn
klsuiejlb oeklhikokle,,;log;e;;pdl;lklsuiejlb
kfdsfghfghfdg hlkrjtyreti4m fifjeocmazn
kfdsfgh fghfdghlkrjty reti4mfifjeocmazn
klsuiejlboeklhi kokle,,;log;e;;pdl;l klsuiejlb
kfdsfghfghfdghlkrjtyreti4m fifjeocm azn
klsuiejlb oeklhikokle,,;log;e;;pdl;lklsuiejlb
kfdsfgh fghfdghlkrjty reti4m fifjeocm azn
klsuiejlb oeklhikokfdfgsdfghyurrtllcvbj erg
klsuiejlb oeklhikokle,, ;log;e;;pdl;lklsuiejlb
kfdsfghfghfdghlkrjty reti4m fifjeocm azn
klsuiejlb oeklhikokle,,;log;e;;pdl;lklsuiejlb
kfdsfghfghfdghlkrjtyreti4m fifjeocmazn
klsuiejlbkfdfgsdfghyurrtllcvbjerg mazn
Se muestra el calentador
para tanque con doble
quemador y estabilizador
de tanque
POR SU SEGURIDAD
Si percibe olor a gas:
1. Cierre el suministro de
gas al aparato.
2. Apague cualquier lla-
ma al descubierto.
POR SU SEGURIDAD
No guarde ni utilice ga-
solina u otros vapores y
líquidos inflamables cer-
ca de este aparato ni de
cualquier otro.

www.desatech.com 118127-01B2
IMPORTANTE: lea y comprenda este manual antes de
ensamblar, encender o dar servicio al calentador. El uso
inadecuado del calentador puede causar lesiones gra-
ves. Conserve este manual para referencias futuras.
ADVERTENCIA GENERAL DE PELIGRO:
El incumplimiento de las precauciones e instrucciones
proporcionadas con este calentador puede causar la
muerte, lesiones físicas graves y pérdidas o daños a la
propiedad ocasionados por incendios, explosiones, que-
maduras, asfixia, intoxicación con monóxido de carbono
y/o electrocución.
Únicamente las personas que puedan entender y seguir las
instrucciones deberán usar o dar servicio a este calentador.
Si necesita ayuda o información sobre el calentador, por
ejemplo, un manual de instrucciones, etiquetas, etc., co-
muníquese con el fabricante.
ESPECIFICACIONES
MODELOS CON UN SOLO
QUEMADOR
• Clasicación:8,000-12,050Btu/h
(2.3-3.5kW)
• Tipodegas:propanoogasLPsolamente
• Encendido:mediantefósforo
• Presióndelsuministrodegasalregulador:
máximapresióneneltanque,mínima20
PSI(1.37bar)
• Presióndesalidadelregulador:
10-18PSI(0.68bar-1.2bar)
• Clasificación de temperatura ambiente
mínima:-17.8°C(0°F)
• Consumodecombustibleporcilindrode9
Kg(20lb):36horas
MODELOS CON DOBLE
QUEMADOR
• Clasicación:8,000-24,000Btu/h
(2.3-7.0kW)
• Tipodegas:propanoogasLPsolamente
• Encendido: piezoeléctrico o mediante
fósforo
• Presióndelsuministrodegasalregulador:
máximapresióneneltanque,mínima20
PSI(1.37bar)
• Presióndesalidadelregulador:
10-18PSI(0.68bar-1.2bar)
• Clasificación de temperatura ambiente
mínima:-17.8°C(0°F)
• Consumodecombustibleporcilindrode9
Kg(20lb):18horas
TABLA DE CONTENIDO
Especicaciones................................................. 2
Informacióndeseguridad.................................... 3
Instruccionesdeensamble.................................. 4
Instruccionesdefuncionamiento......................... 5
Mantenimientoyalmacenamiento....................... 6
Servicio................................................................ 7
Serviciotécnico ................................................... 7
Piezasderepuesto.............................................. 7
Clasicaciónilustradadepiezasylistadepiezas..... 8
Informacióndegarantía..................................... 10

www.desatech.com
118127-01B 3
INFORMACIÓN DE SEGURIDAD
ADVERTENCIA:esteproducto
contieney/ogeneraquímicosque
el estado de California reconoce
que causan cáncer, defectos de
nacimientouotrosdañosrelacio-
nados con la reproducción.
ADVERTENCIA: no usar en resi-
dencias ni en vehículos recreativos.
ADVERTENCIA: peligro de
incendio, quemaduras, inhalación
y explosión. Mantenga los com-
bustiblessólidos,comomateriales
de construcción, papel o cartón a
unadistanciaseguradelcalentador
segúnserecomiendaenlasinstruc-
ciones. Nunca use el calentador en
áreas en las que hayan, o puedan
haber,combustiblesvolátilesoque
se acumulen en el aire, o bien, pro-
ductos como gasolina, solventes,
diluyente de pintura, partículas de
polvo o químicos desconocidos.
PELIGRO DE ASFIXIA
• No utilice este calentador en viviendas
ocupadas por personas.
• No se utilice en lugares sin ventilación.
• Nosedebebloquearelujodeairepara
combustión y ventilación.
•
Se debe proveer suciente aire de venti-
lación para satisfacer la demanda de aire
de combustión del calentador que se está
utilizando.
• Consulte lasecciónde especicaciones
del manual del calentador, la placa de in-
formación del calentador, o llame a DESA
Industries para saber cuanto aire de ven-
tilación se requiere para el calentador.
• La falta de ventilación adecuada ocasiona-
ra que la combustión no sea correcta.
•
La combustión incorrecta puede resultar en
envenenamiento con monóxido de carbono y
ocasionar lesiones serias o incluso la muerte.
Los síntomas del envenenamiento con mo-
nóxido de carbono son, entre otros, dolor de
cabeza,mareoydicultadpararespirar.
1. Evitequelosniñosylosanimalesseacer-
quenalcalentador.
2. Nuncahagafuncionarelcalentadormien-
trasestédormidoocuandolovayaadejar
desatendido.
3. Inspeccioneminuciosamenteelcalentador
enbuscadedaños.Nohagafuncionarun
calentadorqueestedañado.
4. Noaltere el calentadornihaga funcionar
uncalentadorcuyacondiciónoriginalhaya
sidomodicada.
5. UtilicepropanoogasLPsolamente
6. Utiliceúnicamentesuministrodepropanoo
gasLPconextraccióndevapores.Encaso
deteneralgunapreguntasobrelaextrac-
cióndevapores,consulteasudistribuidor
depropanoogasLP.
7.
Parausoenexterioressolamente.Eláreadebe
estarbienventilada.Proporcioneaberturas
mínimasde0.093m²(1pie²)cercadelpisoy
deltecho.Noloutiliceadentrodecasas,casas
móviles,tiendas de campaña, vehículos o
cualquierotrositiocerradoosinventilación.
8.
Utiliceelcalentadorenáreaslibresdellamasal
descubierto,vaporescombustiblesypolvo.
9. Nouseelcalentadorenunsótanonidebajo
delniveldelsuelo.
10.Antesdeconectarelcalentadoraltanque
de propano o gas LP, compruebe que la
perilladel regulador del calentadorestá
enlaposición "OFF"(apagado).Siempre
conecteyenciendaelcalentadorenáreas
libresdellamasaldescubierto.
11. InstaleloscilindrosdepropanoogasLPen
posiciónvertical(laválvulade cierrehacia
arriba).Sujételosparaquenosecaigannilos
tirenaccidentalmenteyprotéjalosdedaños.
12. IMPORTANTE:utiliceúnicamenteelconjun-
todemanguerayreguladorincluidoconel
calentadordeinstalaciónsobretanquecon
doblequemador. Inspeccione el conjunto
demangueraantesdecadauso.Encaso
queelconjuntodemangueramuestreabra-
siónodesgasteexcesivos,osiestároto,
reempláceloantesdeutilizarelcalentador
utilizandoelconjuntodemangueraindica-
doenlalistadepiezas.Debeprotegerla
manguerayelreguladorcontradaños.
13.Elquemadordelcalentadordebeestarpor
lomenosa0.96m(2pies)sobreelpiso.
SiemprefíjeloaltanquedepropanoogasLP
enposiciónvertical.Nuncahagafuncionar
uncalentadorcuandoestéinclinado,niloje
altanquedepropanoogasLPenposición
horizontal.Ellopodríaproducirllamaradas
peligrosasoincendio.Nodirijaelcalorhacia
loscilindrosdepropanoogasLP.
14.Conserve las distancias mínimas hacia
materiales combustibles normales (como
papel),delasiguienteforma:laterales0.91
m(3pies);partessuperioreinferior1.5m
(5pies).Colóqueloa3m(10pies)lonasde
telaoplásticoysujeteestasultimaspara
quenosemuevanovuelenporelviento.

www.desatech.com 118127-01B4
15.Encasoqueenalgúnmomentopercibaolor
agas,INTERRUMPAINMEDIATAMENTEel
funcionamientohastaquehayaencontrado
yarregladoelorigendelafuga.
16.Instale el calentador de tal forma que no
quede expuesto directamente a rocío de
agua,lluvia,goteodeaguay/oviento.
17.Hágalofuncionarúnicamenteenunasuper-
cieestableyplana.
18.
Nointenteencenderunquemadorconlallama
delotro.Utiliceunfósforoporquemador.
19.Notraslapelosquemadoresnilosdirijauno
contraelotro.
20.Nolevantelosquemadoresnitapelosori-
ciosdeentradadeairedeltubomezclador
conelsoportedelacabezadelquemador.
21.Duranteelfuncionamientolastuercasma-
riposaylascabezasdelosquemadoresse
calientandemasiado.Nointenteajustarla
posicióndelquemadorcuandoelcalentador
estefuncionando.Espere15minutospara
queseenfríe.
22.Parausoexclusivoconcilindrosdepropano
de9Kg(20lb).
23.
Debidoalaaltatemperaturadelasupercie
ydelosgasesdecombustión,losniñosylos
adultosdebenmantenerseadistanciaparaevi-
tarquemadurasyquesuropaseincendie.
24.Nomueva,maniobrenirepareelcalentador
cuandoestecalienteoencombustión.No
conectenidesconectedeltanquedepropano
cuandoelcalentadorestécalienteofuncio-
nando.Podríasufrirquemadurasgraves.
25.Antesdecadauso,veriquesielcalentador
tienealgunafuga.Nuncauseunallamaal
descubiertoparabuscarfugas.Apliqueuna
mezcladejabónlíquidoyaguaentodaslas
uniones.Laformacióndeburbujasindicará
unafuga.Arregletodaslasfugas.
26.Mantengalimpiastodas las conexionesy
uniones.Compruebequelaválvuladeltan-
quedepropanoogasLPestálimpia.Antes
decadauso,reviseelempaquedelconector
delaválvuladecombustibledeentradadel
calentadorenbuscadedaños.Cambieel
empaqueencasoqueestedañado.
27.
ElcilindrodegasLPdeberáestarconstruidoy
marcadoconformealasespecicacionespara
cilindrosdegasLPdelDepartamentodeTrans-
portedelosEstadosUnidos(DOT,porsus
siglaseningles)odeTransportecanadiense.
28.Utilíceloúnicamenteconformealoscódigos
locales y en ausencia ellos, conforme al
Código de instalación CAN1- B149.
29.Elalmacenamientodelcalentadorsoloestá
permitidosielcilindrosedesconectayse
separadelcalentador.
INFORMACIÓN DE
SEGURIDAD Continuación
Figura 1 - Instalación del encendedor
piezoeléctrico
Encendedor
piezoeléctrico
Tuercademontaje
delencendedor
piezoeléctrico
Ménsuladesoporte
delquemador
Figura 2 - Cómo conectar las mangueras
de los quemadores al regulador
30.Después de cada uso siempre retire el
calentadordeltanquedepropano.Siempre
guardeeltanquedepropanoenelexterior,
en sitios bienventilados,fuera delalcance
delosniños.Nuncaguardeuntanquede
propanoenelinteriordeedicios,cocheras
ysitiosencerrados.Nuncaguardeuntanque
depropanocercadefuentesdecalorintenso,
delamasaldescubiertooensitiosendondela
temperaturaseasuperiora38°C(100°F).
INSTRUCCIONES DE
ENSAMBLE
SOLAMENTE MODELOS CON 2
QUEMADORES
1. Inspeccionelaspartesdelcalentadoren
busca
dedañosquepudieronhaberocurri-
doduranteelenvío.Encasoqueencuentre
algúndaño,notiquedeinmediatoalpro-
veedor.Compruebequeelpaqueteincluya
todaslaspartesdelcalentador(consultelas
paginas8y9).
2. Introduzcaelencendedorpiezoeléctricoen
laménsuladesoportedelosquemadores
comosemuestraenlagura1.Aprietela
tuercademontajedelencendedorpiezo-
eléctrico.Noaprietelatuercaenexceso.
3. Conectelasmanguerasdelosquemadores
comosemuestraenlagura2.Aprietela
uniónconunallaveparaevitarfugas.
4. Instale el conjunto de quemadores en el
brazodesoporte,utilizandolossoportesde
montajedelascabezasdelosquemadores
ylostornillosdebroncecomosemuestraen
lagura3,pagina5.Introduzcaelcostado
delsoporteenlaranuradelbrazodesopor-

www.desatech.com
118127-01B 5
Figura 3 - Cómo conectar el conjunto de
cabeza del quemador al brazo de soporte
INSTRUCCIONES DE
FUNCIONAMIENTO
1.
Reviseelcalentadorpara ver sisufrió algún
daño.Sielcalentadorestádañado,informede
inmediatoaldistribuidoraquienselocompró.
2. Observetodaslasprecaucionesdeseguri-
dadyoperación.
3. Antesdecadauso,reviseelempaquedela
conexiónderoscainvertida.Reemplaceel
empaquesiestemuestraseñalesdedaños
odesgaste.
4. Compruebequelaperilladelreguladoresté
enlaposiciónOFF(apagado).
5. Solamente modelos con 2 quemadores Co-
necteelcalentadoralprotectordelcilindro
depropanoogasLP,conelbrazodesoporte
enelinteriordelprotectoryconlospernos
Conjuntode
lacabezadel
quemador
Brazode
soporte
Soportede
montajede
lacabezadel
quemador
Tornillode
bronce
Ranura
Oricio
deaire
Figura 4 - Cómo conectar los cables de los
electrodos al encendedor piezoeléctrico
Encendedorpiezoeléctrico
Cablesdeloselectrodos
Figura 5 - Cómo conectar el brazo de soporte
y el regulador al tanque de propano o gas LP
Regulador
Brazodesoporte
Perno
Ménsuladelbrazo
desoporte
te.Apriételoconeltornillo.Compruebeque
losoriciosdeairedeloscostadosdelos
quemadores no estén obstruidos.Apriete
rmementelosquemadoresensusitio.
5. Conecte los cables de los electrodos al
encendedorpiezoeléctricocomosemuestra
enlagura4.
INSTRUCCIONES DE
ENSAMBLE Continuación
atravésdelosdosoricioslocalizadosen
elprotector(consultelagura5).Aprietela
ménsuladelbrazodesoporteensulugar
utilizandolastuercasmariposaincluidas.
6. Todos los modelosUnaelconectorderosca
invertida,queseencuentraenelregulador,al
cilindrodepropanoogasLP,girandolatuer-
caderoscainvertidaendireccióncontraria
alasmanecillasdelreloj,enlaconexiónde
laválvuladelcilindrodepropanoogasLP,
yapriételormementeconunallave.
ADVERTENCIA: conecte el ca-
lentadorenposiciónvertical.Nunca
conecte el calentador en posición
horizontal. Ello podría producir lla-
maradas peligrosas o incendio.
7.
Aprieteconrmezatodaslasconexiones
de gas.
8. Abralaválvuladegasdelcilindroyrevise
todaslasconexionesenbuscadefugas.
Apliqueunamezcladejabónlíquidoyagua
atodaslasunionesdelalíneadegas.La
formacióndeburbujasindicaunafugaquese
debecorregir.NOUTILICEUNALLAMA.
PARA ENCENDER EL CALENTADOR
ADVERTENCIA: al encender el
calentador NO mire por arriba del
calentador(reector).Manténgase
a un lado durante el encendido. No
se pare frente ni ponga partes de
su cuerpo frente al calentador.
ADVERTENCIA: ASEGÚRESE
QUE EN EL LUGAR NO HAYA
LLAMAS AL DESCUBIERTO. Abra
completamentelaválvuladelcilin-
dro de propano o gas LP.

www.desatech.com 118127-01B6
Antesdeintentarencenderelcalentadorlealas
instruccionesdeencendidoensutotalidad.
1. Girelaperilladelreguladordelcalentador
endireccióncontrariaalasmanecillasdel
relojhastalaposición"HI"(alto).
2.
Presioneylibereelencendedorpiezoeléctrico
variasveces(quemadordoble),opongaun
fósforo encendido cerca del elemento de
calefacción(malla)delquemadorqueestá
encendiendo,utilizandoeloriciosubicadoa
uncostadodelreector.Consultelagura6.
PRECAUCIÓN:nointroduzcael
fósforoatravésdeloricio.
3. Presioneelbotónrojoubicadoenlaválvula
de seguridad por donde pasa el gas al
quemador(consultelagura6).
ADVERTENCIA: no presione el
botón rojo de la válvula antes de
activar el encendedor piezoeléc-
trico varias veces o de introducir
el fósforo.
4. Unavezqueseenciendaelgasenlaparte
frontaldelamalla,continúepresionandoel
botóndelaválvuladurante30segundos,y
luegosuéltelo.
5. Silallamaseapaga,espere5minutosy
repitaelprocedimientodeencendido.
6. Encasoquedespuésdeintentarencender
elcalentadorvariasvecesestenoencienda,
notratederepararlo.Regreseelcalentador
alcentrodeservicioautorizadomascerca-
nooalfabricantedelproducto.
7. Paralos modelos condos quemadores,
encienda el otro quemador repitiendo los
pasos1al4.
8. Unavezqueambosoelquemadorúnico,se
hayanencendido,girelaperilladelregulador
delcalentadoralaposicióndecalordesea-
do,LOW(bajo),MED(medio)oHI(alto).
CÓMO APAGAR EL CALENTADOR
1. Cierrermementelaválvuladelcilindrode
propanoogasLP..
2. Girelaperilladelreguladordelcalentador
a la posición OFF (apagado).Antes de
maniobrarelcalentadorespere15minutos
paraqueseenfríe.
3. Despuésdecadausosiempreretireelca-
lentadordeltanquedepropanoogasLP.No
INSTRUCCIONES DE
FUNCIONAMIENTO
Continuación
guardeelcalentadorconeltanquedepropano
ogasLPconectadoaeste.Retireelcalenta-
dordeltanquedepropanoogasLP,girando
latuercadelconectordelcombustible en
direccióndelasmanecillasdelreloj.Siempre
guardelostanquesdepropanoogasLPenel
exterior.Nuncaguardeuntanquedepropano
ogasLPenlugarescerrados.
CÓMO VOLVER A ENCENDER EL
CALENTADOR
1. Cierrermementelaválvuladelcilindrode
propanoogasLP.
2. Espere5minutos.
3. Vuelva encender el calentador siguiendo
las instrucciones sobre Para encender el
calentador,enlapágina5.
Botónrojoen
laválvulade
seguridad
Figura 6 - Cómo encender el calentador
utilizando un fósforo
MANTENIMIENTO Y
ALMACENAMIENTO
1.
Inspeccionealcalentadorantesdecadauso.
Reviselasconexionesenbuscadefugas.
Apliqueunamezcladejabónlíquidoyagua
entodaslasconexiones.Laformaciónde
burbujasindicaunafugaquesedebecorregir.
Reparetodaslasfugasinmediatamente.Porlo
menosunavezalañohagaqueuntécnicode
serviciocalicadoinspeccioneelcalentador.
2.
Antesdecadauso,veriqueelasientodel
empaque(o-ring)enlaesquinaredondeadade
laconexiónderoscainvertida.Sielempaque
(o-ring)estácortado,golpeadoodañadodeal-
gunamanera,reemplacelaconexiónderosca
invertidaconelrepuestonúmeroLPA2025.
3.
Inspeccioneelconjuntodemanguerayregu-
ladorantesdecadauso.Silamangueraestá
muydesgastadaoconroturas,reemplácela.
4.
Cierreelgasdesdeelcilindrodepropanoo
gasLPcuandoelcalentadornoestéenuso.
5. Cuandovayaaguardarelcalentador,debe
desconectarelcilindropropanoogasLPdel
calentador,ydespuésderetirarelcilindro
guardarloenelexterior,comoseindicaen
elcapitulo5delanormaparaelCódigo de
instalación CAN1-B149.

www.desatech.com
118127-01B 7
SERVICIO
Cuandoseutilizauncalentadorquehayasufrido
modicacionesoquenofuncionacorrectamente
puede producirse una situación de peligro.
Cuandoelcalentadorfuncionacorrectamente:
• lamallaqueemitecalortieneuncolorrojo-
anaranjadoresplandeciente.
• nohayllamasarribadelquemador.
• lallamaardeenlasuperciedelamallay
noenelinteriordelquemador(retornodela
llama).
• nohayolorfuertedesagradable,noardenlos
ojosnihaymolestiasfísicas.
• nohayhumonihollín,niadentroniafuera
delcalentador.
• elcalentadornoseapagademaneraines-
peradaoinexplicable.
Las listas de piezas y la vista esquemática
muestranelcalentadortalcomoseconstruyó.
No utilice un calentador que se vea distinto
alque se muestra.En este sentido, utilice
únicamentelaconexiónparalamanguera,el
reguladoryelcilindro(conocidacomoconexión
deroscainvertida),incluidaconelcalentador.
IMPORTANTE:paraestecalentador, elregu-
ladorsedebeajustarcomosemuestraenlas
Especicaciones,enlapágina2.Encasode
teneralgunadudasobreelajustedelregulador,
hagaquelorevisen.
SERVICIO TÉCNICO
Uncalentadorquenofuncionecorrectamente
debeserreparado,peroúnicamentepor una
persona capacitada y experimentada. Para
encontrarelcentrodeserviciomascercanoosi
tienealgunapreguntasobreestecalentador,co-
muníquesealdepartamentodeserviciotécnico
deDESAHeatingProducts,al1-866-672-6040.
Alllamar,tengalamanolosnúmerosdemodelo
yseriedesucalentador.
También puede visitar el sitio web de servi-
cio técnico de DESA Heating Products en
www.desatech.com.
Ademas,puede obtenerserviciodentro dela
garantía,ofueradeella,llevandoelproducto
alcentrodeserviciodesulocalidad.
PIEZAS DE REPUESTO
ADVERTENCIA: use sólo
piezas de repuesto originales.
Este calentador debe usar piezas
diseñadas especícamente. No
las sustituya ni use piezas genéri-
cas. El uso de piezas de repuesto
inadecuadas puede ocasionar
lesiones graves o fatales. Esto
también protegerá la cobertura
de su garantía para piezas reem-
plazadas con garantía.
PIEZAS CON GARANTÍA
Comuníqueseconlosdistribuidoresautorizados
deesteproducto.Sinopuedenproporcionarle
laspiezasoriginalesderepuesto,llameDESA
Industries,al1-415-255-5333.
CuandollameaDESAIndustries,tengalisto:
• sunombre,
• sudirección,
• elnúmerodelmodelodesucalentador,
• lafalladelcalentador,
• lafechadecompra.
Enlamayoríadeloscasos,lepediremosque
devuelvalapiezaalafábrica.
PIEZAS SIN GARANTÍA
Comuníqueseconlosdistribuidoresautorizados
deesteproducto.Sinopuedenproporcionarle
laspiezas originales derepuesto, llame al
departamentodepiezasdeDESA Industries,
al1-415-255-5333.
CuandollameaDESAIndustries,tengalisto:
• elnúmerodelmodelodesucalentador,
• númerodelapiezaderepuesto.

www.desatech.com 118127-01B8
CLASIFICACIÓN ILUSTRADA DE PIEZAS
MODELOS
TC110 Y TC111
2
1
2
3
4
6
75
8
18
9
10
11
12
17
13
14
15
1
16
16

www.desatech.com
118127-01B 9
2
12
13
14
1
16
LISTA DE PIEZAS
Estalistacontienelaspiezasreemplazablesutilizadasenelcalentador.Alhacerunpedidodepie-
zas,sigalasinstruccionesenumeradasenPiezas de repuesto enlapágina7deestemanual.
MODELOS
TC110 Y TC111
N°
N° DE PARTE
DESCRIPCIÓN CANT.
1114092-01 Conjuntodecabezadelquemador • • 1-2
2100911-01 Rejilla • • 1-2
3097159-05 Encendedorpiezoeléctrico • 1
4 102334-01 Tuerca,encendedorpiezoeléctrico • 1
5 114095-01 Brazodesoporte • 1
6 114099-01 Soportedemontajedelacabezadelquemador • 2
7114145-01 Tornillodebronce • 2
8114093-01 Conjuntodemanquera • 2
9 114096-01 Ménsuladelbrazodesoporte • 1
10 114098-01 Conector • 1
11 114097-01 Conexión • 1
12 LPA2025 Regulador/conexiónderoscainvertidadeexcesodeujo • • 1-2
13 114100-01 Termopar • • 1-2
14 100898-01 Tuercadeltermopar • • 2-4
15 114094-01 Conjuntodeelectrodo(redondo) • 1
114094-02 Conjuntodeelectrodo(plano) • 1
16 116995-01 Protectorposterior • • 1-2
17 115063-01 Tuercamariposa • • 2
18 115062-01 Pernoconpivote5/16-18x1.25 • • 2
PIEZASDISPONIBLES(NOSEMUESTRAN)
101834-03 Etiquetacolganteconinstrucciones • 1
101834-04 Etiquetacolganteconinstrucciones • 1
099720-01 Estabilizadordetanque • • 1
LPA5050 Conjuntoderejilladereemplazo • • 1-2
CON DOBLE QUEMADOR
CON UN SOLO QUEMADOR

INFORMACIÓN DE GARANTÍA
GUARDE ESTA GARANTÍA
Modelo
N°deserie
Fechadecompra
Garantía limitada del calentador de infrarrojos de instalación
sobre tanque de propano
DESAIndustriesgarantizaqueesteproductoytodassuspiezasestaránlibresdedefectosenlos
materialesylamanodeobraduranteun(1)añoapartirdelafechadelaprimeracompra,siemprey
cuandosehayanoperadoymantenidodeacuerdoconlasinstrucciones.Estagarantíaseextiende
solamentealcompradorminoristaoriginal,cuandoseproporcionauncomprobantedecompra.
Estagarantíasólocubreelcostodelaspiezasylamanodeobrarequeridaspararestaurarelpro-
ductoaunacondicióndeoperacióncorrecta.Loscostosdetransporteeincidentalesasociadoscon
reparacionesbajogarantíanosonreembolsablesmediantelamisma.
Elserviciodegarantíaestádisponiblesóloatravésdedistribuidoresycentrosdeservicioautori-
zados.
Estagarantíanocubredefectosocasionadospormaluso,abuso,negligencia,accidentes,faltade
mantenimientoadecuado, desgaste normal, alteración,modificación, manipulación, combustibles
contaminados,reparaciónusandopiezasinadecuadasoreparaciónrealizadaporcualquieraqueno
seaundistribuidorocentrodeservicioautorizado.Elmantenimientoderutinaesresponsabilidad
delpropietario.
ESTAGARANTÍAEXPRESASEOTORGAENLUGARDECUALQUIEROTRAGARANTÍA,YASEA
EXPRESAOIMPLÍCITA,INCLUYENDOGARANTÍASDEMERCANTIBILIDADEIDONEIDADPARA
UNPROPÓSITOPARTICULAR.
DESAIndustriesnoasumeningunaresponsabilidadpordañosindirectos,incidentalesoconsecuentes.
Enalgunasprovinciasnosepermitelaexclusiónolimitacióndedañosincidentalesoconsecuenciales.
Estaslimitacionesoexclusionespuedennoaplicarensucaso.Estagarantíalimitadaleotorgadere-
choslegalesespecíficosypodríatambiéntenerotrosderechosquevaríandeunaprovinciaotra.
82AkronRoad
Toronto,Ontario
M8W1T2
415-255-5333
www.desatech.com
118127-01
Rev.B
05/06
This manual suits for next models
6
Table of contents
Languages:
Other Desa Heater manuals
Popular Heater manuals by other brands

Arbonia
Arbonia Duolino DLN2M Instructions for installation and use

Eden Branch Products
Eden Branch Products GL4201 owner's manual

UNITED
UNITED UHQ-867 Instructions for use

Taurus
Taurus ALPATEC MASAI 1000 manual

Tansun Quartzheat
Tansun Quartzheat SORRENTO IP SINGLE SOR 210IP Reference manual

Toyotomi
Toyotomi LC-33 instruction manual