Develop ineo 3300P User manual

Quick Reference
ineo 3300P

Quick Reference
- 2 -
Contents
1—Learning about the printer ....................................................................................................................... 3
Using the printer control panel.................................................................................................................. 3
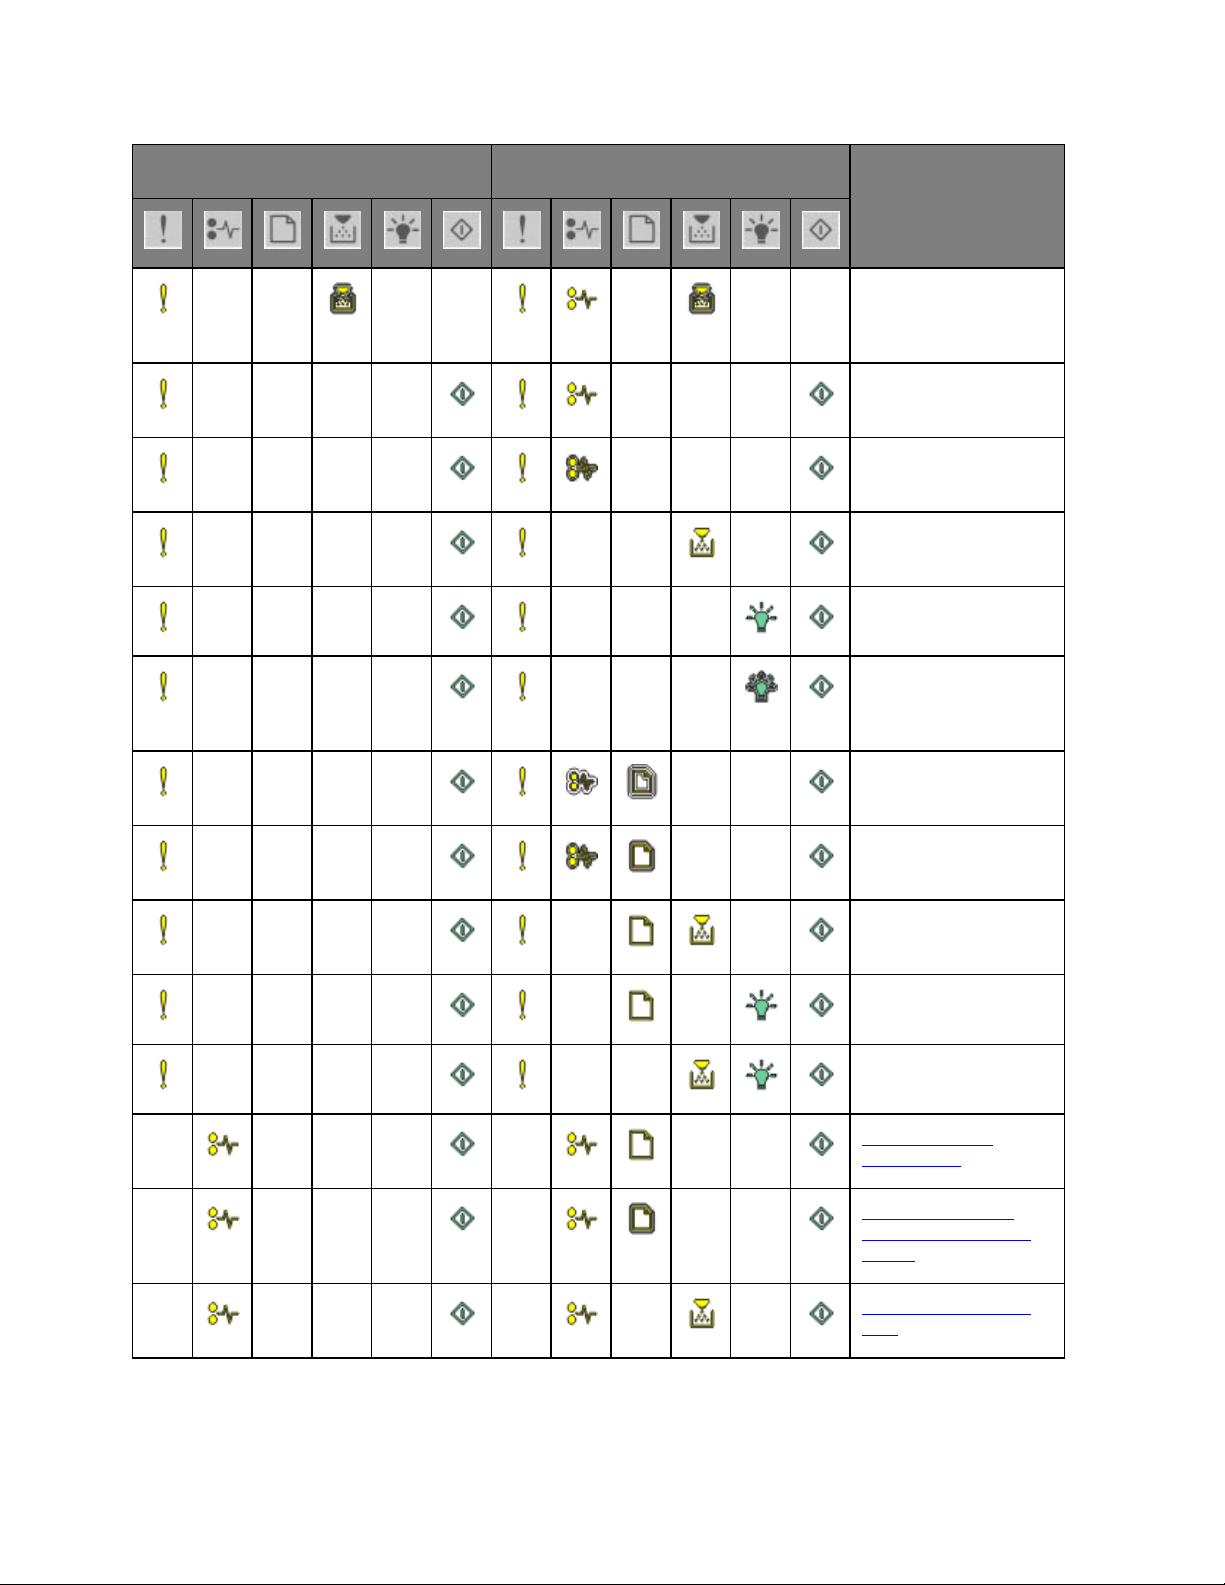
Understanding the printer control panel light sequences ......................................................................... 4
2—Loading paper and specialty media......................................................................................................... 9
Setting the paper size and type ................................................................................................................ 9
Configuring Universal paper settings........................................................................................................ 9
Using the standard bin and paper stop................................................................................................... 10
Loading trays .......................................................................................................................................... 11
Loading the multipurpose feeder ............................................................................................................ 15
Linking and unlinking trays ..................................................................................................................... 19
Linking and unlinking trays ................................................................................................................. 19
Configuring a custom paper type name ............................................................................................. 20
Configuring a custom paper type ....................................................................................................... 20
Assigning a custom paper type .......................................................................................................... 21
3—Printing................................................................................................................................................... 22
Printing documents ................................................................................................................................. 22
Printing a document............................................................................................................................ 22
Adjusting toner darkness.................................................................................................................... 23
Canceling a print job ............................................................................................................................... 24
Canceling a print job from the computer ............................................................................................ 24
4—Clearing jams......................................................................................................................................... 25
Accessing jam areas............................................................................................................................... 25
[x]-page jam, open front door. [20y.xx] ................................................................................................... 26
[x]-page jam, open rear door. [20y.xx] .................................................................................................... 29
[x]-page jam, clear standard bin. [20y.xx]............................................................................................... 32
[x]-page jam, remove tray 1 to clear duplex. [23y.xx] ............................................................................. 33
[x]-page jam, remove tray [x]. [24y.xx].................................................................................................... 36
[x]-page jam, clear manual feeder. [250.xx] ........................................................................................... 39

Quick Reference
- 3 -
1—Learning about the printer
Note: For network printers or printers connected to a print server, you can also check the status of your
printer through the Embedded Web Server.
Using the printer control panel
Light or button
Color
Description
1
Error light
Yellow An error has occurred.
2
Paper jam light
Yellow
A paper jam has
occurred.
3
Load or remove paper light
Yellow Paper must be loaded
in the tray or removed
from the bin.
4
Toner low or replace imaging
unit light
Yellow
The toner cartridge is
low on toner, or the
imaging unit needs to
be replaced.
5
Ready or data light
Green
The printer is in Ready
state.

Quick Reference
- 4 -
Light or button
Color
Description
6
Sleep button and light
Amber
Use this to enable
Sleep mode or
Hibernate mode.
7
Start button and light
Green Use this to initiate a
print job.
8
Stop or cancel button
Red
Use this to cancel a
print job.
Understanding the printer control panel light sequences
The printer control panel lights can mean different things, depending on the light sequence. The lights can
be on, off, blinking, or blinking slowly, indicating a printer status, a warning, or an error. The following
table shows the appearances of the lights.
On
Blinking
Blinking slowly
If the printer control panel light sequence matches a light sequence in the following table, then see the
message in the same row.

Quick Reference
- 5 -
Light sequence
Message
Close front door
Replace imaging unit
Replace unsupported
toner cartridge
Replace unsupported
imaging unit
Toner cartridge, imaging
unit mismatch
Canceling print job
Flushing buffer
Resolution reduced
Non-Printer Manufacturer
toner cartridge
Non-Printer Manufacturer
imaging unit
Printer had to restart
Toner cartridge very low
Imaging unit very low
Toner cartridge nearly low
Imaging unit nearly low
Service error

Quick Reference
- 6 -
Light sequence
Message
Load paper
Remove paper from
standard bin
Change paper
Toner cartridge low
Imaging unit low
Ready
Waiting
Busy
Not ready
If the printer control panel light sequence matches a light sequence in the “Primary light sequence”
column of the following table, then press twice quickly on the printer control panel. Search for a
matching light sequence in the “Supplemental light sequence” column, and then see the message in the
same row.
Primary light sequence
Supplemental light sequence
Message
Missing or
unresponsive toner
cartridge
Replace toner cartridge
Toner cartridge, printer
region mismatch

Quick Reference
- 7 -
Primary light sequence
Supplemental light sequence
Message
Missing or
unresponsive imaging
unit
Standard network
software error
Network [x] software
error
Insufficient memory to
collate job
Complex page
Insufficient memory to
support Resource Save
feature
Standard parallel port
disabled
Standard USB port
disabled
Too many trays
attached
Incorrect paper size
Memory full
Paper jam, clear
standard bin
Paper jam, remove
standard tray to clear
duplex
Paper jam, open rear
door

Quick Reference
- 9 -
2—Loading paper and specialty media
Setting the paper size and type
Using the Embedded Web Server
1. Open a Web browser, and then type the printer IP address in the address field.
Notes:
- Print a network setup page or menu settings page, and then locate the IP address in the TCP/IP
section. The IP address appears as four sets of numbers separated by periods, such as
123.123.123.123.
- If you are using a proxy server, then temporarily disable it to load the Web page correctly.
2. Click Settings >Paper Menu.
Using the printer settings on the computer
Depending on your operating system, access the Paper menu using the Local Printer Settings Utility or
Printer Settings.
Note: The paper size and type settings will be saved until you reset factory default settings.
Configuring Universal paper settings
The Universal paper size is a user-defined setting that lets you print on paper sizes that are not preset in
the printer menus.
Notes:
•The smallest Universal size supported in the multipurpose feeder is 76.2 x 127 mm (3 x 5 inches).
•The largest supported Universal size is 215.9 x 355.6 mm (8.5 x 14 inches).
Using the Embedded Web Server
1. Open a Web browser, and then type the printer IP address in the address field.
2. Click Settings >Paper Menu >Universal Setup.
3. Select the unit of measure, or click Print Width or Print Length.
4. Change the setting, and then click Submit.
Using the printer settings on the computer
1. Depending on your operating system, access the Paper menu using the Local Printer Settings Utility
or Printer Settings.
2. Select the tray containing the Universal paper size, and then select Universal as the paper size.

Quick Reference
- 10 -
Using the standard bin and paper stop
The standard bin holds up to 150 sheets of 20-lb paper. It collects prints facedown. The standard bin
includes a paper stop that keeps paper from sliding out the front of the bin as it stacks.
To open the paper stop, pull it so that it flips forward.
Note: Close the paper stop when moving the printer to another location.

Quick Reference
- 11 -
Loading trays
CAUTION—POTENTIAL INJURY: To reduce the risk of equipment instability, load each tray
separately. Keep all other trays closed until needed.
1. Pull out the tray completely.
Note: Do not remove trays while a job prints or while the following light sequence appears on the
printer control panel. Doing so may cause a jam.
Busy
- Blinking

Quick Reference
- 12 -
2. Squeeze, and then slide the width guide tab to the correct position for the size of the paper you are
loading.

Quick Reference
- 13 -
3. Unlock the length guide. Squeeze, and then slide the length guide tab to the correct position for the
size of the paper you are loading.
Notes:
- For some paper sizes like letter, legal, and A4, squeeze and slide the length guide tab backward
to accommodate their length.
- When loading legal-size paper, the length guide extends beyond the base leaving the paper
exposed to dust. To protect the paper from dust, you can purchase a dust cover separately.
- If you are loading A6-size paper in the standard tray, then squeeze and slide the length guide tab
toward the center of the tray to the A6-size position.
- Make sure the width and length guides are aligned with the paper size indicators on the bottom of
the tray.

Quick Reference
- 14 -
4. Flex the sheets back and forth to loosen them, and then fan them. Do not fold or crease the paper.
Straighten the edges on a level surface.
5. Load the paper stack.
Note: Make sure the paper is below the maximum fill indicator located on the side of the width guide.
Notes:
- Load with the printable side facedown when using recycled or preprinted paper.
- Load prepunched paper with the holes on the top edge toward the front of the tray.
- Load letterhead facedown, with the top edge of the sheet toward the front of the tray. For two-
sided printing, load letterhead faceup with the bottom edge of the sheet toward the front of the
tray.

Quick Reference
- 15 -
6. Insert the tray.
7. From the Embedded Web Server or your computer, set the paper size and type in the Paper menu to
match the paper loaded in the tray.
Notes:
- If the printer is not connected to a network, then access the Paper menu using Local Printer
Settings Utility or Printer Settings, depending on your operating system.
- Set the correct paper size and type to avoid paper jams and print quality problems.
Loading the multipurpose feeder
Use the multipurpose feeder when printing on different paper sizes and types or specialty media, such as
card stock, transparencies, paper labels, and envelopes. You can also use it for single-page print jobs on
letterhead.
1. Open the multipurpose feeder.

Quick Reference
- 16 -
a. Pull the multipurpose feeder extender.
b. Pull the extender gently so the multipurpose feeder is fully extended and open.
2. Squeeze the tab on the left width guide, and then move the guides for the paper you are loading.

Quick Reference
- 17 -
3. Prepare the paper or specialty media for loading.
- Flex sheets of paper back and forth to loosen them, and then fan them. Do not fold or crease the
paper. Straighten the edges on a level surface.
- Hold transparencies by the edges. Flex the stack of transparencies back and forth to loosen them,
and then fan them. Straighten the edges on a level surface.
Note: Avoid touching the printable side of the transparencies. Be careful not to scratch them.
- Flex the stack of envelopes back and forth to loosen them, and then fan them. Straighten the
edges on a level surface.
4. Load the paper or specialty media.
Notes:
- Do not force paper into the multipurpose feeder. Overfilling may cause paper jams.
- Make sure the paper or specialty media is below the maximum paper fill indicator located on the
paper guides.

Quick Reference
- 18 -
- Load paper, transparencies, and card stock with the recommended printable side faceup and the
top edge entering the printer first. For more information on loading transparencies, see the
packaging the transparencies came in.
- Load letterhead faceup with the top edge entering the printer first. For two-sided (duplex) printing,
load letterhead facedown with the bottom edge of the sheet entering the printer first.
- Load envelopes with the flap on the left side facedown.
Warning—Potential Damage: Never use envelopes with stamps, clasps, snaps, windows,
coated linings, or self-stick adhesives. These envelopes may severely damage the printer.

Quick Reference
- 19 -
5. From the Embedded Web Server or from your computer, set the paper size and type in the Paper
menu to match the paper loaded in the multipurpose feeder.
Note: Depending on your operating system, access the Paper menu using Local Printer Settings
Utility or Printer Settings.
Linking and unlinking trays
When the paper size and paper type for any trays are the same, the printer will link those trays. When
one linked tray becomes empty, paper will feed from the next linked tray. It is recommended to give all
unique paper, such as letterhead and different colored plain papers, a different custom type name so that
the trays they are in will not automatically link.
Linking and unlinking trays
Using the Embedded Web Server
1. Open a Web browser, and then type the printer IP address in the address field.
Notes:
- Print a network setup page or menu settings page, and then locate the IP address in the TCP/IP
section. The IP address appears as four sets of numbers separated by periods, such as
123.123.123.123.
- If you are using a proxy server, then temporarily disable it to load the Web page correctly.
2. Click Settings >Paper Menu.
3. From the Tray Configuration section, select a tray, and then change the paper size and type settings.
- To link trays, make sure the paper size and type for the tray match that of the other tray.
- To unlink trays, make sure the paper size or type for the tray does not match that of the other tray.
4. Click Submit.
Using the printer settings on the computer
Depending on your operating system, access the Paper menu using the Local Printer Settings Utility or
Printer Settings.

Quick Reference
- 20 -
Warning—Potential Damage: Paper loaded in the tray should match the paper type assigned in the
printer. The temperature of the fuser varies according to the specified paper type. Printing issues may
occur if settings are not properly configured.
Configuring a custom paper type name
Using the Embedded Web Server
1. Open a Web browser, and then type the printer IP address in the address field.
Notes:
- Print a network setup page or menu settings page, and then locate the IP address in the TCP/IP
section. The IP address appears as four sets of numbers separated by periods, such as
123.123.123.123.
- If you are using a proxy server, then temporarily disable it to load the Web page correctly.
2. Click Settings >Paper Menu >Custom Names.
3. Select a custom name, and then type a new custom paper type name.
4. Click Submit.
5. Click Custom Types, and then verify if the new custom paper type name has replaced the custom
name.
Using the printer settings on the computer (Windows only)
Access the Custom menu using the Local Printer Settings Utility.
Configuring a custom paper type
Using the Embedded Web Server
1. Open a Web browser, and then type the printer IP address in the address field.
Notes:
- Print a network setup page or menu settings page, and then locate the IP address in TCP/IP
section. The IP address appears as four sets of numbers separated by periods, such as
123.123.123.123.
- If you are using a proxy server, then temporarily disable it to load the Web page correctly.
2. Click Settings >Paper Menu >Custom Types.
3. Select a custom paper type name, and then select a custom paper type.
Note: Plain Paper is the factory default paper type for all user-defined custom names.
4. Click Submit.
Using the printer settings on the computer
Depending on your operating system, access the Custom menu using the Local Printer Settings Utility or
Printer Settings.
Other manuals for ineo 3300P
1
Table of contents
Other Develop Printer manuals

Develop
Develop QC 2235 Plus User manual

Develop
Develop ineo 3301P User manual

Develop
Develop D 162F User manual

Develop
Develop ineo 958 User manual

Develop
Develop D1531iD User manual

Develop
Develop ineo 3320 User manual

Develop
Develop ineo 164 User manual

Develop
Develop ineo 160 User manual

Develop
Develop ineo 4000P User manual

Develop
Develop ineo 3300P User manual