Develop ineo 4000i User manual


User's Guides
Which Guide? What's in It?
Safety Information Read this Guide first. Please read the Safety Instructions
before you set up your machine. See this Guide for
trademarks and legal limitations.
Installation
User's Guide
Follow the instructions for setting up your machine, and
installing the drivers and software for the operating system
and connection type you are using.
Quick Guide Learn the basic operations and basic machine
maintenance. See troubleshooting tips.
User's Guide This guide includes the additional contents of the Quick
Guide.
In addition to information about the Print operations, useful
information is included about using the machine on a
network.
Google Cloud Print Guide This Guide provides details about how to use Google Cloud
Print™ services for printing over the Internet.
1

Control Panel Overview
The control panel may vary depending on your model.
1. Liquid Crystal Display (LCD)
Displays messages to help you set up and use the machine.
A four-level indicator shows the wireless signal strength if you are using a wireless
connection.
0 Max
2. Data LED
The Data LED blinks depending on the machine’s status.
When the Data LED is on, data is in the machine’s memory. When the Data LED blinks, the
machine is receiving or processing data.
3. Error LED
The Error LED blinks when the LCD displays an error or an important status message.
1General Information
2

4. Menu Buttons
OK
Press to store your machine’s settings. After you change a setting, the machine returns to
the previous menu level.
Back
• Press to go back one level in the menu.
• Press to select the previous digit when entering numbers.
a or b (+ or -)
• Press to scroll through menus and options.
• Press to enter a number or to increase or decrease the number. Hold down a or b to
scroll faster. When you see the number you want, press OK.
5. Secure
Press to print jobs saved in the memory when you enter your four-digit password.
6. Go
• Press to clear certain error messages. To clear all other errors, follow the LCD instructions.
• Press to print any data remaining in the machine's memory.
• Press to select the displayed option. After you change a setting, the machine returns to
Ready Mode.
7. Cancel
• Press to cancel the current setting.
• Press to cancel a programmed print job and clear it from the machine’s memory. To cancel
multiple print jobs, hold down Cancel until the LCD displays [Cancel All Jobs].
8. Power On/Off
• Turn the machine on by pressing .
• Turn the machine off by pressing and holding down . The LCD displays [Shutting
Down] for a few seconds before going off.
9. WiFi
Launch the wireless installer on your computer and press the WiFi button. Follow the on-
screen instructions to set up a wireless connection between your machine and your network.
When the WiFi light is on, your machine is connected to a wireless access point. When the
WiFi light blinks, the wireless connection is down, or your machine is in the process of
connecting to a wireless access point.
1General Information
3
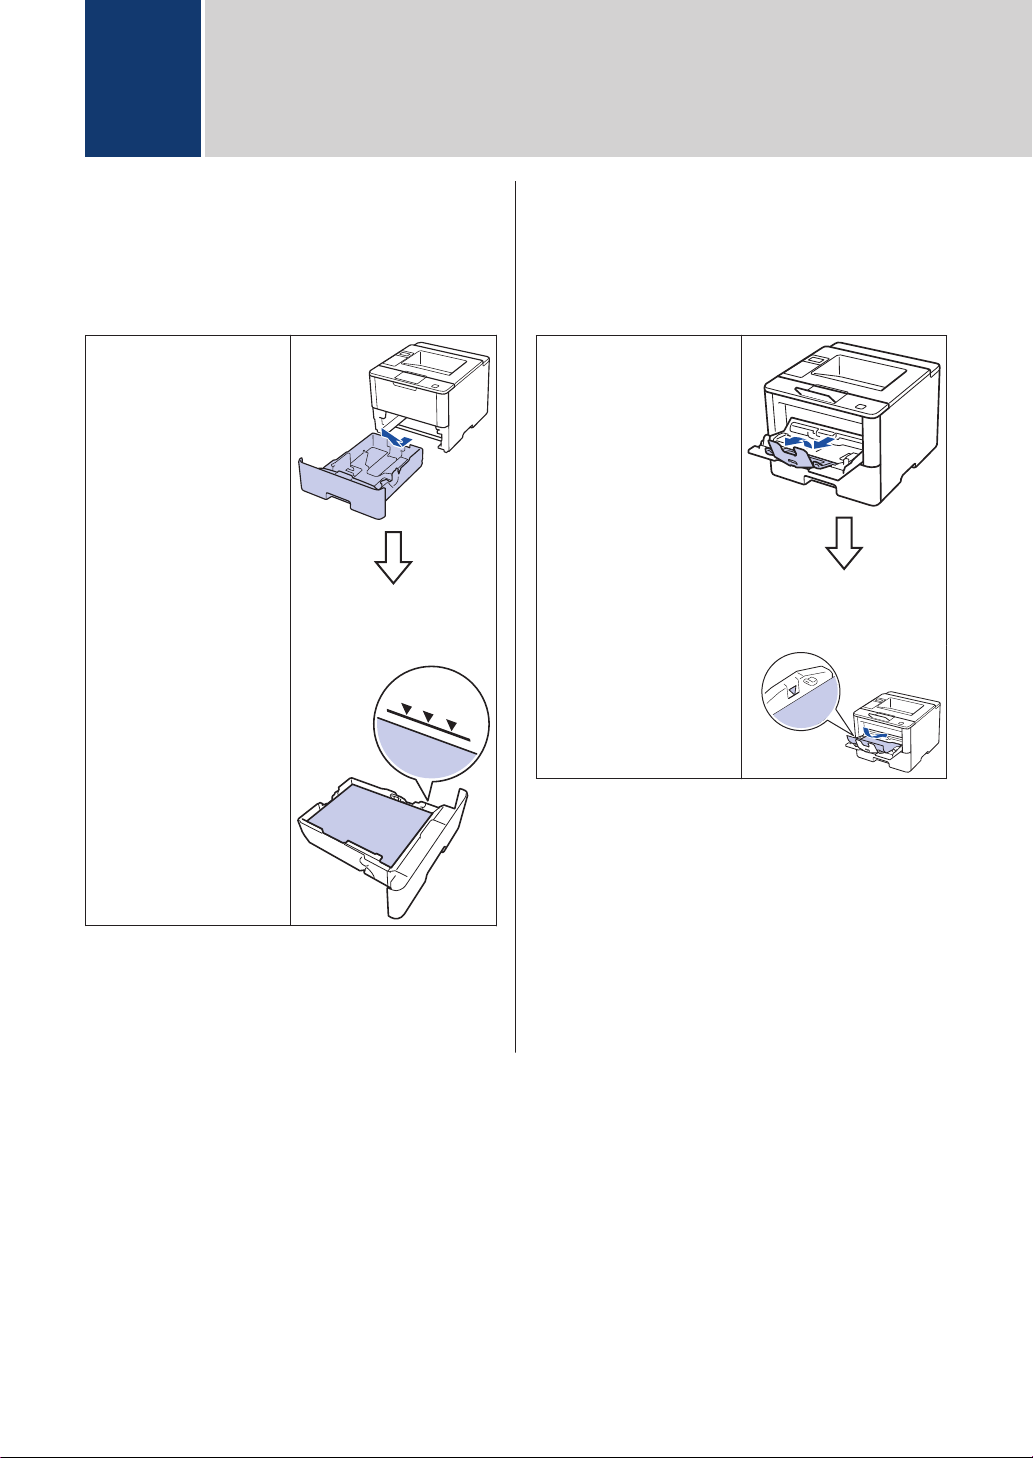
Load Paper in the
Paper Tray
Use the paper tray when printing on the
following media:
Plain paper
Thin paper
Recycled paper
Letterhead
Coloured paper
Thick paper 1
• Adjust the guides
• Fan the paper
1Open the back cover (face up output tray) before
printing to let the printed paper exit onto the face up
output tray.
For more detailed information, see the User's
Guide: Load and Print Using the Paper Tray.
Load Paper in the Multi-
purpose Tray (MP Tray)
Use the MP tray when printing on the
following media:
Plain paper
Thin paper
Recycled paper
Bond paper
Letterhead
Coloured paper
Thick paper 1
Labels 1
Envelopes 1
• Adjust the guides
• Fan the paper
1Open the back cover (face up output tray) before
printing to let the printed paper exit onto the face up
output tray.
For more detailed information, see the User's
Guide: Load and Print Using the
Multi
‑
purpose Tray (MP Tray).
2Load Paper
4

Print from Your Computer
Print a Document
For labels, thick paper, and envelopes, set
the paper size and paper type in the printer
before printing the document.
1From the document that you are trying
to print, open the Print dialog.
2If necessary, adjust the settings.
3Print the document.
For details of the function of the printer driver,
refer to the Help of the printer driver.
3Print
3Print
5

Use this section to resolve problems you may encounter when using your machine.
Identify the Problem
Even if there seems to be a problem with your machine, you can correct most problems yourself.
First, check the following:
• The machine's power cord is connected correctly and the machine's power is on.
• All of the machine's orange protective parts have been removed.
• The access point, router, or hub is turned on and its link indicator is blinking.
• Paper is inserted correctly in the paper tray.
• The interface cables are securely connected to the machine and the computer.
Find the Error Find the Solution
Using the LCD 1. Follow the messages on the LCD.
2. See the instructions in the following table.
3. If you cannot resolve the error, see the
User's Guide.
Error and Maintenance Messages
The most common error and maintenance messages are shown in the table.
Error Message Cause Action
Cartridge Error The toner cartridge is not
installed correctly.
Remove the toner cartridge and
imaging unit assembly. Take out the
toner cartridge, and put it back in the
imaging unit again. Reinstall the toner
cartridge and imaging unit assembly
in the machine.
If the problem continues, contact
customer support.
ATroubleshooting
6

Error Message Cause Action
Drum ! The corona wire on the
imaging unit must be
cleaned.
Clean the corona wire on the imaging
unit.
See the User's Guide: Clean the
Corona Wire.
If the problem continues, replace the
imaging unit with a new one.
The imaging unit or the
toner cartridge and imaging
unit assembly is not
installed correctly.
Remove the imaging unit, remove the
toner cartridge from the imaging unit,
and put the toner cartridge back into
the imaging unit. Reinstall the imaging
unit in the machine.
Drum End Soon The imaging unit is near the
end of its life.
Order a new imaging unit before the
LCD displays Replace Drum.
Jam 2-sided The paper is jammed in the
2-sided tray or inside the
back cover.
Remove the 2-sided tray and open
the back cover to pull out all jammed
paper.
Jam Inside The paper is jammed inside
the machine.
Open the front cover, remove the
toner cartridge and imaging unit
assembly, and pull out all jammed
paper. Close the front cover.
Jam MP Tray The paper is jammed in the
MP tray.
Remove all jammed paper from in
and around the MP tray. Press Go.
Jam Rear The paper is jammed in the
back of the machine.
Open the fuser cover and remove all
jammed paper. Close the fuser cover.
Jam Tray 1
Jam Tray 2
Jam Tray 3
The paper is jammed in the
indicated paper tray.
Pull out the paper tray indicated on
the LCD and remove all jammed
paper.
No Drum Unit The imaging unit is not
installed correctly.
Reinstall the toner cartridge and
imaging unit assembly.
No Paper The machine is out of
paper, or paper is not
loaded correctly in the
paper tray.
• Refill paper in the paper tray. Make
sure the paper guides are set to
the correct size.
• If paper is in the tray, remove it and
load it again. Make sure the paper
guides are set to the correct size.
ATroubleshooting
7

Error Message Cause Action
No Paper Fed T1
No Paper Fed T2
No Paper Fed T3
The machine failed to feed
paper from the indicated
paper tray.
Pull out the paper tray indicated on
the LCD and remove all jammed
paper.
No Paper MP The MP tray is out of paper,
or paper is not loaded
correctly in the MP tray.
Do one of the following:
• Refill paper in the MP tray. Make
sure the paper guides are set to
the correct size.
• If paper is in the tray, remove it and
load it again. Make sure the paper
guides are set to the correct size.
No Paper T1
No Paper T2
No Paper T3
The machine failed to feed
paper from the indicated
paper tray.
Do one of the following:
• Refill paper in the paper tray
indicated on the LCD. Make sure
the paper guides are set to the
correct size.
• If paper is in the tray, remove it and
load it again. Make sure the paper
guides are set to the correct size.
No Toner The toner cartridge or the
toner cartridge and imaging
unit assembly is not
installed correctly.
Remove the toner cartridge and
imaging unit assembly. Remove the
toner cartridge from the imaging unit,
and reinstall the toner cartridge back
in the imaging unit. Reinstall the toner
cartridge and imaging unit assembly
back in the machine. If the problem
continues, replace the toner cartridge
with a new one.
Replace Drum It is time to replace the
imaging unit.
Replace the imaging unit with a new
one.
The imaging unit counter
was not reset when a new
imaging unit was installed.
Reset the imaging unit counter.
See the instructions included with the
new imaging unit.
Replace Toner The toner cartridge is at the
end of its life. The machine
stops all print operations.
Replace the toner cartridge with a
new one.
Toner Low If the LCD displays this
message, you can still print.
The toner cartridge is near
the end of its life.
Order a new toner cartridge now so
you have it ready when the LCD
displays Replace Toner.
8

Paper Jams
An error message indicates where the paper is stuck in your machine.
1
2
3
4
Error messages:
1. Jam Rear
2. Jam 2-sided
3. Jam Tray
4. Jam Inside
Solutions for Wireless Connection
If you cannot connect your machine to the wireless network, see the following:
•User's Guide: Print the WLAN Report
•Installation: Alternate wireless configuration method
ATroubleshooting
9
Table of contents
Other Develop Printer manuals

Develop
Develop ineo 25e User manual

Develop
Develop ineo 4000P User manual

Develop
Develop ineo 160 User manual

Develop
Develop ineo 3300P User manual

Develop
Develop ineo 164 User manual

Develop
Develop ineo 3301P User manual

Develop
Develop ineo 5000i User manual

Develop
Develop QC 2235 Plus User manual

Develop
Develop ineo 3320 User manual

Develop
Develop ineo 3300P User manual


