DFI CS620 User manual

DFI CS620 ISA Device User Guide
V 1.1

www.dfi.com
2
Table of Contents
Table of Contents ......................................................................................................................................2
Revision History ........................................................................................................................................3
1 Introduction ...........................................................................................................................................4
1.1 System Setup ........................................................................................................................................... 4
1.2 Terminology ............................................................................................................................................. 5
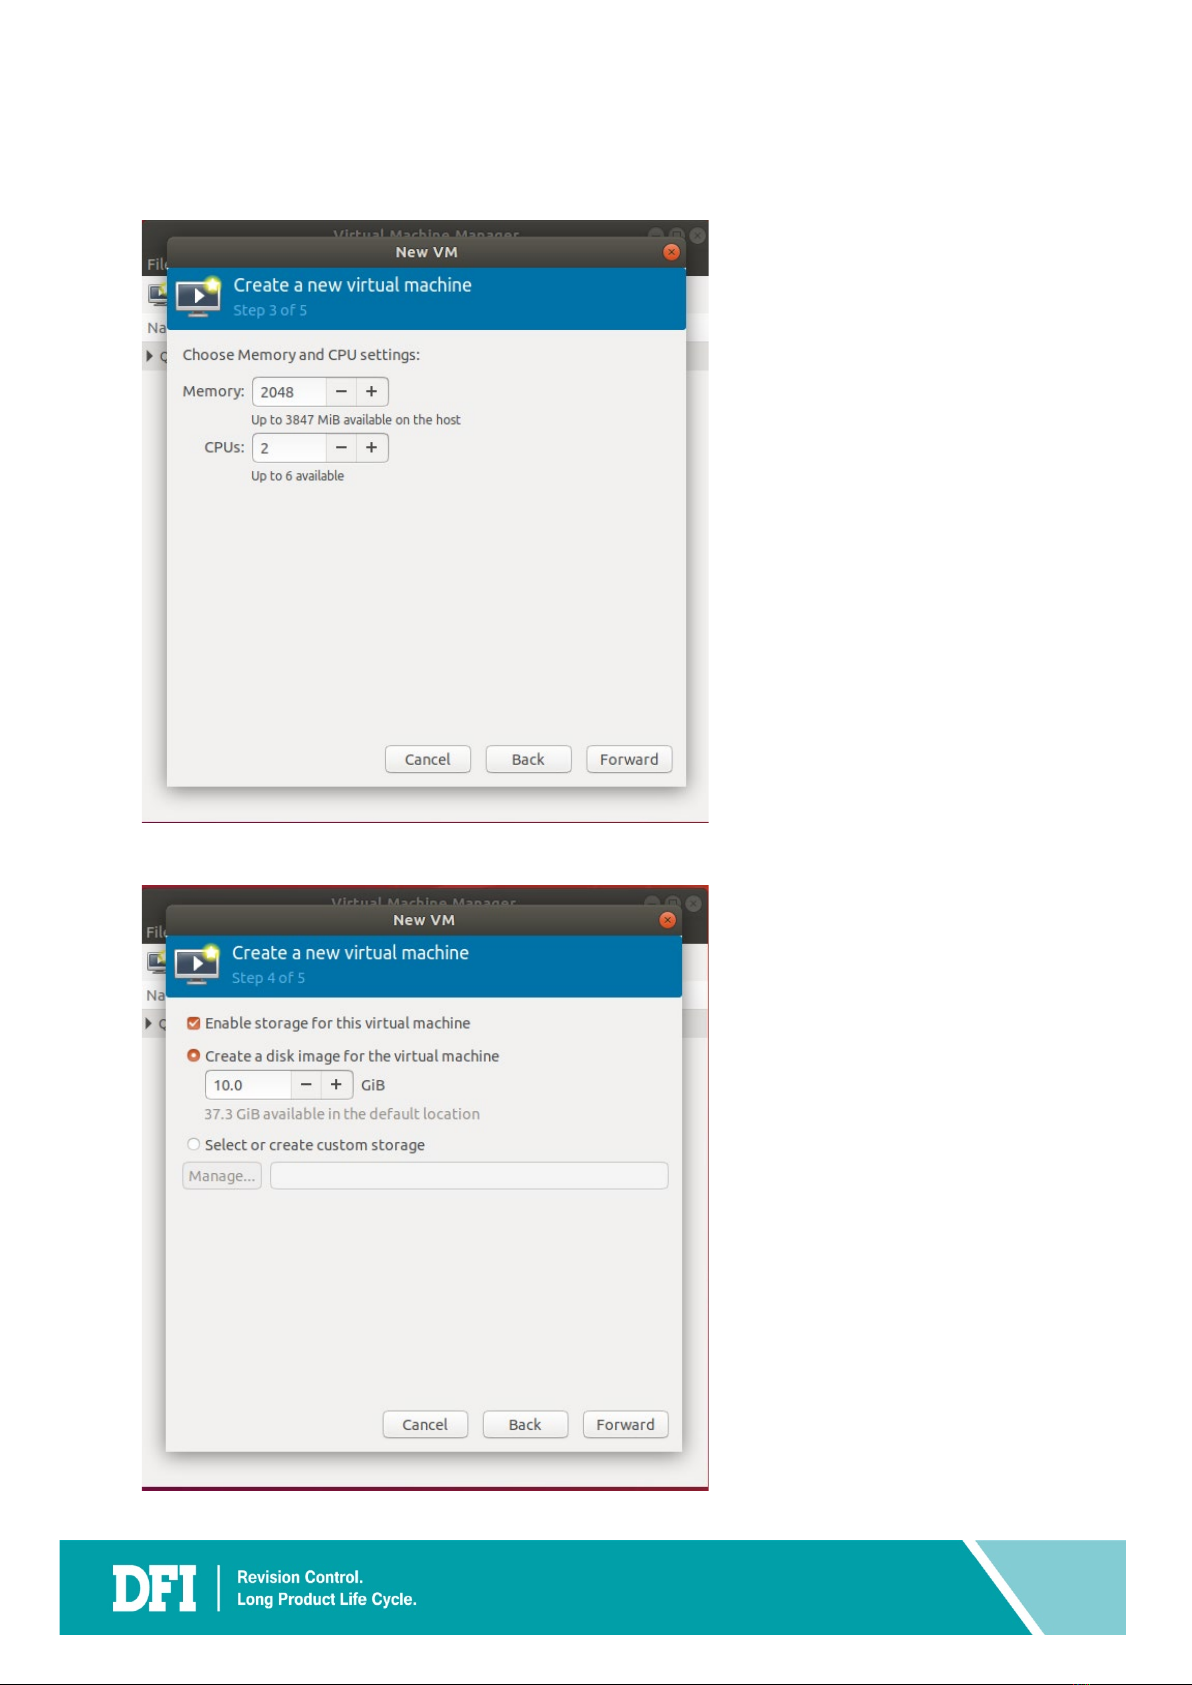
2 Create VM - New Legacy Image Case.......................................................................................................6
3 Legacy Image Extraction ....................................................................................................................... 16
3.1 Sysprep .................................................................................................................................................. 16
3.2 Creating a Bootable Clonezilla USB........................................................................................................ 19
3.3 Extracting the Legacy Image to a USB Device........................................................................................ 22
4 Create VM – Old Legacy Image Case...................................................................................................... 29
5 Restore Legacy Image to VM................................................................................................................. 37
6 Add Device to VM ................................................................................................................................ 42
6.1 Add ISA Device....................................................................................................................................... 43
6.2 Add Serial Device ................................................................................................................................... 52
6.3 Add Sound Device.................................................................................................................................. 54
6.4 Add Parallel Device ................................................................................................................................ 56
6.5 Add USB Disk Device.............................................................................................................................. 58
6.6 Add PCI Host Device .............................................................................................................................. 60
6.7 Add Network Device.............................................................................................................................. 62
7 Install Virtual Device Driver to VM........................................................................................................ 65
7.1 Install Virtual Device Driver ................................................................................................................... 66
7.2 Install Ethernet Controller Driver........................................................................................................... 74
7.3 Install DIO Driver.................................................................................................................................... 82

www.dfi.com
3
Revision History
Date Revision Description Author
2020/11 0.9 Initial document. For DVT sample.
Jack Lan, Kuowei Pai,
Fernando Lin, Fred
Chou
2021/1 0.10 Update Ch. 2 contents, add step 13 ~ 22.
Jack Lan, Kuowei Pai,
Fernando Lin, Fred
Chou
2021/2 1.0 Formal release version.
Jack Lan, Kuowei Pai,
Fernando Lin, Fred
Chou
2021/4 1.1 Add DIO function page Jack Lan, Fernando
Lin

www.dfi.com
4
1 Introduction
DFI provides a virtualization solution that new X86 platform can also use ISA device.
CS620 provides a host image (Ubuntu), which includes hypervisor KVM and let user
install their legacy image. This document will guide user how to install legacy image
and configure ISA device setting.
1.1 System Setup
There are two parts: Prepare VM and Add Device to VM.
Prepare VM has two cases: New Legacy Image and Old Legacy Image (image from
old machine).
Ch 2. Create VM - New
Legacy Image Case
Ch 6. Add Device to VM
Ch 4. Create VM – Old
Legacy Image Case
Case 2
Old Legacy Image
Case 1
New Legacy Image
Prepare VM
Add Device to
VM
Ch 3. Legacy Image
Extraction
Ch 5. Restore Legacy
Image to VM
Ch 7. Install Virtual Device Driver to VM

www.dfi.com
6
2 Create VM - New Legacy Image Case

www.dfi.com
7
1. Run virt-manager
2. Create a new virtual machine by clicking the button in the top left-hand corner

www.dfi.com
8
3. Select Local install media (ISO image or CDROM). Then click Forward
4. Upload ISO image file. Then click Forward

www.dfi.com
9
5. Enter the appropriate RAM and CPU settings as required.
EX. Windows XP case, suggest Memory: 2048MiB, CPUs:2
6. Assign the amount of storage for legacy image.

www.dfi.com
10
7. Enter a name for your virtual machine, and check Customize configuration before
install, then click Finish
8. Click Sound ich6. In Sound Device, select AC97. Then click Apply

www.dfi.com
11
9. Click Tablet. Then click Remove
10. Select Yes

www.dfi.com
12
11. Repeat step 9 ~ 10 to remove NIC: xx:xx:xx and Console 1
12. After remove Tablet, NIC:xx:xx:xx, and Console 1 virtual devices, click Begin Installation
13. After create VM finished, QEMU/KVM list will be added a new VM (winxp)
14. When Windows Setup screen is shown as below picture, please press and hold F6
immediately in VM and release after the message shown Press F2…

www.dfi.com
13
15. Press Sin this step as below picture.
16. Press Enter in this step as below picture.

www.dfi.com
14
17. Press Enter in this step as below picture.
18. Complete installing Windows XP.
Attention please. If the mouse cannot be used in VM when installing Windows XP,
please use keyboard to choose setup items.
19. After Windows XP setup completed, shutdown it first.
20. Go back to hardware details, select Floppy 1, and then select Remove.

www.dfi.com
15
21. Keep Delete associated storage files unchecked, and select Delete.
22. Now you can restart guest OS to use.
Note
The online update function of host image (Ubuntu) is default turned off. Please do not turns
on this function to prevent online update modify the KVM library.

www.dfi.com
16
3 Legacy Image Extraction
This section will guide you on how to carry out the legacy system image extraction starting
from the system preparation tool Sysprep thru to the restoration of the new system. You
need two USB drive for this section.
3.1 Sysprep
Sysprep is a tool that comes with Windows. This is the initial step prior to cloning. This step is
known as generalizing the PC. It removes PC-specific information from the Windows image,
including the PC’s security identifier (SID). This allows you to capture the image and apply it
to other PCs.
NOTE
Sysprep files for Windows XP are available in the installation CD or can be downloaded
online at https://www.petenetlive.com/KB/Article/0000599. For other versions of Windows,
the Sysprep is already included and can be found at C:\Windows\System32\sysprep folde r.

www.dfi.com
17
Steps for Sysprep:
1. In your legacy system, create a new folder in C: drive called Sysprep

www.dfi.com
18
1. Locate the DEPLOY.cab .zip file. This file can be found either in the CD installation or
C:\Windows\System32\or can also be downloaded online
2. Double-click the DEPLOY.cab file
3. Copy over the sysprep.exe file, the setupcl.exe file and the setupmgr.exe file to your C:
\ Sysprep folder
4. Run sysprep.exe file
5. Click Reseal and OK
6. The system will shut down
7. Before booting the legacy system, plug in the Clonezilla USB drive and proceed to
extracting the image from the legacy system
NOTE
Please don’t turn on the system before the image extraction using Clonezilla is completed.
Else, the system will register the original hardware again. If you have already booted-up the
system without completing extracting the image using Clonezilla, re-run the Sysprep steps
again.

www.dfi.com
19
3.2 Creating a Bootable Clonezilla USB
Clonezilla is a disk cloning application. It is an open-source application which you can
download and install on your system.
After the Sysprep process is done, continue with cloning the disk content by creating the
bootable USB device using your preferred bootable tool. In this document, the tool used to
create the bootable Clonezilla is Rufus. Prepare two USB devices. Use the first device to
prepare the bootable Clonezilla and the second device to save the disk content to the image
(.iso) file. These two devices are to be plugged in together at the same time.
NOTE
Download Rufus at https://rufus.akeo.ie
NOTE
Download the Clonezilla iso file at
https://clonezilla.org/downloads.php
Just download stable version

www.dfi.com
20
Steps to create a bootable USB Clonezilla using Rufus:
1. Download Rufus installer
2. Format a USB drive that has equal or bigger size than the file you will move to (i.e
clonezilla.iso)
3. Launch the Rufus installer application
4. Please refer to below settings to burn a Clonezilla USB boot disk
This manual suits for next models
1
Table of contents
Other DFI Motherboard manuals