DHG SystemRoMedic Eva400 User manual

Eva400/Eva450/Eva600
IFU no: 789-ML Ver. 21 2021-12-07
SWL: 180 kg/ 400 lbs
SWL: 205 kg/ 450 lbs
SWL: 270 kg/ 600 lbs
Eva400EE: 60100001
Eva400EM: 60400011
Eva450EE: 60100002
Eva450EE, low legs: 60100006
Eva450EM, low legs: 60100007
Eva600EE: 60100003
Eva600EE, low legs: 60100010
Instructions for use – English
Bruksanvisning – Svenska
Brukermanual – Norsk
Brugsvejledning – Dansk
Käyttöohje – Suomi
Gebrauchsanweisung – Deutsch
Handleiding – Nederlands
Manuel d’utilisation – Français
Manuale utente – Italiano
Manual de usuario – Español
Instrukcja obsługi – Polski
Návod k použití – Český
Návod na použitie – Slovensky
Instruções de utilização - Português

Table of contents
English............................................................................................... 4
Svenska............................................................................................20
Norsk.................................................................................................37
Dansk................................................................................................54
Suomi................................................................................................71
Deutsch.............................................................................................88
Nederlands....................................................................................105
Français..........................................................................................122
Italiano............................................................................................139
Español..........................................................................................156
Polski..............................................................................................173
Český..............................................................................................190
Polski..............................................................................................173
Slovensky .....................................................................................206
Português .....................................................................................173
Dimensions Eva400/Eva450 ..................................................................229
Dimensions Eva600..............................................................................230
DimensionsEva450 with low legs ..........................................................231
DimensionsEva600 with low legs ..........................................................232
Recycling instruction............................................................................233
Serial number......................................................................................234
EMC tables ..............................................................................................235

3IFU
1. Lift arm
2. Mast
3. Handlebar
4. Battery pack
5. Emergency stop button on control box
6. Control box
7. Motor for base-width adjustment
8. Rear castors with brakes
9. SlingBar with safety latches
10. Front castors
11. Emergency lowering
12. Motor/actuator for lift arm
13. Mast height adjustment
14. Base-width adjustment pedal (model EM)Base-width adjustment pedal (model EM)
15. Hand control15. Hand control
Mobile lift Eva has been developed to meet most lifting needs in combination with the right accessories. It is a lift unit
that can lift user in a seated or supine position. The Eva is made largely of aluminium, which makes it relatively light,
considering the weight it can lift.
15
1
2
3
4
5
6
7
8
9
10
11
12
13
Eva450EEL Eva600EEL
Eva450EML
REVISION HISTORY
REV.
DESCRIPTION
DATE
APPROVED
D
E
F
C
1
2
3
4
B
A
3
2
1
5
C
D
4
6
7
8
A
B
SCALE:1:10
DWG. NO.
REV.
NAME
DATE
DRAWN
APPROVED BY
SHEET 1 OF 1
WEIGHT:
COMMENTS:
STATUS:
TITLE
MATERIAL:
SIZE
Released
EVA EEL 450 base
90001288 02
g
2011-05-20
A3
Unless otherwise stated, general
tolerances according to ISO 2768-m
hc-jope
This drawing and any information or descriptive matter set out hereon are the confidential and copyright property of Handicare
and must not be disclosed, loaned, copied or used for manufacturing, tendering or any other purpose without their written permission.
14
Instructions for use - English
Eva400/Eva450/Eva600

4IFU
Safety information
Visual inspection
• Inspect the packaging for any damage.
• Check for correct product being delivered.
• Inspect lift functions regularly.
• Check to ensure that material is free from damage.
Before use
• Check if all the parts/components are included in the packaging.
• Check if all approved accessories are included int the package.
• Check if Product Quality Approval document is included in the packaging. Save this document for future contact
with manufacturer.
• Make certain the lift is properly assembled.
• Check lifting function and base-width adjustment.
• Check driving function in all directions.
• Check sling bar connection and safety latch function.
Intended use of the product
Eva is a movable and portable unit which together with approved accessories assists in lifting and/or transferring
patients in a seated or supine position from bed to chair or vice versa, as well as transferring patients short distances
indoors when needed. Eva decreases risk of injuries to caregivers in the lifting situation. To be used by caregivers who
can read and understand the instruction on how to use the lift.
Eva is intended to be used in both Home healthcare environment and Professional healthcare facility environment.
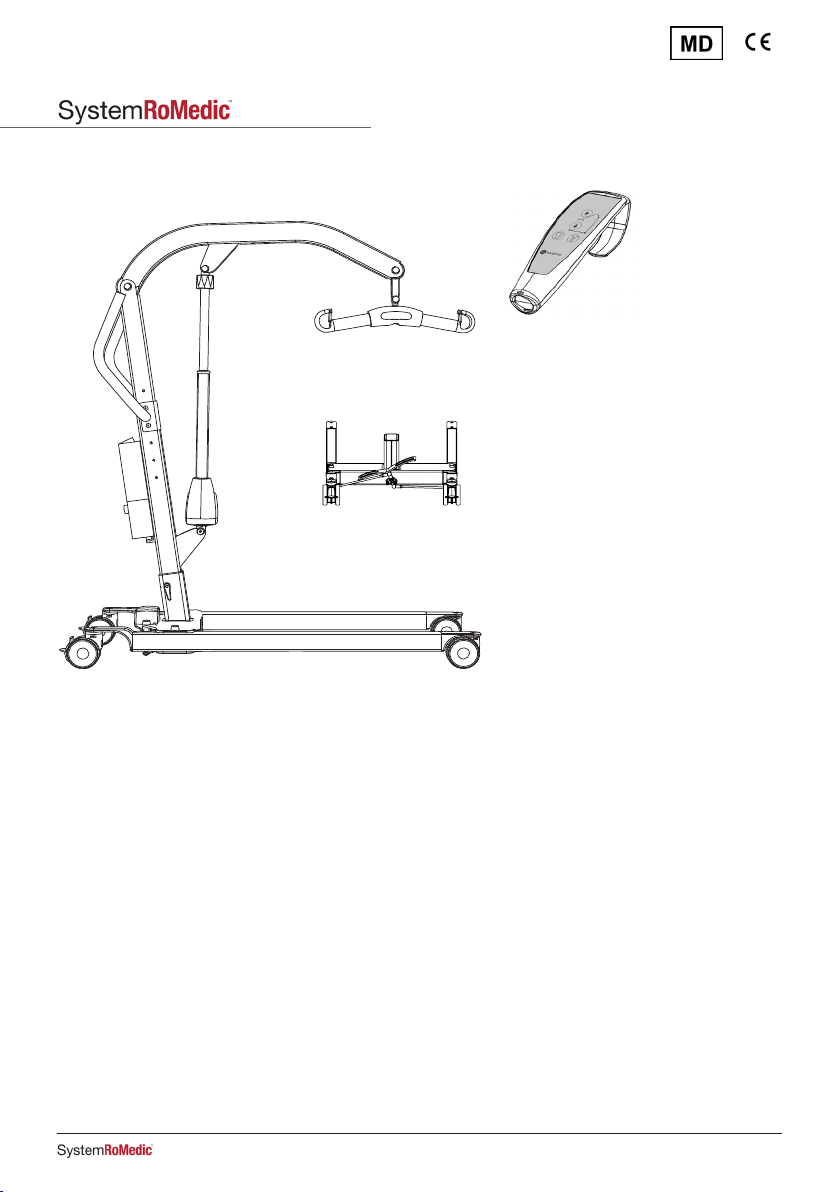
Device description
Eva is to be used for transferring persons with physical disabilities (with little or no muscular function, including loss of
voluntary movement functions) between two point for example bed and wheels chair.
Eva is to be operated by caregivers (lay persons and healthcare professionals) who have access to and the ability to
read and understand the IFU (instructions for use) of the Eva. Eva reduces the need for manual lifting of the patient, thus
making the lifting situation safer and reducing care personnel’s work related injuries.
• Always read the user manuals for all assistive devices used during a transfer.
• Keep the user manual where it is accessible to users of the product.
• Always make sure that you have the right version of the user manual.
• The most recent editions of user manuals are available for downloading from our website,
www.directhealthcaregroup.com.
• Under no circumstances may the lift be used by persons who have not received instruction in the operation of the lift.
• It is strongly prohibited to modify the original product.
Always read the user manual

5IFU
Assembly
Check to ensure that all components are included
Mast with lift arm, lift motor, sling bar, control box and battery.
Undercarriage with base-width adjustment motor and locking handle.
Hand control and cord.
Instructions, charging cable and power supply cord for charging.
Insert the mast onto the base. There are three alternatives for adjusting the height of the
mast. Secure the mast with the locking handle.
Eva450/Eva600: Place the battery in the mount in the control box.
Mount handlebar with two wrenches. (13 mm)
Connect the cables: The cable for the hand control in outlet HS; the cable for the hoist
motor in outlet M1, and the cable for the base motor in outlet M2.
Release the emergency stop and perform a final inspection (see final inspection).
HS M1 M2

6IFU
Final inspection
Check to ensure that no parts have been left in the packaging.
Inspect the lift for signs of wear and damage.
Check all four castor wheels and castor wheel locks.
Check all connections and fixtures including screws and bolts.
Check the emergency stop function by activating the emergency stop button, and
then pressing either the up or down button. If nothing happens when the up or
down buttons are pressed, the emergency stop is functioning properly.
Grasp the hand control, press the up button and run the lift arm all the way up.
Then, press the down button and run the lift arm all the way down.
Test base-width adjustment function. Press the button for base-width adjustment
to widen the base fully, and then press the other button to narrow the base again.
Test lift function by lifting a person (not a user) using an approved sling. At the
same time, check the emergency lowering function with someone on the lift. See
section on Emergency lowering.
If the lift is functioning correctly, connect the charger and check to ensure that the
charging lamp on the control box lights up.
NOTE!
Before the lift is used for the first time:
• it must be charged for at least 4 hours. See section on charging batteries.
• the control box service counter needs to be reset. To reset the service counters
press both lift buttons on the hand control at the same time for 5 seconds.
An audio signal will indicate that the timer has been reset.
Keep the user manual where it is accessible to users of the product.
Eva450/Eva600
Eva400
EE
EM
Eva450/Eva600

7IFU
Using the product
Contraindications, Precautions, Warnings:
Contraindications
• The floor lifts may not be used by patients above the maximum weight indicated on the label of the lifts.
• The lift must not be lowered into water or used in a shower.
• The lift must not be left or stored in a damp or humid environment.
• The lift must not be cleaned using steam.
• The lift must not be charged in a wet room.
• The lift must not be used in oxygen-enriched environments.
• The floor lift must not be used outdoors, only indoors.
• The lift is not intended for long transporting of users, only for short transfers.
Precautions
• Check that the floor lift is used on a dry and proper levelled surface.
• Check the floor lift is correctly mounted/assembled before its first use.
• Check the floor lift after every folding/disassembly after any transport.
• Check lifting motion and inspect the actuators full range.
• Inspect the lift once per year to detect any signs of damage.
• Check that the hand control does not show signs of wear.
• Check that the hand control markings are in accordance with the lifting functions.
• Check the battery status.
• During yearly service note the number of lift the actuator as performed and take action accordingly.
• It is important to never leave the user alone during the transfer.
• Warranty applies only if repairs or alterations are made by personnel who are authorized by Direct Healthcare Group.
• Ensure that there are no obstacles or people in the way of the lift.
• Handle the battery with care. Do not drop.
• Use only batteries and cables that are intended for the lift.
• Verify that all lifting accessories aligns with gravity and can move freely.
• Activate the brakes whenever the lift is not in use.
• Low speed is recommended when moving a lift when a user is using it.
• Take care not to drive the floor lift over thresholds with high speed or force.
• When passing over a threshold, pass the back wheel of the floor lift first. Approach the threshold with lower speed
and communicate the coming threshold to the user.

8IFU
Safe working load
Different products on the assembled lift system; ie. lift, sling bar, lifting sling and other accessories may have different
safe working loads. It is always the lowest maximum load alowed indicated for the respective products on the system
that applies for the entire system. Always check the markings on all products in the unit and contact Direct Healthcare
Group with any questions.
Residual risks and risk control measures:
Risk Hazard Risk Control Measure Information
User Risk Device tilts. If a lift is started with the user far outside the base of
support of the lift, or if a user sitting in a sling is moved
outside the base of support of the lift, it could lead to the
device tipping, and the user falling.
During a lift, the user must be over the base of support of
the lift during the entire lifting procedure. Never move the
user, or start a lift from, outside the base of support of the
device.
Material Risk Components loosening or
breaking due to Corrosion.
Improper treatment of the lift could lead to components
corroding. Use the lift indoors, and do not store or use it in
wet or humid environments.
See sections Contraindications, Precautions and Warnings
and Maintenance for more information and detailed
information about use and storage environments.
Warnings
• The caregiver must be able to read and understand the Manual/IFU of the product.
• It is important to use only approved accessories to prevent unintended detachment of components and subsequently
a fall that may lead to patient injury.
• Use careful and gentle maneuvers when moving the lift to avoid swinging and impact injuries from surrounding
furniture and other objects.
• For optimal function and safety, the lift should be inspected regularly, see the Maintenance/Service manual.
• Lifting accessories must be properly fitted and tested in relation to the user’s needs and functional ability.
• Special care must be taken when using strong power sources such as diathermy and the like so that diathermy
cables are not placed on or near the device. In case of doubt consult with a Direct Healthcare Group representative.
• Never attempt to lift the mobile lift unit by the handlebar or lift arm.
• Never stand on the lift during when it is operating.
• Do not leave a user or patient unattended during a transfer.
• Never move the lift by pulling on the actuator.
• During a lift, the user must be over the base of support of the lift during the entire lifting procedure, to avoid tipping of
the lift. Never move the user, or start a lift from, outside the base of support of the device.

9IFU
Risk Hazard Risk Control Measure Information
User Risk Device tilts. If a lift is started with the user far outside the base of
support of the lift, or if a user sitting in a sling is moved
outside the base of support of the lift, it could lead to the
device tipping, and the user falling.
During a lift, the user must be over the base of support of
the lift during the entire lifting procedure. Never move the
user, or start a lift from, outside the base of support of the
device.
Material Risk Components loosening or
breaking due to Corrosion.
Improper treatment of the lift could lead to components
corroding. Use the lift indoors, and do not store or use it in
wet or humid environments.
See sections Contraindications, Precautions and Warnings
and Maintenance for more information and detailed
information about use and storage environments.
Charging batteries
A tone sounding when using the lift indicates that the battery need recharging.
Charge the lift after use to ensure that the battery is always fully charged.
Lock the castor wheels when charging the battery.
Eva450/Eva600
1. Connect the charging cable to a power outlet and in the connection for charger cable.
The symbol for charging is shown on the display.
2. Check to ensure that the lamps on the control box light up. The green LED lamp indicates that
the charger is receiving power and the yellow LED lamp indicates that the battery is charging.
3. Charging stops automatically when the battery is fully charged.
Wall-mounted charger
1. Remove the battery pack from the lift and place it in the wall-mounted charger.
2. Check to ensure that the LED lamp on the front of the charger lights up.
Eva400
1. Connect the charger to the charger cable leading from the underside of the control box.
2. Connect the charger to a power outlet (100-240 V AC).
3. When the charger is connected, the control box lamp indicates a yellow light.
NOTE!
Before the lift is used for the first time, it must be charged for at least 4 hours.
For maximum battery life, charge batteries regularly. We recommend daily charging when the lift is
used daily.
The emergency stop must be deactivated during charging.
Eva450/Eva600: Battery information on the display
The battery discharging will be shown in four stages:
Battery state 1: The battery is ok, no need for charging (100 - 50 %).
Battery state 2: Battery needs charging. (50 - 25 %)
Battery state 3: Battery needs charging. (Less than 25 %) A tone sounds when a button is pressed in
this battery state.
Battery state 4: The battery needs charging. (17V or lower) At this stage some of the functionality
of the lift is lost.At this battery stage it is only possible to drive the lift arm down. Furthermore an
audio signal will sound when a control button is activated. The symbol will switch between the two
pictures for 10 seconds.
The battery symbol is shown when the control box is active until power down (2 minutes after use).
It is not possible to use other batttery types than BAJ1/BAJ2.
The battery level is measured via voltage. This means that it is possible to experience e.g. that the
battery switches from state 1 to state 2 and back to state 1.
LED
indication of
charging
LED indica-
tion of hand
control
activation
Button for
electrical
emergency
lowering
Charger
Eva400
Eva450/Eva600

10 IFU
Eva450EEL Eva600EEL
Eva450EML
REVISION HISTORY
REV.
DESCRIPTION
DATE
APPROVED
D
E
F
C
1
2
3
4
B
A
3
2
1
5
C
D
4
6
7
8
A
B
SCALE:1:10
DWG. NO.
REV.
NAME
DATE
DRAWN
APPROVED BY
SHEET 1 OF 1
WEIGHT:
COMMENTS:
STATUS:
TITLE
MATERIAL:
SIZE
Released
EVA EEL 450 base
90001288 02
g
2011-05-20
A3
Unless otherwise stated, general
tolerances according to ISO 2768-m
hc-jope
This drawing and any information or descriptive matter set out hereon are the confidential and copyright property of Handicare
and must not be disclosed, loaned, copied or used for manufacturing, tendering or any other purpose without their written permission.
EM
EE
EE
EM
Service information read-out
Basic service information can be read out on the display. To get the service information on the
display please press the lifting arm up button for half a second. The information will be shown for
½ minute or until other buttons are activated.
• Total cycles done by the actuator
• Total work done by the actuator (ampere usage times seconds in use)
• Total number of overloads
• Days since last service/Days between services
Hand control
Raising/lowering the lift arm
Symbol indicate direction of travel.
Motion stops as soon as the button is released.
If the lift arm encounter an obstacle while lowering, the lift will immediately stop the motion.
In order to continue, the lift arm will need to be raised slightly by using the hand control
before further lowering.
Electrical base-width adjustment (EE)Electrical base-width adjustment (EE)
Markings on the buttons of the hand controll indicate function.Markings on the buttons of the hand controll indicate function.
Motion stops as soon as the buttons are released.Motion stops as soon as the buttons are released.
Manual base-width adjustment (EM)Manual base-width adjustment (EM)
Push down on the respective pedals at the back ofPush down on the respective pedals at the back of
the lift to widen and narrow the base.the lift to widen and narrow the base.
Changing the battery
”Click!”
12
Eva450/Eva600

11IFU
Emergency stop
To activate the emergency stop
Press the red emergency stop button on the control box.
Resetting
Turn the button in the direction of the arrows until the button pops out.
To prevent battery discharge, we recommend that the emergency-stop button
is pressed in when the lift is not in use.
Emergency lowering
Manual emergency lowering
For manual emergency lowering, turn the round plastic knob on the actuator clockwise.
Electrical emergency lowering
For electrical emergency lowering, use the down button on the control box.
Use a narrow object such as a pen.
Brakes
Locking the wheels
Lock the rear wheels by pressing down on the brake pedals on both rear wheels
with your foot.
Wheels should not be locked during lifting, so that the lift can align itself with the
user’s centre of gravity.
The only time the wheels should be locked is during lifting from the floor;
otherwise, there is a risk of the lift rolling and colliding with the user’s head.
Locked wheels during lifting increase the risk of the lift tipping.
Unlocking the wheels
To release the wheel brakes, lift the brake pedals upwards with your foot.
Eva450/Eva600
Eva450/Eva600Eva400
Eva400

12 IFU
Trouble shooting
If the lift or base-width adjustment cannot be activated, check the following:
- That the emergency stop button is not pressed in.
- That all cables are properly and securely connected. Pull out the contact and plug it in again firmly.
- That battery charging is not in progress.
- That the battery is charged.
If the lift is not working properly, contact your dealer.
If the lift makes unusual noises:
- Try to determine the source of the sound. Take the lift out of operation and contact your dealer.

13IFU
Instructions for use
1. Never use the lift if you have not had proper training on lifts and slings.
Never use the lift before you have read the manual for both the lift and slings.
2. Perform risk assessment, which will dictate whether one or more carers are required.
3. Always do a check of the lift before using it. Pay special attention to checking wheels, bolts, lift arm, sling bar and
labels. See manual for how to check lift before use.
4. Before using the lift always plan and assess the risk before a lift and transfer:
a. Check suitability of the environment where you plan to conduct lifting and then make a plan for the task.
b. Check whether both the lift and the sling you plan to use function properly. Fill out any necessary form before use.
c. Check that the lift battery is charged.
d. Check that the lift has been serviced.
e. Visually inspect the lift and the sling for signs of damage or defects.
f. Ensure sizing and type of sling is correct for the user.
5. Use the lift as a mobile lifting station. Don’t drive if you don’t have to. Plan for a short transfer, move chairs, carpets
and other furniture that might be in your way.
6. Place the sling on the user before you place the lift close to the user. See Accessories such as EasyGlide Ovals,
FootStool, Slide Sheets that can assist you in sling application.
7. Move the lift slowly towards the user. Keep one hand between the sling bar and the user to make sure you never hit
the user with the sling bar.
8. Attach the loops from the sling to the sling bar. Start with the upper ones. Check so that the sling bar does not
rotate and hit the user. After attaching all sling loops, check that they all are inside the safety latch by pulling the
loops down.
9. Lifting procedures:
a. When lifting a user from a chair/toilet/wheelchair etc is most often done by placing the lift in front of the chair or
coming from the side
b. When lifting a user from a bed, it is easiest if you raise the head of the bed and lift the user from a seated
position. If you need to lift a user from lateral position, please pull in the lower straps of the sling to keep them
from sliding up/into groin area. Lower parts of the sling should not touch either knee joints or groin area.
c. When lifting a user from the floor, it is easiest if the user can sit up on the floor. If it is not possible, the most
common method is to place the lift so that a pillow underneath user’s head will be in one corner near the base
of the lift and closer to one side of the mast. Remember to lock the wheels!

14 IFU
Instructions for use
10. Press UP button on the hand control to lift the user. Keep on lifting, until straps are tight and the user is just about to
be lifted, then STOP and make a safety check.
a. Check so that the sling bar is horizontal. If not, it means that the sling is not properly placed and the user will not
be lifted correctly.
b. Check so that the straps are not caught in the wheelchair, bed rail and other objects.
c. Check so that the sling loops are fully protected from slipping of the sling bar by the closed safety latches.
d. Check so that the user is ready, comfortable and safe in the sling by asking him or her.
e. Check so that the sling bar does not touch the user’s head.
f. Check so that wheels are not locked or blocked. They should only be locked if you lift from the floor.
From this point of taking tension you can release the brakes.
11. Press UP button again and lift the user up.
12. Transfer the user slowly towards the place of destination. Keep the transfer as short as possible.
13. Lowering procedures:
a. When lowering to a bed, it is often best to assist the user into a seated position. Therefore, raise the head of the
bed before lowering the user. If you lower into lateral position, make sure that the user is not placed too high up
in the bed preventing him or her from hitting his or her head into the headboard of the bed.
b. When lowering to a chair, make sure to assist the user to sit as far back in the chair as possible.
14. Press DOWN button to lower the user. When lowering the user, make sure that the sling bar will not hit the head.
Once the user touches down on the chair, try to move the lift and the sling bar away from user’s face. Brakes should
be off to allow this to happen. Lower so that the straps from the sling are not tight and release the loops from the
sling bar. Move the lift away so that you have space enough to remove the sling.
15. Helpful hint:
a. To place the sling try to use a ReadySlide or a EasyGlide oval.
b. To move the lift first check if the wheels are rolling easily. They might need to be cleaned or changed. If it still
challenging to move the lift, the problem could be that the floor is too soft or that the weight of the user is too
high for one caregiver. If that is not possible, plan to perform risk assessment and potentially change to more
caregivers, or possible a different type of lift such as a ceiling lift.
16. If you have questions please talk to your patient handling adviser or us at Direct Healthcare Group. What is the best
handling for one user might be bad for the next one.

15IFU
Accessories
Expected lifetime of accessories
Consult the manual or information sheets regarding the respective accessories.
Lifting slings
Direct Healthcare Group’s SystemRoMedic™ line includes a wide range of functional
and comfortable, high-quality lifting slings that are adapted for all types of lifting and for
users with different needs. The lifting slings are available in several materials and in sizes
ranging from XXS to XXL. There are also special lifting sling models in XXXL and XXXXL
for extremely large and heavy users. All models are safe and very easy to use.
Sling bars
SlingBar is a two-point aluminium sling bar available in four variants with different width.
All variants of SlingBar have safety latches which prevent the sling straps from creeping
out of the sling bar and all variants are for users weighing up to 300 kg/660 lbs.
To get more room in a lifting sling when using SlingBar two-point sling bar,
SlingBarSpreader M side bars can be used as an accessory. SlingBarSpreader M open
up the lifting sling and provide for a more reclined position.
SlingBar XS article no.: 70200071
SlingBar S article no.: 70200001
SlingBar M article no.: 70200002
SlingBar L article no.: 70200003
SlingBarSpreader M article no.: 70200042
StretcherBar, article no.: 70200006, and StretcherSling, article no.: 46502007, for lifting
in a supine position.
Sling bar RFL X4, Article no.: 70200017, is a four-point sling bar designed to provide
more space in the sling, for example, for obese and/or pain-sensitive users.
QuickLink article no.: 70200101
Hand control
Hand control HB33-6, article no.: 70200089, with service, battery status and overload
indicator.
Scales
Charder MHS2500 is used together with a stationary or mobile lift for weighing of users.
Article no.: 70100002, SWL: 300kg/660lbs
Article no.: 70200003, SWL: 400kg/880lbs
Assistive devices for positioning
Direct Healthcare Group´s SystemRoMedic™ range includes a wide selection of
functional, comfortable, high-quality assistive devices for positioning that can be adapted
for different types of lifting and for users with different needs.

16 IFU
Maintenance
The lift must undergo thorough inspection at least once per year. Inspection must be performed by authorized personnel
and in accordance with Direct Healthcare Group’s service manual.
Repairs and maintenance may only be done by authorized personnel using original spare parts.
Used batteries are to be left at the nearest recycling station. Used batteries can also be returned to
Direct Healthcare Group or a Direct Healthcare Group dealer for recycling.
Service agreements
Direct Healthcare Group offers the possibility of service agreements for maintenance and regular testing of your mobile
lift. Contact your local Direct Healthcare Group representative.
Cleaning/disinfection
If necessary, clean the lift with a cloth with warm water or a soap solution and check that the castors are free from dirt
and hair. The electronic components (battery, control box, hand control, actuators, cables) should be cleaned with a
damp cloth only. To avoid degreasing of the piston rods, the actuators should be retracted to minimum stroke and
without load before cleaning. Ensure that the lift is dried thoroughly after cleaning. Do not steam clean due to risk of
corrosion. Do not use cleaning agents containing phenol or chlorine, as this could damage the materials. If disinfection
is needed, 70 % ethanol, 45% isopropanol or similar should be used. Recommended frequency of cleaning is weekly
and possibly more often depending on frequency of use.
Storage and transportation
If the lift is not to be used for some time or e.g., during transport, we recommend that the emergency stop button
be pressed in. The lift should be transported and stored in -10 ° C to + 50 ° C and in normal humidity, 20% to 80%
non-condensing. The air pressure should be between 700 and 1060 hPa. See also Technical Information below, and
marked on the device. Leftmost symbol indicates storage and transportation. Let the lift reach room temperature
before the batteries are charged or the lift is used. The lift should not be stored so that it is exposed to dust, or so that
the battery is exposed to direct sunlight.
Operation
The operating environment should be 5 °C to 40°C, relative humidity 20% to 80% non-condensing, and atmospheric
pressure 700 to 1060 hPa. See also Technical Information below, and marked on the device. Leftmost symbol
indicates operating condition.
40°C
5°C
50°C
-10°C
1060
hPa
700
hPa
1060
hPa
700
hPa
%
80%
20%
%
80%
20%
40°C
5°C
50°C
-10°C
1060
hPa
700
hPa
1060
hPa
700
hPa
%
80%
20%
%
80%
20%

17IFU
Symbols
Blue/white
Read user manual
May not be discarded in domestic waste
The product complies with the requirements of the Medical Device Regulation (EU) 2017/745
Type B, according to the degree of protection against electric shock.
The device is intended for indoor use.
Class lI equipment
This product is tested and approved in regards to safety
in the workplace according to the requirements of the US
Occupational Safety & Health Administration. ”US” stands for
compliance with the requirements of US authorities, ”C” for
compliance with Canadian requirements.
Yellow/Black
International general warning symbol
Red/ black
Do not push or pull the lift by the actuator
Duty cycle:
2 min in active (ON) mode,
18 min in rest (OFF) mode.
Eva400 Eva450/Eva600

18 IFU
Lifting speed 34 mm/s without load.
Batteries Two 12V, 2.9 Ah valve-regulated, sealed, lead accumulator (gel-type batteries)
Number of cycles when fully loaded: 300
Internal charger External: Linak CH01
(9000368) Mains voltage
100-240VAC (50-60 Hz). Max.
400mA
Internal: Included cable. Max. 400mA
Motor (mast) DC 24V, 5 A. IP X4.
Operationtime: 10% at maxi-
mum continous running of 2
minutes, maximum 5 switching
cycles per minute. Push:
6000N.
DC 24 V, 10 A. IP X4. Operationtime: 10% at
maximum continous operation of 2 minutes, maxi-
mum 5.5 cycles per minute. Push: 10 000N.
Motor (base) 24V, 5 A, IP X4. Operationtime:
10% at maximum continous
operation of 2 minutes,
maximum 5 cycles per minute.
Push: 3000N.
24 V, 3 A, IP X4. Operationtime: 10% at maximum
continous operation of 2 minutes, maximum 5.5
cycles per minute. Push: 3000N.
Sound level With load: upwards: 43 dB(A)
downwards: 44 dB(A).
With load: upwards: 74.7 dB(A) downwards: 52.6
dB(A).
Material Aluminum
Emergency lowering Manual and electrical
Castors Front 4”, 100 mm, back 4”, 100mm
Weight 74.9 lbs, 34 kg 77.1 lbs, 35 kg
IP class IP X4
Expected lifetime 10 years
Expected lifetime
of accessories Consult the manual or information sheets regarding the respective accessories
Operating forces
buttons on hand control
4 N
Turning diameter 1340 mm/ 54 inch
Max. load 400 lbs, 180 kg 450 lbs, 205 kg 600 lbs, 270 kg
Operating environment 5 °C to 40°C, relative humidity 20% to 80% non-condensing, and atmospheric
pressure 700 to 1060 hPa.
Storage and transportation
environment
-10 °C to + 50 °C, relative humidity 20% to 80% non-condensing, and atmospheric
Environment pressure 700 to 1060 hPa.
Eva450 Eva600
Eva400
Technical Information

19IFU
The lift has been tested for compliance with current regulatory standards regarding its capacity to block EMI
(electromagnetic interference) from external sources. The lift has been tested according to IEC60601-1-2 Edition 4.
Some procedures can help reduce electromagnetic interferences, such as following the intended environment: Home
Healthcare Environment and Professional Healthcare facility environment.
The following are exceptions to the above intended environment: Near HF Surgical Equipment and in a RF Shielded
room of an ME SYSTEM for magnetic resonance imaging.
WARNING: In case the unit stops operating, behaves in an unexpected way, or moves unintentionally due to possible
electromagnetic disturbance or interference, the unit should be switched off. It should be switch on again and its
function should be verified before use. If the problem remains the unit should be used in another room or environment.
In case of other equipment being disturbed, its function should be verified before using again.
WARNING: In case the unit stops operating or behaving in an unexpected way due to possible EM disturbance, the
unit should be switched off. Its function should be verified, and the equipment should be used in another room or
environment. In case of other equipment being disturbed, its function should be verified before using again.
WARNING: Use of this equipment adjacent to or stacked with other equipment should be avoided because it could result
in improper operation. If such use is necessary, this equipment and the other equipment should be observed to verify
that they are operating normally.
WARNING: Portable RF communications equipment (including peripherals such as antenna cables and external
antennas) should be used no closer than 30 cm (12 inches) to any part of the lift including cables specified by the
manufacturer. Otherwise, degradation of the performance of this equipment could result.
Take from ceiling lifts
Electromagnetic Compatibility (EMC)

20 IFU
1. Lyftarm
2. Mast
3. Körhandtag
4. Batteri
5. Nödstoppsknapp på kontrollbox
6. Kontrollbox
7. Motor för breddning
8. Bakre hjul med broms
9. Lyftbygel med urkrokningsskydd
10. Främre hjul
11. Nödsänkning (manuell)
12. Motor/ställdon för lyftarm
13. Höjdinställning av mast
14. Manuell benbreddning (EM)
15. Handkontroll
Den mobila lyften Eva är utvecklad för att täcka de flesta personlyftsbehov tillsammans med rätt lyfttillbehör. Det är en
personlyft som klarar både sittande och liggande lyft. Eva är tillverkad till stor del av aluminium vilket ger den en låg vikt i
förhållande till vad den klarar av att lyfta.
15
1
2
3
4
5
6
7
8
9
10
11
12
13
Eva450EEL Eva600EEL
Eva450EML
REVISION HISTORY
REV.
DESCRIPTION
DATE
APPROVED
D
E
F
C
1
2
3
4
B
A
3
2
1
5
C
D
4
6
7
8
A
B
SCALE:1:10
DWG. NO.
REV.
NAME
DATE
DRAWN
APPROVED BY
SHEET 1 OF 1
WEIGHT:
COMMENTS:
STATUS:
TITLE
MATERIAL:
SIZE
Released
EVA EEL 450 base
90001288 02
g
2011-05-20
A3
Unless otherwise stated, general
tolerances according to ISO 2768-m
hc-jope
This drawing and any information or descriptive matter set out hereon are the confidential and copyright property of Handicare
and must not be disclosed, loaned, copied or used for manufacturing, tendering or any other purpose without their written permission.
14
Bruksanvisning - Svenska
Eva400/Eva450/Eva600
This manual suits for next models
2
Table of contents
Languages:
Other DHG Medical Equipment manuals

DHG
DHG RoMedic HeelStrap User manual

DHG
DHG Bure Rise & Go DB User manual

DHG
DHG SystemRoMedic Bure Rise & Go DB User manual

DHG
DHG Raizer M User manual

DHG
DHG MiniLift200 User manual

DHG
DHG Bure XL User manual

DHG
DHG RoMedic LowBackSling User manual

DHG
DHG RoMedic LiftSeat User manual

DHG
DHG WendyLett2Way User manual

DHG
DHG VENTURI MINO User manual