Diamedica DPA 02 Manual

Page 1of 13
© Copyright Diamedica (UK) Ltd 2017
DPA 02TM
Diamedica Portable Anaesthesia System
INSTRUCTIONS FOR USE MANUAL
Diamedica (UK) Ltd
Grange Hill Industrial Estate
Bratton Fleming
Barnstaple, Devon
EX31 4UH, United Kingdom
Tel: +44 (0)1598 710066 Fax: +44 (0)1598 710055
Revision A 05-05-2017 DCN-0002
ENG
0088

Page 2of 13
© Copyright Diamedica (UK) Ltd 2017
Read this page first
INTENDED USE
This device is suitable for use in hospital settings with limited resources or in any field or
outreach locations and is suitable for adult and paediatric patients.
The DPA02 facilitates the administration of inhalational anaesthesia and respiratory support in
difficult environments, humanitarian emergency situations and low resource settings.
FOREWORD
This manual is intended to provide guidance on the function, performance and user
maintenance of the DPA02 Anaesthesia System.
The policy of Diamedica (UK) Ltd is to continuously improve its products. Changes may be made
to this manual without notice being given.
Users of the DPA02 Anaesthesia System must read, understand and follow the guidance given
in this manual before using the system.
THE NEED FOR PATIENT MONITORING
WARNING
The DPA02 Anaesthesia System delivers mixtures of gases and vapours which could cause injury
or death to the patient. The effect of anaesthesia drugs on individual patients can vary so that
“typical” device settings for concentrations delivered to the patient do not necessarily ensure
patient safety.
The DPA 01, DPA 02 and DPA 03 Portable Anaesthesia Systems are designed for use in remote
areas with limited logistical support and emergency situations where ideal medical conditions
are unlikely. The ultimate responsibility for patient or procedure contraindication lies with the
anaesthetist, and will be situation dependent.
Medical conditions which contraindicate the use of a DPA Series Portable Anaesthesia System
and its associated applications include any medical conditions which may contraindicate the
medical procedure itself.
It is essential that the patient’s respiration and cardiovascular status are frequently checked by
the anaesthetist.

Page 3of 13
© Copyright Diamedica (UK) Ltd 2017
The anaesthetist is ultimately responsible for patient safety and should always have a
secondary means of maintaining patient safety during anaesthesia.
Observations of the patient must take precedence over machine settings in judging the
condition of the patient.
Drawover anaesthesia is contraindicated for patients below 10kg, for these patients the
machine should be used in continuous flow.
The system is only intended to be used by Qualified Anaesthetists

Page 4of 13
© Copyright Diamedica (UK) Ltd 2017
INSTRUCTIONS FOR DPA 02TM PORTABLE ANAESTHETIC SYSTEM
(2) The reservoir. See Fig 2
The following parts of the reservoir are identified;
A. The pressure relief valve with outlet pressure set at 7.5cm water.
B. The air entry one way valve with arrows indicating direction of air flow.
C. The oxygen supplementation port (metallic nozzle).
D. The 2 litre reservoir bag.
E. Vaporiser.
F. A solid block with four openings and a metallic nozzle.
Fig. 2
Assembly of reservoir:
1. While standing in front of the vaporiser and facing the DPA 02 anaesthetic machine, hold the
reservoir block so that the metallic nozzle (C) is on the left and pointing away from you.
2. Attach the reservoir block to the input port on the left side of the vaporiser
3. With the reservoir block firmly in place attach as follows:
4. To the rear port attach the air entry valve with the arrows pointing forward
5. To the top port attach the pressure relief valve so that it stands vertically.
6. To the bottom port attach the green reservoir bag
The Diamedica Portable Anaesthetic
machine DPA 02TM has three principal
components; vaporiser, reservoir, and
breathing system. It can be rapidly
assembled ready for use as follows:
(1) The vaporiser
Remove the vaporiser from the
container and place it on the wire grill.
Fix the vaporiser to the stand using the
captive screw at the back of the upright
section.
F
Fig. 1

Page 5of 13
© Copyright Diamedica (UK) Ltd 2017
7 To the metallic nozzle attach the clear oxygen tubing from the oxygen source.
(3) The breathing system (See Fig. 3)
The following parts of the breathing system are identified:
1. The valve unit. This consists of two separate clear cylindrical valves known as the inspiratory
(A) and expiratory (B) valves, connected by a 20cm length of clear narrow tubing (C). The
inspiratory valve is long, narrow and has a side port. The expiratory valve is short, wide and has
a fixing bracket.
2. Self-inflating bag (D) (a smaller size is available for children)
3. A dual limb of 22mm Silicon tubing (E) ending in a standard ‘Y’ piece
4. A 1 litre reservoir bag to act as test lung.
5. A length of standard respiratory tubing for scavenging of expired gases.
Assembly of breathing system:
1. Attach the narrow inspiratory valve (A) to the exit port of the vaporiser. Rotate the valve so that the
side port points downwards and forwards at an angle of approx. 45 degrees.
2. Attach the self inflating bag (D) to the side port of the inspiratory valve so that it lies in front of the
case pointing downwards (this can also be connected by the additional supplied 22mm silicone tube).
3. Take the expiratory valve (B) and insert the on to the case. Tighten the metallic screw located below
the expiratory valve to secure it in position.
4. Attach one side of the dual limb respiratory tubing to the inspiratory valve and the other to the
expiratory valve.
5. Attach scavenging tube to expiratory valve 30mm outlet.
To test the assembly: Attach the test lung (1 litre green reservoir bag) to the patient end ‘Y’ piece of the
respiratory tubing and confirm the integrity of the system using the self inflating bag.
B
C
D
E
Connection for
expired gas outlet
Fig. 2
Expiratory tube
Inspiratory tube
A
D
B
C
T
o
p
a
t
t
F
r
m patient
E
Fig. 3

Page 6of 13
© Copyright Diamedica (UK) Ltd 2017
Main Circuit
Ayres ‘T’ Piece paediatric circuit
The circuit can be connected directly to the inspiratory valve section as below. It is
recommended that this circuit should be used with a minimum fresh gas flow from
concentrator or cylinder of at least 3 x the patient’s minute volume.
The flow capabilities of the draw-over vaporiser are 1 –35 L/min
If the supplementary flow rate is greater than 4 lt/min the patient circuit can be replaced with a
paediatric circuit (Mapleson F) suitable for continuous flow / assisted ventilation with small
children.
ALWAYS ENSURE THAT YOUR ASSEMBLED UNIT IS SECURELY POSITIONED AND THAT THE
VAPORISER IS AS LEVEL AS IS PRACTICABLE. IN ANY CASE THIS SHOULD ALWAYS BE LESS THAN
30FROM THE HORIZONTAL.
Expired gases
To patient
Vaporiser
Inspiratory valve section Mapleson F
Draw over
vaporiser
O2
Reservoir
bag
Air
Valve
Over pressure
valve
Valve
Valve
Self-inflating
bag or
bellows
Expired
gases
Patient
Control tube: when pressure is applied
by the self-inflating bag or bellows this
tube closes the expiratory valve allowing
the lungs to be inflated
Expiratory valve
Note: The self-inflating bag or bellows may be replaced by a suitably designed ventilator
Modified valve detail
Expired
gases
Fig. 4
Fig. 5

Page 7of 13
© Copyright Diamedica (UK) Ltd 2017
DETAIL OF PATIENT CIRCUIT VALVE ARRANGEMENT AND OPERATION
>>>>Indicates direction of flow >>>>
>>>Direction of flow>>>
One way
valves
Self-inflating
bag
Inspiratory/expiratory
connection tube
Inspiratory arm of valve for DPA Portable
Valve and Patient Circuit
Diaphragm Valve
Scavenging
connection
Expiratory Arm of Valve
Fig. 6
Page 8of 13
© Copyright Diamedica (UK) Ltd 2017
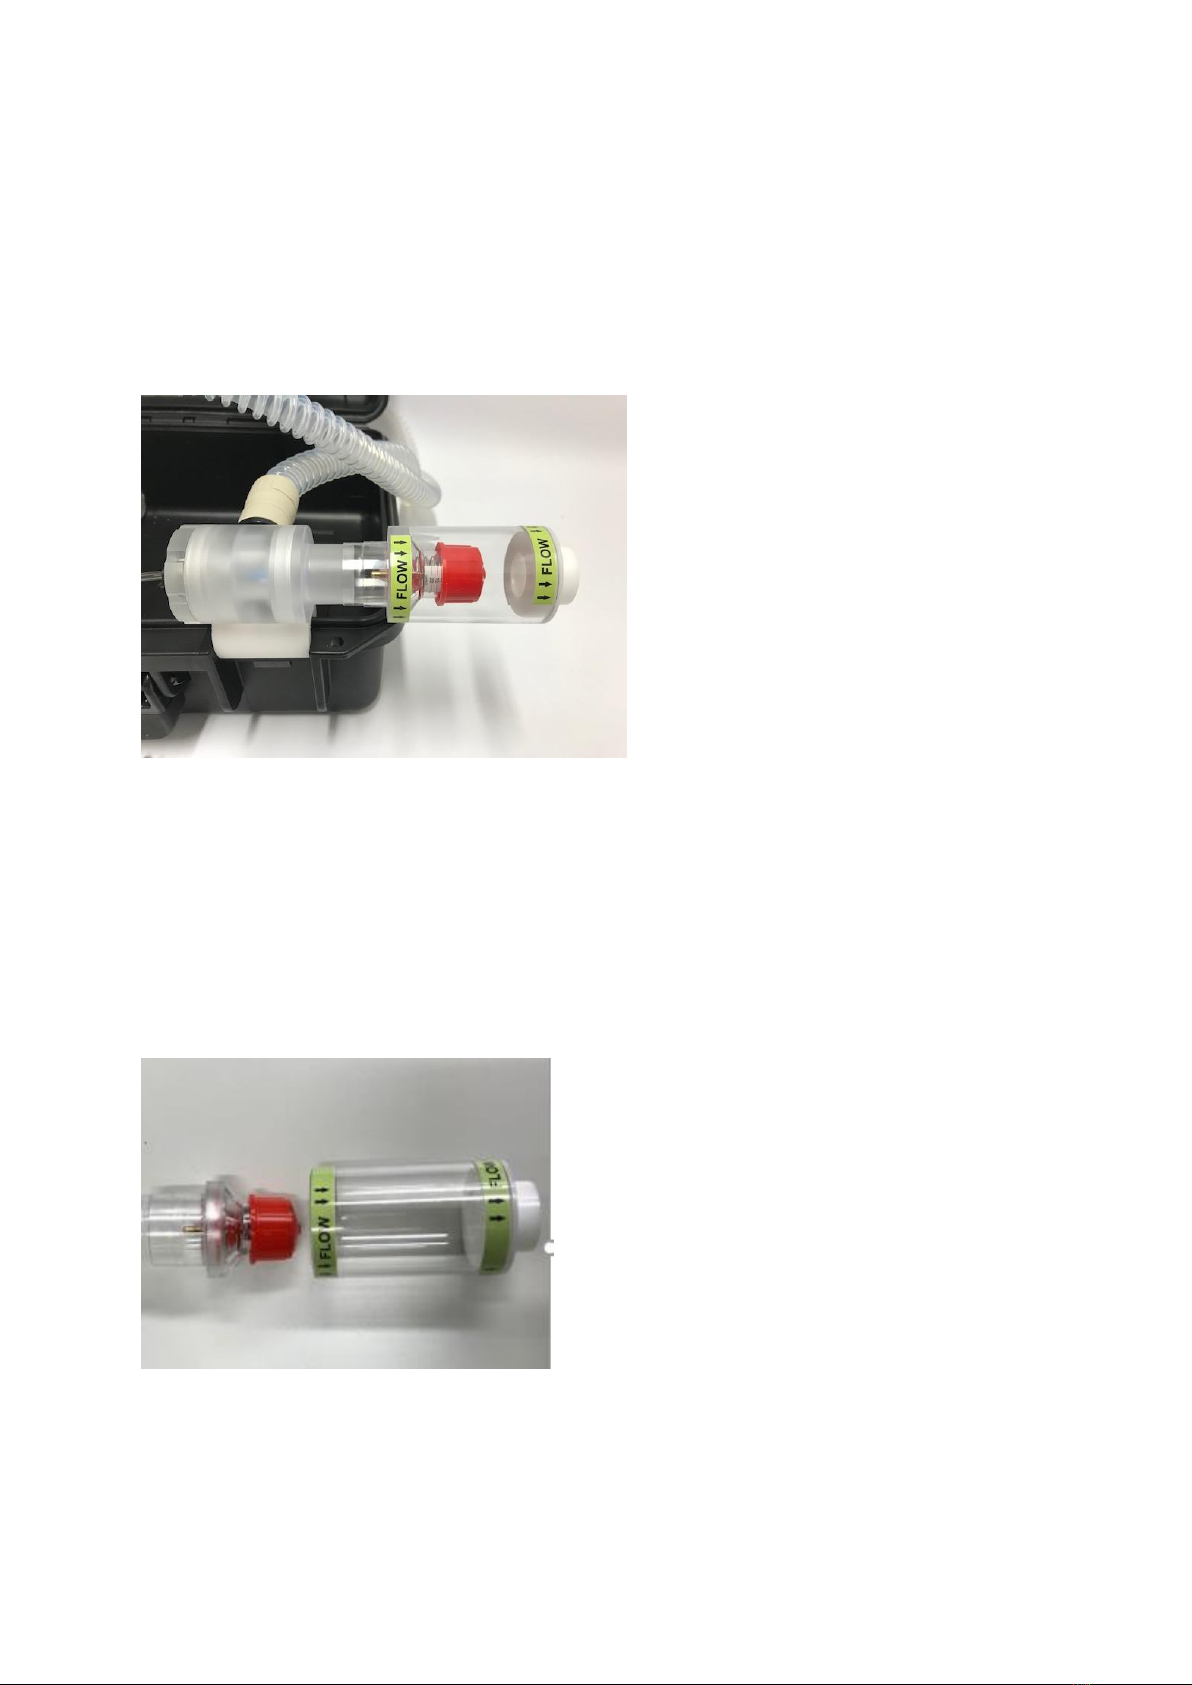
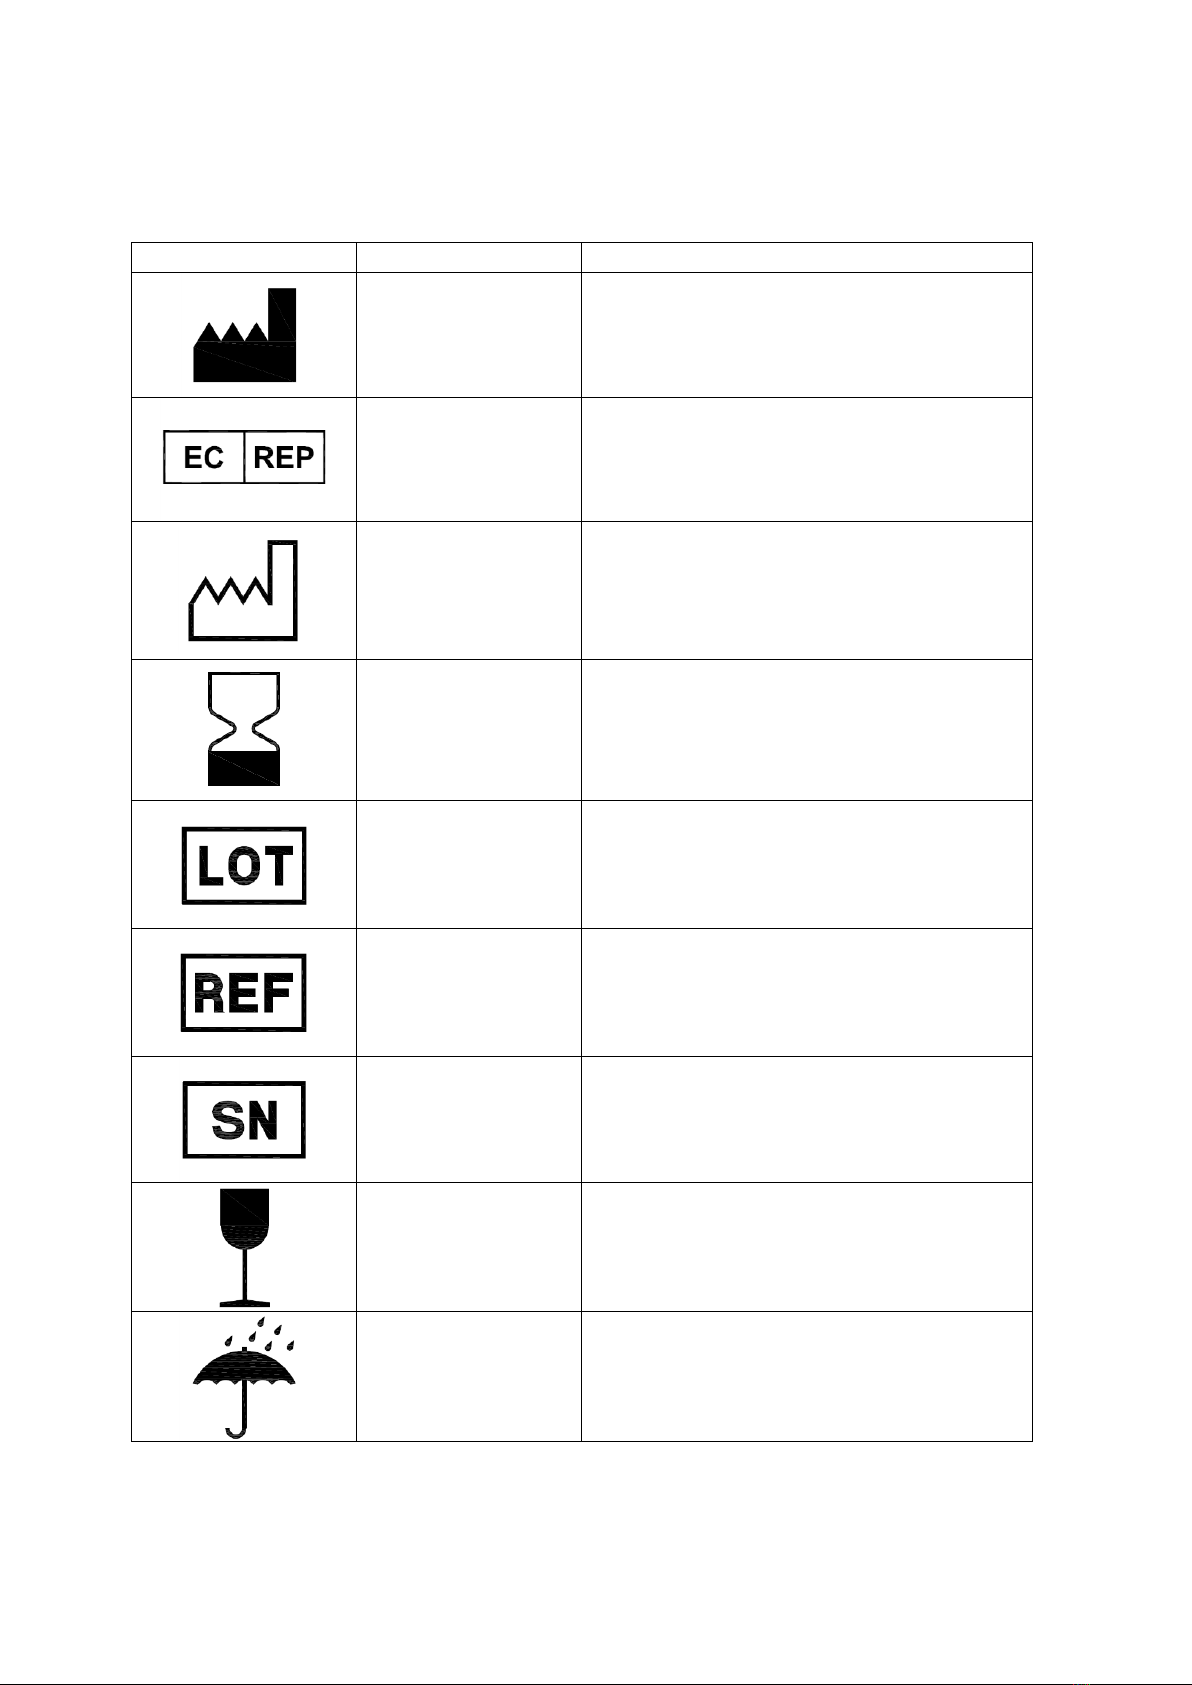
PEEP (Positive end expiratory pressure)
PEEP can be fitted to the DPA 02 by connecting to the expiratory valve as shown in the picture
below ensuring the correct direction of flow.
To adjust the PEEP valve
The PEEP valve can be removed by pulling the valve from the clear case. To adjust the valve,
turn red cap clockwise to increase pressure and anti-clockwise to reduce pressure. The PEEP
valve pressure ranges from 0-20 cmH20.
Fig. 7
Fig. 8

Page 9of 13
© Copyright Diamedica (UK) Ltd 2017
CLEANING AND GENERAL MAINTENANCE
Cleaning and maintenance
The DPA 02 is designed to require minimal maintenance and cleaning, however some basic
cleaning is identified below.
Patient safety is the primary concern of the anaesthetist and infection control is critical to
ensuring the safety of surgical procedures.
Each DPA02 is supplied with a breathing circuit and as these items may come in contact with
the patient they can therefore potentially pass infectious agents from one patient to another if
used improperly.
The breathing tubing provided with the DPA 02 should be cleaned and disinfected according to
your hospital’s infection control procedures. If no bacteria filter is used, then the entire circuit
should be cleaned and disinfected after each patient.
Any bacteria filters and other single-use items provided should be discarded after one use since
they are not designed to be reprocessed.
Halothane decomposes over time causing the release of halides, which can corrode metal
components, particularly in the presence of moisture. For this reason, a stabilizing agent,
thymol, is added to prevent decomposition. Since thymol does not volatilize along with
halothane, it can accumulate in the vaporiser, making the control lever stiff.
If the control lever is stiff it may be the result of accumulated thymol. You can perform the
following to try to loosen the lever:
1. Remove the vaporiser from the stand. Set to zero.
2. Turn it upside down, and shake it vigorously followed by turning the lever until it
becomes loose.
3. When the lever loosens, the vaporiser should be drained and rinsed with fresh agent.
4. Attach the vaporiser to the stand and fill with fresh halothane.
If the anaesthetist has any concerns relating to cleaning or maintenance or the function of the
DPA 02 they should contact the manufacturer.
Ensure that agent is removed from vaporiser before securing in Peli-case for transportation
The vaporiser should not require recalibration. Any field / operational calibration should only
be done following consultation with manufacturer.

Page 10 of 13
© Copyright Diamedica (UK) Ltd 2017
Accessories and spares
All accessories used with the DPA 02TM must:
•Be oxygen compatible,
•Be biocompatible,
•Comply with the general requirements of the 93/42/EEC European Directive
Technical data enquiries
For all technical, performance or component related enquiries please contact Diamedica -
Method for disposing of the device
If the product is returned to the manufacturer at the end of its life the company will ensure
disposal in line with industry practice.

Page 11 of 13
© Copyright Diamedica (UK) Ltd 2017
Frequently asked questions on the breathing system.
Q. Which volatile agents can be used with the Diamedica vaporiser?
A. The scale is calibrated for both Halothane and Isoflurane. A Sevoflurane version of the
vaporiser is also now available. If ether is the only volatile agent available it must be vaporised
in a different vaporiser.
Q. How is the vaporiser filled?
A. The vaporiser is filled by unscrewing the filler cap and pouring the agent directly from the
bottle into the chamber. No special filling device is required although a funnel is available if
needed. If the vaporiser requires filling during anaesthesia then the vaporiser must be turned
off while being filled.
Q. How can the vaporiser be emptied completely before a different agent is used?
A. Remove the vaporiser from the stand by releasing the captive screw at the back of the
upright section. The filler cap is removed and the vaporiser inverted over the bottle until fully
drained using the funnel if required. To remove the residual contents, the dial must be turned
on fully and gas/air blown through the chamber for several minutes until the vapour can no
longer be detected.
Q. What regular maintenance is required for the Diamedica vaporiser?
A. The vaporiser has been designed to require minimal maintenance. If movements of the dial
lever become stiff, the shuttle casing should be cleaned. A small quantity of Halothane is
poured into the chamber which is inverted and shaken several times before being discarded.
DIAMEDICA (UK) LTD
Grange Hill Industrial Estate, Bratton Fleming
Barnstaple, Devon, EX31 4UH, UK
Tel : +44(0)1598 710066
Email : support@diamedica.co.uk
www.diamedica.co.uk
0088
Page 12 of 13
© Copyright Diamedica (UK) Ltd 2017
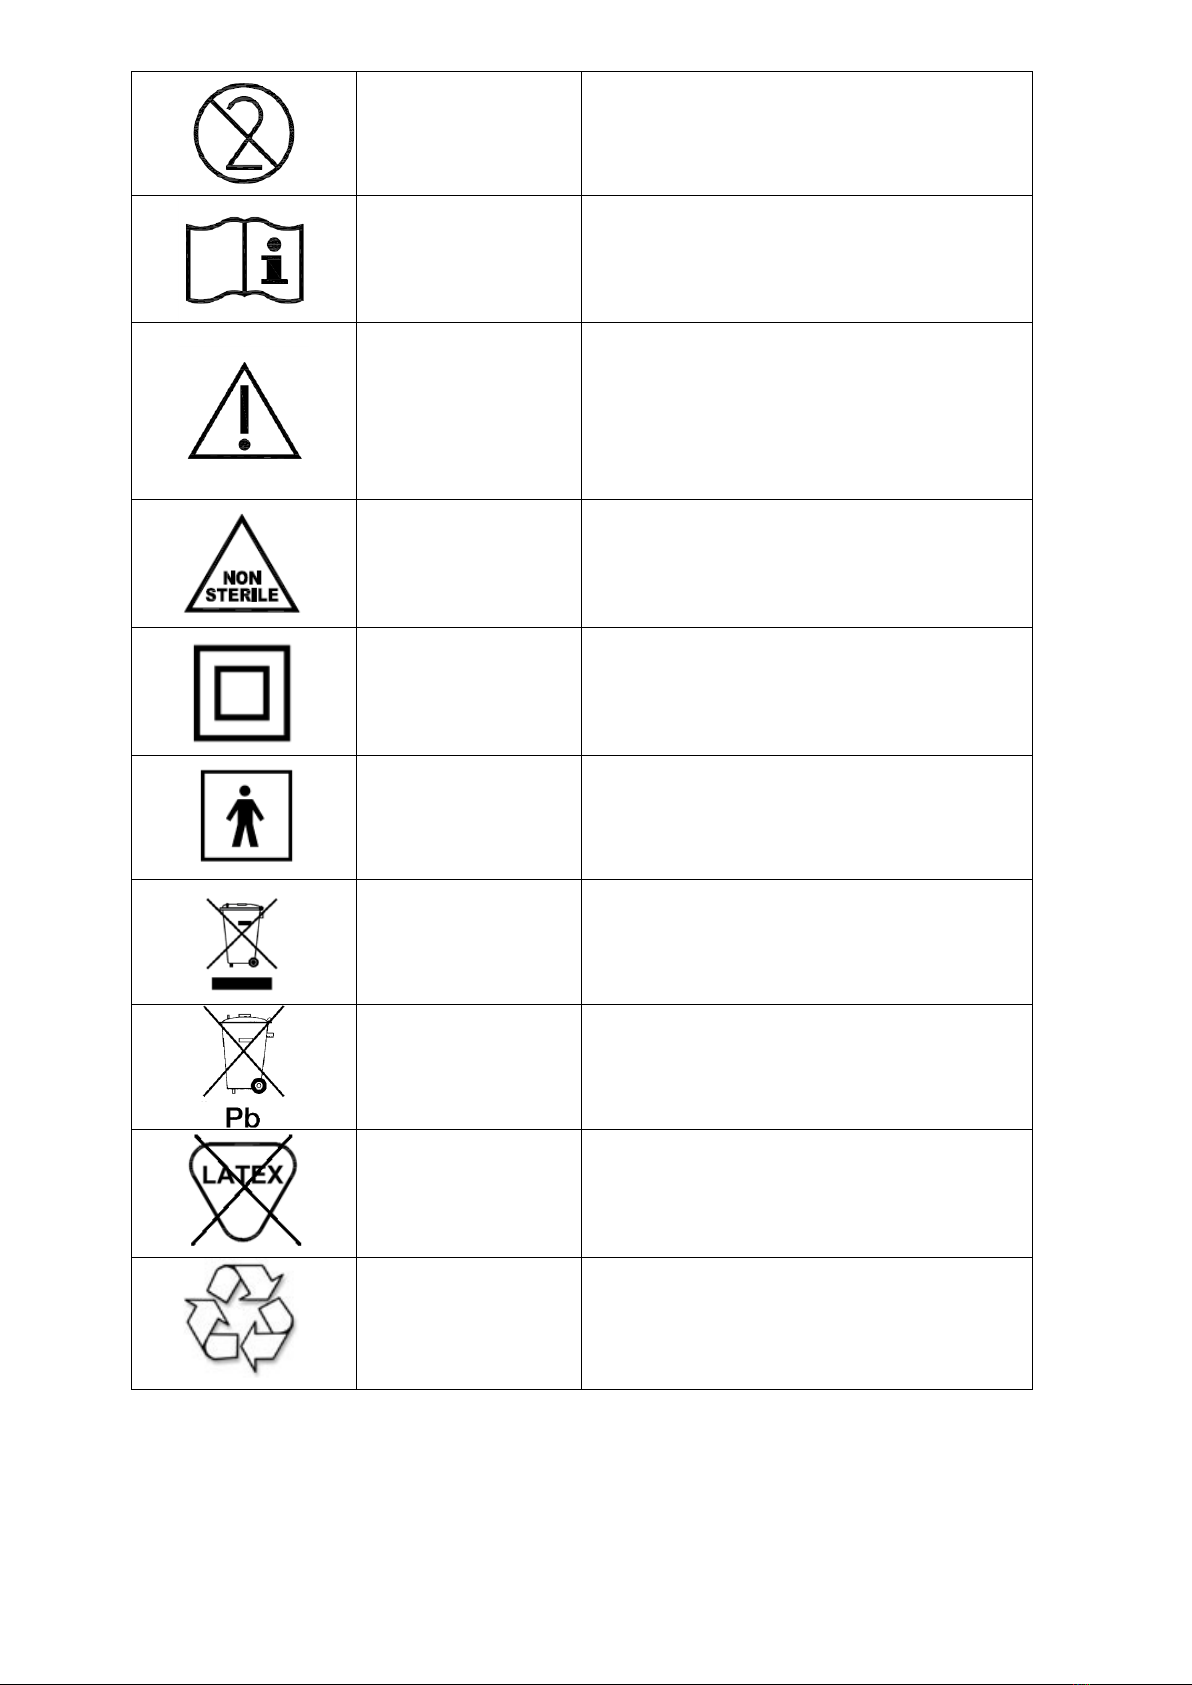
SYMBOLS GLOSSARY
Some or all the following symbols may be used within this manual or found on the product or
packaging labels. Please familiarize yourself with them:
Symbol
Description
Comment
Manufacturer
Indicates the medical device manufacturer,
as defined in EU Directives 90/385/EEC,
93/42/EEC and 98/79/EC.
Authorized
representative
in the European
Community
Indicates the Authorized representative in
the European Community.
Date of
manufacture
Indicates the date when the medical device
was manufactured.
Use-by date
Indicates the date after which the medical
device is not to be used.
Batch code
This symbol shall be accompanied by the
manufacturer's batch code. The batch code
shall be adjacent to the symbol.
Catalogue
number
Indicates the manufacturer's catalogue
number so that the medical device can be
identified.
Serial number
Indicates the manufacturer's serial number
so that a specific medical device can be
identified.
Fragile, handle
with care
Indicates a medical device that can be
broken or damaged if not handled carefully.
Keep dry
Indicates a medical device that needs to be
protected from moisture.
Page 13 of 13
© Copyright Diamedica (UK) Ltd 2017
Do not re-use
Indicates a medical device that is intended
for one use, or for use on a single patient
during a single procedure.
Consult
instructions for
use
Indicates the need for the user to consult
the instructions for use.
Caution
Indicates the need for the user to consult
the instructions for use for important
cautionary information such as warnings
and precautions that cannot, for a variety
of reasons, be presented on the medical
device itself.
Non-sterile
Indicates a medical device that has not
been subjected to a sterilization process.
Class II equipment
Type BF applied part
Recycling symbol
Products with this symbol should not be
disposed of in the bin
The battery
recycling symbol
Chemical symbol for battery type included
beneath
Does not contain or
have the presence
of natural rubber
latex
Indicates that an
object is capable of
being recycled
Other manuals for DPA 02
1
Table of contents
Other Diamedica Medical Equipment manuals


Popular Medical Equipment manuals by other brands


Getinge
Getinge Arjohuntleigh Nimbus 3 Professional Instructions for use

Mettler Electronics
Mettler Electronics Sonicator 730 Maintenance manual

Pressalit Care
Pressalit Care R1100 Mounting instruction

Denas MS
Denas MS DENAS-T operating manual

bort medical
bort medical ActiveColor quick guide

AccuVein
AccuVein AV400 user manual


