Dilog DL9110 User manual

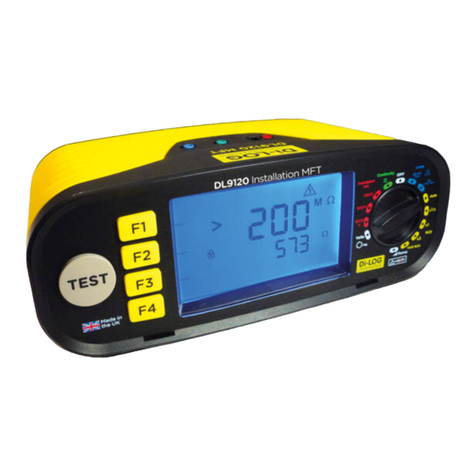
DL9110
DL9118
Multifunction
installation tester
Operating Instructions
Revision 1

DL9110 / DL9118 Operating Instructions
- 2 -
Figure 1 DL9110 / DL9118 Overview

DL9110 / DL9118 Operating Instructions
- 3 -
Figure 2 Earth Continuity/Insulation Measure ent
Figure 3 Voltage easure ent using test probes

DL9110 / DL9118 Operating Instructions
- 4 -
Figure 4 Voltage, RCD, Zs and line i pedance easure ent at a
ains outlet
Figure 5 Voltage, RCD, Zs, Ze and line i pedance easure ent at a
distribution board

DL9110 / DL9118 Operating Instructions
- 5 -
Figure 6 Phase to phase i pedance/PSC easure ent (DL9118 only)
Figure 7 Phase rotation (DL9118 only)

DL9110 / DL9118 Operating Instructions
- 6 -
Limited Warranty & Limitation of Liability
DI-LOG Test Equip ent guarantees this product to be free fro
defects in aterial and work anship under nor al use and service for
a period of 2 year. The period of warranty will be effective at the date of
purchase.
(c) Copyright 2018
All rights reserved. Nothing fro this edition ay be ultiplied, or
ade public in any for or anner, either electronically, echanically,
by photocopying, recording, or in any anner, without prior written
consent fro DI-LOG. This also applies to acco panying drawings and
diagra s.
Due to a policy of continuous develop ent DI-LOG reserves the right
to alter the equip ent specification and description outlined in this
publication without prior notice and no part of this publication shall be
dee ed to be part of any contract for the equip ent unless specifically
referred to as an inclusion within such contract.

DL9110 / DL9118 Operating Instructions
- 7 -
Table of ontents
Li ited Warranty & Li itation of Liability ............................................... 6
Table of Contents.................................................................................... 7
Introduction ............................................................................................. 9
1 User Notes ........................................................................................ 10
2 Safety Notes...................................................................................... 11
3 Accessories....................................................................................... 12
3.1 Standard Accessories................................................................ 12
3.2 Optional Accessories................................................................. 12
4 Unit Description ................................................................................ 13
4.1 Identifying parts of the unit........................................................ 13
4.2 LCD display ............................................................................... 14
5 Using the DL9110 / DL9118.............................................................. 16
5.1 Power On ................................................................................... 16
5.2 Battery Health Check................................................................. 16
5.3 Re ote probe (only supplied with DL9118) .............................. 16
5.4 Continuity Tests......................................................................... 16
5.5 Insulation Resistance Tests....................................................... 18
5.6 Voltage Measure ent and Phase Rotation............................... 19
5.7 Single Phase High Current Earth Loop I pedance / Line
I pedance ........................................................................................ 19
5.8 Three Phase Line I pedance (DL9118 only)............................. 21
5.9 Non trip Earth Loop I pedance / Line I pedance ................... 22
5.10 Auto RCD Test Sequence........................................................ 23
5.11 RCD Trip Ti e Tests ............................................................... 25
5.12 RCD trip current (Ra p) Tests ................................................ 27
6 Electrical Specifications .................................................................... 29
6.1 Earth Continuity ......................................................................... 29
6.2 Insulation Resistance................................................................. 29
6.3 Earth Loop Impedance .............................................................. 29
6.4 Line Impedance ......................................................................... 30
6.5 RCD ........................................................................................... 30
6.6 Voltage/Frequency Measure ent ............................................. 30
7 Environ ental Conditions................................................................. 31
8 Maintenance...................................................................................... 32
8.1 Preparing to work on the DL9110 / DL9118.............................. 32
8.2 Securing the DL9110 / DL9118 ................................................. 32
8.3 Cleaning ..................................................................................... 32
8.4 Battery Replace ent ................................................................. 33
8.6 Service and Calibration. ............................................................ 34
8.7 Spare Parts. ............................................................................... 35
Appendix A............................................................................................ 36

DL9110 / DL9118 Operating Instructions
- 8 -
Disposal of Old Product
This product has been designed and anufactured with high quality
aterials and co ponents that can be recycled and reused.
Please fa iliarise yourself with the appropriate local separate collection
syste for electrical and electronic products.
Please dispose of this product according to local regulations. Do not
dispose of this product along with nor al waste aterial. The correct
disposal of this product will help prevent potential negative
consequences for the environ ent and hu an health.

DL9110 / DL9118 Operating Instructions
- 9 -
Introduction
The DL9110 / DL9118 is a hand held, battery powered, ulti-function
electrical installation test instru ent capable of perfor ing a
co prehensive range of tests, including:
Earth Continuity @ 200 A
Insulation Resistance at 250V, 500V and 1000V (1000V in DL9118 only)
Voltage
Frequency
Phase rotation (DL9118 only)
RCD Trip Ti e at ½I∆n, I∆n and 5xI∆n
RCD Trip current
Non trip Zs and PFC easure ent on RCD protected circuits
High current Ze and PFC on non RCD protected circuits
Phase to neutral i pedance and PSC
Phase to phase i pedance and PSC (DL9118 only)
Power socket wiring polarity

DL9110 / DL9118 Operating Instructions
- 10 -
1 User Notes
This instrument and its operating instructions are intended for use
by adequately trained personnel.
The following sy bols are used in these operating instructions and on
the DL9110 / DL9118.
Warning of electrical danger!
Indicates instructions ust be followed to avoid danger to
persons.
I portant, follow the docu entation! This sy bol indicates
that the operating instructions ust be adhered to in order to
avoid danger.

DL9110 / DL9118 Operating Instructions
- 11 -
2 Safety Notes
This DL9110 / DL9118 is fully co pliant with the require ents of:
BS EN 61010-1: 2010
BS EN 61010-2-30:2010
BS EN 61557 part 1, 2, 3, 4, 6, 7 and 10.
In order to ensure safe operation of this instru ent, all notes and
warnings in these instructions ust be observed at all ti es.
The DL9110 / DL9118 has been designed to ake
easure ents in a dry environ ent.
The DL9110 / DL9118 ay be used to test circuits with a
axi u over-voltage Category III, 300 V AC/DC with
reference to earth.
High voltages are present at the probe tips of the DL9110
/ DL9118 during insulation resistance easure ent.
Always hold test probes above the hand guards.
The DL9110 / DL9118 and all associated cables and leads
ust be checked for signs of da age before equip ent
is operated.
Prior to any resistance easure ent, always ensure that
the circuit under test is electrically isolated.
Where safe operation of the DL9110 / DL9118 is no longer possible it
should be i ediately shut down and secured to prevent accidental
operation.
It ust be assu ed that safe operation is no longer possible:
- if the instru ent or leads show visible signs of da age or
- the instru ent does not function or
- after long periods of storage under adverse environ ental conditions.
If the DL9110 / DL9118 is used in a anner not specified
by this docu ent then the protection provided by the
equip ent ay be i paired.

DL9110 / DL9118 Operating Instructions
- 12 -
3 Accessories
3.1 Standard Accessories
The DL9110 / DL9118 is supplied with the following ite s:
DL9110 or DL9118 unit
Padded neck strap
Professional carry case
DI-LOG ains lead
1.2 M black test lead
1.2 M red test lead
1.2 M green test lead
Black crocodile clip
Red crocodile clip
Green crocodile clip
Re ote probe with test button (DL9118 only)
MN1500 (AA) 1.5v Batteries x 6
Spare 1.6A 1000V HRC FF FuseOperating Instruction Manual
Calibration certificate
3.2 Optional Accessories
1.6A 1000V HRC FF Fuse
Do not open unit, no other serviceable parts.

DL9110 / DL9118 Operating Instructions
- 13 -
4 Unit Description
The DL9110 / DL9118 is a hand held, ulti-function electrical
installation test instru ent, capable of perfor ing all of the required
electrical tests. Tests are selected using the colour coded rotary
switch.
4.1 Identifying parts of the unit
The nu bering below refers to figure. 1
1. Rotary Switch
a. Voltage, Frequency and Phase Rotation
b. Insulation resistance @ 1000V (DL9118 only)
c. Insulation resistance @ 500V
d. Insulation resistance @ 250V
e. Continuity @ 200 A
f. Off
g. High current Ze/Zs and PSC/PFC
h. Non-trip Zs and PFC
i. Auto RCD sequence
j. RCD trip ti e @ ½ I∆N
k. RCD trip ti e @ I∆N
l. RCD trip ti e @ 5I∆N
. RCD trip ti e (ra p test)
2. LCD Display
3. Function keys F1, F2, F3 and F4
4. TEST key
5. Test lead input (RED)
6. Test lead input (GREEN)
7. Test lead input (BLACK)
Note: The function performed by keys F1 – F4 depends upon
the rotary switch position. For each rotary switch
position, the left hand side of the L D display indicates
the function of the key above.

DL9110 / DL9118 Operating Instructions
- 14 -
4.2 L D display
1. Icons for function key F1. These icons are used to display the
available options for the selected test. Repeatedly pressing
function key F1 cycles through the available options.
2. Icons for function key F2. These icons are used to display the
available options for the selected test. Repeatedly pressing
function key F2 cycles through the available options.
3. Icons for function key F3. These icons are used to display the
available options for the selected test. Repeatedly pressing
function key F3 cycles through the available options.
4. Icons for function key F4. These icons are used to display the
available options for the selected test. Repeatedly pressing
function key F4 cycles through the available options.
5. Zs/Ze progress indicator
6. RCD test icons. These icons display the selected RCD test
function.
7. RCD status. Indicates when the RCD has tripped during an
RCD test.
8. Phase sequence indicator
9. Battery status indicator. Shows the a ount of charge in the
batteries.
10. Secondary display.
11. Pri ary display
12. Mains supply status icons. These icons indicate the status of
the ains supply between line and earth (L-PE), line and
neutral (L-N) and neutral and earth (N-PE) during RCD and
Loop tests.

DL9110 / DL9118 Operating Instructions
- 15 -
Note: Testing is inhibited if the mains supply is incorrect.
13. Warning Icons. These icons are used to infor the user of the
potential of any hazard or warning which ay restrict the
operation of the DL9110 / DL9118. Details are provided in the
relevant parts of these operating instructions.
14. Fuse warning. Indicates if the internal fuse has blown.

DL9110 / DL9118 Operating Instructions
- 16 -
5 Using the DL9110 / DL9118
5.1 Power On
To turn the DL9110 / DL9118 on si ply rotate the rotary switch to the
required test position.
5.2 Battery Health heck
The DL9110 / DL9118 will auto atically perfor battery health checks
periodically or when a new test type is selected.
Note: When the battery symbol is flashing all tests will be inhibited
and the batteries should be replaced as described in section
8.4.
5.3 Remote probe (only supplied with DL9118)
The re ote probe can be used in place of the standard 4 red test
lead. When the re ote probe is connected, the TEST button on the
probe perfor s the sa e function as the TEST key on the DL9110 /
DL9118. Either TEST button can be used to initiate a easure ent.
5.4 ontinuity Tests
Always ensure that the circuit under test is electrically
isolated.
Measure ents can be adversely affected by i pedances
of additional operating circuits connected in parallel or by
transient currents.
If the test probes are connected across a voltage of >30V
ac/dc then the DL9110 / DL9118 will auto atically display
the voltage between the probes, the warning buzzer will
sound and the TEST key is inhibited.
Rotate the rotary switch until the Continuity test is selected.
When the continuity test is selected, the DL9110 / DL9118 will display
the user selectable test options for approxi ately 1 second; Buzzer,
Lead Zero and Auto Start. If the Buzzer or Lead Zero was previously
enabled then the icon will re ain on the display when the continuity
test is selected.
Functions keys F1-F4 have are used to select the options below:

DL9110 / DL9118 Operating Instructions
- 17 -
F1 F2 F3 F4
Buzzer Not used Lead Zero Auto start
Buzzer (F1)
When enabled, the Buzzer will sound when the continuity easure ent
is less than 20 oh s.
Lead Zero (F3)
The instru ent can auto atically co pensate for the resistance of the
test leads as follows:
Fit the supplied crocodile clips to the red and black test probes and
connect the test probes fir ly together. Press and hold the Lead Zero
(F3). The easured resistance of the test leads is shown in the pri ary
display until a beep is heard and the Lead Zero icon is shown on the
display. All subsequent easure ents will auto atically include
co pensation for the test lead resistance until the function is disabled
by pressing function key F3.
Note: A maximum test lead resistance of 10 ohms can nulled out. If
the test lead resistance is greater than 10 ohms an error
beep will indicate that the Lead Zero function has failed and
the display icon will not be shown.
Note: For ease of use, the DL9118 will store the Lead Zero
compensation when switched off and recall this value when
next switched on. The stored value is only applicable to the
test leads used when the compensation measurement was
made. If the test leads are replaced the Lead Zero function
should be repeated using the replacement test leads.
Auto Start (F4)
When Auto start is activated the AUTO icon is shown on the display.
Continuity easure ents will start auto atically when the test probes
are connected to a resistance less than 20koh s.
Note: If the probes are connected to a resistance greater than
20kohms in Auto mode the test will not start.
Note: If the probes are connected to a voltage >30V ac/dc in Auto
mode the test will not start. The measured voltage will be
shown in the primary display..
The Auto Start function will auto atically ake easure ents when
the test leads are connected to a resistance.

DL9110 / DL9118 Operating Instructions
- 18 -
When the Auto Start function is disabled press and hold the TEST key
to ake a continuity easure ent. The resistance between the test
probes is shown until the TEST key is released.
During a easure ent, the easured value is shown in the pri ary
display and the test voltage is shown in the secondary display.
5.5 Insulation Resistance Tests
Always ensure that the circuit under test is electrically
isolated.
If the test probes are connected across a voltage of >30V
then the DL9110 / DL9118 will auto atically display the
voltage between the probes, the warning buzzer will
sound and the TEST key is inhibited.
Use the rotary switch to select either the 250V, 500V or 1000V MΩ
(DL9118 only) test.
The DL9110 / DL9118 will display the Test Lock and battery sy bol for
1 second. If the Test Lock feature is required, it should be activated as
described below.
Functions keys F1-F4 have are used to select the options below:
F1 F2 F3 F4
Buzzer Test Lock Not used Not used
Buzzer (F1)
When enabled, the Buzzer will sound when the continuity easure ent
is less than or equal to 1Mohm.
Test Lock (F2)
The Test Lock is used to ‘lock’ the DL9110 / DL9118 in a continuous
easure ent ode, with a single press of the TEST key. When Test
Lock is enabled the LCD shows the padlock icon. When Test Lock is
active the TEST key is locked until the option is disabled or the rotary
switch is oved to another position.
To enable the Test Lock ode, press the F2 key before the TEST key is
pressed or press F2 and the TEST si ultaneously.
To disable Test Lock, press F2 or turn the rotary switch to another
position.

DL9110 / DL9118 Operating Instructions
- 19 -
To ake an insulation resistance easure ent, press and hold the
TEST key. The resistance between the test probes is displayed until the
TEST key is released. Alternatively, use the Test Lock function to allow
easure ents to be started or stopped with single press of the TEST
key.
During a easure ent, the easured value is shown in the pri ary
display and the easured test voltage is shown in the secondary
display.
5.6 Voltage Measurement and Phase Rotation
Rotate the rotary switch until the V test is selected. The DL9110 /
DL9118 will auto atically easure any voltage present on the test
probes. The TEST key is not required.
The function keys do not perfor any operations while in Voltage
ode.
When an AC voltage is applied to the test probes, the frequency of the
easured voltage is shown in the secondary display.
DL9118 only: When a 3 phase voltage is connected to the test probes,
the voltage between the red and black is displayed in the pri ary
display and the phase sequence icon is shown on the display. When
the test probes are connected as follows: RED to L1, GREEN to L2,
BLACK to L3 the display icon will show L1 L2 L3.
5.7 Single Phase High urrent Earth Loop Impedance / Line
Impedance
The DL9110 / DL9118 will only allow the Earth Loop
I pedance test to be perfor ed if the correct voltages
are detected between line-earth (L-PE illu inated), line-
neutral (L-N illu inated) and neutral-earth (N-PE not
illu inated).
Rotate the rotary switch until Ze/Zs High is selected. Functions keys
F1-F4 have are used to select the options below:

DL9110 / DL9118 Operating Instructions
- 20 -
F1 F2 F3 F4
L-PE loop/
L-N loop
select
Not used Not used Auto Start
Note: When the Ze/Zs High switch position is selected, the DL9110
/ DL9118 will default to the last used setting, even if it has
been switched off.
L-PE/L-N (F1)
Press the function key F1 to select either the Earth Loop I pedance
test (L-PE) or the Line I pedance test (L-N).
Auto Start (F4)
When Auto start is activated the AUTO icon is shown on the display.
Loop easure ents will auto atically start approxi ately 4s after the
DL9110 / DL9118 is connected to correct ains supply via a ains
plug or the test probes. The Auto Start function re ains enabled if the
switch position is changed or the DL9110 / DL9118 is powered off. To
disable the Auto Start function press F4.
Note: If the mains supply is removed with the 4s countdown the
loop test will not start.
Note: If the mains power is removed during the loop measurement,
the test will terminate and the display will show “R D” to
indicate that power has been removed.
To begin the test, press and release the TEST key or select Auto Start
using F4.
During the test, progress is shown by the rotating progress icon. When
the test is co plete, the loop easure ent is shown in the pri ary
display and the calculated Prospective Fault Current (PFC) or
Prospective Short-circuit Current (PSC) is shown in the secondary
display.
Note: The DL9110 / DL9118 will determine the fault voltage that
may appear on the protective conductor during the test. If
the fault voltage is greater than 25V the DL9110 / DL9118 will
indicate >25V on the L D, but the user may proceed with the
test. If the fault voltage is greater than 50V, this is indicated
on the L D and the test is inhibited.
This manual suits for next models
1
Table of contents
Other Dilog Test Equipment manuals
