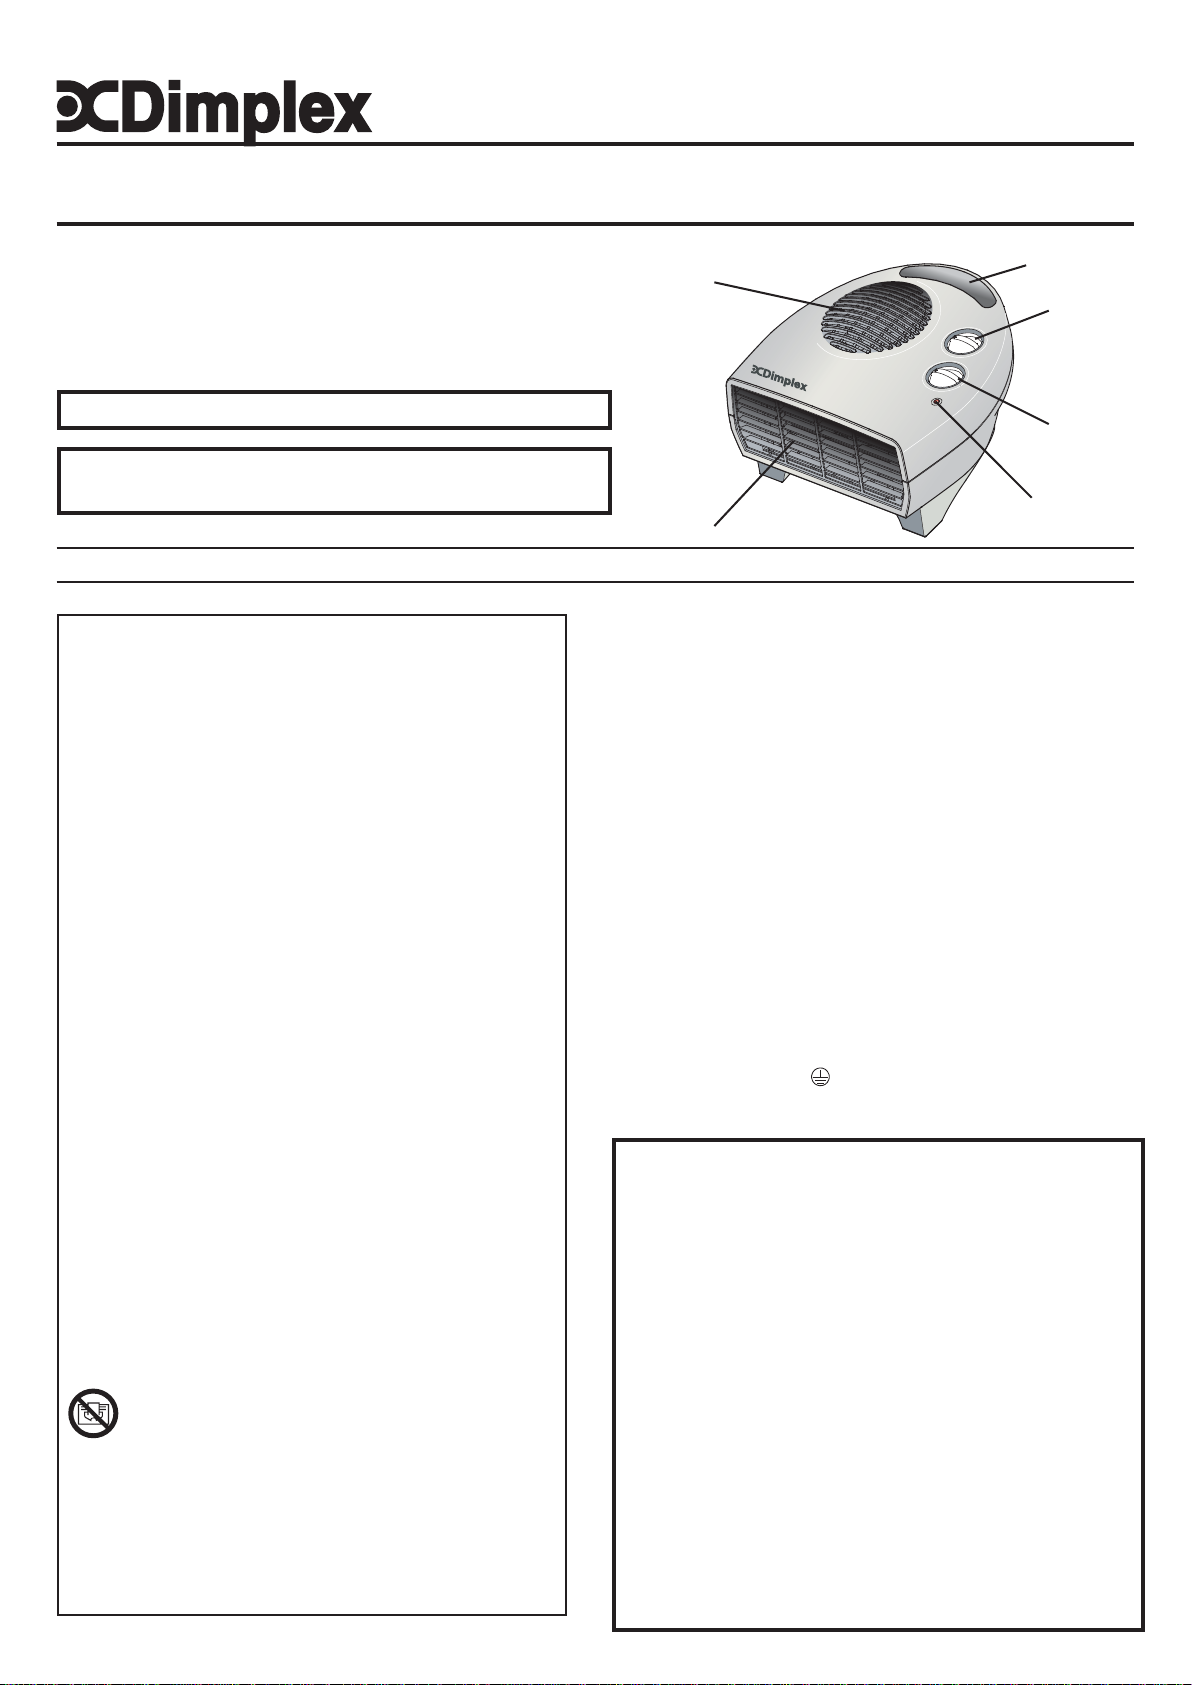
manuals.online logo
Brands
  1. Home
  2. •
  3. Brands
  4. •
  5. Dimplex
  6. •
  7. Heater
  8. •
  9. Dimplex 5011139037800 User manual

Dimplex 5011139037800 User manual

thermostat
knob - see
Fig. 3
heat control
knob - see
Fig. 2
air outlet
Installation and Operating Instructions
08/51250/0 Issue 1
IMPORTANT SAFETY ADVICE
DO NOT use the heater on deep pile carpets or the long hair
type of rugs, or less than 750mm (30") away from any
overhanging surface. Keep combustible materials such as
drapes and other furnishings clear from the front, sides
andrearoftheheater.Donotuseheatertodryyourlaundry.
DO NOT use the heater in the immediate surroundings of a
bath, a shower or a swimming pool.
DONOTplacetheheaterdirectlybelowafixed socket outlet.
WARNING: In order to avoid overheating, do not cover the
heater.
The socket-outlet must be accessible at all times to enable
the mains plug to be disconnected as quickly as possible.
DO NOT COVER or obstruct in any way the air inlet slots in
thetop and bottom of the heater,or the air outlet slotsatthe
front of the heater.
DONOToperatethe heater with the mains lead overhanging
the front outlet grille.
The heater should always be used on a flat, stable surface.
This appliance is not intended for use by children or other
persons without assistance or supervision if their physical,
sensory or mental capabilities prevent them from using it
safely. Children should be supervised to ensure that they
do not play with the appliance.
Warning : In order to avoid a hazard due to inadvertent
resetting of the thermal cutout, this appliance must not be
supplied through an external switching device, such as a
timer, or connected to a circuit that is regularly switched
on and off by the utility.
THE HEATER CARRIES A WARNING SYMBOL
INDICATINGTHATIT MUSTNOT BECOVERED.
The instruction leaflet belongs to the appliance and must
be kept in a safe place. If changing owners, the leaflet must
be surrendered to the new owner.
IMPORTANT –Ifthe mains leadofthis appliance isdamaged,
itmust be replaced by the manufacturer or itsservice agent
or a similarly qualified person in order to avoid a hazard.
IMPORTANT:THESEINSTRUCTIONSSHOULDBEREADCAREFULLYANDRETAINEDFORFUTUREREFERENCE
Electrical connection
This heater must be used on an ~ supply only and the voltage
marked on the heater must correspond to the supply voltage.
This heater is fitted with a rewirable plug incorporating a 13 amp
fuse. In the event of replacing the fuse in the plug supplied, a 13
amp fuse approved by ASTA to BS 1362 must be used. If any
other type of plug is used, a 15 amp fuse must be fitted in the
plug, the adaptor, or at the distribution board.
IMPORTANT : If the plug is not suitable for your socket, the 13
amp plug should be removed. Before wiring the appropriate
plug, please note that the wires in this mains lead are coloured
in accordance with the following code :
BLUE: NEUTRAL
BROWN: LIVE
As the colours of the wires in the mains lead may not correspond
with the coloured markings in your plug, proceed as follows :
Connect the BROWN wire to the terminal marked ‘L’ or coloured
RED.ConnecttheBLUEwire to the terminal marked‘N’orcoloured
BLACK.Note : ‘L’or‘N’wiremust not beconnected to the EARTH
terminal marked ‘E’ or or coloured GREEN or GREEN AND
YELLOW. If in doubt, consult your electrician.
VERY IMPORTANT ADVICE
NORMAL USE OF YOUR FAN HEATER IN AREAS
WHICH HAVE HIGH LEVELS OF FLUFF, DUST OR
HAIR (e.g. BEDROOMS/DRESSING AREAS/HAIR
SALONS) ESPECIALLY ON SOLID/LINO
COVERED FLOORS, WILL RESULT IN THE
ACCUMULATION OF THESE INSIDE THE
HEATER AT THE BACK OF THE ELEMENT.
IF LEFT TO BUILD UP, IT WILL EVENTUALLY
RESULT IN THE SAFETY CUT-OUT OPERATING
TO PROTECT YOU AND THE HEATER FROM THE
DANGER OF THE PRODUCT OVERHEATING!
IT IS THEREFORE CRITICAL THAT YOU USE A
VACUUM CLEANER TO REGULARLY BLOW OUT
AND CLEAN ANY ACCUMULATION FROM THE
HEATER! (See CLEANING section overleaf for
more detailed instructions on how to do this)
air inlet handle
mains neon
Fig.1
Model(s)Specification
DXFF20TSN 2.0kw Switch, Thermostat & Neon
DXFF30TSN 3.0kw Switch, Thermostat & Neon
DXFF20TSN & DXFF30TSN Flat Fan Heaters
IMPORTANT - DO NOT USE AS A HAIRDRYER
REGULAR VACUUM CLEANING IS REQUIRED
TO ENSURE PROPER OPERATION (see below)
Using the heater
The mains neon (see Fig. 1) will light up to show that the heater
is connected to the mains supply.
Heat control - see Fig. 2
The heat control positions are as follows:
O-Off
-Cool Blow *
I-Half heat output
II -Full heat output
Thermostat control - see Fig. 3
The heat output is controlled by the thermostat, according to the
room temperature. Turn the knob to maximum setting initially.
When the room is warm enough, reduce the setting slowly until
the heater just clicks off.
The heater will now cycle on and off to maintain your selected
room temperature.
NOTE: If the heater does not come on when the thermostat is
set to a low number, this is normally because the room is warmer
than the thermostat setting and is not a fault.
*When the heat control is set to ‘ ’ for Cool Blow, set the
thermostat control to max. position.
Position ‘ ’will turn the heater on and off to maintain a
temperature of approximately 5°C to help protect against frosty
conditions.
Fig.2
www.dimplex.co.uk
Republic of Ireland Tel. 01 8424833
The product complies with the European Safety Standards EN60335-2-30 and the European Standard Electromagnetic Compatibility (EMC) EN55014,
EN60555-2 and EN60555-3 These cover the essential requirements of EEC Directives 2006/95/EC and 2004/108/EC
Safety – Overheat Protection
For your safety, this appliance is fitted with a thermal cut-out. In
the event that the product overheats, the cut-out switches the
heater off automatically.
To bring the heater back into operation, remove the cause of the
overheating, then unplug or turn off the electrical supply to the
heater for a few minutes.
When the heater has cooled sufficiently, re-connect and switch
on the heater.
Cleaning
ALWAYS DISCONNECT FROM THE POWER SUPPLY BEFORE
UNDERTAKINGANYCLEANINGOPERATION.
TO ENSURE CONTINUED NORMAL OPERATION OF YOUR
HEATER, YOU MUST REGULARLY CLEAN OUT ANY
ACCUMULATIONOFPARTICLESFROMINSIDETHEHEATER!
THISISBESTACHIEVEDBYUSINGYOURVACUUMCLEANERIN
BLOWMODE TOBLOWAIRINTOTHEHEATERTHROUGHTHE
FRONTAIROUTLETTODISLODGEANYACUMULATEDMATTER
FROMTHEBACKOFTHEELEMENT(IFITDOESNOTHAVETHIS
FUNCTION,THENBLOWINGHARDYOURSELFWILLHAVETHE
SAMERESULT).THENUSETHEVACUUMINSUCTIONMODETO
SUCKOUT THE NOW LOOSE PARTICLES THROUGH THETOP
ANDBOTTOMAIRINLETS.THISWILLSERVETOCLEANTHESE
AREASALSO.
For normal surface cleaning, do not use detergents, abrasive
cleaning agents or polish of any kind on the heater. Wipe with
a dry cloth to remove dust and a damp (not wet) cloth to clean
off stains. Be careful not to allow moisture into the heater
Recycling
For electrical products sold within the European
Community.
At the end of the electrical products useful life it should
not be disposed of with household waste. Please
recycle where facilities exist. Check with your Local
Authority or retailer for recycling advice in your country.
After Sales Service
Your product is guaranteed for three years from the date of
purchase. Within this gurantee period, we undertake to repair
orexchangethis product free of charge(subjecttoavailability).
PLEASENOTE - This guarantee will bevoidif the product is not
used and maintained according to the details and warnings
contained in these user instructions.
Your rights under this guarantee are additional to your statutory
rights, which in turn are not affected by this guarantee.
Should you require after sales information or assistance with
this product please go to www.dimplex.co.uk where you will
find our self help guide by clicking on “After Sales” or ring our
helpdesk on 0845 600 5111 (UK) or 01 842 4833 (R.O.I.) .
Spare parts are also available on the website
www.dimplex.co.uk
Please retain your receipt as proof of purchase.
Fig. 3
Dimplex UK Ltd.
Millbrook House
Grange Drive
Hedge End
Southampton
Hampshire. SO30 2DF
[c] Dimplex UK Limited
All rights reserved. Material contained in this publication may not be reproduced in whole or in part, without prior permission in writing of Dimplex UK Limited.

This manual suits for next models

2

Other Dimplex Heater manuals

Dimplex PLX050ENC User manual

Dimplex

Dimplex PLX050ENC User manual

Dimplex Heater User manual

Dimplex

Dimplex Heater User manual

Dimplex CH Series User manual

Dimplex

Dimplex CH Series User manual

Dimplex OFRC20 User manual

Dimplex

Dimplex OFRC20 User manual

Dimplex EPX User manual

Dimplex

Dimplex EPX User manual

Dimplex CFP120 User manual

Dimplex

Dimplex CFP120 User manual

Dimplex DXUCTW2B User manual

Dimplex

Dimplex DXUCTW2B User manual

Dimplex FX 20V User manual

Dimplex

Dimplex FX 20V User manual

Dimplex GFP 050 W User manual

Dimplex

Dimplex GFP 050 W User manual

Dimplex LC2507W31 User manual

Dimplex

Dimplex LC2507W31 User manual

Dimplex DEE 1113 User manual

Dimplex

Dimplex DEE 1113 User manual

Dimplex DES 1821 User manual

Dimplex

Dimplex DES 1821 User manual

Dimplex AC3CN User manual

Dimplex

Dimplex AC3CN User manual

Dimplex DHCB20 User manual

Dimplex

Dimplex DHCB20 User manual

Dimplex DHCH20E User manual

Dimplex

Dimplex DHCH20E User manual

Dimplex EWA-C Series User manual

Dimplex

Dimplex EWA-C Series User manual

Dimplex PLXE User manual

Dimplex

Dimplex PLXE User manual

Dimplex DTR 350 C User manual

Dimplex

Dimplex DTR 350 C User manual

Dimplex PFH30E User manual

Dimplex

Dimplex PFH30E User manual

Dimplex DuoHeat Duo300i User manual

Dimplex

Dimplex DuoHeat Duo300i User manual

Dimplex DXLWP400 User manual

Dimplex

Dimplex DXLWP400 User manual

Dimplex DGWH4031 Installation instructions manual

Dimplex

Dimplex DGWH4031 Installation instructions manual

Dimplex OFRC10ECCb User manual

Dimplex

Dimplex OFRC10ECCb User manual

Dimplex AC3N User manual

Dimplex

Dimplex AC3N User manual

Popular Heater manuals by other brands

KALOS KLEH124-0300 Assembly instructions

KALOS

KALOS KLEH124-0300 Assembly instructions

Reznor FT30-CV installation operation service maintenance

Reznor

Reznor FT30-CV installation operation service maintenance

Stadler Form Peter Black P-013 operating instructions

Stadler Form

Stadler Form Peter Black P-013 operating instructions

VEAB VFLPG FITTING INSTRUCTION

VEAB

VEAB VFLPG FITTING INSTRUCTION

Bimar PTC Kompact S223A.EU Instruction booklet

Bimar

Bimar PTC Kompact S223A.EU Instruction booklet

Optimum OK-9210 operating instructions

Optimum

Optimum OK-9210 operating instructions

Minib KT 110 installation manual

Minib

Minib KT 110 installation manual

Pinnacle Climate MAC-30W-DDF User's manual and operating instructions

Pinnacle Climate

Pinnacle Climate MAC-30W-DDF User's manual and operating instructions

Klarstein 10032004 manual

Klarstein

Klarstein 10032004 manual

Somogyi Elektronic home FK 25 instruction manual

Somogyi Elektronic

Somogyi Elektronic home FK 25 instruction manual

NuTone 6200 user guide

NuTone

NuTone 6200 user guide

Jata JCRA2307 Instructions of use

Jata

Jata JCRA2307 Instructions of use

BriskHeat FGDH instruction manual

BriskHeat

BriskHeat FGDH instruction manual

UNITED UHG-842 user manual

UNITED

UNITED UHG-842 user manual

Marta MT-OH2430A user manual

Marta

Marta MT-OH2430A user manual

Eberg IXU 2000 instruction manual

Eberg

Eberg IXU 2000 instruction manual

Blyss Victoria quick start guide

Blyss

Blyss Victoria quick start guide

Sunnydaze Decor BAO-125 manual

Sunnydaze Decor

Sunnydaze Decor BAO-125 manual

manuals.online logo
manuals.online logoBrands
  • About & Mission
  • Contact us
  • Privacy Policy
  • Terms and Conditions

Copyright 2025 Manuals.Online. All Rights Reserved.