manuals.online logo
Brands
  1. Home
  2. •
  3. Brands
  4. •
  5. Dimplex
  6. •
  7. Heater
  8. •
  9. Dimplex M2GTS User manual

Dimplex M2GTS User manual

The product complies with the European Safety Standards EN60335:2-30 and the European Standard Electromagnetic Compatibility (EMC) EN55014:1,
EN55014:2, EN61000:3-2 and EN61000:3-3 which cover the essential requirements of EMC Directive 2014/30/EU and the LVD Directive 2014/35/EU.
M2GT
08/53250/0 Issue 0
M2GTS
[c] Glen Dimplex UK Limited
All rights reserved. Material contained in this publication may not be reproduced in whole or in part, without prior permission in writing of Glen Dimplex UK Limited.
248
278
232
231
193
192
1
2
3
4
Blue
5oC Frost
Blue
6oC - 16oC
Green
17oC - 19oC
White
20oC - 22oC
Red
22oC - 30oC
M2GT M2GTS
2
1
3
4
5
67
8
10
11
12
9
STANDBY
Dimplex M2GT & M2GTS Ceramic Fan Heaters
THESE INSTRUCTIONS SHOULD BE READ CAREFULLY AND RETAINED FOR FUTURE REFERENCE
IMPORTANT SAFETY ADVICE
DO NOT use the heater in the immediate
surroundings of a bath, a shower or a swimming
pool.
DO NOT place the heater directly below a xed
socket outlet.
The socket-outlet must be accessible at all times
to enable the mains plug to be disconnected as
quickly as possible.
DO NOT COVER the heater or obstruct the air
inlet and outlet openings in any way.
DO NOT operate the heater with the mains lead
overhanging the front outlet grille.
WARNING: In order to avoid overheating do not
cover the heater.
IMPORTANT: If the mains lead of this appliance is
damaged, it must be replaced by the manufacturer
or its service agent or a similarly qualied person
in order to avoid a hazard.
WARNING: In order to avoid a hazard due to
inadvertent resetting of the thermal cut-out,
this appliance must not be supplied through an
external switching device, such as a timer, or
connected to a circuit that is regularly switched
on and off by the utility.
This appliance can be used by children aged from
8 years and above and persons with reduced
physical, sensory or mental capabilities or lack of
experience or knowledge if they have been given
supervision or instruction concerning the use of
the appliance in a safe way and understand the
hazards involved. Children shall not play with the
appliance. Cleaning and user maintenance shall
not be made by children without supervision.
Children of less than 3 years should be kept away
unless continuously supervised.
Children aged from 3 years and less than 8 years
shall only switch on/off the appliance provided
that it has been placed or installed in its intended
normal operating position and they have been
given supervision or instruction concerning the
use of the appliance in a safe way and understand
the hazards involved. Children aged from 3
years and less than 8 years shall not plug in,
regulate and clean the appliance or perform user
maintenance.
CAUTION: Some parts of this product can
become very hot and cause burns. Particular
attention has to be given where children and
vulnerable people are present.
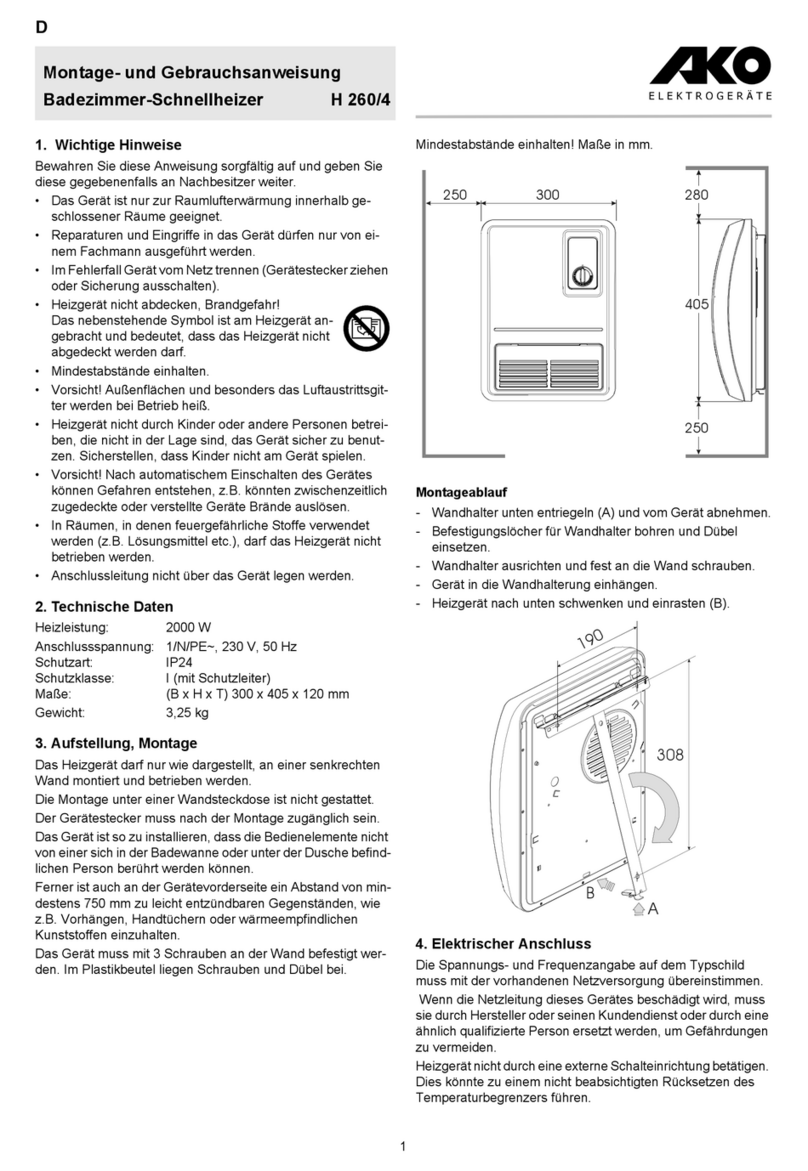
IMPORTANT: The heater must be on a at stable
surface when in use.
IMPORTANT: Avoid use of an extension cord
because the extension cord may overheat and
cause risk of re.
Keep combustible materials such as drapes and
other furnishings clear from the front, sides and
rear of the heater. Do not use heater to dry your
laundry.
IMPORTANT: Minimum distance to heater of
150mm from the back and sides and 300mm
from the top to any surface must be maintained
at all times.
Electrical connection
This heater must be used on an A.C. ~ supply only and the voltage
marked on the heater must correspond to the supply voltage. This
heater is tted with a plug incorporating a 13-amp fuse. When
replacing the fuse, a 13-amp fuse approved by ASTA to BS 1362
must be used.
If the plug is not suitable for the socket outlets in your home, the
plug must be cut off and an appropriate one tted. A plug cut off
from a mains lead will give a shock hazard if inserted into a 13-
amp socket elsewhere in the house. To avoid this, it should be
disposed of immediately.
NOTE: The fuse cover of a non-rewirable plug must be retted
when changing the fuse. Should the cover become lost, the plug
must not be used until the correct replacement fuse cover is
obtained from your supplier or by contacting our customer helpline.
IMPORTANT: The wires in this mains lead are coloured in
accordance with the following code:
BLUE: NEUTRAL
BROWN: LIVE
GREEN & YELLOW: EARTH
As the colours of the wires in the mains lead may not correspond
with the coloured markings in your plug, proceed as follows:
Connect the BROWN wire to the terminal marked ‘L’ or coloured
RED. Connect the BLUE wire to the terminal marked ‘N’ or
coloured BLACK.Note: ‘L’ or ‘N’ must not be connected to the
EARTH terminal marked ‘E’ or ‘ ’ or coloured GREEN or GREEN
AND YELLOW.
If in doubt, consult your electrician.
Operation
Main Elements - See Fig. 2
1. Control Panel
2. Display Screen
3. Air Outlet
4. Oscillation Base (M2GTS Only)
The heat output is controlled electronically according to the room
temperature. When the unit is plugged in the display screen will
light up white with STANDBY displayed at the bottom of the screen,
see Fig. 9, and the appliance will beep once. After 10 seconds the
intensity of the display will fade to 20%. The display will remain lit
until the appliance is disconnected from the mains or a button is
pressed. The control panel elements are shown in Table 1, Fig. 3
(M2GT) and Fig.4 (M2GTS).
Table 1
Standby
Runback Time
Plus Button
Minus Button
Oscillation (M2GTS Only)
To turn on the appliance, press the “ ” button on the control
panel. To turn off the appliance press the “ ” again. A countdown
from 10 to 1 will be displayed and then the heater will revert to
standby mode, see Fig. 9. The rst time the appliance is turned
on the appliance will set to 22oC as the default temperature, the
default mode setting is “Eco”. Subsequently, when the appliance
is turned on it will power on at the last set temperature and mode.
The display will show the current set temperature, see Fig. 5. The
set temperature range starts at 5o
C and ends at 30oC. The set
temperatures are colour coded to easily identify optimal settings.
The colour coding is noted in Fig. 5. To change the set temperature
press “ ” to raise the desired temperature and press “ ” to lower
it. If either button is pressed and held for 1 second or more the
temperature will continually rise or fall until button is released.
When the air temperature rises above the set temperature, the
heat will switch off but the fan will continue to run for 25 seconds.
When the air temperature drops below the set temperature, the
unit will come back on. If the heater is not operating this may be
because the set temperature is lower than the room temperature. If
no buttons have been pressed for 10 seconds, the display screen
will go into sleep mode. The screen backlight will fade to 20% of
its intensity.
Note: When in heating mode if the “ ” button is pressed the fan
will continue to run for 15 seconds while counting down 10 to 1
on screen.
Audio - see Fig. 6
When a button is pressed the heater emits and audible beep. If
the “ ” + “ ” buttons are pressed and held for 2 seconds this
will turn off audio for button presses. If both buttons are pressed
and held again the audio will be turned on again. The screen will
show either the audio on or audio off symbols as shown in Fig.
6. After 2 seconds display will return to the temperature screen.
Fan Only Mode - Fig. 7
If the “ ” + “ ” buttons are pressed and held for 2 seconds this will
switch the appliance into fan only mode. In this mode the heating
elements are powered down and the appliance will blow cool air.
The fan symbol “ ” will appear on the display when the appliance
is in fan only mode. If the “ ” + “ ” buttons are pressed and held
again for 2 seconds this will switch the appliance out of fan only
mode and the display screen will return to the temperature screen.
Oscillation - See Fig. 8 & Fig. 12 (M2GTS Only)
The heater can be switched into oscillation mode by pressing the “
” button on the control panel. An oscillation graphic will appear at
the top of the temperature screen, see Fig. 8. The heater oscillates
back and forth on its base through 90 degrees as shown in Fig. 12.
Power Settings - see Fig. 10
The heater has 3 power settings. To cycle through these settings,
press and hold the “ ” button for 2 seconds. This will bring up the
power setting screen. Press the “ ” button again to cycle through
the 3 settings, “Low”, “High” and “Eco”, as shown in Fig. 10. The
settings will ash when displayed on the screen. Once a setting
is left highlighted for 6 seconds it will then become selected and
return to the temperature screen. Press the “ ” button at any
time to cancel the operation. When in “Eco” setting the heater will
automatically switch between “High” (2000W) and “Low” (1000W)
setting as required to maintain the set temperature.
‘Intelligent’ Eco Mode
This is the appliance default setting, the appliance will automatically
start up in this setting once power is applied and the standby
key is pressed. The LCD display will indicate the desired room
temperature and the appliance will automatically regulate the room
temperature accordingly. In this mode the appliance operates at
full power, however the output of the appliance is automatically
reduced and regulated as the room temperature approaches the
desired level. This mode optimises energy use by calculating the
most efcient and effective way to achieve the desired temperature
setting. The desired room temperature can be adjusted at any time
during operation by pressing the appropriate key.
Runback Timer Mode - See Fig. 11
The heater is tted with a run-back timer feature which can be set
in any of the operating modes. Press the “” button to switch to the
runback timer screen. The runback timer range is 1 to 12 hours.
The displayed runback time will be ashing on screen, starting
at “01 Hrs”. Press the “ ” button again to increase the runback
time by 1 hour. Pressing “ ” will cancel the runback operation.
Once the desired runback time is left to ash for 6 seconds the
timer will be set. The display will switch back to the temperature
screen with the runback countdown displayed below as shown in
Fig. 11. To cancel the current runback timer, press the “ ” button.
The runback countdown will ash to “OFF” then disappear. Once
the run time has been set the heater will run and the runback
countdown will remain on the display until the set time runs out.
At this point the heater will switch to standby mode. To turn the
heater back on, press the “ ” button.
Note: If runback countdown is active in Fan mode the text below the
fan symbol will alternate between “Fan” and runback countdown.
Tilt Switch
The heater is tted with a tilt switch which will prevent the heater
from working if the heater is accidentally tipped over in any
direction.
Overheat Protection
The heater is tted with a temperature limiter. If the air inlet or outlet
grilles are restricted in anyway the temperature limiter switches the
heater off automatically. To bring the heater back into operation,
remove the cause of overheating then unplug the unit from the
electricity supply for a few minutes. When the heater has cooled
sufciently reconnect and switch on the heater.
Electronic Thermostat
In addition, if the electronic thermostat reads an abnormal ambient
room temperature it will cut the power to the heater and display
“ERROR” on screen. When the temperature has cooled to an
acceptable ambient room temperature it will restore power to the
heater and “ERROR” will disappear from the screen. The heater
will return to previous operation mode. The heater will then operate
as normal, if the heater does not switch on this may be because
the room temperature is still warmer than the set temperature.
Cleaning
Switch off the appliance rst and disconnect the plug from the
socket. Clean the housing with a moist cloth, vacuum cleaner or
brush. Do not use any abrasive or caustic cleaning agents. Do
not use any ammable cleaning agents e.g. petrol or spirit for
cleaning the appliance. Never immerse the appliance in water.
Air inlet and outlet area should be cleaned with a vacuum cleaner
regularly· If the appliance is not used for extended periods, it must
be protected against excessive dust and dirt.
Recycling
For electrical products sold within the European
Community. At the end of the electrical products useful
life it should not be disposed of with household waste.
Please recycle where facilities exist. Check with your
Local Authority or retailer for recycling advice in your
country.
After sales service
Your product is guaranteed for 3 years from the date of purchase.
After sales information or assistance with this product can be found
on our website: www.dimplex.co.uk/support
Your rights under this guarantee are additional to your statutory
rights, which in turn are not affected by this guarantee.
Please do not return a faulty product to us as this may result in loss
or damage and delay in providing you with a satisfactory service.
If after following these steps your product still does not operate
you should return it to your point of purchase.
Please retain your receipt as proof of purchase.

This manual suits for next models

1

Other Dimplex Heater manuals

Dimplex Cold Watcher User manual

Dimplex

Dimplex Cold Watcher User manual

Dimplex FX 20V User manual

Dimplex

Dimplex FX 20V User manual

Dimplex Electric Unit Heaters User manual

Dimplex

Dimplex Electric Unit Heaters User manual

Dimplex DHCER20WIFI User manual

Dimplex

Dimplex DHCER20WIFI User manual

Dimplex XLE Series User manual

Dimplex

Dimplex XLE Series User manual

Dimplex C70 User manual

Dimplex

Dimplex C70 User manual

Dimplex CAB10A User manual

Dimplex

Dimplex CAB10A User manual

Dimplex GFP200 W User manual

Dimplex

Dimplex GFP200 W User manual

Dimplex XLS24N User manual

Dimplex

Dimplex XLS24N User manual

Dimplex 3071 User manual

Dimplex

Dimplex 3071 User manual

Dimplex Contrast DXC20 User manual

Dimplex

Dimplex Contrast DXC20 User manual

Dimplex DGWH4031 User manual

Dimplex

Dimplex DGWH4031 User manual

Dimplex AC3RN User manual

Dimplex

Dimplex AC3RN User manual

Dimplex DGR32WNG User manual

Dimplex

Dimplex DGR32WNG User manual

Dimplex OFC1500TLG User manual

Dimplex

Dimplex OFC1500TLG User manual

Dimplex AC3N User manual

Dimplex

Dimplex AC3N User manual

Dimplex DuoHeat Duo300N User manual

Dimplex

Dimplex DuoHeat Duo300N User manual

Dimplex IRX Series User manual

Dimplex

Dimplex IRX Series User manual

Dimplex DDF250 Supplement

Dimplex

Dimplex DDF250 Supplement

Dimplex Monterey MFP050 User manual

Dimplex

Dimplex Monterey MFP050 User manual

Dimplex B075E User manual

Dimplex

Dimplex B075E User manual

Dimplex Girona GFP 200 B User manual

Dimplex

Dimplex Girona GFP 200 B User manual

Dimplex TDTR 175 W User manual

Dimplex

Dimplex TDTR 175 W User manual

Dimplex HL 185 T User manual

Dimplex

Dimplex HL 185 T User manual

Popular Heater manuals by other brands

Versonel SPP1500SBH owner's manual

Versonel

Versonel SPP1500SBH owner's manual

Gabarron Elnur RBC11 Installation instructions and user guide

Gabarron

Gabarron Elnur RBC11 Installation instructions and user guide

Steamist SMS-100 Instructions for installation and use

Steamist

Steamist SMS-100 Instructions for installation and use

Frico PA3210CA Original instructions

Frico

Frico PA3210CA Original instructions

Orbegozo SP 6000 instruction manual

Orbegozo

Orbegozo SP 6000 instruction manual

Honeywell HZ-510E instruction manual

Honeywell

Honeywell HZ-510E instruction manual

Bionaire CALEFACTOR BCH4562E instruction manual

Bionaire

Bionaire CALEFACTOR BCH4562E instruction manual

for Living Home Maison Collection Installation and user manual

for Living

for Living Home Maison Collection Installation and user manual

Sentiotec Onni Mini user manual

Sentiotec

Sentiotec Onni Mini user manual

Infiniton MICA HMK-31 user manual

Infiniton

Infiniton MICA HMK-31 user manual

Wacker Neuson HI750 Series Operator's manual

Wacker Neuson

Wacker Neuson HI750 Series Operator's manual

Superior AA250 Series Installation, operation and service instructions

Superior

Superior AA250 Series Installation, operation and service instructions

Kensington RH-D11 instruction manual

Kensington

Kensington RH-D11 instruction manual

Desa REM 3,3 ECA owner's manual

Desa

Desa REM 3,3 ECA owner's manual

Trane BAYCCHT101AA Installer's guide

Trane

Trane BAYCCHT101AA Installer's guide

Qlima R4224TC operating manual

Qlima

Qlima R4224TC operating manual

tiki GBFU 50 E5 Instructions for use

tiki

tiki GBFU 50 E5 Instructions for use

MrHeater MR. HEATER MH80CV Operating instructions and owner's manual

MrHeater

MrHeater MR. HEATER MH80CV Operating instructions and owner's manual

manuals.online logo
manuals.online logoBrands
  • About & Mission
  • Contact us
  • Privacy Policy
  • Terms and Conditions

Copyright 2025 Manuals.Online. All Rights Reserved.