DITTING KE640 VARIO User manual

Operating Instructions
KE 640
”Grind-on-Demand“
KE 640
KE 640 Vario

Dear customer / service personnel
the ”Single Espresso Grinder KE 640” is a fully automatic espresso cof-
fee grinder of the proven Ditting quality.
We have developed this product with over 80 years of experience in
the manufacture of coffee grinders assuring you of high quality grind-
ing of espresso and other types of coffee beans.
Read through and observe the operating instructions, so you and your
customers will thoroughly enjoy the ”KE 640”. Please store the instruc-
tions in a safe place. If anything is unclear or additional information is
required, please contact your authorized dealer or us as the manufac-
turer. We will be pleased to advise you further. We wish you unlimited
pleasure and success with our product.
Ditting Maschinen AG

Page Page
Table of contents
1. Safety 1
1.1 Symbols 1
1.2 Safety Instructions 1
1.3 Usage Purpose 2
1.4 Personnel Requirements 2
2. Technical Data 2
3. Description 3
4. Safety Devices of the Grinder 4
5. Set-up and Basic Adjustment 4
5.1 Usage Location 4
5.2 Installation 4
5.3 Basic Adjustment 5
6. Operation 5
6.1 Handling the Grinder 5
6.2 Display / Menue 6
6.3 Interruption of grinding 7
7. Operating faults 8
8. Cleaning 9
8.1 Cleaning with GRINDZ™ Grinder Cleaner 9
8.2 Cleaning the Grinder Placement Surface 9
8.3 Cleaning the Grinder Casing 9
8.4 Cleaning of the Grinding Mechanism 9
9. Removal of the Integrated Grinder 10
9.1 Disconnect the main plug 10
9.2 Release the motor’s plug-in connector (1) 10
9.3 Vaccum out the grinder 10
9.4 Component assembly is carried out in reverse order 10
10. Maintenance and Repair 11
10.1 Grinding Disc Replacement 11
10.2 Grinding fineness adjustment with the grinder switched ON 11
11. Spare Parts 12
12. Wiring Diagram 13
12.1 Diagram 100-115V 50/60Hz 13
12.2 Diagram 200-230V 50/60Hz, 240V/50Hz 14
13. Certificate 15
14. Warranty Conditions 15

Page 1
Always remove the electrical plug from the outlet prior to conducting
maintenance or cleaning work on the grinder. Also, prior to removing
the hopper, the plug must be removed from the electrical outlet.
Never operate a grinder with a damaged electrical cord. Inspect the
grinder regularly for damages of the electrical cord, plug, etc.
Any required repairs may only be conducted by authorized service
personnel. For this reason, please contact a customer service repair
facility, your dealer or us directly as the manufacturer.
Do not exceed the maximum allowable continuous grinding time of 20
min. Afterwards, allow the grinder to cool off before the next opera-
tion.
Do not make any modifications or alterations to the grinder. The manu-
facturer assumes absolutely no liability for damages occurring from
failure to observe these instructions.
Children can not appreciate the dangers that can exist in the operation
of electrical grinders. For this reason, never leave children unsuper-
vised with electronic appliances such as this grinder.
Never submerge the grinder in water and never op-
erate with wet hands.
1. Safety
Please read carefully and observe the following
safety instructions. Failure to do so can result in
damage to the grinder and danger to the user.
1.1 Symbols
The following two symbols are used in these operating instructions:
Safety Instruction:
Imminent accident danger if you fail to observe.
General Instruction:
Failure to observe can result in damage to the grind-
er and optimum operation cannot be guaranteed.
1.2 Safety Instructions
Only whole roasted coffee beans may be ground in the KE 640.
When unpacking please inspect whether the power supply (voltage)
complies with the grinder voltage on the manufacturer’s name plate
on the bottom of the grinder. Never operate the grinder in damp or wet
surroundings.

Page 2
2. Technical Data
Type KE 640, KE 640 Vario
Voltage/Frequency 200-230V / 50/60Hz
240V / 50Hz
100-115V / 50/60Hz
Rotation
230-240V 50 Hz 1420 rpm
110-115V 60 Hz 1640 rpm
Sound Emission
Idle Operation 55 dB
Operation 75 dB
Pre-Fuse 16 A-slow
Overload Circuit Breaker
230-240V 4A T
110-115V 7A T
Max. Permissible Running Time S3 20% e.g.(4 sec. on / 16 sec. off)
of the Grinder (6 sec. on; 60 sec. off)*
Dimensions in mm W 240, D 320, H550
Weight 13 kg (28.7 lbs)
Hopper Capacity 1,5 kg (3.3 lbs.)
(Please request technical data for other voltages and frequencies from the manufacturer or dealer.)
1.3 Usage Purpose
Only whole roasted coffee beans may be ground in the KE 640 grinder.
Never use the grinder to grind other products or objects.
1.4 Personnel Requirements
No special requirements are necessary for the users of this grinder. It
is nevertheless a prerequisite that these operating instructions have
been carefully read and understood and that all instructions provided
are observed. In addition, safety-conscious operation is expected.
* only for 115V 60Hz

Page 3
3. Description
Main Components and Operating Elements
The main components and operating elements are pictured in the il-
lustration.
Pos. 1 Hopper with lid
Pos. 2 Lock screw for hopper
Pos. 3 Grinding fineness adjustment*
Pos. 4 Lock screw for grind adjustment lid
Pos. 5 Grind adjustment lid
Pos. 6 Grinding fineness scale
Pos. 7 Display
Pos. 8 Single shot pre-selection button
Pos. 9 Single shot timer
Pos. 10 Double shot pre-selection button
Pos. 11 Double shot timer
Pos. 12 Spout
Pos. 13 Port-a-filter mounting
Pos. 14 Port-a-filter rest
Pos. 15 Fastening screw for Port-a-filter rest
Pos. 16 Start / Stop switch
Pos. 17 Drip tray
Pos. 18 Hopper slide
Pos. 19 Main switch (back)
Pos. 20 Trip switch (back)
Pos. 21 Power cable (back)
* for Vario with adjustment screw on the lid
1
2
3
7
8
12
13
14
17
9
4
5
18
6
10
11
15
19
20
21
16

Page 4
5. Set-up and Basic Adjustment
A grinding test run is carried out on each grinder in our factory. This is
why you may find ground material residue in the grinding
mechanism!
5.1 Usage Location
Place the grinder on a level, vibration-free surface.
Never operate the grinder in moist, or even worse, in
wet surroundings!
5.2 Installation
You have received your grinder in operating condition. Now you only
need to connect it to the main plug. Proceed as follows:
Protect your device with separate pre-fuses (not in-
cluded in the scope of delivery) according to the in-
formation provided under Point 2 “Technical data”.
Make sure that the pre-fuse is not overloaded by
other devices (e.g. fan heaters, deep freezers).
Check whether the main voltage and frequency cor-
respond to the information on the rating plate.
Insert the plug into the corresponding grounded outlet.
4. Safety Devices of the Grinder
Thermal overload circuit breaker
The motor of the grinder is protected by a thermal overload circuit
breaker, which interrupts the motor’s electric circuit in the event of
electric overload. The trip switch, item 20, must be pressed to enable
the grinder to be re-started.
The user has no influence whatsoever on this cir-
cuit breaker. If the circuit breaker trips repeatedly,
an authorised service partner must be consulted, as
the motor’s winding may be damaged.
Page 5
6. Operation
Only use the KE 640 espresso grinder for whole roasted coffee beans.
Observe the safety instructions under 1.2!
The max. permissible operating cycle for 200-230V and 240V is 4 sec.
ON and 16 sec. OFF, i.e. three double shots per minute. For 115V the
max. permissible operating cycle is 6 sec. ON and 60 sec. OFF. Do not
exceed the maximum allowable continuous grinding time of 20 min.
Afterwards, allow the grinder to cool down before the next operation.
6.1 Handling the Grinder
Proper operation necessitates the steps described in the following:
6.1.1 Actuate the main switch on the rear of the grinder.
6.1.2 Open the hopper. Pour whole roasted espresso beans into the
hopper from above. Never pour in coffee powder.
6.1.3 Check whether the hopper slide (item 18) is open.
6.1.4 Adjust the port-a-filter rest (item 14) to your espresso machine’s
port-a-filter. Proceed as follows:
Switch off the KE 640 espresso grinder by using the main switch (item
19). Use the enclosed Allen key to loosen the fastening screws (item
15) slightly and adjust the height of the port-a-filter rest.
5.3 Basic Adjustment
Once the device is ready to operate, a grinding test should be carried
out.
Basic adjustment to a moderately fine setting has been carried out in
the factory using espresso beans. The following markings have been
made on the grinding mechanism (interior):
Red mark 1: Basic adjustment O, finest setting and minimum
grinding disc spacing
Red mark 2: Basic factory setting and also the position for in-
stalling and removing the lid, in order to achieve the
factory setting after positioning the lid.
Never rotate the grinding discs clockwise further
then the red mark 1, as the grinding discs may other-
wise be damaged.
Red mark 1 Red mark 2

Page 6
Slide the port-a-filter between the port-a-filter mounting and the port-
a-filter rest until it comes to a stop.
Push the port-a-filter rest up and tighten the fastening screws. The
setting is correct when the port-a-filter independently remains in the
mounting.
6.1.5 Switch on the grinder and check whether the factory grinding
time settings for single S 2.0 and double D 4.0 appear in the display by
pushing the buttons (Item 8 / 10). If the display corresponds to the fac-
tory settings, continue as described in point 6.1.9; if this is not the case,
the time must be set (see point 6.1.6).
6.1.6 Setting the grinding time (portion quantity). Simultaneously press
both buttons for approx. 3 sec. MENU appears in the display. Scroll to
menu option STI using the single button (Item 8).
6.1.7 Use the Single shot timer, item 9, to set 2.0 sec. Scroll to menu
option DTI using the single button. Use the Double shot timer, item 11,
to set 4.0 sec.
6.1.8 To store these values, press both buttons simultaneously until
SAVE appears in the display.
6.1.9 Adjust the grinding fineness by pulling the sliding detent out to
the front / turn the adjustment screw* and turning the lid / grinding
fineness adjustment to the 2 mark. Note that “0” is the finest setting
and “10” is the coarsest setting.
Rotation to the left = fine
Rotation to the right = coarse
6.1.10 Push your espresso machine’s port-a-filter into the port-a-filter
mounting, item 13, until the grinding process is switched on.
6.1.11 Now brew a test portion of espresso using your machine. If the
result is unsatisfactory, repeat adjustment steps 6.1.6 to 6.1.8 again by
varying the grinding time and grinding fineness. Carry out this process
until the best coffee results have been reached.
6.2 Display / Menue
6.2.1 Calling up the menu
To call up the menu, simultaneously press both buttons for approx. 3
sec. MENU appears in the display. Scroll forward using the single but-
ton. Scroll backwards using the double shot button.
*for KE 640 Vario

Page 7
6.2.2 Grinding time setting
The grinding time range for single cups and double cups should be
set between 0.1 and 10 sec. Scroll to menu option STI (time for single
cups) using the single button. Use the Single shot timer, item 9, to set
the time. Scroll to menu option DTI (time for double cups) using the
single button. Use the Double shot timer, item 11, to set the time.
6.2.3 Quantity indicator
Scroll to menu option S using the single button. The display shows e.g.
S 000020 – You have ground 20 single cup portions. Scroll to menu op-
tion D using the single button. The display shows e.g. D 000018 – You
have ground 18 double cup portions.
6.2.4 Continuous quantity indicator (not resettable)
Scroll to menu option SC using the single button. The display shows
e.g. SC 000127 – You have ground 127 single cup portions altogether.
Scroll to menu option DC using the single button. The display shows
e.g. DC 000120 – You have ground 120 double cup portions.
Press the single button again to scroll forward to set the grinding time
again (see 6.2.2).
6.2.5 Save and exit the menu
To store these values, press both buttons simultaneously until SAVE
appears in the display.
6.2.6 Reset function
If you wish to reset the quantity indicator 6.2.3, switch off the grinder at
the main switch. Press both buttons simultaneously and switch on the
main switch again. The quantity indicator is now set to O.
6.3 Interruption of grinding
If the grinding process is interrupted before the set grinding time has
expired, the LED in the active pre-selection button flashes. The grind-
ing process can be re-started by pushing the port-a-filter back into the
mounting. The missing quantity is ground into the port-a-filter.
If this is not desired push the pre-selection button and the entire set
grinding quantity or grinding time is available once again.

Page 8
Defect
The grinder hums but
does not grind.
The grinder does not
grind, the display is
lit, single cup is pre-
selected
Defect
The grinder does not
start, the operating
mode display is not
lit.
In the case of other malfunctions or continued faults, please contact your
dealer or your authorised customer service centre.
7. Operating faults
Cause
The spout is
clogged.
Grinding is set too
fine.
A foreign object is in
the grinding mecha-
nism.
The grinding time is
set to O.
Cause
The main plug is not
inserted.
The overload circuit
breaker has been
tripped.
The pre-fuse has
tripped.
Remedy
Set grinding fineness to
“coarse” and trigger the
grinding process. The grinder
will then grind itself free. Af-
terwards, return the setting to
the desired grinding fineness.
Turn the grinding fine-
ness setting to the right, to
“coarse”, and trigger the
grinding process. The grinder
will then grind itself free. Af-
terwards, return the setting to
the desired grinding fineness.
Clean the grinding mecha-
nism as described and re-
move the foreign object. Ob-
serve the safety instructions!
Reset the grinding time.
Remedy
Insert the main plug into the
socket.
Check to determine whether
the trip button of the circuit
breaker has jumped out.
Press the trip button in again
if appropriate. If the circuit
breaker trips repeatedly, con-
tact your authorised custom-
er service centre or dealer.
Check the pre-fuse. Restore
the pre-fuse to its initial
state or replace it. Determine
whether other devices are
connected to this fuse.

Page 9
8. Cleaning
8.1 Cleaning with GRINDZ™ Grinder Cleaner
We recommend cleaning your espresso grinder once a week with our
GRINDZ™ Grinder Cleaner.
Simply take the recommended dose (35 - 40g) and drop it into an empty
grinder hopper. You can also use the cap of the jar for dosing. A full
cap will yield between 35 - 40 grams.
Turn the fineness adjustment to medium and operate as if grinding
coffee beans. Once complete, we recommend passing twice as much
coffee through to purge any residue.
8.2 Cleaning the Grinder Placement Surface
8.2.1 Pull out the main plug!
8.2.2 Tilt the grinder to one side and clean the area on which it stands
and the bottom of its base.
8.2.3 Both surfaces must be dry and free of oil and grease.
8.2.4 Reposition the grinder
8.3 Cleaning the Grinder Casing
Clean the outside of the casing from time to time using a damp cloth.
Observe the safety instructions under 1.2!
Be careful of sharp edges when cleaning. There is
a risk of injury!
8.4 Cleaning of the Grinding Mechanism
Always pull out the main plug from the socket before
carrying out maintenance or cleaning work on the
grinder!
Do not let any foreign objects fall into the grinding
mechanism!
8.4.1 Close the hopper slide. Remove the lock screw (Item 2). Turn the
base of the hopper to the right so that the bayonet releases the hopper.
Pull the hopper off upwards.
8.4.2 Remove beans out of the filler neck. Remove the lock screw (Item
4) and turn the grind adjustment lid to the right. The sliding detent au-
tomatically engages in the coarsest setting.
Page 10
9. Removal of the Integrated Grinder
Always pull the main plug from the socket before
carrying out maintenance or cleaning work on the
device!
Observe the safety instructions under 1.2!
Do not let any foreign objects fall into the grinding
mechanism!
9.1 Disconnect the main plug
Close and remove the hopper. Place the grinder on its side and un-
screw the fastening screws. Store the screws and washers in a safe
place. Re-position the grinder on its rubber feet. Proceed as described
in 8.4.2 and 8.4.3.
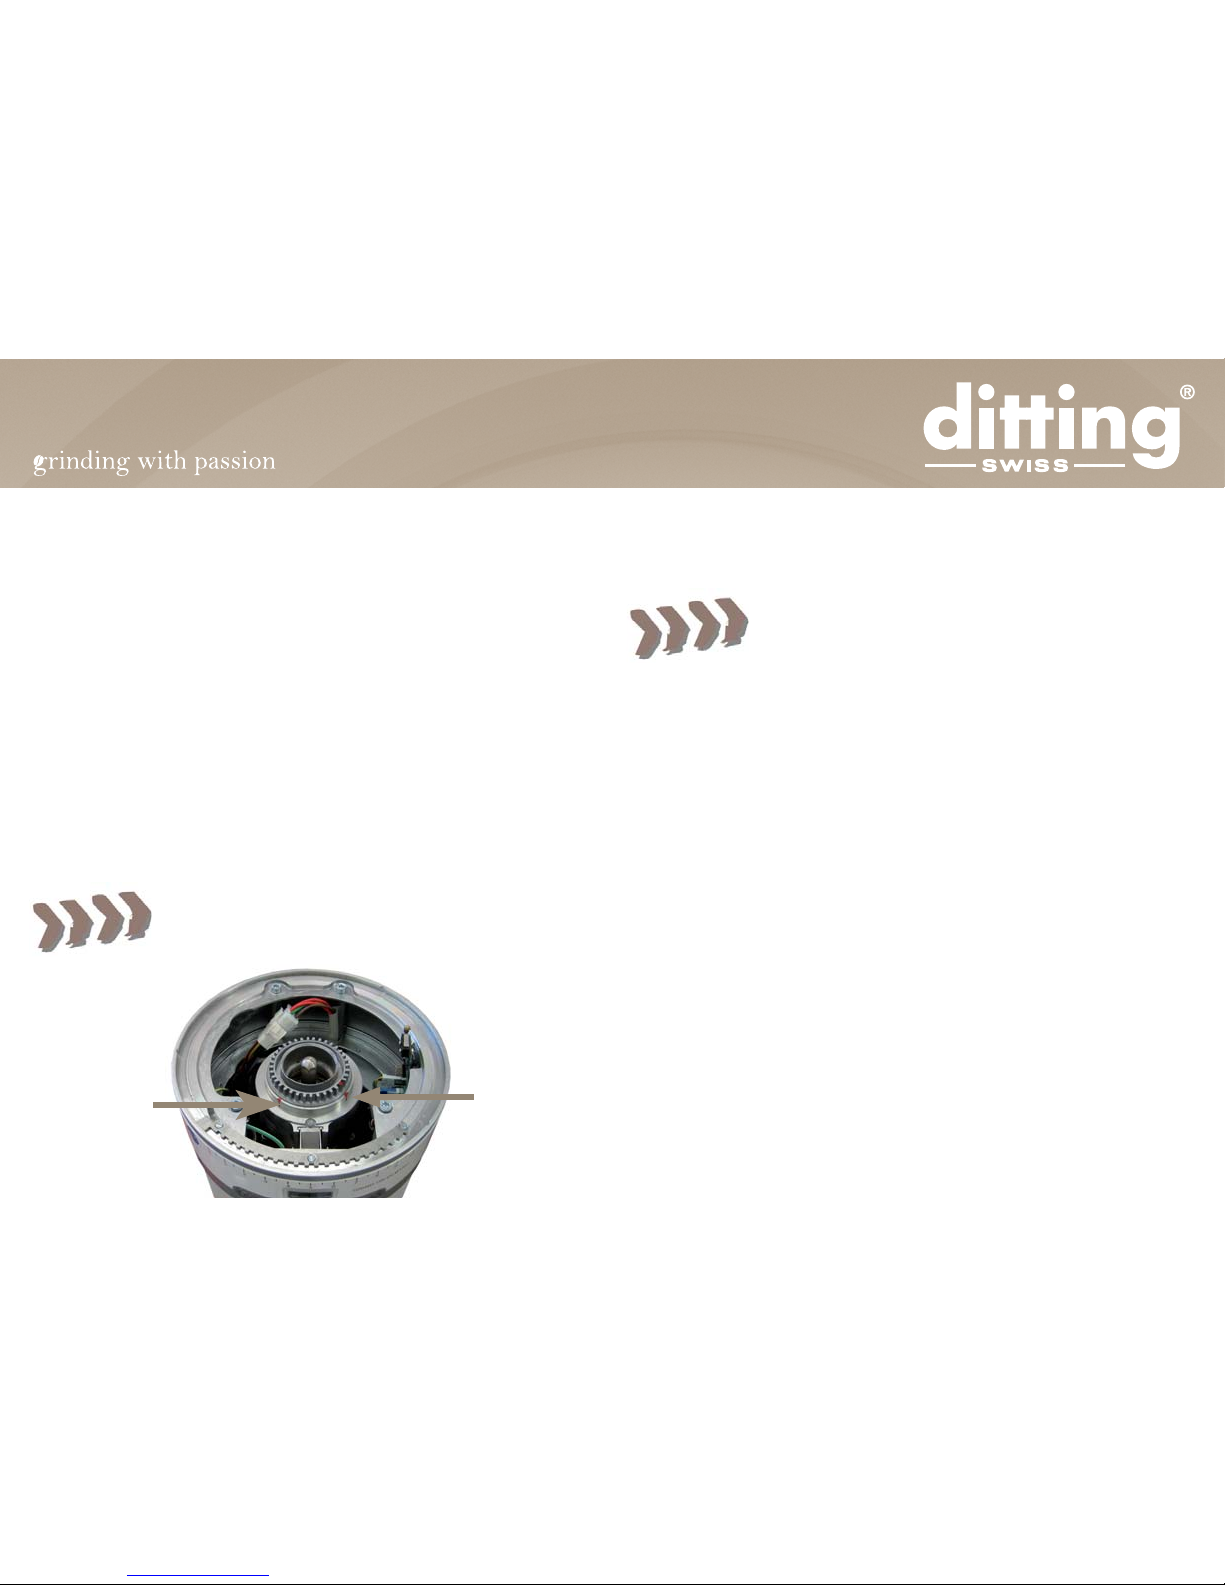
9.2 Release the motor’s plug-in connector (1)
Carefully pull the integrated grinder out of the casing (2).
9.3 Vaccum out the grinder
Carefully vacuum out the grinder casing and the integrated grinder’s
spout and clean with a brush. Do not damage any cables!
9.4 Component assembly is carried out in reverse order
To do this, please note 8.4.5 to 8.4.7.
8.4.3 Remove the grind adjustment lid (Item 5).
8.4.4 Now you can carefully vacuum out the grinder housing.
Please do not change any grinder settings!
8.4.5 During the reassembly please make sure that the grind adjust-
ment lid is placed in a way that the 2 engaging cones fit into the tooth-
ing of the grinding disc support. The screw of the grind adjustment has
to be placed over the cut-out in the intermediate ring.
8.4.6 Lower the grind adjustment lid onto the intermediate ring and turn
to the left. Fasten the lock screw (Item 4).
8.4.7 Carry out a grinding and coffee brewing test. Readjust the grind-
ing setting if necessary.

Page 11
10. Maintenance and Repair
Always pull the main plug from the socket before
carrying out maintenance or cleaning work on the
grinder!
Inspect the grinder regularly for damage, particu-
larly to the electrical cable, plug, etc.
Any required repairs may only be conducted by
authorized specialist personnel. For this reason,
please contact a customer service repair facility,
your dealer or us directly as the manufacturer.
10.1 Grinding Disc Replacement
10.1.1 Grinding disc replacement should only be carried out by autho-
rised specialists or a customer service centre. “Repair manual KE 640
grinding disc replacement and basic adjustment”, article No. 6592, is
required for replacing grinding discs.
10.1.2 Grinding disc replacement may also be carried out using a re-
placement (AT) integrated grinder. To do this, order an AT integrated
grinder. On receipt of the AT integrated grinder, remove your integrat-
ed grinder from the KE 640 according to section 9 and install the AT
integrated grinder into the KE 640.
Return your old integrated grinder in the packaging.
10.2 Grinding fineness adjustment with the grinder switched ON
10.2.1 Set the grinding fineness adjustment to the O detent.
10.2.2 Close and remove the hopper.
10.2.3 Remove the remaining beans from the filler shaft and vacuum
out the grinder casing.
10.2.4 Remove the sealing ring from the filler shaft.
10.2.5 Loosen – do not unscrew – the adjusting screws with the size
2.5 Allen key.

Page 12
10.2.6 Insert the adjusting handle (Service-Pack) into the filler shaft.
The adjusting handle must engage in the slot in the filler shaft’s trans-
verse bar.
10.2.7 Set the double portion grinding time to 10 sec. (see section 6.2.2).
10.2.8 Hold the adjusting handle firmly and push the port-a-filter into
the port-a-filter mounting until the grinder switches on.
10.2.9 Whilst the grinder is running, turn the adjusting handle to the left
until a slight ringing sound becomes audible. Now turn the adjusting
handle slightly to the right until no further ringing sound can be heard.
It is important to ensure that no grinding disk “rat-
tling” can be heard at the finest setting! Otherwise
the service life of the discs will be significantly re-
duced!
10.2.10 Tighten the adjusting screws and remove the adjusting handle
from the filler shaft.
10.2.11 Insert the sealing ring again. If the sealing ring is damaged, it
must be replaced.
10.2.12 Replace the hopper and allow it to engage in the bayonet and
replace the lock screw (item 2). Open the hopper slide.
10.2.13 Reset the desired double portion grinding fineness and grind-
ing time.
10.2.14 Push your espresso machine’s port-a-filter into the port-a-filter
mounting (item 14), until the grinding process is switched on.
10.2.15 Only remove the port-a-filter once the grinding process has
been completed. Repeat approximately twice until the grinder casing
is filled completely with fresh, re-adjusted ground coffee.
10.2.16 Now brew a test portion of espresso using your machine. If
the result is unsatisfactory, repeat the adjustment steps as described
in section 6.1.6 to 6.1.8, by varying the grinding time and grinding fine-
ness.
11. Spare Parts
Spare parts are usually ordered from your customer service centre
or your local dealer. To ensure quick and correct processing of your
order, the following information is absolutely essential:
1. Type designation, serial number and voltage of the grinder (on the
rating plate underneath the grinder).
2. An exact description of the part to be replaced or the article num-
ber.

Page 13
12. Wiring Diagram
12.1 Diagram 100-115V 50/60Hz

Page 14
12.2 Diagram 200-230V 50/60Hz, 240V/50Hz

Page 15
13. Certificate 14. Warranty Conditions
1. The warranty period is 1 year from the date of purchase.
2. The warranty covers all damages that can be attributed to infe-
rior materials or defective workmanship. Corresponding grinders
will be repaired or replaced free-of-charge, with the exception of
transport or freight charges. Transport is the responsibility of the
customer. Therefore, avoid damages with all returns by correct
packing.
3. The grinder may only be opened for cleaning purposes in accor-
dance with the Operating Instructions.
4. This warranty does not cover damages which have occurred
through: Improper usage, improper maintenance, lack of ser-
vicing, usage for purposes other than those intended, incorrect
installation, incorrect voltage, breakage, natural wear or for rea-
sons beyond our sphere of influence.
5. In order to maintain the warranty, only original spare parts and
accessory parts may be used.
6. Observe in addition our General Delivery Conditions in their re-
spective current version.
7. The manufacturer is in no way liable for consecutive or second-
ary damages.
8. The warranty does not cover costs resulting from repairs con-
ducted by non-authorized personnel.
EC Declaration Conformity
As defined by EMC-directive 89/392/EWG Ditting Maschinen AG
Bramenstrasse 11
CH-8184 Bachenbülach - Switzerland
Telefon : +41 44 864 1800
Telefax : +41 44 864 1801
Name of the manufacturer or in the EU residential authorized person:
Hemro AG
Address of the manufacturer or the authorized person:
Bramenstrasse 11, CH-8184 Bachenbülach
announce, that the machine below
product type : commercial device for food processing
machine description : Espresso grinder
machine typ : KE 640, KE 640 Vario
is in compliance with the conditions of the Directive of Machines 98/37/EG
and with the main standards stipulated in the Directive concerning low tension
73/23/EWG and applies to the national laws that transpose it.
Issued in Bachenbülach : 01.01.2008
Function of subscriber : Managing Director
Name of subscriber : Nils Erichsen
Signature

Ditting Maschinen AG
Bramenstrasse 11
CH- 8184 Bachenbülach, Switzerland
Tel.: +41 (0)44 864 1800
Fax: +41 (0)44 864 1801
www.dittingswiss.ch
July 2009
Subject to change without prior notice!
Other manuals for KE640 VARIO
2
This manual suits for next models
1
Table of contents
Other DITTING Coffee Grinder manuals

DITTING
DITTING KR 804 User manual

DITTING
DITTING KF 903 User manual

DITTING
DITTING 804 Series Assembly instructions

DITTING
DITTING KE640 ES User manual

DITTING
DITTING KE640 2.0 User guide

DITTING
DITTING KE640 2.0 User guide

DITTING
DITTING KE 640 Original operating manual

DITTING
DITTING KE 640 Vario User manual

DITTING
DITTING 807 User manual

DITTING
DITTING KR 1203 User manual


