DITTING ProD User manual

GB
ALLROUND GRINDER
Operating Instructions
Allround-Grinder
GB
rating
I
nstructions

GB
ALLROUND GRINDER
2
Content
Prior to using the grinder.................................................................................................................. 3
Scope of supply ................................................................................................................................. 3
For Your Safety................................................................................................................................... 3
Symbols......................................................................................................................................... 3
Safety warnings............................................................................................................................. 3
Explanation of symbols .................................................................................................................... 4
Appropriate Use................................................................................................................................. 5
Operating parts.................................................................................................................................. 6
Preparation......................................................................................................................................... 6
Assembling the grinder.....................................................................................................................6
Mounting the hopper .....................................................................................................................6
Attach the residue tray.................................................................................................................. 6
Adjusting the port-a-filter holder.................................................................................................... 7
Inserting the port-a-filter holder .................................................................................................... 7
Removing the port-a-filter holder.................................................................................................. 7
Operation............................................................................................................................................ 8
Setting the grinding time ............................................................................................................... 8
Setting the fineness of the grind ................................................................................................... 8
Start grinding................................................................................................................................. 8
Grinding large quantities............................................................................................................... 8
Special functions............................................................................................................................... 9
Double grinding time/Double shot................................................................................................ 9
Break function ............................................................................................................................... 9
Safety devices.................................................................................................................................... 9
Cleaning............................................................................................................................................ 10
Cleaning with GRINDZTM grinder cleaner ................................................................................... 10
Cleaning the grinder‘s surfaces and housing ............................................................................ 10
Cleaning the hopper.....................................................................................................................11
Disposal of the grinder.....................................................................................................................11
Technical data .................................................................................................................................. 12
Troubleshooting............................................................................................................................... 12
Notes ................................................................................................................................................. 14
GB
ALLROUND GRINDER
3
Prior to using the grinder
After unpacking as well as prior to each use,
check if the grinder or the power cord show any
signs of damage.
If there is damage, do not use the grinder, but
instead notify your dealer.
These Operating Instructions comply with valid
EU standards and regulations. Also observe
country-specific guidelines and laws outside
Switzerland!
ATTENTION: Each grinder is tested in the
factory, including grinding coffee. Therefore
there can be ground coffee residues
inside the grind chamber which could fall
out during transport.
Please read through the safety instruc-
tions and Operating Instructions care-
fully prior to initial use. This is the only
way to ensure that all features are used safely
and reliably.
Store these Operating Instructions in a safe place
and also pass it on to any subsequent owner.
Scope of supply
– Coffee grinder
– Hopper with lid
– Operating Instructions
The following parts are located in the hopper:
–Groundsbin
– Port-a-filter holder
–Residuetray
–Screwdriver
– Cleaner brush
Check if the shipment is complete and undam-
aged. If a part is missing or defective, please
contact your dealer.
For Your Safety
Symbols
Severe risk!
Failure to observe this warning can lead
to physical injury or death.
Medium level of risk!
Failure to observe this warning may
cause material damage.
Slight risk!
Instructions which should be observed
when using the grinder.
Safety warnings
Hazardous voltage!
Faulty electrical installation or exces-
sive line voltage may result in an electric
shock.
– Only use the grinder if the line voltage match-
es the specifications on the nameplate.
– Regularly check the grinder and cables for
damage. Do not operate the grinder if it is
damaged or the power cable or the plug are
damaged.
– If the power cable of this grinder is damaged,
it must be replaced by the manufacturer or its
customer service or a person having similar
qualifications in order to avoid risks.
– Connect the grinder only to a correctly ground-
ed power outlet. If you are unsure, because it
can be seen that the earthing contacts or the
power outlet have, for instance, been painted
over, in the interests of your own safety have
the power outlet checked by a qualified pro-
fessional.
– Do not open the casing yourself; only allow the
repair to be done by authorized specialists.
Contact an authorized customer service work-
shop or your dealer in such cases. Warranty
and liability claims are excluded in the event
TAKE CARE
DANGER
ATTENTION
DANGER

GB
ALLROUND GRINDER
4
of damage resulting from repairs you carry out
yourself, improper connection or incorrect op-
eration.
– In the event of repairs, only parts may be used
which correspond to the original specifications
for the grinder. This grinder contains electrical
and mechanical parts that are essential for
protection against dangers.
– Do not place the grinder itself or the power ca-
ble or plug in water.
– Never handle the plug with damp hands.
– Keep the grinder, the power plug and the pow-
er cable away from open fire or hot surfaces.
– Use the grinder only in dry interior areas. Nev-
er use it in damp areas or in the rain.
– Never operate or store the grinder in such a
way that it could fall into a sink or a wash ba-
sin.
– Never handle an electric appliance if it falls
into water. In such cases, pull out the power
plug.
– When you are not using the grinder, are clean-
ing it, or a fault develops,
always pull out the
plug from the power socket.
– Neveruse the powercableto carry the grinder.
– Before you clean the grinder or remove or in-
sert the hopper set the power switch to “0“ and
pull out the power plug.
– Make sure that an appliance no longer being
used does not work any more: Pull the pow-
er plug out of the socket and cut through the
power cable.
Danger for children and other people!
Children often do not recognize dangers
or underestimate them.
– This grinder is not intended for use by peo-
ple (including children) with restricted physi-
cal, sensory, or intellectual abilities or lack of
experience and/or lack of knowledge, unless
they are supervized by a person responsible
for their safety or received instructions from
this person about how to operate the grinder.
– Keep the packing container or materials away
from babies and small children. There is a risk
of suffocation!
– Supervise children and store the grinder out of
their reach in order to be certain that they do
not play with it.
Risk of damage resulting from im-
proper use!
Incorrect use of the grinder can result in
damage.
– Never exceed the maximum permissable op-
erating time.
Espresso grinding:
The grinder must cool down for 24 seconds
after a 6 second grinding phase. Do not grind
more than one dose of espresso in 30 sec-
onds.
Filter grinding:
The maximum permissable grinding time is
30 seconds. After this grinding procedure the
grinder must cool off for 2 minutes.
– Set the grind level finer only when the grinder
is in operation or when there are no beans in
the grinder.
– Never expose the grinder to high tempera-
tures (heating, etc.) or the effects of weather
(rain, etc.).
– Do not allow any foreign objects to fall into the
grinder.
– Place the grinder only on an even, stable and
firm surface.
TAKE CARE
DANGER
GB
ALLROUND GRINDER
5
Explanation of symbols
You will see the following symbols on the grinder:
Suitable for use with food
Instructions for disposing of old appli-
ances (see page 11).
Appropriate Use
Only roasted whole coffee beans may be ground
with this grinder. Never grind grain or other prod-
ucts with the grinder, as otherwise severe dam-
age to the grinder can result.
The grinder is appropriate for both private and
commercial use. In commercial use the prevail-
ing trade regulations must be conformed to.
Use the grinder only as described in these oper-
ating instructions. Any other use is improper and
can lead to damage or even to injury to persons.
The manufacturer does not assume liability for
damage resulting from improper use.

GB
ALLROUND GRINDER
6
Preparation
1. Remove all the parts from the hopper.
2. Wash out the hopper aand the grounds bin b
with water. After this carefully dry the parts.
Assembling the grinder
Mounting the hopper
1. Place the hopper, as illustrated above, on the
bayonet seal of the grinder. Then turn the hop-
per to the right until it snaps into place.
2. Fill the hopper with roasted whole coffee
beans.
Attach the residue tray
• Tilt the grinder slightly forward and insert the
residue tray i.
Operating parts
f
g
c
a
b
h
i
d
e
a. Hopper with lid
b. Grounds bin (within hopper)
c. Button for grind adjustment
d. On/Off switch (on rear of grinder)
e. Start/Stop button
f. Adjustment button for grinding time
g. Indicator lamp
h. Port-a-filter holder
i. Residue tray
GB
ALLROUND GRINDER
7
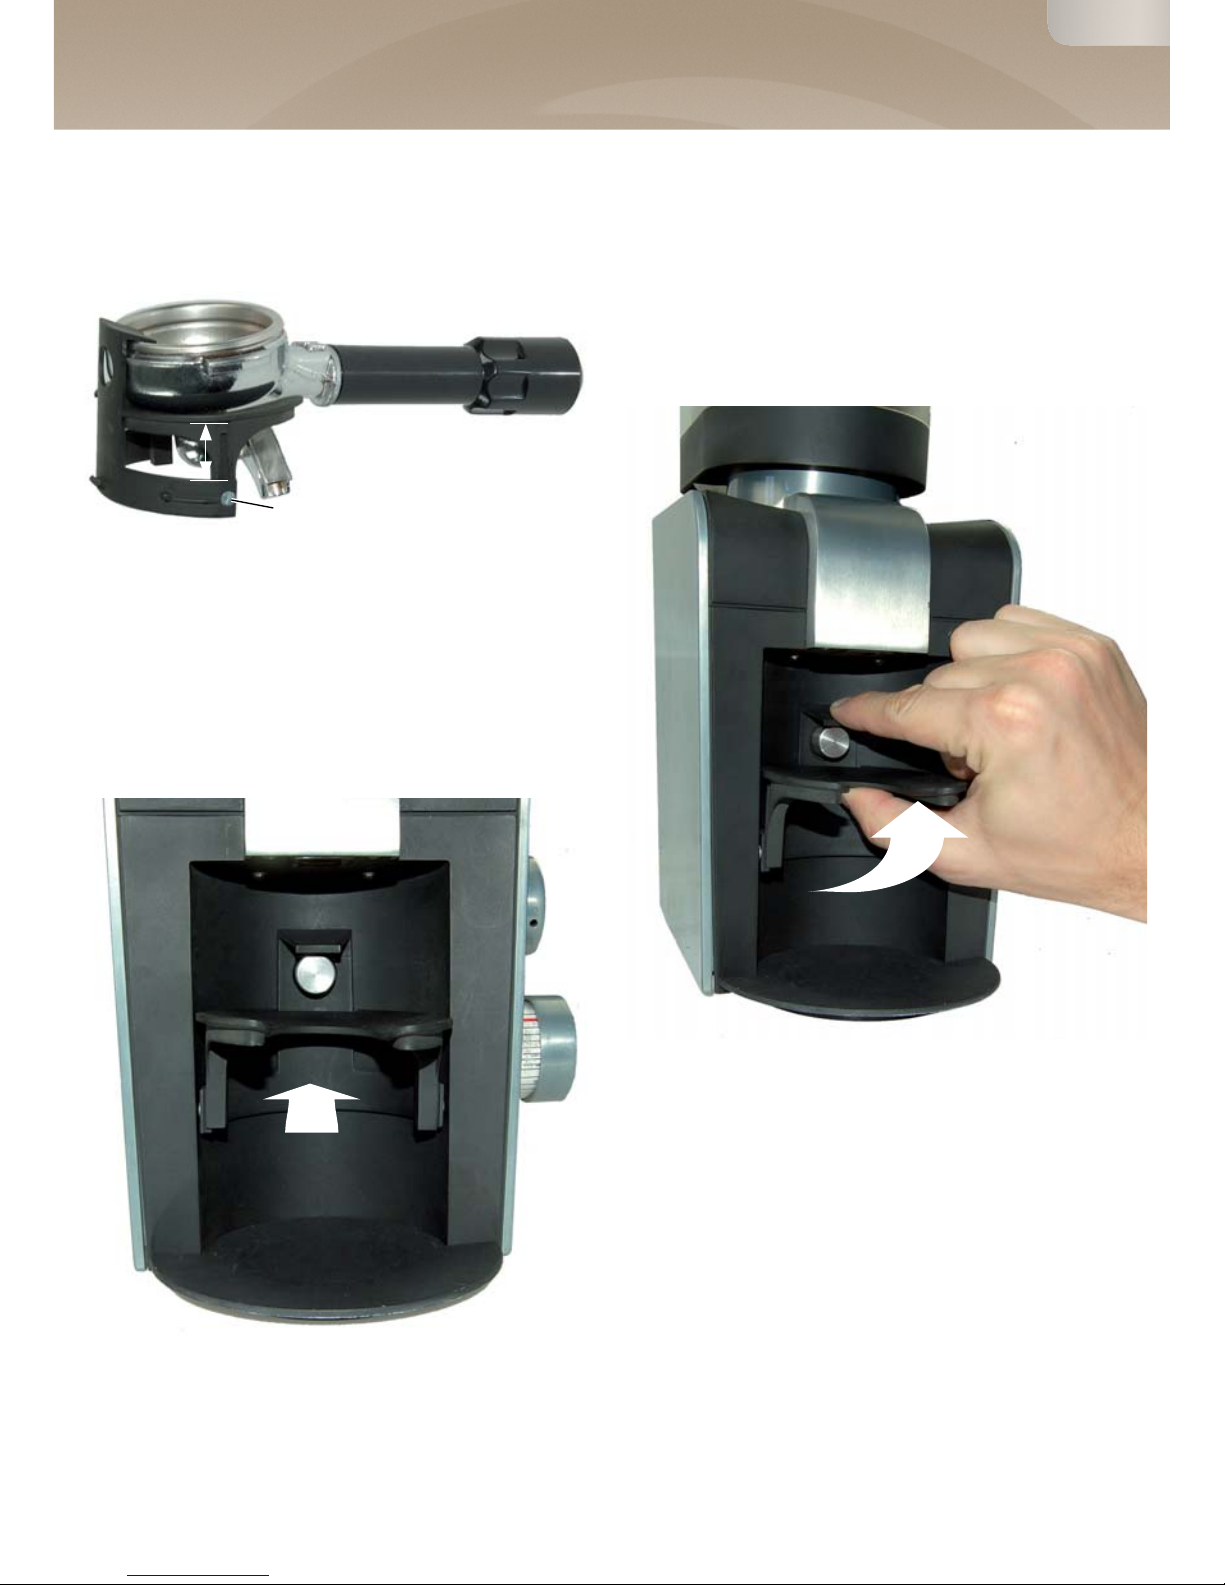
Adjusting the port-a-filter holder
The port-a-filter holder can be adjusted to all cur-
rent port-a-filter sizes.
K
j
1. Loosen the two screws jwith the screw
driver supplied.
2. Set the distance kso that the port-a-filter
sits horizontally in the holder.
3. Tighten the two screws jagain.
Inserting the port-a-filter holder
E
L
1. Insert the port-a-filter holder as shown past
the Start/Stop button eand hold it in this posi-
tion.
2. Slide the holder in at the position luntil it
engages.
3. Insert the port-a-filter as a reference. If the
port-a-filter does not stay in the desired posi-
tion, the holder must be readjusted.
Removing the port-a-filter holder
• Press the holder gently together as shown
above than pull it forward from below.

GB
ALLROUND GRINDER
8
Operation
Setting the grinding time
f
g
c
d
The grinding time depends not only on the de-
sired quantity of ground coffee, but also on the
fineness of the grind. Work out the optimal set-
ting by means of repeated trials.
– Set the desired grinding time with the button f.
Setting the fineness of the grind
Risk of damage resulting from
improper use!
– Adjust the fineness of the grind only when the
grinder is in operation or when there are no
beans in the grinder.
• Set the degree of fineness using the button c.
fine = fine grind
medium = medium grind
coarse = coarse grind
Start grinding
Requirements:
The hopper is filled with whole coffee beans and
the grind time and fineness are set.
1. Switch on the coffee grinder with the mains
switch d(rear side of the grinder).
The indicator lamp glights up.
2. Place the port-a-filter of your espresso ma-
chine in the port-a-filter holder.
Grinding begins automatically.
Grinding large quantities
If you want to grind larger amounts of coffee, use
the grounds bin located in the hopper to catch the
ground coffee.
1. Remove the port-a-filter holder as shown on
p. 7.
2. Set the desired grinding time with the button f.
3. Insert the grounds bin far enough under the
spout to push the start/stop button eto trigger
the grinding operation.
DANGER

GB
ALLROUND GRINDER
9
Special functions
Double grinding time/Double shot
Your coffee grinder is equipped with an automat-
ic function for grinding coffee e.g. for a double
espresso in one step.
1. Briefly press the port-a-filter of your espresso
machine against the start/stop button eonce.
The indicator lamp gblinks, showing that the
double shot function is switched on.
2. Now push the port-a-filter of your espresso
machine into the port-a-filter holder.
Grinding of a double quantity begins auto-
matically.
This function can also be used for filter and
French Press grinding.
Switching off the function
a. After grinding, the function is automatically
switched off again.
b. Briefly press the start/stop button again.
The indicator lamp stops blinking.
Break function
With the break function you can interrupt the
grinding process (for instance to press down the
espresso powder partway through).
1. Remove the port-a-filter holder / grounds bin
during grinding.
Grinding stops and the indicator lamp blinks.
2. To continue grinding push the port-a-filter
back into the port-a-filter holder or place the
grounds bin under the spout again.
If you donot wish to continue grinding after break,
tap quickly on the start/stop button e.
Safety devices
Your coffee grinder is equipped with a variety of
safety devices which protect the user and the
grinder from harm.
Microswitch in the hopper mountin
This microswitch makes sure that the grinder
does not start without a properly attached hop-
per.
Fuse
As a protection against external power surges
the grinder is fitted with a fuse. The fuse is ac-
cessible from the footplate.
Protection through software
This safety device ensures that in the case of
overload, blockage or running empty the grinder
automatically switches off.
Grind chamber protection
There can still be tiny stones and grit even in the
most select coffee varieties. For such foreign ob-
jects not causing any damage, the grinder is fit-
ted with a safety device that stops the grinder in
such cases.
The problem is dealt with in the following way:
1. Use the grind adjustment button cto set to
maximum fineness.
2. Start the grinder.
The grinder grinds itself free.
3. Start another grind and set the desired grind
adjustment again.
If the problem is not solved with this method,
please seek help from an authorized service
partner.

GB
ALLROUND GRINDER
10
Cleaning the grinder’s surfaces and
housing
Danger of electric shock!
In combination with live parts water can
lead to electric shocks or short circuits.
– Make sure that no liquid gets into the grinder.
– Switch the grinder off and pull out the plug be-
fore cleaning.
Risk of damage
Incorrect cleaning can damage the sensi-
tive surfaces of the housing.
– If possible, use only clear water without any
cleaning agent. In the case of tenacious stains
you can use mild soapy water.
– Under no circumstances may strong cleaners,
spirits, thinners, gasolene or similar substanc-
es be used for cleaning.
1. Remove ground coffee with the brush sup-
plied.
2. Clean flat surfaces and the housing regularly
with a soft, slightly damp cloth.
Cleaning
Just as with your espresso or filter coffee ma-
chine, you should also clean your coffee grinder
(if possible every week). In particular the grinder
must be kept clean and free of deposits in order
to guarantee the accuracy of every shot.
Cleaning with GRINDZ
TM
grinder cleaner
1. Empty the hopper completely.
2. Grind all coffee beans that are still in the
grinder into the port-a-filter/ grounds bin.
3. Use button cto set the coarsest level of
fineness.
4. Put the contents of a sachet or a cap full of
GRINDZTM grinder cleaner (35 - 40 g) into the
hopper.
5. Grind the entire quantity of the grinder
cleaner (2 - 3 double shots).
6. Clean the hopper and refill it with coffee
beans.
7. Grind 2 - 3 double shots of coffee beans.
Set the level of fineness back to the desired
adjustment.
With this, all remnants of the cleaning agent
are removed and cleaning is complete.
Hint:
When GRINDZTM grinder cleaner is ground the
production of dust is normal and of no signifi-
cance. Remove dust particles with a soft cloth.
TAKE CARE
DANGER

GB
ALLROUND GRINDER
11
Cleaning the hopper
1. Empty the hopper before you remove it. Oth-
erwise coffee beans fall out at the bottom.
2. Turn the hopper slightly anticlockwise and
remove it.
3. Clean the hopper daily both internally and
externally with a moist cloth. Coffee remains
can negatively affect the taste.
Risk of damage
Do not put either the hopper or the resi-
due tray into a dishwasher. Otherwise the
color of the synthetic material could change or it
could bleach white.
Disposal of the grinder
Old appliances must not be placed
in household garbage!
Once an appliance can no longer be
used every consumer is required by
law to dispose of old appliances sepa-
rately from household garbage, for example at a
council/regional collection depot. In this way it is
guaranteed that old appliances are disposed of
appropriately and that negative effects on the en-
vironment are avoided.
For this reason, electrical appliances are marked
with the symbol shown.
TAKE CARE
GB
ALLROUND GRINDER
12
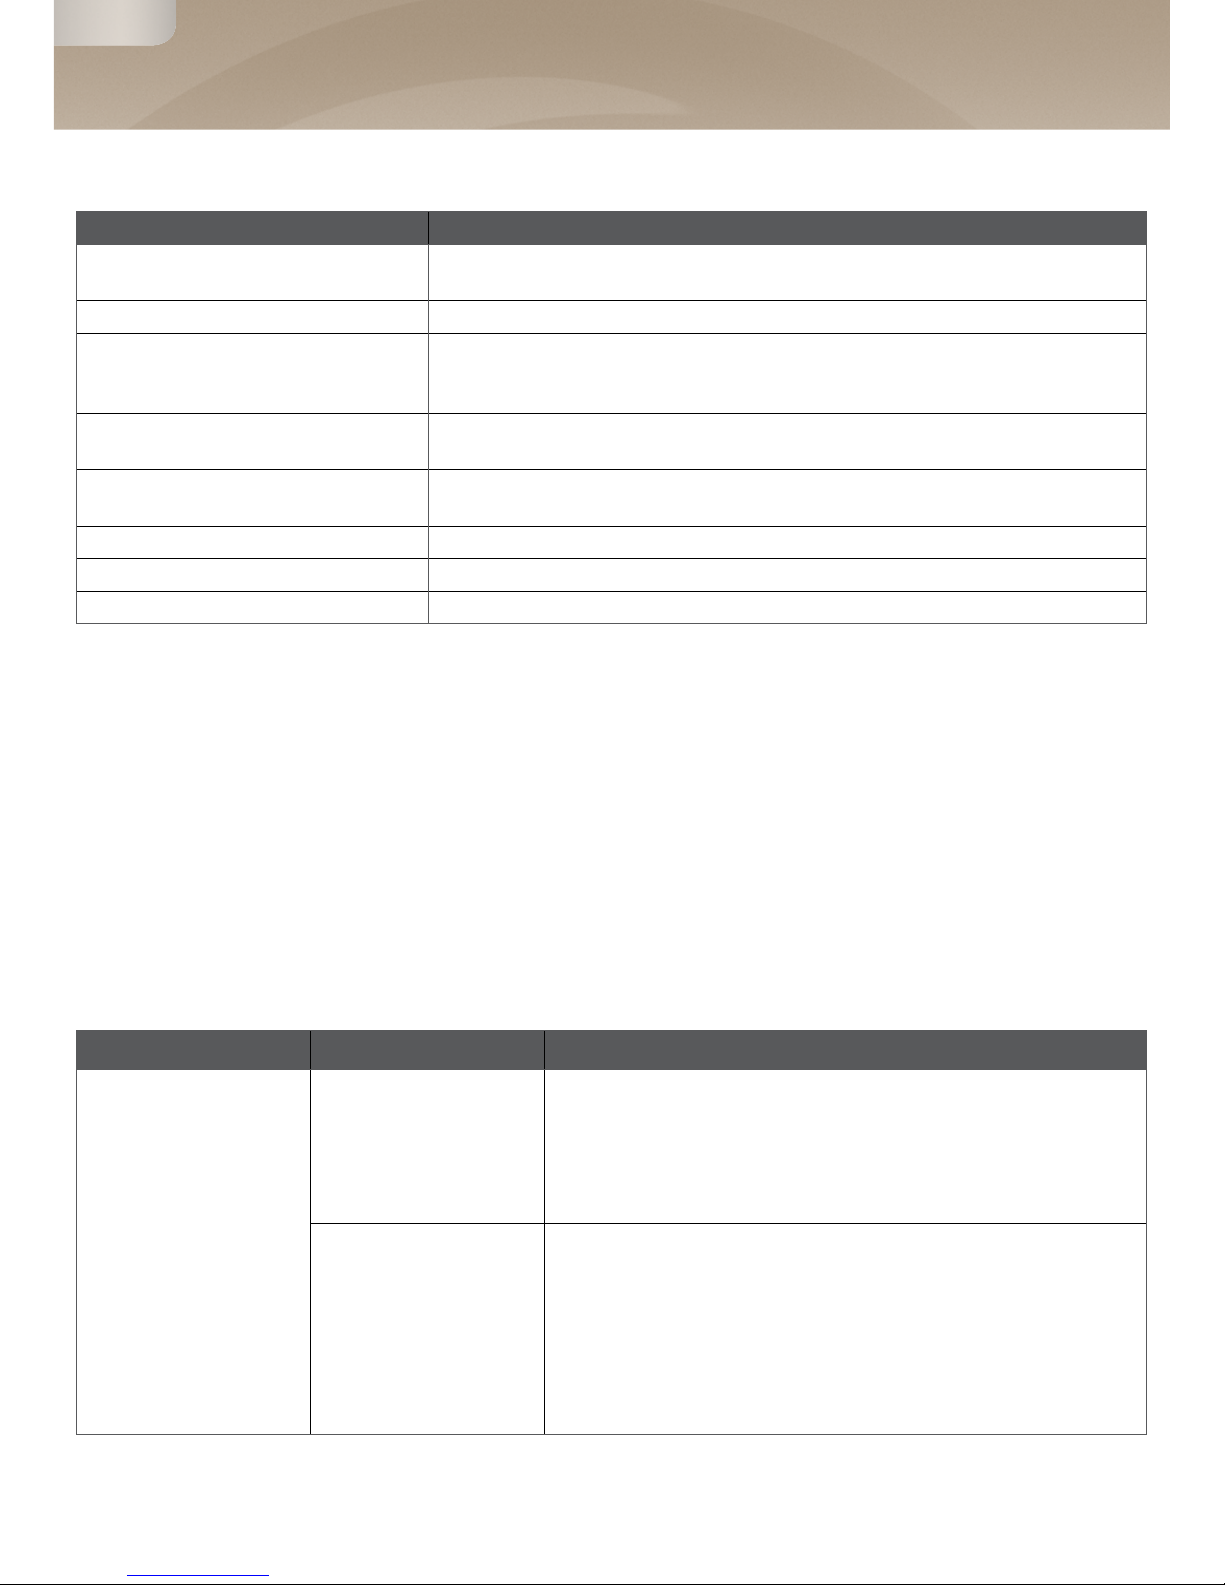
Technical data
Designation ProD
Operating voltage or 200-240V/50/60Hz (e.g. Europe)
100-115 V/50/60 Hz (e.g. USA, Canada, Japan)
Speed 1650-1850 rpm
Grinding capacity at
200-240 V; 50/60 Hz
100-115 V; 50/60 Hz
1,9-8,7 g/s (fine to coarse)
1.3-7.5 g/s (fine to coarse)
Sound pressure level 60 dB when running empty
80 dB when grinding
maximum permitted operating
time S3 20% (e.g. 6s ON, 24s OFF).
Dimensions WxHxD in mm 162 x 370 x 270
Weight 6 kg
Capacity of the hopper Approx. 260 g
Troubleshooting
The following information should help you deal with operational problems. If you are unsuccessful,
please obtain the help of an authorized service partner.
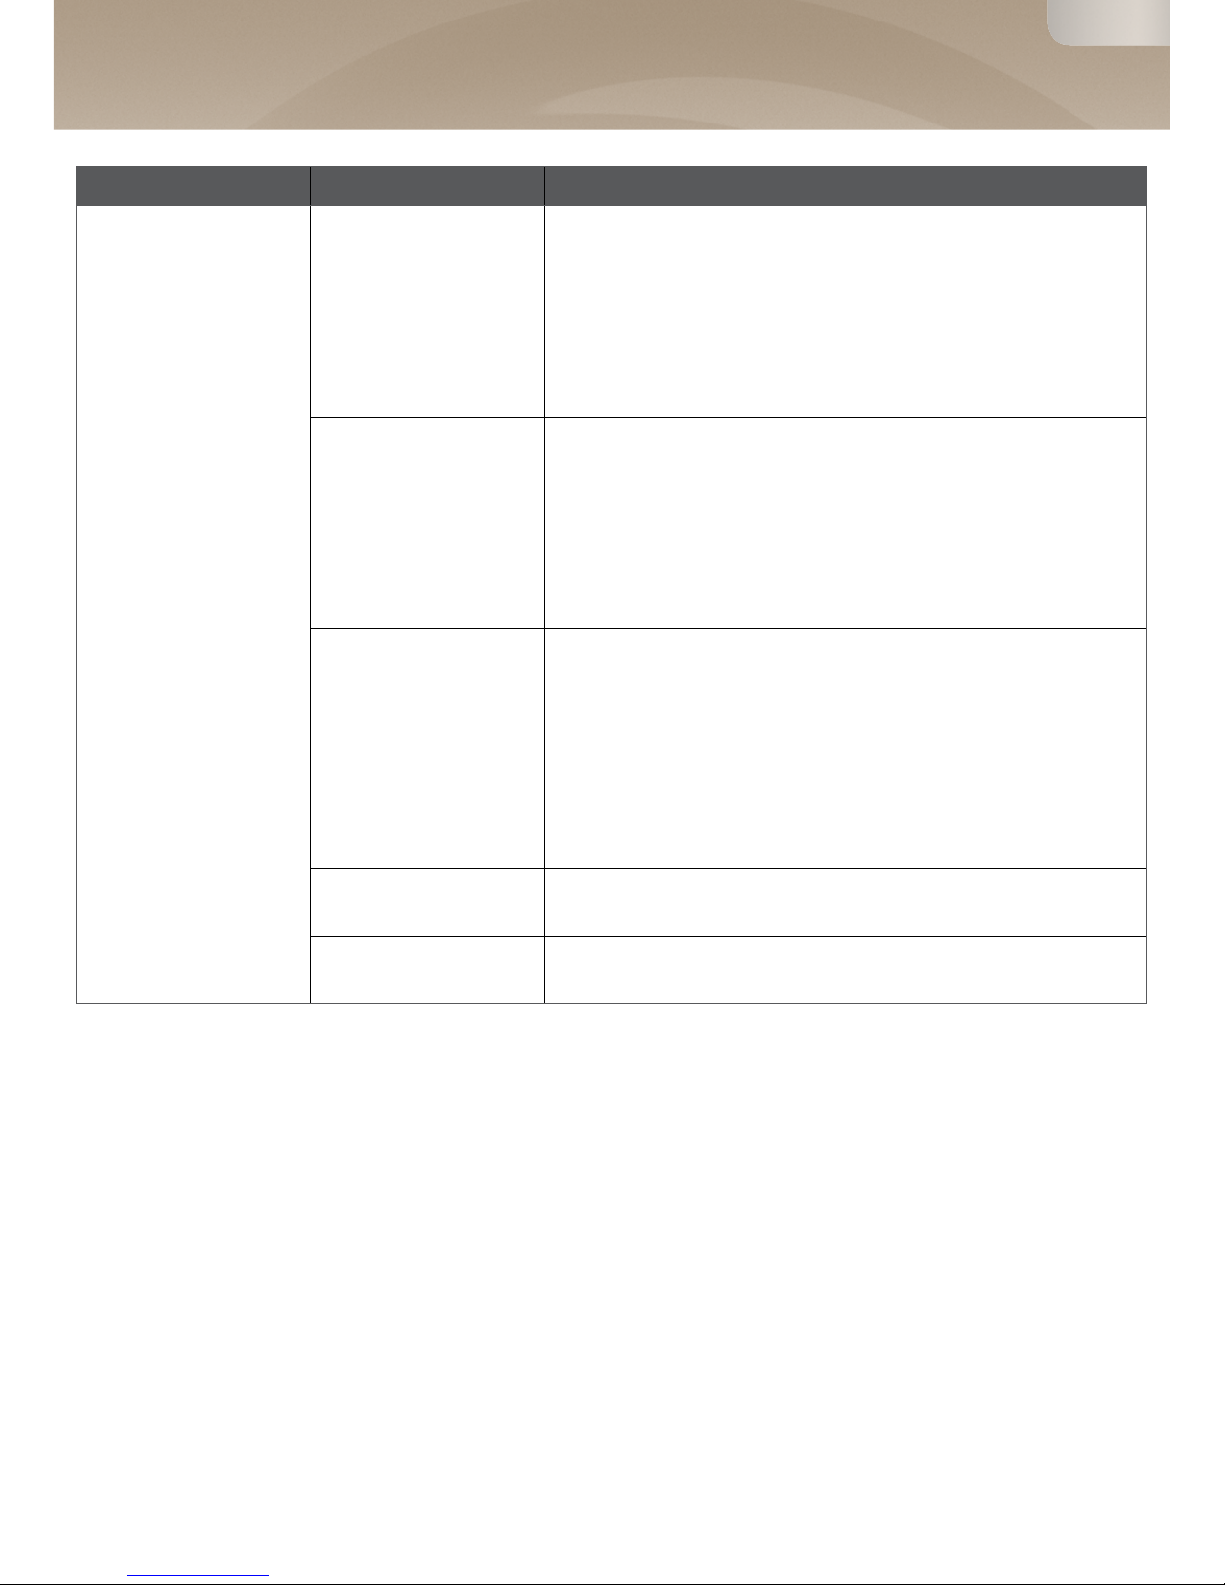
Problem Cause Solution
The grinder does
not start. The indi-
cator lamp gdoes
not light up.
The plug is not
plugged in or there
is no electricity
supply to the power
socket.
Insert the plug into the socket or plug the grinder into
another socket.
The fuse is blown. 1. Pull out the plug.
2. Using the supplied screw driver screw out the
bracket holding the fuse on the bottom of the
grinder.
3. Replace the fuse with a new one of the type
"T6/250."
4. Screw the fuse bracket back in.
GB
ALLROUND GRINDER
13
Problem Cause Solution
The grinder does
not start or runs for
only a short time.
The indicator lamp
gblinks.
The level of fine-
ness is too fine. 1. Use the adjustment button cto set to maximum
fineness.
2. Clean the spout if necessary with a spoon handle.
3. Start a grind operation.
The grinder grinds itself free.
4. Start another grind operation and set the desired
level of fineness.
The grinder spout
is blocked. 1. Clean the grinder spout with a spoon handle.
2. Use the adjustment button cto set to maximum
fineness.
3. Start a grind operation. The grinder grinds itself
free.
4. Start another grind operation and set the desired
level of fineness.
There is foreign ob-
ject in the grinder. 1. Use the adjustment button cto set to maximum
fineness.
2. Start a grind operation.
The grinder grinds itself free.
3. In the event that the foreign object cannot be
removed from the grinder in this way and continues
to block the grinder, contact your dealer/service
partner.
The hopper is not
mounted correctly. Correct the placement of the hopper (see page 6).
The hopper is
empty. Fill it with roasted, whole coffee beans.

GB
ALLROUND GRINDER
Notes
14

GB
ALLROUND GRINDER
Notes
15

GB
ALLROUND GRINDER
Ditting Maschinen AG
Länggenstrasse 34
CH-8184 Bachenbülach
Switzerland
www.dittingswiss.ch
May 2013
Änderungen vorbehalten!!
Subject to amendment!!
¡¡Se reserva el derecho a modificaciones!!
Sous réserve de modifications!!
Table of contents
Other DITTING Coffee Grinder manuals

DITTING
DITTING KE640 VARIO User manual

DITTING
DITTING KR 1203 User manual

DITTING
DITTING KS 3 User manual

DITTING
DITTING KE640 2.0 User guide

DITTING
DITTING KF 804 User manual

DITTING
DITTING KE 640 Original operating manual

DITTING
DITTING KE640 VARIO User manual

DITTING
DITTING KE640 ES User manual

DITTING
DITTING KR 804 User manual

DITTING
DITTING KR 805 User manual


