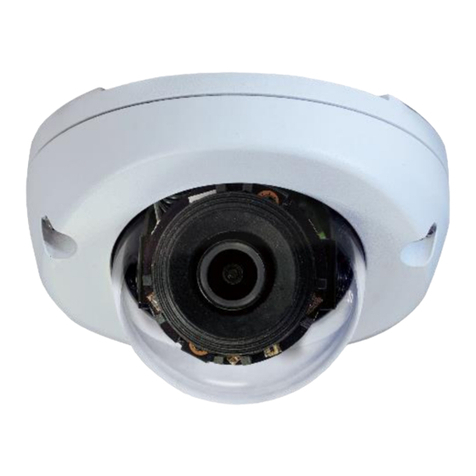
DivioTec NDR153P User manual

Published March 2018
IR Indoor Fixed Mini Dome Camera
NDR153P
User Manual
Note: The manual is subject to change without notice

Contents
Chapter 1: Product Introduction
Overview ................................................................................................1
NDR153P.............................................................................................1
Cable ..................................................................................................1
Hardware Installation ..............................................................................2
Chapter 2: Camera Configuration
Accessing the Camera’s Configuration Menu (Graphical User Interface) ..3
Installing CAM-FINDER Software ......................................................3
CAM-FINDER....................................................................................6
Introduction to the CAM-FINDER User Interface ...............................7
Button Functions..............................................................................7
Web Browser ...................................................................................8
Configuring the Camera’s Setting .........................................................10
Browsing Through the Configuration Menu.......................................11
Video - Video Configuration .................................................................12
Primary Stream 1............................................................................12
Secondary Stream ..........................................................................13
Third Stream ..................................................................................14
Image - Exposure ..................................................................................15
Configurations...............................................................................15
Day Night Setting...........................................................................17
Image - Basic Settings ...........................................................................18
Orientation ....................................................................................18
Digital Processing ...........................................................................18
Image - ROI...........................................................................................20
Configurations...............................................................................20
Image - Privacy Zone.............................................................................21
Configurations...............................................................................21
Image - OSD .........................................................................................22
General Settings.............................................................................22
Text Overlay ...................................................................................22
Network - Basic.....................................................................................23
IPv4 Settings ..................................................................................23
System Settings..............................................................................23
IPv6 Settings ..................................................................................23
RTMP Settings................................................................................24
Network - FTP.......................................................................................25
Configurations...............................................................................25
Network - SSL.......................................................................................26
SSL Configurations.........................................................................26
Certificate......................................................................................26
Network - SSH ......................................................................................27
SSH Configurations........................................................................27
Network - 802.1x..................................................................................28
802.1x Configurations ...................................................................28
Network - SNMP...................................................................................29
SNMP Configurations.....................................................................29
Network - Firewall.................................................................................30
Firewall Configurations ..................................................................30
Network - LDAP....................................................................................31
LDAP Configurations......................................................................31
Network - DDNS ...................................................................................32
DDNS Configurations.....................................................................32
Network - RTSP.....................................................................................33
RTSP Configurations.......................................................................33
Multicast (Stream 1 to Stream 3) ....................................................34
Network - GB28181..............................................................................36
GB28181 Configurations ...............................................................36
System - Date/Time...............................................................................37
Date/Time Configurations ..............................................................37
Time Setting ..................................................................................37
Time Zone Setting..........................................................................37
System - Maintenance...........................................................................38
System Information........................................................................38
Firmware Update ...........................................................................38
Backup...........................................................................................39
Restore ..........................................................................................39
Video System .................................................................................39
System - User Management ..................................................................40
Admin Setting................................................................................40
User List.........................................................................................40
User Information............................................................................41
Event - Alarm Handler...........................................................................42
Alarm Handler Configurations........................................................42
Alarm Schedule Settings.................................................................42
Event - Motion Detection......................................................................43
Motion Configurations...................................................................43
Zone1 to Zone5 Setup....................................................................43
Motion Schedule Settings...............................................................44
Event - Sabotage Detection...................................................................45
Sabotage Detection Configurations................................................45
Sabotage Schedule Settings ...........................................................45
Event - Object Detection .......................................................................46
Object Detection Configurations ....................................................46
Object Schedule Settings................................................................49
Event - FTP Upload................................................................................50
FTP Upload Handler Configurations................................................50
Remote Server................................................................................50
Event - SMTP Notification......................................................................51
SMTP Notification Handler Configurations......................................51
Trigger Event..................................................................................51
SMTP Server...................................................................................52
Recipient List..................................................................................52
Event - Network Storage.......................................................................53
Network Storage Configurations....................................................53
Trigger Event..................................................................................53
Recipient Setup..............................................................................53
Login Certificate.............................................................................54
Mount and Remove Network Storage ...........................................54
Event - Relay Handler............................................................................55
Relay Handler Configurations.........................................................55
Event - SD Record Handler ....................................................................56
SD Record Handler Configurations .................................................56
SD Information...............................................................................56
Alarm/Motion/Sabotage/Object Detection Settings .........................57
Record Type Selected: Snapshot ....................................................57
Alarm/Motion/Sabotage/Object Detection Settings .........................58
Record Type Selected: Video ..........................................................58

1
Chapter 1: Product Introduction
Chapter 1: produCt IntroduCtIon
Overview
NDR153P Cable

2
Chapter 1: Product Introduction
Hardware Installation
No. Name
1 Installation Sticker
2 Expansion Bolts
3 Mounting Screws
4 IP Camera Top-Cover Housing
1. Put the installation sticker on the ceiling.
2. Remove the base of the camera. Use expansion bolts and mounting
screws to fix the base of the camera onto the ceiling.
3. Adjust the direction of the camera to the desired field of view.
4. Put the top-cover housing of the camera back and fix it to the base on
the ceiling.

4
Chapter 2: Camera Configuration
Chapter 2: Camera ConfIguratIon
Accessing the Camera’s Configuration
Menu (Graphical User Interface)
The camera’s default IP address is 192.168.0.250, make sure the IP address
of the computer accessing the camera is on the same network subnet
before proceeding.
You can access the camera via a web browser or CAM-FINDER software.
The following information outlines the instructions for each method.
Installing CAM-FINDER Software
1. Download the CAM-FINDER installer file.Please access: http://www.
diviotec.com/index.php?tid=1603&pid=31&cid=50
2. Unzip the CAM-FINDER file to a location on the hard drive.
3. Once unzipped, double click on the setup file to start the installation
program.
4. Click the Next button on the welcome screen to continue.
Next button
Note: If CAM-FINDER is already installed, you can skip this section and
continue to the next section CAM-FINDER on page 7.

5
Chapter 2: Camera Configuration
5. Confirm the directory that the program will be installed on. To specify
a different folder, please click on the Browse button and locate the
desired installation folder.
Next button
Browse button
Disk Cost
button
User accounts
8. Click on the Next button to continue.
6. To check the available drives you can install the software to and their
available and required disk space, please click on the Disk Cost button.
7. Specify which user accounts on the computer can access the program,
the options are Everyone and Just me.

6
Chapter 2: Camera Configuration
Next button
9. Click on the Next button to begin installation.
Close button
10. Once the installation process is complete, click on the Close button to
finish. A shortcut will be created on the desktop.

7
Chapter 2: Camera Configuration
CAM-FINDER
1. Locate and open the CAM-FINDER software shortcut on the desktop.
4. You can access the menu by double clicking the camera’s IP address
under Camera List. The IE will be opened automatically.
2. When the program is launched, it will begin searching the network for
IP cameras automatically (the search will last for up to 90 seconds). You
can also manually search cameras by clicking on the Search button.
3. Once the camera is discovered, it will show the following information:
▪Model Name
▪IP address
▪MAC address
▪UUID
▪Serial Number
▪Version
Camera
List

8
Chapter 2: Camera Configuration
Introduction to the CAM-FINDER User Interface Button Functions
Preview
Control Bar
Information
Device Mark
Camera List
UI Block Description
Control Bar Contains [Search], [Assign IP], [Home Page] and [Firmware
Upgrade] buttons.
Preview Displays the selected camera image.
Information Displays the selected camera information such as Model Name,
IP, MAC, UUID, SN and Version.
Camera List
Lists the cameras discovered by the search function. Each camera
shows the “IP”, “Status”, “Model Name” and “Device
Mark”. Users can also click the column headers to sort the list.
Device Mark Asterisk sign indicates that this device has “Preview”, “Assign
IP” and “Firmware Upgrade” functions.
Function Button Description
Search Discovers IP cameras available on the network.
Assign IP Changes the IP address of the camera.
Home Page Opens the web browser to the home page of
the camera.
Firmware
Upgrade Upgrades the camera firmware.
Search
When the [Search] button is clicked, the application will start searching
cameras on the network. To stop searching, click the [Done] button.
Assign IP
When the [Assign IP] button is clicked, a pop-up window “IP Address
Configuration” will appear, providing options to use DHCP or static IP address.
Home Page
To view the home page of a particular camera, double click on the camera in
the list, the web browser will open and redirect to the home page. To access
the home page of two or more cameras, tick the box of the cameras you
wish to view and click on the [Home Page] button.
Firmware Upgrade
To update the camera firmware, tick the box of the cameras you wish to
update and click on the [Firmware Upgrade] button. Follow the on-screen
prompts to complete the upgrade. If the camera does not support firmware
upgrade, a pop-up window will be displayed.
NOTE: Different IP camera models use different firmwares, please do NOT
update the firmware of different models using the same firmware.

9
Chapter 2: Camera Configuration
Admin
1234
1. Locate and open one of the web browsers (such as Internet Explorer,
Chrome, Firefox, etc.) shortcut on the desktop.
2. In the address bar, type 192.168.0.250 (default IP address of the camera)
and then press the Enter button.
3. You will be prompted with a pop-up window asking for login
information, type in “Admin” (default login name) and
“1234” (default password)
4. Once logged in, you will see the main screen.
Web Browser
5. If no video is displayed on the screen, please make sure you have VLC
Media Player installed on the computer. If not, please download and
install it first, then you can see the video from the web browser.
Note: The recommended browsers to use are Internet Explorer,
Safari, Firefox and Chrome. However, Chrome only supports
the viewing of the web Setup menu; Live View
of the video stream is not supported.

10
Chapter 2: Camera Configuration
SetupViewerSnapshot Start/Stop
Live view Motorized Lens
Zoom Control
Buttons used to control zooming function.
Button Description
Returns the camera back to default position.
Adjusts the camera to zoom in or out.
Zoom Position
Adjusts the camera’s zoom level. Move the zoom slider bar left or right to
adjust the zoom level. The value of the zoom position will be reflected in
the text field. However, the zoom position cannot be manually entered in
the text field.
Focus Control
Adjusts the camera’s focus. To adjust the focus automatically, press the Auto
Focus button. To set the focus manually, press the to focus far objects,
and to focus near objects. The focus can also be adjusted through the
slider bar.
Zoom
Control
Focus
Control
Zoom
Slider
Snapshot
Takes a image snapshot from the camera, you will be prompted to store the
image file onto the computer’s hard drive.
Start/Stop
Press to stop the live video, press again to restart.
Viewer
Views the live video of the camera.
Setup
Options for configuring the IP camera.

11
Chapter 2: Camera Configuration
Configuring the Camera’s Setting
1. To configure the camera’s setting, click on the Setup button on the
main screen to enter the configuration menu.
Setup

12
Chapter 2: Camera Configuration
Browsing Through the Configuration Menu
The layout of the configuration menu is split into two sections. All the
camera settings are located on the left hand side of the interface, clicking
on them will open their corresponding sub-menu on the right. The following are the camera settings available on the left hand side:
▪Video
– Video Configuration
▪Image
– Exposure
– Basic Settings
– ROI
– Privacy Zone
– OSD
▪Network
– Basic
– FTP
– SSL
– SSH
– 802.1x
– SNMP
– Firewall
– LDAP
– DDNS
– RTSP
– GB28181
▪System
– Date/Time
– Maintenance
– User Management
▪Event
– Alarm Handler
– Motion Detection
– Tampering Alarm
– Object Detection
– FTP Upload
– SMTP Notification
– Network Storage
– Relay Handler
– SD Record Handler

13
Chapter 2: Camera Configuration
Primary Stream 1
Codec
Configures the format of the video stream, the options are H.265 and
H.264.
Resolution
Configures the resolution of the video stream. The available options are
2592x1944, 2048x1536 and 1920x1080.
Rate Control
Configures the Rate Control mode as CBR (constant bit rate) or CVBR
(constrained variable bit rate) for the stream. Selecting CVBR will show the
setting options for Smart ROI, Smart FPS and Smart GOP.
Smart ROI
Enables or disables Smart ROI feature. Enabling it will increase the bit rate
of moving objects and make them clearer. Bit rate of images around the
moving objects will not be modified.
Frame Rate
Adjusts the frame rate of the video stream, the range is 1~30FPS. The stream
will be off if 0is selected.
Smart FPS
Enables or disables Smart FPS feature. Enabling it will increase the FPS to
30FPS when a moving object is detected. If no moving object is detected,
FPS will be reduced to save bandwidth.
GOP Length
Configures the GOP length of the stream, the range is 1~120. Users can
enter the value or adjust it through the slider bar.
Video - Video Configuration

14
Chapter 2: Camera Configuration
Smart GOP
Enables or disables Smart GOP feature. Enabling it will allow GOP to
automatically increase when no moving objects are detected to save
bandwidth. When moving objects are detected, GOP will automatically
decrease.
Bit Rate
Configures the bit rate, the range is 64~8000. Users can enter the value or
adjust it through the slider bar.
Secondary Stream
Codec
Configures the format of the video stream, the options are H.265 and
H.264.
Resolution
Configures the resolution of the video stream. The available options are
1280x720,640x480,640x360 and 320x240.
Rate Control
Configures the Rate Control mode as CBR (constant bit rate) or CVBR
(constrained variable bit rate) for the stream.
Frame Rate
Adjusts the frame rate of the video stream, the range is 0~30FPS. The stream
will be off if 0is selected.
GOP Length
Configures the GOP length of the stream, the range is 1~120. Users can
enter the value or adjust it through the slider bar.
Bit Rate
Configures the bit rate, the range is 64~8000. User can enter the value or
adjust it through the slider bar.
Video Configuration Cont.

15
Chapter 2: Camera Configuration
Third Stream
Resolution
Configures the resolution of the video stream. The available options are
640x360 and 320x240.
Quality
Configures the video quality of the stream. The options are High, Nor-
mal and Low.
Frame Rate
Adjusts the frame rate of the video stream, the range is 1~30FPS. The stream
will be off if 0is selected.
Save
Save button to apply the configurations, click on this button once all the
settings are confirmed for the new changes to take effect.
Video Configuration Cont.

16
Chapter 2: Camera Configuration
Image - Exposure Configurations
Assists users to set up one Day profile and one Night profile.
Profile
Selects which profile (Day or Night) to configure.
AE Mode
The available options are Auto, Iris priority, Shutter priority, 50Hz, 60Hz
and Lock.
If Lock is selected, then Exposure Time Control, Gain Control and BLC cannot
be edited. Only Exposure Time can be edited (the range is 1/7~1/20000).
Adjustment
Adjusts the weighting from 0~255. Users can enter the value or adjust it
through the slider bar.
Exposure Time Control
The available options are OFF, 1/30, 1/15, 1/7.5 and User Define.
Select User Define to enter the values of Maximum Exposure Time (the
range is 1/7~1/30) and Minimum Exposure Time (the range is 1/30~1/20000)
manually.
Exposure Time
The range is 1/7~1/20000. It can only be edited when Lock is selected as
the AE Mode.

17
Chapter 2: Camera Configuration
Exposure Cont. Gain Control
The available options are OFF, Low, Medium, High and User Define.
Select User Define to enter the value of Maximum Gain (the range is
1~512) manually.
Gain
The range is 1~512. It can only be edited when Lock is selected as the AE
Mode.
BLC
Enables or disables backlight compensation function, enable this option if
an image in the camera is too dark.
WDR
Enable this function if the camera is exposed to bright backlight, glare
or high contrast lighting. The available options are OFF, Auto and 1~10
values.
AWB Mode (Auto White Balance Mode)
White balance allows the camera to produce more accurate colors under
different lighting conditions. The default setting is Auto White Balance,
which automatically adjusts the white balance to suit the current lighting
condition. You can also adjust the white balance manually through RG Gain
or BG Gain. The range is 0.00~10.00.
Defog
Enable this function to remove fog or moisture. The available options are
OFF, Low, Medium and High.
Noise Reduction
Enable this function to reduce noise. The available options are OFF and
1~11.

18
Chapter 2: Camera Configuration
Exposure Cont. Day Night Setting
Image Profile
Select Day or Night profile to automatically set up parameters quickly. The
available options are AUTO, Force Day and Force Night.
Day Night Control
Select the Day and Night control mode. The available options are AUTO,
Force Day, Force Night and Switch Schedule.
IR Control
Select the IR control mode to use. The available options are High, Medium
and Low.
IR Cut Control
Select the IR cut control mode to use. The available options are Auto, Force
Day and Force Night.
Save
Save button to apply the configurations, click on this button once all the
settings are confirmed for the new changes to take effect.
Note: To make configuration simple and fast, please set the day or night
profiles first, then go to “Day Night Setting” and select the profile to use.
Table of contents
Other DivioTec Security Camera manuals

DivioTec
DivioTec NBR225P User manual

DivioTec
DivioTec TBR722 User manual

DivioTec
DivioTec TBR925 User manual

DivioTec
DivioTec NDM362 User manual

DivioTec
DivioTec TDR751 User manual

DivioTec
DivioTec TBR721 User manual

DivioTec
DivioTec NBR124 User manual

DivioTec
DivioTec NDR154P User manual

DivioTec
DivioTec TBR922 User manual

DivioTec
DivioTec NBR525P User manual