dji Ronin-MX User manual

©2016 DJI. All Rights Reserved.
RONIN-MX User Manual
V1.0 2016.04

©2016 DJI. All Rights Reserved.
Disclaimer and Warning
Congratulations on purchasing your new DJI product. The information in this document affects your
safety and your legal rights and responsibilities. Read this entire document carefully to ensure proper
configuration before use. Failure to read and follow instructions and warnings in this document may result
in serious injury to yourself or others, or damage to your DJI product or damage to other objects in the
vicinity. This User Manual and all other collateral documents are subject to change at the sole discretion
of DJI. For up-to-date product information, visit http://www.dji.com and click on the product page for
this product.
Do not modify or adjust the Ronin-MX
The Ronin-MX has been calibrated before it leaves the factory. No modification or adjustment of the
Ronin-MX is required or recommended. Be sure to use the original battery, otherwise performance may
be hindered and internal malfunctions or damage may occur. Please download the corresponding
Assistant software.
By using this product, you hereby signify that you have read this disclaimer and warning carefully and
that you understand and agree to abide by the terms and conditions herein. You agree that you are solely
responsible for your own conduct while using this product, and for any consequences thereof. You agree
to use this product only for purposes that are proper and in accordance with all applicable laws, rules,
and regulations, and all terms, precautions, practices, policies and guidelines DJI has made and may make
available.
DJI accepts no liability for damage, injury or any legal responsibility incurred directly or indirectly from
the use of this product. The user shall observe safe and lawful practices including, but not limited to,
those set forth in this User Manual.
Using this Manual
Before You Begin
The following documents have been produced to help you safely operate and make full use of your Ronin-
MX:
Ronin-MX Quick start Guide
Ronin-MX User Manual
Ronin-MX Intelligent Battery Safety Guidelines
Check all of the included parts listed in the In the Box section below. Read this entire User Manual and
watch the informational and tutorial videos on the product page of DJI’s official website
(http://www.dji.com*****). Read the disclaimers and warnings above to understand your legal rights and

©2016 DJI. All Rights Reserved.
responsibilities. If you have any questions or problems during the installation, maintenance or use of this
product, please contact DJI or a DJI authorized dealer.
Download DJI Ronin Assistant App
Download and install the DJI Ronin Assistant App.
Search “DJI Assistant” on the App Store and then follow instructions for iOS installation.
Search “DJI Ronin” on Google Play and then follow instructions for Android installation.
For the best experience, use a mobile device that runs iOS 7.1 or Android 4.3, or a later version.
Contents
Disclaimer and Warning.....................................................................................................................1
Using this Manual..............................................................................................................................1
Introduction.......................................................................................................................................3
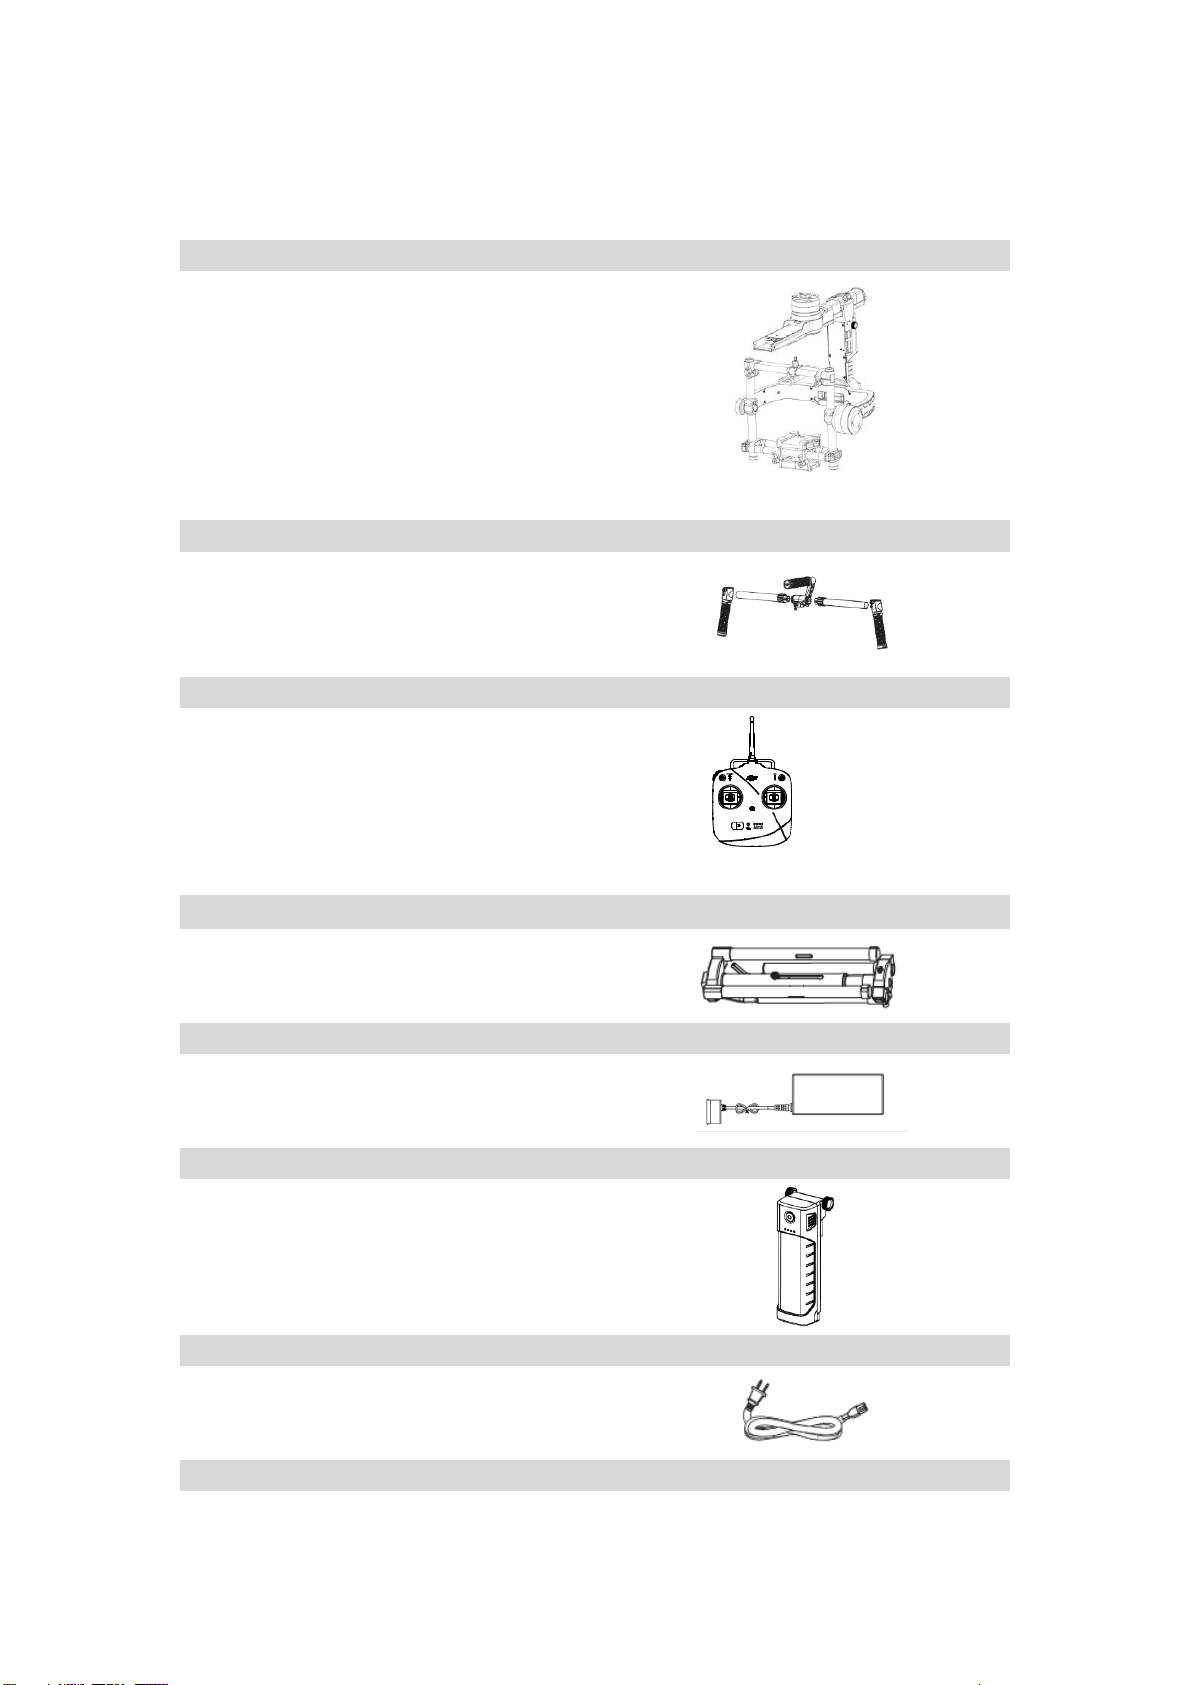
In the Box ..........................................................................................................................................4
Ronin-MX Diagram.............................................................................................................................6
Getting Started ..................................................................................................................................7
Tuning Stand..............................................................................................................................7
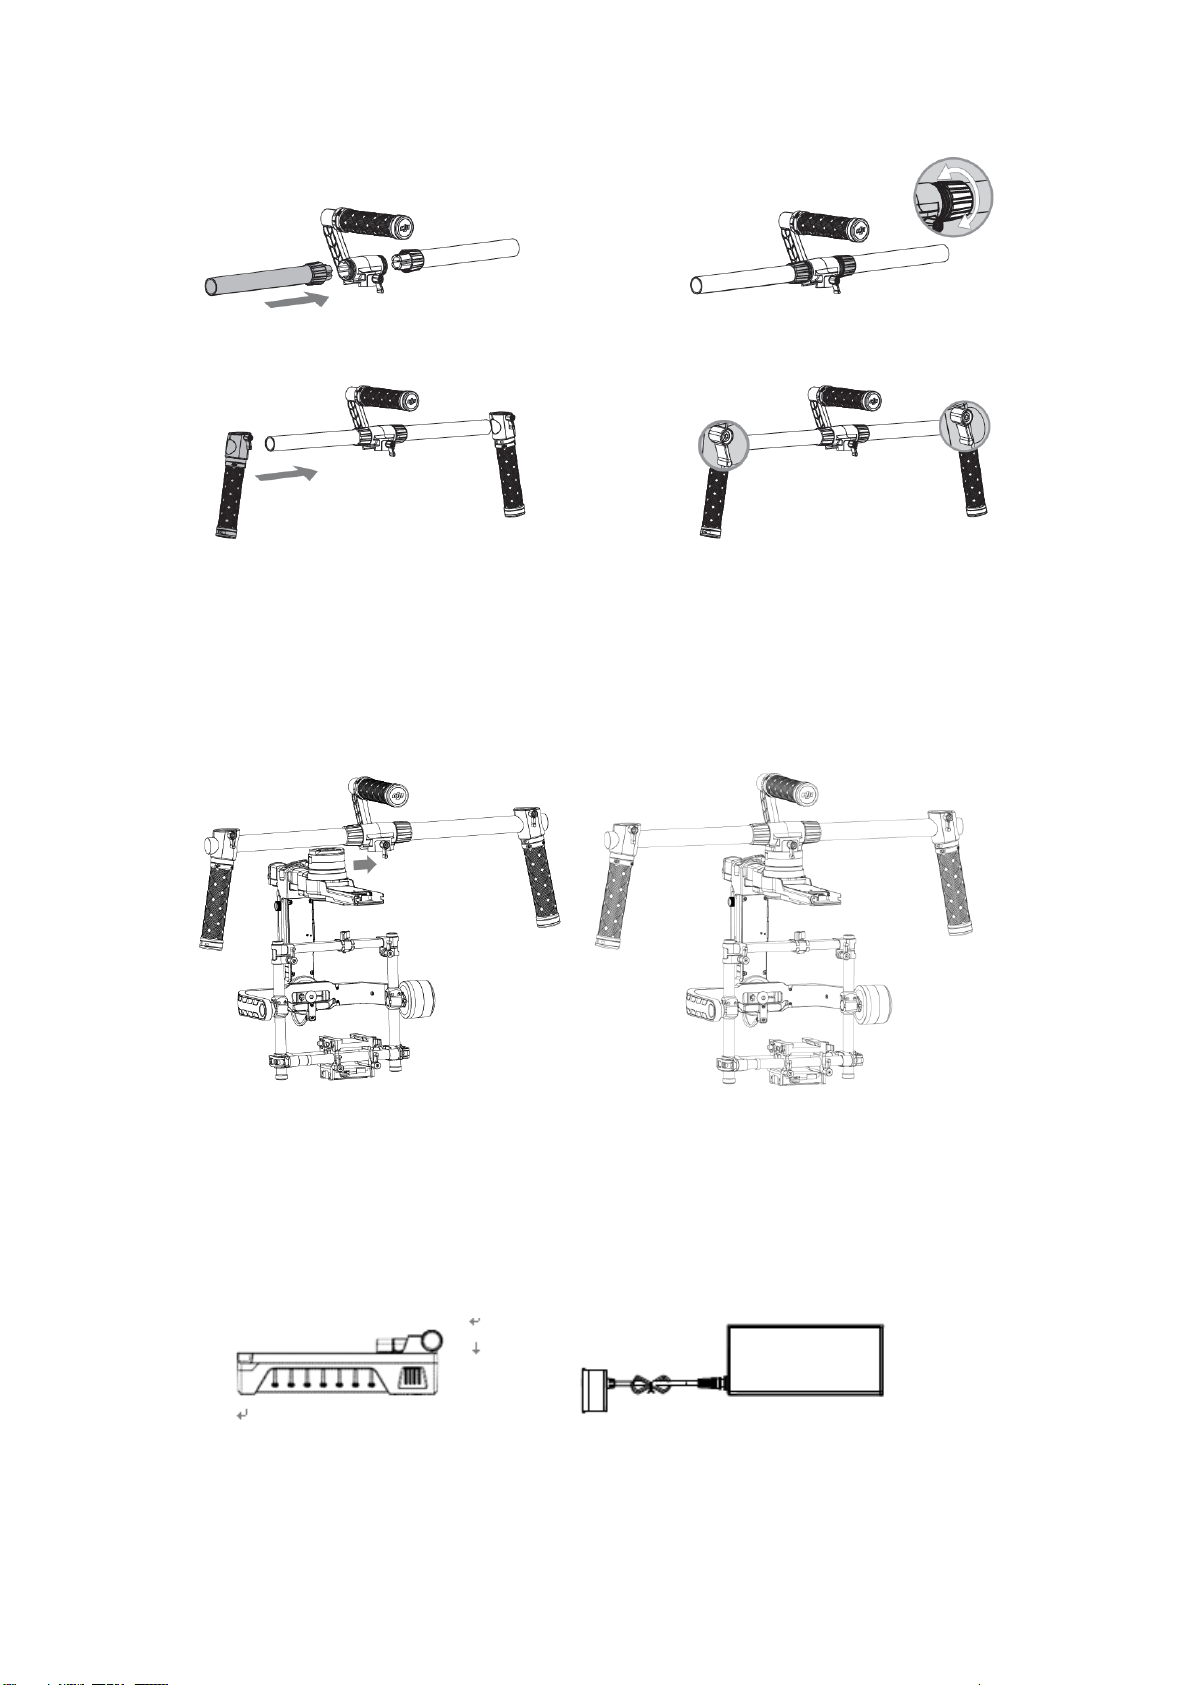
Assembling the Handle Bar........................................................................................................7
Installing the Handle Bar onto the Gimbal.................................................................................8
DJI Intelligent Battery ................................................................................................................8
Charging the DJI Intelligent Battery ...................................................................................9
Using the DJI Intelligent Battery.......................................................................................10
DJI Intelligent Battery Installation ....................................................................................10
Mounting the Camera .............................................................................................................11
Camera Size Requirements ..............................................................................................11
How to mount the camera...............................................................................................12
Configuring the Handle Bar .....................................................................................................13
Balancing .........................................................................................................................................14
Step 1: Balancing the Vertical Tilt ............................................................................................14
Step 2: Balancing the Roll Axis .................................................................................................14
Step 3: Balancing the Tilt Axis..................................................................................................15
Step 4: Balancing the Pan Axis.................................................................................................15
Advanced Roll Adjustment.......................................................................................................16
Tuning and Operation for Handheld Usage......................................................................................16
DJI Ronin-MX Assistant App Tuning .........................................................................................16
Download and Install .......................................................................................................16
Basic Settings...................................................................................................................17
Advanced Settings ...........................................................................................................19
DJI PC / MAC Assistant Tuning .................................................................................................24
Install DJI PC / MAC Assistant...........................................................................................25
Settings............................................................................................................................26
Remote Control Operation ......................................................................................................32
Remote Control Diagram .................................................................................................32
Connecting the Remote Control to the Ronin-MX ...........................................................32

©2016 DJI. All Rights Reserved.
Remote Control Power LED Indicator Status....................................................................33
Remote Control Battery Level Indicator Status ................................................................33
Remote Control Features.................................................................................................34
Operation Modes ....................................................................................................................34
Underslung Mode............................................................................................................34
Upright Mode ..................................................................................................................35
Briefcase Mode................................................................................................................35
Using with Matrice 600 ...................................................................................................................36
Mounting the Ronin-MX onto Matrice 600 .............................................................................36
DJI GO App Tuning ...................................................................................................................38
Remote Controller Operation ..................................................................................................40
Adding a Third-Party Transmitter/Receiver......................................................................................41
Maintenance ...................................................................................................................................41
Troubleshooting...............................................................................................................................42
Specifications...................................................................................................................................43
Compliance Notice ..........................................................................................................................44
FCC Compliance Notice ...........................................................................................44
RF Exposure Information .........................................................................................44
IC RSS Warning.........................................................................................................45
KCC Warning Message .............................................................................................45
NCC Warning Message ............................................................................................45
EU Compliance Statement.......................................................................................46
Introduction
Developed for filmmaking professionals, the DJI Ronin-MX marks a generational leap forward in
camera stabilization technology, it is designed for handheld use and can be mounted to a DJI Matrice
600 aircraft for capturing amazing footage from the air. It also support to be used on vehicle, Jib or
Wirecam. The technology built into the DJI Ronin-MX allows a broad spectrum of cameras, of varying
sizes and weights, to be stabilized during filming.
Using with the DJI SRW-60G, the Ronin-MX can rotate 360 degrees continuously while obtaining the
HD video link. It can also be connected to DJI Lightbridge 2 during aerial shot for video link. The
Ronin-MX is compatible with DJI Focus, too.
A brushless gimbal stabilization system is not simply three brushless motors moving on three axes.
The motors work with position feedback and the IMU (Inertial Measurement Unit) to communicate
with DJI’s custom 32-bit processor, which processes movement calculations in milliseconds. This
reduces angular vibration to less than 0.02˚of translated movement, meaning that the camera will
remain perfectly steady. The Ronin-MX can be used in different operation modes: underslung mode,
upright mode, briefcase mode and so on.

©2016 DJI. All Rights Reserved.
In the Box
Gimbal x1
The gimbal includes built-in DJI motor drive
modules, an independent IMU module, a 32-
bit DSP processor, a power supply module, a
Bluetooth module, a transmitter/receiver
module, a camera shelf, a power breakout box
and slip ring.
Handle Bar x1
Customizable handle bar for the gimbal. The
handle bar is assembled from five parts,
including a top handle, two handle bars and
two grips.
Remote Control –2.4 GHz x1
Control the gimbal’s movements, switch work
modes, and select gimbal speed.
Ronin-MX
Tuning Stand x1
For suspending or storing the gimbal.
Charger x1
Automatic switching charger 100-240V
DJI Intelligent Battery x2
Power source for the gimbal.
Supplies power for other external devices.
Cable Pack x1
ANSI cable
JIS or CE cable (varies by region)
Micro USB Cable x1

©2016 DJI. All Rights Reserved.
For firmware upgrades.
CAN Cable x1
For connecting the gimbal and Matrice 600.
Camera Mounting Plate x1
For mounting your camera onto the gimbal.
Camera Upper Mounting Plate x1
For mounting your camera onto the gimbal.
Vibration Absorber x1
For mounting the gimbal onto the Matrice 600.
Accessories Package
Camera Screw A (1/4”) x2
Camera Screw B (3/8”) x2
Camera Screw C (1/4”) x2
Camera Screw D (3/8”) x2
Lens Support Screw x1
Lens Support x1
Allen Wrench x3 (2 mm, 3 mm, 3/16”)
Vibration Absorber Screw X1
Camera Upper Mounting Plate Screw x2

©2016 DJI. All Rights Reserved.
Ronin-MX Diagram
[1] Top Handle Bar
[2] Side Handle
[3] Gimbal Connector
[4] CAN2 Bus Port
[5] Pan Motor
[6] DJI Intelligent Battery
[7] Pan Adjustment Slider
[8] Intelligent Battery Power Distributor Mounting Plate (optional)
[9] D-BUS Receiver Port
[10] USB Port & CAN1 Bus Port
[11] Bind Button
[12] Gimbal LED Indicator Light
[13] Camera Upper Mounting Plate
[14] Roll Motor
[15] Tilt Motor
[16] Fore and Aft Adjustment
[17] Tilt Vertical Adjustment

©2016 DJI. All Rights Reserved.
[18] Roll Adjustment
[19] IMU Port
[20] P-TAP Accessory Power Port
[21] USB Accessory Power Port
[22] P-TAP Port (rear side)
[23] DJI Lightbridge Port (rear side)
[24] GCU Port (rear side)
Getting Started
Tuning Stand
You can use the tuning stand to hold the Ronin-MX during setup or for storage. To unfold the tuning
stand, follow the steps below.
1. Hold the stand in the upright position as shown in the picture below.
2. Press the buttons [1] on the outsides of the lower legs and rotate the legs downwards, away from
the stand. Then press the buttons [2] on the outsides of the upper support arms and pull them
upwards, away from the stand. Press the button [3] on the vertical support and slide it up to extend
the stand, as shown.
3The upper half of this tuning stand can be removed by loosening the knob on the rear of the stand.
You can use it with any C-stand style stud that fits into the hole where the support arms converge.
When mounting this section to a C-stand, always be sure to check the balance of the stand so that
the Ronin-MX, if it is fitted with a camera, does not tip over.
When setting on a table, make sure the table is flat and level.
Assembling the Handle Bar
1. Attach the handle bars to both sides of the top handle by tightening the grip screws.

©2016 DJI. All Rights Reserved.
2. Attach the grips to the handle bar and lock them in the preferred position.
Installing the Handle Bar onto the Gimbal
1. Place the handle bar in position, as shown below, then slide it horizontally into the gimbal and
tighten the knob.
2. Holding the gimbal by the grips, make sure that the gimbal is not obstructed during a 360
degree pan. The installation is complete.
DJI Intelligent Battery
Before you start using your Ronin-MX, be sure to charge the battery. The DJI Intelligent Battery was
specially designed for the Ronin-MX. It has a capacity of 1580 mAh, a voltage of 14.4 V, and a variety
of power management functions. Only charge the DJI Intelligent Battery with DJI approved charger
(MODEL BC235144015). When the DJI Intelligent Battery is fully charged, the Ronin-MX has a
maximum run-time of three hours.
DJI Intelligent Battery Charger

©2016 DJI. All Rights Reserved.
DJI Intelligent Battery Functions
Balanced Charging
Automatically balances the voltage of each battery cell
during charging.
Battery Level Display
Displays current battery levels
Overcharge Protection
Charging stops automatically when the battery voltage is
too high.
Over-Discharge Protection
Discharging stops automatically when battery voltage is
too low.
Short-Circuit Protection
Automatically cuts power supply when a short circuit is
detected
Sleep Protection
Sleep mode is activated after 20 minutes of inactivity,
saving power
Charging Temperature
Detection
The battery will charge only when the temperature is
between 0 ˚C and 55˚C
Battery Specifications
Type
LiPo
Capacity
1580 mAh
Voltage
14.4 V
Charging Environment Temperature
32°to 104°F (0° to 40°C)
Operating Environment Temperature
14°to 104°F (-10° to 40°C)
Charging/Discharging Environment
Relative Humidity
<80%
● Read the user manual, disclaimer, and battery safety guidelines before use. Users
take full responsibility for all operations and usage.
● Always use DJI approved chargers. DJI takes no responsibility for any consequences
resulting from the use of non-DJI approved chargers.
Charging the DJI Intelligent Battery
1. Connect the charger to a wall socket (100-240V, 50/60Hz).
2. Connect the DJI Intelligent Battery to the charger.
3. The battery level indicator lights display the current charge level as the DJI Intelligent Battery
charges.
4. The DJI Intelligent Battery is fully charged when the battery level indicator lights turn off.
Disconnect the battery from the charger when charging is complete.

©2016 DJI. All Rights Reserved.
Using the DJI Intelligent Battery
[1] Battery Level Indicators
[2] Power Button (with LED indicator)
[3] Thumb Screws
Checking the
Battery Level
When the DJI Intelligent Battery is turned off, pressing the battery power
button once will display the current battery level.
Powering On
When the DJI Intelligent Battery is turned off, press and hold the power
button for 1 second to turn on the DJI Intelligent Battery.
Powering Off
When the DJI Intelligent Battery is turned on, press and hold the power
button for 1 second to turn off the DJI Intelligent Battery.
DJI Intelligent Battery Installation
1. Loosen the screws on either side of the DJI Intelligent Battery. Slide the DJI Intelligent Battery
directly into the gimbal and then slide it down. Be sure the battery’s thumb screws go fit into
their locating slots, so that the DJI Intelligent Battery makes full contact with the gimbal’s
electrical leads.
2. Tighten the screws on the DJI Intelligent Battery to lock it in place.
● Make sure the DJI Intelligent Battery is turned off during installation.

©2016 DJI. All Rights Reserved.
● An incorrectly installed battery may lead to (1) Poor battery connection, or
(2) Unavailable battery information.
3. Mount the Intelligent Battery Power Distributor with an Intelligent Battery here to supply power
for your camera or other accessories, if needed.
Mounting the Camera
The Ronin-MX uses an adjustable camera mounting plate that allows you to easily balance, install,
and remove the camera. The Ronin-MX has been tested with the following types of cameras.
Other cameras similar in size and weight may also be compatible.
Black Magic Cinema Camera
Canon 5D MK III
Nikon D800
Black Magic Pocket Cinema Camera
Canon 6D
Panasonic GH3
Canon 1Dc
Canon 7D
Panasonic GH4
Canon 5D MK II
Canon C100
Sony Alpha 7
RED EPIC
ARRI ALEXA Mini
Camera Size Requirements
The maximum depth from the center of gravity on the camera base plate is 120 mm. The
maximum height, measured from the top of the camera base plate, is 130 mm. The maximum
width is 160 mm.
●Make sure the camera is powered off during installation.
● It is recommended to use soft connection cables to avoid obstructing camera
movement.

©2016 DJI. All Rights Reserved.
How to mount the camera
1. Attach the camera mounting plate to your camera using the provided camera screws A, B, C or
D. Choose the correct screw holes according to your camera’s configuration. Some cameras
have two tripod mounting holes. If two mounting holes are available on your camera, use them
both. Secure the camera as firmly as possible.
2. Install the lens support by gently pushing it up, so that it is applying light pressure to the lens.
Then tighten the thumbscrew.
Note: Camera screws A and B only fit the holes of the mounting plate, while camera screws C and D
only fit the slot of the mounting plate. Be sure to use the correct 1/4" or 3/8" screws.
Why do you need to use a lens support?
Certain cameras have a very tight lens securing system, and some cameras such as the
Canon 5D MKII and MKIII have very loose lens securing systems. The Ronin-MX balances
the camera as one solid unit. If the mounted camera has a loose lens securing system, the
lens support must be used. This is because a loose connection between the lens and the
camera body may allow vibrations that travel through to the camera but not directly to
the lens, resulting in the two masses shaking at different frequencies. The resulting
oscillations will be transmitted to the IMU, causing the whole gimbal to shake. If the lens
support fits, it's best to use it at all times.
● The lens support can be installed facing outward or inward to accommodate different
lens types.
● Ensure alignment of the camera base plate and then tighten the mounting screw, before
tightening the lens support.
3. Mount the Camera Upper Mounting Plate to the top of the camera through the hot shoe and
then tighten it.

©2016 DJI. All Rights Reserved.
4. With the gimbal facing outward on the tuning stand, slide the mounting plate into the receiver
until the safety lock engages. Adjust the vertical position of the cross bar to meet the camera
upper mounting plate.
5. When the camera achieves a rough balance, tighten the camera base side clamp and the lock -
knob.
Note: You can adjust the tightness of the clamp with an M3 Allen wrench.
Configuring the Handle Bar
The customizable handle bar of the Ronin-MX can be removed, if necessary. Loosen the two grip
screws where the handle bar meets the gimbal then remove the grips from the handle bar. You can
remove one or both sides of the handle bar. The resulting configuration is shown below.

©2016 DJI. All Rights Reserved.
Balancing
To obtain the best performance from the Ronin-MX, proper balancing is a must. Accurate balance is
critical for shots where the Ronin-MX will be subjected to extreme movements or accelerations
(running, horseback riding, biking, car mounts, helicopters, etc.) Proper balance will also offer a
longer battery runtime. There are three axes that need to be accurately balanced prior to turning
on the Ronin-MX and setting up the software.
The camera needs to be fully configured, with all accessories, prior to installing and
balancing the camera on the gimbal. If the camera has a lens cap, be sure to remove it
prior to balancing. Be sure that the Ronin-MX’s power is turned off while balancing the
camera.
Step 1: Balancing the Vertical Tilt
To adjust the vertical balance, you will need to change the camera’s vertical position. Adjust the
height of the crossbar to achieve vertical tilt balance.
1. Rotate the Tilt Axis so that the camera lens is pointing upward, then loosen the two vertical
adjustment tabs and the lock-knobs on the top cross bar.
2. Gently slide the camera mount crossbar forwards or backwards until the camera points upwards
when released.
3. Tighten the tabs and lock-knobs, then manually rotate the assembly, simulating tilt, to ensure
there is no binding in the tilt motor. When proper balance is achieved, you can rotate the
camera to any tilt angle and it will stay in that position (while holding the roll axis in position).
Ensure that the measurement marks match up on both of the vertical bars. If they do not
match up, the assembly could possibly be skewed higher or lower on one side, which
would cause the tilt motor to bind.
Step 2: Balancing the Roll Axis
Balancing the camera, from left to right, on the Roll Axis is also required. When the proper left/right
roll balance is achieved, the camera will remain level.
1. Loosen the three lock-knobs to allow the camera and mounting plate to slide left and right.
2. Slide the camera left or right until the Roll Axis remains level.
3. Tighten the three lock-knobs to lock the camera mounting plate in position.

©2016 DJI. All Rights Reserved.
When adjusting the roll balance position of the camera, only loosen the two lock-knobs a
few turns to allow the camera base to slide. Do not loosen the lock-knobs excessively.
Step 3: Balancing the Tilt Axis
1. Loosen the camera base's side clamp and the lock-knob on the cross bar to allow the camera
and mounting plate to slide forwards and backwards.
2. Slide the camera forwards or backwards until the tilt axis remains level. Only very small
adjustments are required to achieve the proper balance.
3. Tighten the side clamp to lock the camera and mounting plate in position. When the proper
fore and aft tilt balance is achieved, the camera will stay level when you remove your hand
(while holding the roll axis in position).
Step 4: Balancing the Pan Axis
To achieve the pan axis balance, you must adjust the pan axis slide.
1. Open the clamp [1] on the pan axis and turn the knob [2] to slide the assembly. Identify if the
Ronin-MX is front heavy or rear heavy. Rotate the Ronin-MX on the stand so one side is higher
than the other, if the front end rotates from the higher position to the lower position and that
means the Ronin-MX is currently front heavy, then you will need to slide the gimbal backward,
otherwise you need to slide the gimbal forward.
2. Tighten the clamp after balancing is completed. While the Ronin-MX is resting on the tuning
stand, try rotating the Ronin-MX. If the camera does not swing, the pan axis is properly
balanced.

©2016 DJI. All Rights Reserved.
Advanced Roll Adjustment
If additional roll adjustment is needed in cases where the camera itself is too light in comparison to
the tilt motor assembly, advanced roll adjustment can be achieved by loosening the indicated screws
and pushing the assembly to the right or left.
Tuning and Operation for Handheld Usage
DJI Ronin-MX Assistant App Tuning
After balancing the mechanism, you can fine tune the balance by adjusting software parameters in
the DJI Assistant app, and configure your Ronin-MX.
Download and Install
1. Download the DJI Assistant app.
For the iOS version, search “DJI Assistant” in the App Store, then follow the installation instructions.
Search “DJI Ronin” in Google Play, then follow the installation instructions for the Android version.
2. Ensure that Bluetooth is enabled on your mobile device and orient the camera in the standard
operating position (facing forwards). Turn on your Ronin-MX, then launch the DJI Assistant App.
3. When using the DJI Assistant app for the first time, you will be prompted to register using a valid
e-mail address.
4. Connect your device to the Ronin-MX by following the step-by-step instructions in the DJI

©2016 DJI. All Rights Reserved.
Assistant app. After connecting to the gimbal’s main control, you will see the Wizard menu. When
the indicator at the top of the screen displays solid green and the blue light is blinking, the
connection is complete. The green LED on the Ronin-MX will also light up.
5. Activation is required when use the Ronin-MX for the first time, otherwise the gimbal will not
work. To activate your Ronin-MX, connect your mobile device to Internet, then enter the ‘More’
page in the DJI Assistant app and tap the ‘Activate’ button.
● After enabling Bluetooth on your mobile device, return to the DJI Assistant app to
connect to the Ronin-MX. The Ronin-MX will not appear in the mobile device’s
Bluetooth device list. It can only be connected via the DJI Assistant app.
●The iOS version and Android version of the DJI Assistant app functions are the same.
Assistant pages shown in this manual are from the iOS version.
Basic Settings
The functions accessible in the Wizard are the most basic functions you may want to adjust upon
receiving your Ronin-MX. These options are also the most frequently used functions during
standard operation. You can adjust all of these settings in the Wizard menu.
1. Calibrate
Auto Tune Stability provides an easy one-touch button for automatic configuration of each axis. The
trajectory, speed, power, and stiffness of motors are automatically tuned for the camera
configuration that is mounted. Auto Tune Stability should be tapped whenever a new camera
configuration is mounted or whenever the lens or accessories are changed. This will ensure stability
and provide ideal calibration settings.
2. Live Data
This data represents the feedback from each motor axis. If a particular motor axis indicates a power
reading greater than 10, this often means the mechanical balance of the camera hasn’t been
properly adjusted. A properly balanced camera rig will display readings close to 0 power on each
axis, but these values may vary. The angle reading indicates the current angle of each axis is in
relation to center.

©2016 DJI. All Rights Reserved.
3. Briefcase Mode
When Briefcase Mode is switched on, the Ronin-MX will be able to seamlessly transform into this
operation mode. With Briefcase Mode turned off, the Ronin-MX will allow the camera to roll when
the Ronin-MX is tilted past the standard roll axis parameters.
4. SmoothTrack Mode
When SmoothTrack Mode is enabled, the Ronin-MX will can be "steered," on the selected axis, by
the camera’s operator. The steering/translation speed can be adjusted for each axis independently.
When the Ronin-MX's top bar is rotated left or right, the camera will move, smoothly following the
user’s input, and stop at the appropriate angle. In the SmoothTrack options menu, the settings for
the pan axis, roll axis and the tilt axis can be independently adjusted.
The speed will determine how fast the camera will travel while translating a pan/roll/tilt movement.
Deadband will determine how much movement the gimbal will tolerate prior to translating the
camera’s pan/roll/tilt.
The Acceleration determines how closely the camera will follow the translated pan/tilt/roll
movement.
When mounting a heavy camera (such as RED) on the Ronin-MX, the Acceleration should be
adjusted properly. If the acceleration is too large, the camera could not stop steady due to the inertia.
If the acceleration is too small, the SmoothTrack speed of the gimbal could not reach at the
maximum speed.
The SmoothTrack pan, roll, and tilt speed can be tested. Ensure there is no obstruction of the
camera before tapping the test button.
5. Control Speed Adjustment
The remote control speed can be adjusted here. This setting represents the maximum speed in the
pan and tilt axis when the remote control sticks are pushed all the way in any given direction.

©2016 DJI. All Rights Reserved.
Advanced Settings
There are more advanced functions you can adjust through the Assistant to meet your requirements.
Gimbal Menu
1. Motor Adjustment
It is highly recommended to choose the Camera Type (SLR Camera or RED Camera) to obtain best
Stiffness, Strength, Outfilter and Control value.
The Auto Tune Stability button allows for automatic adjustment of each motor’s stiffness (as relayed
from the sensors and interpreted by the Ronin-MX) to accomplish an optimized setting. Besides the
stiffness, there are other electronic settings being tuned.
Other manuals for Ronin-MX
2
Table of contents
Other dji Camera Accessories manuals

dji
dji Zenmuse X5R User manual

dji
dji OM 4 User manual

dji
dji MATRICE 30 Series Instruction Manual

dji
dji RONIN 2 User manual

dji
dji Ronin User manual

dji
dji Zenmuse Z15-A7 User manual

dji
dji MG-12000P User manual

dji
dji mavic Instruction Manual

dji
dji OSMO MOBILE 3 User manual

dji
dji Zenmuse Z15-BMPCC User manual