dji Enterprise X-Port User manual

V1.0 2020.03
User Manual
DJI ENTERPRISE X-PORT

Searching for Keywords
Search for keywords such as “battery” and “install” to find a topic. If you are using Adobe
Acrobat Reader to read this document, press Ctrl+F on Windows or Command+F on Mac to
begin a search.
Navigating to a Topic
View a complete list of topics in the table of contents. Click on a topic to navigate to that
section.
Printing this Document
This document supports high resolution printing.

©2020 大疆创新 版权所有
1
Contents
Disclaimer and Warning 2
Introduction 2
In the Box 2
Overview 3
Payload SDK Port 3
Payload Design Instructions 4
Payload Requirements 4
Payload Mounting Requirements 5
Mounting 6
Mounting the Payload to the X-Port Gimbal 6
Mounting the X-Port Gimbal to the Aircraft 8
Settings 8
The DA2 Page 8
The DJI Pilot App Page 9
Control Parameter Settings 11
User Parameter Settings 12
Other Parameter Settings 13
Functions 13
Gimbal Function Debugging 13
Gimbal Control 14
Appendix 14
Specications 14
Firmware and Software Version Requirements 15
Firmware Update 15
Log Export 16
Mounting the Extended Landing Gears 16
Using the Special Gimbal Dampers 16
Obstruction in Dual Gimbal Installation 16

2
©2020 大疆创新 版权所有
DJI ENTERPRISE X-PORT User Manual
Disclaimer and Warning
Please read this entire document and all safe and lawful practice DJITM provided carefully, and visit
the DJI official website (http://www.dji.com) to download the full version of the User Manual and
carefully read all instructions and warnings therein before use. Failure to read and follow instructions
and warnings or lack of strong awareness of safety during the operation may result in serious injury to
yourself or others, damage to your DJI product, or damage to other objects. By using this product, you
hereby signify that you have read this disclaimer and warning carefully and that you understand and
agree to abide by the terms and conditions herein. You agree that you are solely responsible for your
own conduct while using this product, and for any consequences thereof. You agree to use this product
only for legitimate purposes. DJI accepts no liability for damage, injury or any legal responsibility incurred
directly or indirectly from the use of this product.
DJI is a trademark of SZ DJI TECHNOLOGY CO., LTD. (abbreviated as “DJI”) and its affiliated
companies. Names of products, brands, etc., appearing in this document are trademarks or registered
trademarks of their respective owner companies. This product and document are copyrighted by DJI
with all rights reserved. No part of this product or document shall be reproduced in any form without the
prior written consent or authorization of DJI.
This document and all other collateral documents are subject to change at the sole discretion of DJI.
For up to date product information, visit https://developer.dji.com/payload-sdk/ and click on the product
page for this product.
This disclaimer is available in various languages. In the event of divergence among dierent versions, the
English version shall prevail.
Introduction
DJI ENTERPRISE X-Port (hereinafter referred to as “X-Port”) gimbal is designed to enable developers
and manufacturers to create third-party payloads based on DJI’s gimbal technology, with access to
its resources including power systems, communication links, and aircraft status parameters such as
GPS data, ight attitude data, and app date and time. DJI also provides a suite of software products
to support developers in using the X-Port gimbal, such as the Onboard SDK, Mobile SDK, the DJI Pilot
app, and the DJI ASSISTANTTM 2 desktop application.
In the Box
DJI ENTERPRISE X-Port Gimbal
×1
Protection Cover×1 Primary Arm Mounting Screw×5

©2020 大疆创新 版权所有
3
DJI ENTERPRISE X-PORT User Manual
Overview
Payload SDK Port
The X-Port gimbal connects the load via the Payload SDK (PSDK) port for both power supply and
communication. See below for detailed pin descriptions.
1. Yaw Base Centerline
2. DJI Gimbal Connector 2.0 (DGC2.0)
3. Yaw Motor
4. Yaw Base
5. Yaw Waterproof Sticker
6. Yaw Arm
7. Roll Motor
8. Roll Waterproof Sticker
9. Roll Arm
10. Pitch Axis Centerline
11. Pitch Secondary Arm Mounting Hole
12. Pitch Secondary Arm End
13. Pitch Primary Arm Mounting Hole
14. Pitch Primary Arm Waterproof Washer
15. Pitch Motor
16. Payload SDK Port
17. Pitch Primary Arm End
18. microSD Card Slot
Secondary Arm Mounting
Screw×1
Secondary Arm sleeve ×1 Secondary Arm Plug ×1
3
5
6
2
8
7
9
10
11121314
1716
15
4
1
18
Power supply
MDI network
NC
To payload
TimeSync
High-power
apply
GND
GND
GND
UART_RX
PPS
HIGH_POWER_APPLY
LAN_RXP
LAN_RXN
12
14
18
20
2
4
6
16
8
10
NC
NC
UART_TX
GND
LAN_TXP
LAN_TXN
VCC
VCC
VCC
NC
NC
NC
11
13
17
19
1
3
5
15
7
9
19 1
20 2

4
©2020 大疆创新 版权所有
DJI ENTERPRISE X-PORT User Manual
Number Pin Name Pin Type Specication Description
1, 3, 5 VCC Power supply 13.6 V / 2 A,
17 V / 2.5 A Supply power for the PSDK load.*
2, 4, 6, 15 GND
7 UART1_TX Supported later.
8 UART1_RX
9 CAM_RDY Supported later.
10 DRONE_TRIG Reserved Supported later.
11 USART2_TX Reserved UART TTL (3.3
V) Communicates with the PSDK load.
12 USART2_RX
13 VSYNC Supported later.
14 PPS Reserved 0~3.3 V digital
signal
The PPS signal generated from the
aircraft, used for time synchronization.
16 HIGH_POWER_
APPLY PPS signal 0~3.3 V digital
signal
The default aircraft output voltage is
13.6 V, which becomes 17 V once
a high-power application has been
raised.
17 LAN_TXP High-power
application
pin
100 Mbps
Used for high-speed communication
between the aircraft and the PSDK
load.
18 LAN_RXP
19 LAN_TXN
20 LAN_RXN
* When used with the aircraft, the MATRICETM 200 series V2 aircraft’s gimbal connector will supply the power of 4 A rated current (peak
current <5). The DJI X-Port gimbal’s 3-axis stalled power consumption before take-o, and the hovering power consumption with 250
g load (indoor windless, and no remote controller operation) are as below
Gimbal power consumption 3-axis stalled power consumption Hovering power consumption with 250 g load
Normal Status 3.2 A / 13.6 V 1 A / 13.6 V
High-power Status 2.56 A / 17 V 0.8 A / 17 V
The gimbal connector voltage will decrease if the gimbal and load power consumption increase due to line loss. The gimbal
consumption is related to load size, load shape, load inertia, load rotation speed controlled by gimbal, and upwind speed during ight. It
is very important to ensure that the power provided to the load meets the load’s voltage and current requirements, as the gimbal actual
power consumption may exceed the 3-axis stalled power consumption due to heavy load, larger upwind speed or quick load rotation
speed during ight.
Payload Design Instructions
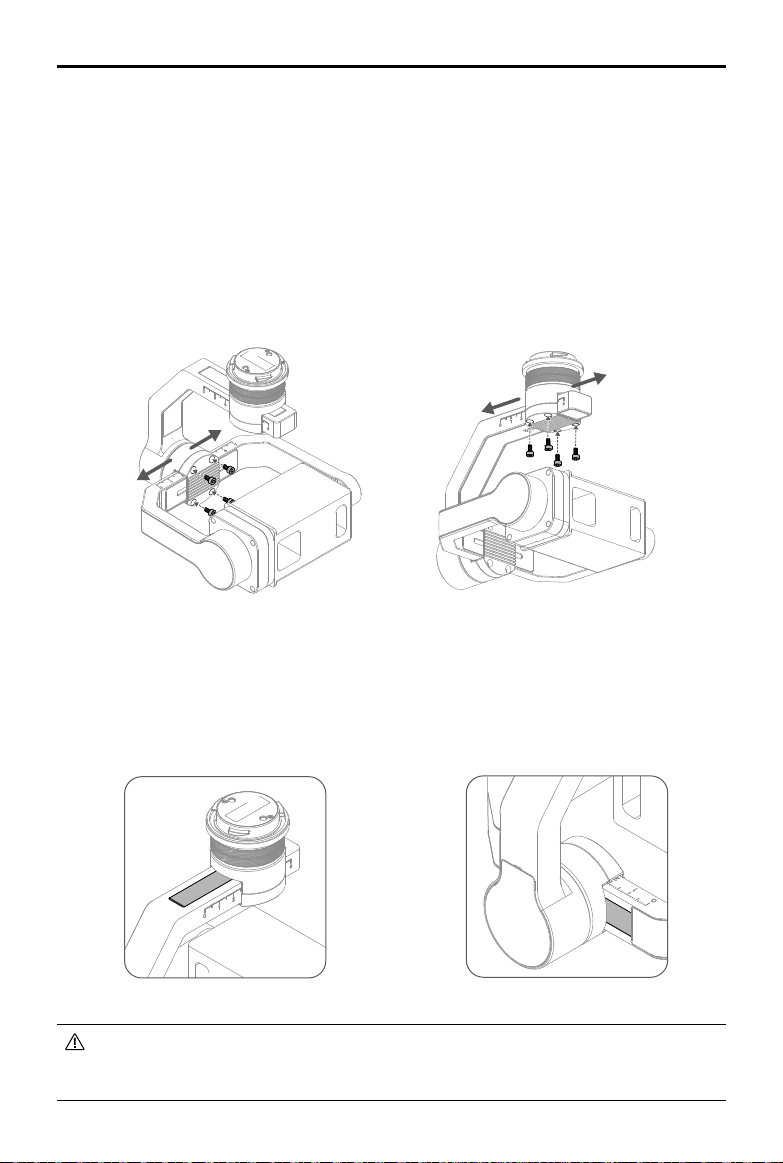
Please follow the requirements below to design your payload when used with the X-Port gimbal.
Payload Requirements
1. Mass
The total mass of the payload should not exceed 450 g.
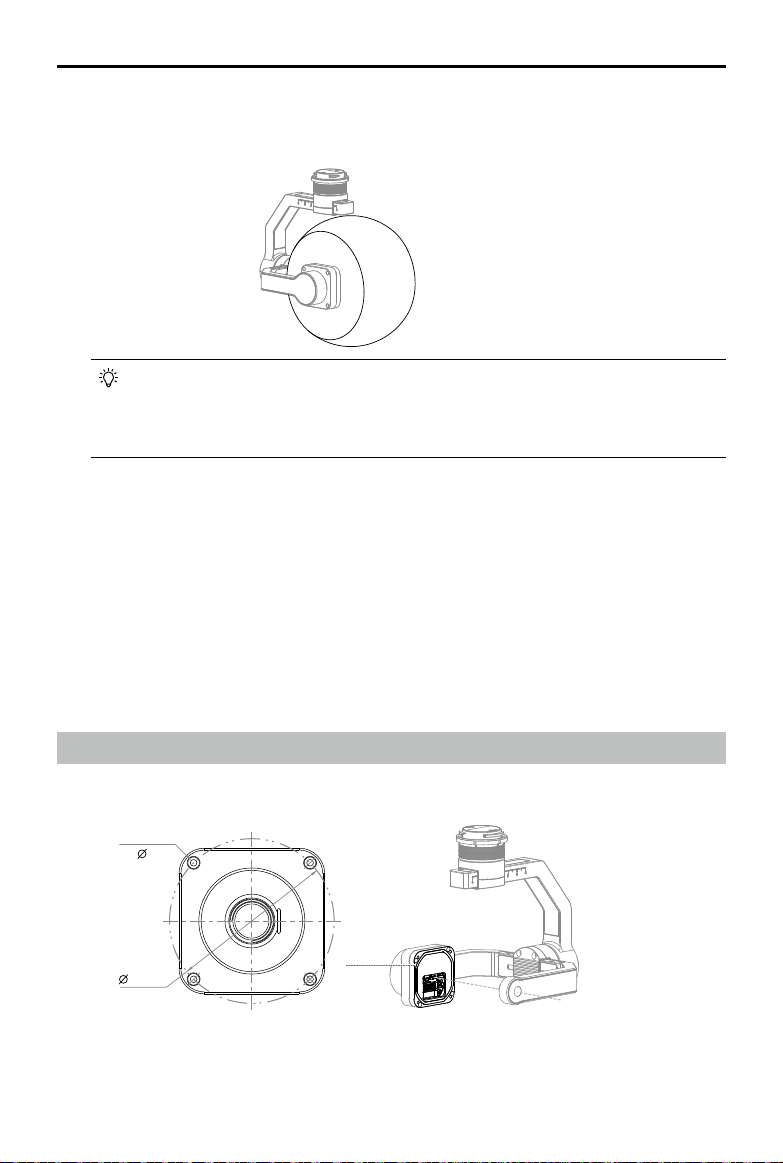
2. Shape
a. The dimension of the payload in the direction of the Pitch axis centerline is 80 mm. Note that this
measurement must be accurate within the range of ± 0.1 mm. Otherwise, it may result in improper
assembly or excessive frictional resistance, which will aect control.

©2020 大疆创新 版权所有
5
DJI ENTERPRISE X-PORT User Manual
When used with the M200 Series V2, the extended landing gears are required to meet the
diameter design specication of 136 mm. If using the default landing gears, it is required
to limit the Pitch rotation or the spherical surface diameter must be 100 mm, otherwise,
the payload may touch the ground when rotating.
c. Ensure that a load positioned to the front of the pitch axis centerline will not be blocked by the
yaw arm when the load tilts up to 45°. If the front half of the load protrudes too far out, it might get
in the way of other components during gimbal self-testing when using dual gimbals (the specic
constraints of the front half part will vary depending on the type or size of the other gimbal in
place), and the payload might touch the ground when the gimbal pitch rotates.
3. Stiness
Ensure that there is enough connection stiffness between various payload components. It is
recommended to use an aluminum alloy shell, avoiding 3D-printed or carbon ber shells.
4. Waterproofness
Ensure the payload mounting interface
Payload Mounting Requirements
Please follow the descriptions below to design an adaptable installation interface for the payload based
on the X-Port gimbal.
52.00
4
×2.10
Unit: mm
1. Primary Arm Mounting
Four primary arm mounting screws (M2) are needed to mount the payload. Their size requirements
are shown in the gure. Ensure that the depth of the corresponding threaded hole in the payload is at
least 5.3 mm.
b. Draw a spherical surface with a diameter of 136 mm, using the mass center of the load as the
center of the sphere. Ensure that all movement of a load positioned to the back of the pitch axis
centerline can be completely contained within this sphere.

6
©2020 大疆创新 版权所有
DJI ENTERPRISE X-PORT User Manual
2. Secondary Arm Mounting
A secondary arm mounting screw (M3), an arm sleeve, and an arm plug are needed. Ensure that the
secondary arm mounting screw goes through the pitch axis centerline.
3. Mass Center Position Requirement
a. For a payload with a constant mass center, ensure that the mass center is on the pitch axis
centerline.
b. For a zoom camera with a variable mass center position, ensure that the mass center is on the
pitch axis centerline when the lens is at maximum magnication.
Mounting
Mounting the Payload to the X-Port Gimbal
Payload Interface Mounting
The connector used to connect the gimbal and payload is a 20-pin board-to-wire connector from ACES
Electronics Co., Ltd. The model is S-50420-020HKH0-001.
Make sure to reserve a hole on the position where the payload is mounted on the gimbal pitch
primary arm so that the connector end and the cable (the length is about 100 mm) can come
out.
DO NOT plug in or unplug the payload from the connector when powered on.
Payload Mounting Steps
Follow below steps to mount the payload to the gimbal.
1. Insert the 20-pin connector’s male end to the gimbal mainboard’s female end on the pitch primary
arm, make sure to keep the payload and the gimbal facing the front, while the microSD card slot
points to the gimbal rear. Then use four M2 screws to install the payload onto the gimbal, with some
thread glue applied on the screws to ensure secure installation.
2. Gently open the pitch secondary arm to put the secondary arm sleeve between the gimbal and
payload. Apply an appropriate amount of 243 thread glue to the thread of the secondary arm
mounting screw, tighten the screw from the other side of the secondary arm, and nally attach the
secondary arm plug and ensure that it is pressed to the end.
1
2 3

©2020 大疆创新 版权所有
7
DJI ENTERPRISE X-PORT User Manual
3. Rotate the payload around the Pitch axis centerline and ensure that the payload can remain
stationary at all positions.
4. Use an L-shaped hexagonal screwdriver to loosen the 4 screws on the Roll arm (no need to remove
the screws), hold the yaw arm with one hand, and adjust the position of the roll arm to ensure that
the roll arm can keep balance while rotating, then re-tighten the 4 screws.
5. Use an L-shaped hexagonal screwdriver to loosen the 4 screws on the yaw arm (no need to remove
the screws), hold the yaw base with one hand, and adjust the position of the yaw arm to ensure
that the gimbal can remain stationary (not rotate around the yaw base) at any position when the yaw
base centerline is not perpendicular to the ground, then re-tighten the 4 screws.
6. Trim the yaw waterproof sticker to t the gimbal, make sure there is about a 1 mm slot between
the sticker and the gimbal, then remove the release paper to attach the waterproof sticker into the
groove of the yaw arm.
7. Trim the roll waterproof sticker to fit the gimbal, and remove the release paper to attach the
waterproof sticker into the groove of the roll arm.
For the same payload, once adjustment is nished, you can record the adjustment position
on the corresponding ruler on the yaw / roll arm. This reading can be referenced for each
adjustment to save time in nding the center of mass position.

8
©2020 大疆创新 版权所有
DJI ENTERPRISE X-PORT User Manual
Mounting the X-Port Gimbal to the Aircraft
Align the white and
red dots and insert
the X-Port gimbal
connector.
Rotate to lock
the X-Port gimbal
connector in place.
Make sure to press down the gimbal detachment button when rotating the gimbal lock to
remove the gimbal. The gimbal lock should be fully rotated when removing the gimbal for the
next installation.
The DJI Payload SDK Development Kit 2.0, purchased separately, can be used to debug the
X-Port gimbal. Refer to the Payload SDK Development Kit 2.0 user guide for details.
Settings
Control parameter settings and user parameter settings can be done with DJI Assistant 2 For Matrice
(hereinafter referred to as DA2) or DJI Pilot App.
The DA2 Page
Downloading and Installing the DA2 Software
Downloading and Installing the DA2 according to below link.
http://www.dji.com/matrice-200-series-v2/info#downloads
Make sure to use the latest rmware for debugging.
Connecting to DA2
1. Make sure the gimbal is mounted to the aircraft correctly.
2. Connect the aircraft and the PC with a USB to USB cable.
3. Launch DA2 and log in with a DJI account. Click X-Port to access the settings.
Payload SDK Page Overview
12

©2020 大疆创新 版权所有
9
DJI ENTERPRISE X-PORT User Manual
Set the related parameters on the Payload SDK page.
The DJI Pilot App Page
Downloading and Installing the DJI Pilot App
Search for the DJI Pilot app in the Google Play Store to download and install the app on your mobile
device. Make sure you mobile device is connected to the remote controller.
Make sure to use the latest rmware for debugging.
Connecting to the DJI Pilot App
1. Make sure the gimbal is mounted to the aircraft correctly.
2. Make sure the remote controller and the aircraft is linked.
3. Launch DJI Pilot app and log in with a DJI account. Click Gimbal Settings to access the settings.
Gimbal Settings Page Overview
Set the related parameters on Gimbal Settings page.

10
©2020 大疆创新 版权所有
DJI ENTERPRISE X-PORT User Manual

©2020 大疆创新 版权所有
11
DJI ENTERPRISE X-PORT User Manual
Control Parameter Settings
The following parameters cannot be adjusted by end users.
DO NOT use external modules to control the gimbal (including angle adjustment, speed adjustment and
gimbal center).
The Gimbal Balance Test, Gimbal Coaxiality Test, Gimbal Parameter Auto-tuning, Gimbal Force
Adjustment, and Reset Control Parameters are available on the Control Parameter Settings page of DA2
or the Gimbal Settings page of DJI Pilot app.
The following content uses the DA2 page as an example to describe setting operations.
Gimbal Balance Test
During Gimbal Balance Test, the three gimbal axis are in Joint Angle mode, and they can rotate at the
same speed within the mechanical limits in sequence. If the gimbal is out of balance, the gimbal output
will be changed under the inuence of gravity during rotation, so that any imbalances and the direction
of imbalances can be identied.
Here are the steps to the test:
1. Tap “Gimbal Balance Test” on “Gimbal Settings” page, and prepare the aircraft and gimbal according
to app instructions.
2. Run the test according to app instructions.
3. Gimbal Balance Test needs to be rerun if the gimbal is found to be out of balance based on test
progress and results. These adjustments maybe required:
a. Move the payload forward (backward) and upward (downward) and perform the balance test
again.
b. Adjust the position of the gimbal Roll arm to the left (to the right) and perform the balance test
again.
c. Adjust the position of the gimbal Yaw arm forward (backward) and perform the balance test again.
Gimbal Coaxiality Test
During Gimbal Coaxiality Test, the gimbal pitch-axis is in Joint Angle mode, and it can rotate at the same
speed within the mechanical limits. If the gimbal coaxiality is poor, the gimbal will not rotate smoothly at
certain positions during rotation, hence the test identies issues in gimbal coaxiality.
It is important to make sure the Gimbal Balance Test is finished and the gimbal is balanced before
performing the Gimbal Coaxiality Test
Here are the steps to the test:
1. Tap “Gimbal Coaxiality Test” on “Gimbal Settings” page, and prepare the aircraft and gimbal
according to app instructions.
2. Run the test according to app instructions.

12
©2020 大疆创新 版权所有
DJI ENTERPRISE X-PORT User Manual
3. During Gimbal Coaxiality Test, you can adjust the mounting of the payload and the pitch secondary
arm according to the coaxiality test progress and results. If the gimbal coaxiality is poor, please
adjust the pitch secondary arm end screw hole forward or backward, upward or downward, and
then perform the Gimbal Coaxiality Test again.
Gimbal Parameter Auto-tuning
Tap “Gimbal Parameter Auto-tuning” on “Gimbal Settings” page, then it will automatically adjust the
gimbal control parameters according to the payload.
1. Mount the payload onto the gimbal, and make sure the Gimbal Balance Test and Gimbal Coaxiality
Test are both ok.
2. Turn o the aircraft’s motors and keep the gimbal stationary (both roll and pitch angle are within ±5°),
then the DA2 / DJI Pilot will start the Gimbal Parameter Auto-tuning.
Gimbal Force Adjustment
If the gimbal control force is too weak or too strong, you can adjust the force applied onto the gimbal
using DA2 / DJI Pilot.
Reset Control Parameters
Performed to reset the control parameters.
User Parameter Settings
The following parameters can be adjusted by end users.
The following parameters can be set on “User Parameter Settings” page of DA2 or “Gimbal Settings” of
DJI Pilot app.
1. The Start / Stop Buer of Gimbal Pitch / Yaw
The smaller the value (the greater the gimbal acceleration), the faster the gimbal responds when
operating the remote controller dial, and the faster the gimbal can stop when the remote controller
dial is released.
The greater the value (the smaller the gimbal acceleration), the slower the gimbal responds when
operating the remote controller dial, and the slower the gimbal can stop when the remote controller
dial is released.
2. Gimbal Pitch / Roll / Yaw Adjust
Once the gimbal is still not balanced after performing Gimbal Auto Calibration or when the manual
adjustment is required, adjust these parameters.

©2020 大疆创新 版权所有
13
DJI ENTERPRISE X-PORT User Manual
Other Parameter Settings
The following parameters can be set on “Gimbal Settings” page in DJI Pilot app.
1. Gimbal Pitch Limit Extension
The gimbal pitch control range is from -90°to +30°when turned off, and from -120°to +30°when
turned on.
2. Max Gimbal Pitch / Yaw Speed
The greater the value (the greater the gimbal speed), the faster the gimbal rotates when operating the
remote controller dial.
Functions
The following parameters can be adjusted by end users.
Gimbal Function Debugging
This function is available on “Gimbal Function Debugging” in DA2 or “Gimbal Settings” in DJI Pilot app.
1. Gimbal Pitch / Yaw Speed Adjustment
Use the remote control dial or drag the Gimbal Pitch / Yaw Speed Adjustment slider on DA2 to
control the gimbal rotating.
2. Gimbal Angle Adjustment
Enter a pitch or yaw value in the Gimbal Angle Adjustment box to rotate the gimbal to a specic
angle.
3. Gimbal Auto Calibration
If the gimbal is still not balanced, tap Gimbal Auto Calibration to adjust it.
4. Re-centering the Gimbal
Tap to center the gimbal.

14
©2020 大疆创新 版权所有
DJI ENTERPRISE X-PORT User Manual
Compatible aircraft * M200 series V2
Weight 340 g
Dimensions 128×140×145 mm
Supported load weight
range <450 g
Supported load
dimensions
The dimension of the load in the direction of the Pitch axis centerline is 80 mm.
Draw a spherical surface with a diameter of 145 mm, using the mass center of
the load as the center of the sphere. Ensure that the load locates at the back
of the pitch axis centerline can be completely wrapped in the spherical surface
when it moves.
Appendix
Specifications
1. Follow mode: Gimbal yaw will rotate with the aircraft yaw rotation.
Free mode: Gimbal rotates freely.
Reset: The gimbal pitch and roll will center.
2. Using the DJI Pilot app to control the gimbal
Tap and slide on the app’s camera view to control the gimbal rotation.
1
2
Gimbal Control
Used the DJI Pilot app to control the gimbal.

©2020 大疆创新 版权所有
15
DJI ENTERPRISE X-PORT User Manual
* Please refer to the DJI ocial website for more information about the latest compatible aircraft types.
** Measured when hovering in windless conditions, which may be aected by the aircraft's ight status, wind speed, and load
inertia.
Firmware and Software Version Requirements
M200 series V2 aircraft rmware V01.00.0650
GL900A remote controller rmware V01.00.0650
Pilot APP V1.7.0
MSDK V4.12
DJI Assistant2 for Matrice win V02.00.11
DJI Assistant2 for Matrice mac V02.00.11
Gimbal angular
vibration range ** ±0.008°
Gimbal controllable
range
Pitch: +30°to -120°, Yaw: ±320
If the load size is quite large, the gimbal controllable range may decrease. The
actual controllable range is subject to the load.
Gimbal connector DGC2.0
PSDK port power 13.6 V / 2A, 17V / 2.5 A
IP rating IP44
Operating temperature -20°C to 50°C (-4°F to 122°F)
Firmware Update
Mount the gimbal onto the aircraft, connect the aircraft to the PC with a USB cable. Launch DA2 and
select X-Port, then go to the rmware update page.

16
©2020 大疆创新 版权所有
DJI ENTERPRISE X-PORT User Manual
Log Export
1. Gimbal log export
A micropSD card with a capacity of up to 32G can be inserted into the card slot on the gimbal to
store the gimbal logs. If the gimbal fails, you can connect the microSD card to your computer, and
copy the les in DAT format at the corresponding time and provide it to DJI support for analysis.
2. PSDK log export
PSDK logs are stored on the aircraft. If there is a problem with the PSDK, you can connect the aircraft
to your computer, use the DA2 log export function to export ight data, and provide it to DJI support
for analysis.
Mounting the Extended Landing Gears
If you use the M200 series V2 aircraft, the extended landing gears (excluded) are required since the
gimbal may touch the ground during self-test.
Using the Special Gimbal Dampers
If you use the M200 series V2 aircraft, the special gimbal dampers (excluded) are required when
attaching the X-Port gimbal onto the aircraft.
Obstruction in Dual Gimbal Installation
During dual gimbal usage, X-Port gimbal may obstruct another gimbal when they are both rotating.
The X-Port centroid has a variable position, and the scenario described below is using the longest yaw
arm and does not consider the size of the front end of the load.
The obstruction angles during rotation of different gimbals are shown in the below table, where the
obstruction angle 1 is the angle range when the gimbal is rotating clockwise, and the obstructing angle
2 is the angle range when the gimbal is rotating counterclockwise.
The details of using the M200 Series V2 aircraft are shown in the gure below. The X-Port gimbal is
installed in gimbal position B, and another gimbal is installed in gimbal position A. The angle at which
both gimbals face forward is the zero point and the counterclockwise is positive.
1
2
1
A
B
0° 0°
2
Front side of gimbals
Gimbal A rotating range
Gimbal B rotating range
Dual gimbal Obstruction range

©2020 大疆创新 版权所有
17
DJI ENTERPRISE X-PORT User Manual
Below table shows the obstruction angle during the rotation when using dual gimbals.
NO. Gimbal
position Gimbal type Obstruction angle 1 Obstruction angle 2
Dual gimbal
obstruction
range
1A Zenmuse XT -256.15° ~-283.85° +76.15° ~+103.85° 27.70°
B X-Port -82.34° ~-97.67° +262.33° ~+277.66° 15.33°
2A Zenmuse Z30 -235.75° ~-304.25° +55.75° ~+124.25° 68.50°
B X-Port -64.69° ~-115.31° +244.69° ~+295.31° 50.62°
3A Zenmuse X5S -237.40° ~-302.60° +57.40° ~+122.60° 65.20°
B X-Port -66.97° ~-113.03° +246.97° ~+293.03° 46.06°
4A Zenmuse XT2 -242.93° ~-297.07° +62.93° ~+117.07° 54.14°
B X-Port -72.87° ~-107.13° +252.87° ~+287.13° 34.26°
5A X-Port -229.99° ~-310.01° +49.99° ~+130.01° 80.02°
X-Port -49.99° ~-130.01° +229.99° ~+310.01° 80.02°
As shown in the table above, when an M200 Series V2 aircraft is mounted with two X-Port gimbals, the
obstruction angle is 80.02 °. Note that the above data are theoretical values, without considering the
vibration, wind direction, the aircraft tilt and the aircraft braking during actual ight, and are for reference
only. In addition, the actual attitude of gimbal A could aect the rotation range of gimbal B.
When the front end of the payload exceeds a certain size, the obstruction will be the payload
itself rather than the gimbal body.

18
©2020 大疆创新 版权所有
DJI ENTERPRISE X-PORT User Manual
Compliance
FCC Compliance
This device complies with Part 15 of the FCC Rules. Operation is subject to the following
two conditions: (1) This device may not cause harmful interference, and (2) This device
must accept any interference received, including interference that may cause undesired
operation.
Any changes or modifications not expressly approved by the party responsible for
compliance could void the user’s authority to operate the equipment.
Supplier’s Declaration of Conformity
Product name: DJI ENTERPRISE X-PORT
Model Number: PSDK-XP01
Manufacturer’sName: SZ DJI TECHNOLOGY CO., LTD.
Manufacturer’sAddress: 14th oor, West Wing, Skyworth Semiconductor Design Building
NO.18 Gaoxin South 4th Ave, Nanshan, Shenzhen, Guangdong, China
Responsible Party: DJI Technology, Inc.
Responsible Party Address: 201 S. Victory Blvd., Burbank, CA 91502
Contact person: Fajia Wang
Telephone: (650)812-0559
We, DJI Technology, Inc., being the responsible party, declares that the above mentioned
model was tested to demonstrate complying with all applicable FCC rules and regulations.
This device complies with part 15 of the FCC Rules. Operation is subject to the following
two conditions: (1) This device may not cause harmful interference, and (2) this device
must accept any interference received, including interference that may cause undesired
operation.
Signed for and on behalf of: DJI Technology, Inc.
Name: Fajia Wang
Position: Certication Manager
Date: 2020-03-20
Signature:
ISED Compliance
CAN ICES-3 (B)/NMB-3(B)
EU Compliance Statement: SZ DJI TECHNOLOGY CO., LTD. hereby declares that this
device is in compliance with the essential requirements and other relevant provisions of the
Directive 2014/30/EU.
A copy of the EU Declaration of Conformity is available online at www.dji.com/euro-
compliance
EU contact address: DJI GmbH, Industriestrasse 12, 97618, Niederlauer, Germany
Declaración de cumplimiento UE: SZ DJI TECHNOLOGY CO., LTD. por la presente declara
que este dispositivo cumple los requisitos básicos y el resto de provisiones relevantes de
la Directive 2014/30/EU.
Hay disponible online una copia de la Declaración de conformidad UE en www.dji.com/
euro-compliance
Dirección de contacto de la UE: DJI GmbH, Industriestrasse 12, 97618, Niederlauer,
Germany
EU-verklaring van overeenstemming: SZ DJI TECHNOLOGY CO., LTD. verklaart hierbij
dat dit apparaat voldoet aan de essentiële vereisten en andere relevante bepalingen van
Richtlijn 2014/30/EU.
De EU-verklaring van overeenstemming is online beschikbaar op www.dji.com/euro-
compliance
Contactadres EU: DJI GmbH, Industriestrasse 12, 97618, Niederlauer, Germany
Declaração de conformidade da UE: A SZ DJI TECHNOLOGY CO., LTD. declara, através
deste documento, que este dispositivo está em conformidade com os requisitos essenciais
e outras disposições relevantes da Diretiva 2014/30/EU.
Existe uma cópia da Declaração de conformidade da UE disponível online em www.dji.
com/euro-compliance
Endereço de contacto na UE: DJI GmbH, Industriestrasse 12, 97618, Niederlauer, Germany
Dichiarazione di conformità UE: SZ DJI TECHNOLOGY CO., LTD. dichiara che il presente
dispositivo è conforme ai requisiti essenziali e alle altre disposizioni rilevanti della direttiva
2014/30/EU.
Una copia della dichiarazione di conformità UE è disponibile online all'indirizzo Web www.
dji.com/euro-compliance
Indirizzo di contatto UE: DJI GmbH, Industriestrasse 12, 97618, Niederlauer, Germany
Déclaration de conformité UE : Par la présente, SZ DJI TECHNOLOGY CO., LTD déclare
que cet appareil est conforme aux principales exigences et autres clauses pertinentes de
la directive européenne 2014/30/EU.
Une copie de la déclaration de conformité UE est disponible sur le site www.dji.com/euro-
compliance
Adresse de contact pour l'UE : DJI GmbH, Industriestrasse 12, 97618, Niederlauer,
Germany
EU-Compliance: Hiermit erklärt SZ DJI TECHNOLOGY CO., LTD., dass dieses Gerät den
wesentlichen Anforderungen und anderen einschlägigen Bestimmungen der EU-Richtlinie
2014/30/EU entspricht.
Eine Kopie der EU-Konformitätserklärung finden Sie online auf www.dji.com/euro-
compliance.
Kontaktadresse innerhalb der EU: DJI GmbH, Industriestrasse 12, 97618, Niederlauer,
Germany
ДекларациязасъответствиенаЕС: SZ DJI Technology Co., Ltd. декларира, че това
устройство отговаря на основните изисквания и другите приложими разпоредби на
Директива 2014/30/ЕС.
Копие от Декларацията за съответствие на ЕС ще намерите онлайн на адрес www.dji.
com/euro-compliance
Адрес за контакт за ЕС: DJI GmbH, Industriestrasse 12, 97618, Niederlauer, Германия
Prohlášení o shodě pro EU: Společnost SZ DJI Technology Co., Ltd. tímto prohlašuje, že
tohle zařízení vyhovuje základním požadavkům a dalším příslušným ustanovením směrnice
2014/30/EU.
Kopie prohlášení o shodě pro EU je k dispozici on-line na webu www.dji.com/euro-
compliance
Kontaktní adresa v EU: DJI GmbH, Industriestrasse 12, 97618, Niederlauer, Německo
EU-overensstemmelseserklæring: SZ DJI Technology Co., Ltd. erklærer hermed, at denne
enhed er i overensstemmelse med de væsentlige krav og andre relevante bestemmelser i
direktiv 2014/30/EU.
Der er en kopi af EU-overensstemmelseserklæringen tilgængelig online på www.dji.com/
euro-compliance
EU-kontaktadresse: DJI GmbH, Industriestrasse 12, 97618, Niederlauer, Tyskland
ΔήλωσηΣυμμόρφωσηςΕΕ: Η SZ DJI Technology Co., Ltd. δια του παρόντος δηλώνει ότι
η συσκευή αυτή συμμορφώνεται με τις βασικές απαιτήσεις και άλλες σχετικές διατάξεις της
Οδηγίας 2014/30/EΕ.
Αντίγραφο της Δήλωσης Συμμόρφωσης ΕΕ διατίθεται ηλεκτρονικά στη διεύθυνση www.dji.
com/euro-compliance
Διεύθυνση επικοινωνίας στην ΕΕ: DJI GmbH, Industriestrasse 12, 97618, Niederlauer,
Γερμανία
ELi vastavuskinnitus Käesolevaga teatab SZ DJI Technology Co., Ltd., et see seade on
kooskõlas direktiivi 2014/30/EL oluliste nõuete ja muude asjakohaste sätetega.
ELi vastavusdeklaratsiooni koopia on kättesaadav veebis aadressil www.dji.com/euro-
compliance
Kontaktaadress ELis: DJI GmbH, Industriestrasse 12, 97618, Niederlauer, Saksamaa
PranešimasdėlatitiktiesESreikalavimams Bendrovė „SZ DJI Technology Co., Ltd.“ tvirtina,
kad šis prietaisas atitinka pagrindinius 2014/30/ES direktyvos reikalavimus ir kitas susijusias
nuostatas.
ES atitikties deklaracijos kopiją galite rasti adresu www.dji.com/euro-compliance
ES kontaktinis adresas: „DJI GmbH“, Industriestrasse 12, 97618, Niederlauer, Germany
(Vokietija)
ESatbilstībaspaziņojums: SZ DJI Technology Co., Ltd ar šo apliecina, ka šī ierīce atbilst
direktīvas 2014/30/ES pamatprasībām un pārējiem būtiskiem nosacījumiem.
ES atbilstības deklarācijas kopija pieejama tiešsaistē vietnē www.dji.com/euro-compliance
ES kontaktadrese: DJI GmbH, Industriestrasse 12, 97618, Niederlauer, Vācija
EU:n vaatimustenmukaisuusvakuutus: SZ DJI Technology Co., Ltd. ilmoittaa täten, että
tämä laite on direktiivin 2014/30/EU olennaisten vaatimusten ja sen muiden asiaankuuluvien
ehtojen mukainen.
Kopio EU:n vaatimustenmukaisuusvakuutuksesta on saatavana verkossa osoitteessa www.
dji.com/euro-compliance
Yhteystiedot EU:ssa: DJI GmbH, Industriestrasse 12, 97618, Niederlauer, Germany
RÁITEAS Comhlíonta an AE: Dearbhaíonn SZ DJI Technology Co., Ltd. leis seo go bhfuil
an gléas seo de réir na gceanglas riachtanach agus na bhforálacha ábhartha eile sa Treoir
2014/30/AE.
Tá coip de Dhearbhú Comhréireachta an AE ar fáil ar líne ag www.dji.com/euro-compliance
Seoladh teagmhála san AE: DJI GmbH, Industriestrasse 12, 97618, Niederlauer, Germany
Dikjarazzjonita’Konformitàtal-UE: SZ DJI Technology Co., Ltd. hawnhekk tiddikjara li dan
l-apparat huwa konformi mar-rekwiżiti essenzjali u ma’ dispożizzjonijiet relevanti oħra tad-
Direttiva 2014/30/UE.
Kopja tad-Dikjarazzjoni ta’ Konformità tal-UE hija disponibbli onlajn s-sit www.dji.com/euro-
compliance
Indirizz ta’ kuntatt tal-UE: DJI GmbH, Industriestrasse 12, 97618, Niederlauer, il-Ġermanja
a UE de conformitate: Prin prezenta, SZ DJI Technology Co., Ltd. declară faptul că acest
dispozitiv este conform cu cerințele esențiale și celelalte prevederi relevante ale Directivei
2014/30/UE.
Un exemplar al Declarației UE de conformitate este disponibil online, la adresa www.dji.
com/euro-compliance
Adresa de contact pentru UE: DJI GmbH, Industriestrasse 12, 97618, Niederlauer,
Germania
IzjavaEUoskladnosti: Družba SZ DJI Technology Co., Ltd. izjavlja, da ta naprava ustreza
osnovnim zahtevam in drugim ustreznim določbam Direktive 2014/30/EU.
Kopija izjave EU o skladnosti je na voljo na spletu nawww.dji.com/euro-compliance
Kontaktni naslov EU: DJI GmbH, Industriestrasse 12, 97618, Niederlauer, Nemčija
EUIzjavaosukladnosti: Tvrtka SZ DJI Technology Co. Ltd. izjavljuje da je ovaj uređaj
izrađen u skladu s osnovnim zahtjevima i ostalim relevantnim odredbama Direktive 2014/30/
EU.
Kopija EU Izjave o sukladnosti dostupna je na mrežnoj stranici www.dji.com/euro-
compliance
Adresa EU kontakta: DJI GmbH, Industriestrasse 12 97618, Niederlauer, Njemačka
Vyhlásenie o zhode EÚ: SZ DJI Technology Co., Ltd. týmto vyhlasuje, že toto zariadenie
je v zhode so základnými požiadavkami a ďalšími relevantnými ustanoveniami smernice
2014/30/EÚ.
Kópia tohto Vyhlásenia o zhode EÚ je k dispozícii online na www.dji.com/euro-compliance
Kontaktná adresa v EÚ: DJI GmbH, Industriestrasse 12, 97618, Niederlauer, Nemecko
DeklaracjazgodnościUE: Firma SZ DJI Technology Co., Ltd. niniejszym oświadcza, że
przedmiotowe urządzenie jest zgodne z zasadniczymi wymogami i innymi stosownymi
postanowieniami dyrektywy 2014/30/UE.
Kopię deklaracji zgodności UE można znaleźć w Internecie na stronie www.dji.com/euro-
compliance
Adres do kontaktu w UE: DJI GmbH, Industriestrasse 12, 97618, Niederlauer, Niemcy
EUmegfelelőséginyilatkozat: A DJI Technology Co., Ltd. ezúton megerősíti, hogy ez az
eszköz megfelel a 2014/30/EU Irányelv alapvető követelményeinek és más vonatkozó
Table of contents
Other dji Camera Accessories manuals

dji
dji RONIN-SC FOCUS MOTOR User manual

dji
dji Ready Rig Quick Connector User manual

dji
dji MG-12000P User manual

dji
dji OSMO MOBILE 3 User manual

dji
dji Ronin User manual

dji
dji Force Pro User manual

dji
dji Ronin S2 User manual

dji
dji Ronin-MX User manual

dji
dji High-Bright Remote Monitor User manual

dji
dji ZENMUSE H4-3D User manual