DLab Liquid Handling HiPette User manual

Mechanical Pipette
HiPette
User Manual
12301725
Ver.20211213

CONTENTS
1.YOUR NEW PIPETTE .......................................................................................1
1.1 ADJUSTABLE VOLUME PIPETTES ........................................................................1
1.2 FULLYAUTOCLAVABLE ......................................................................................2
2.UNPACKING......................................................................................................2
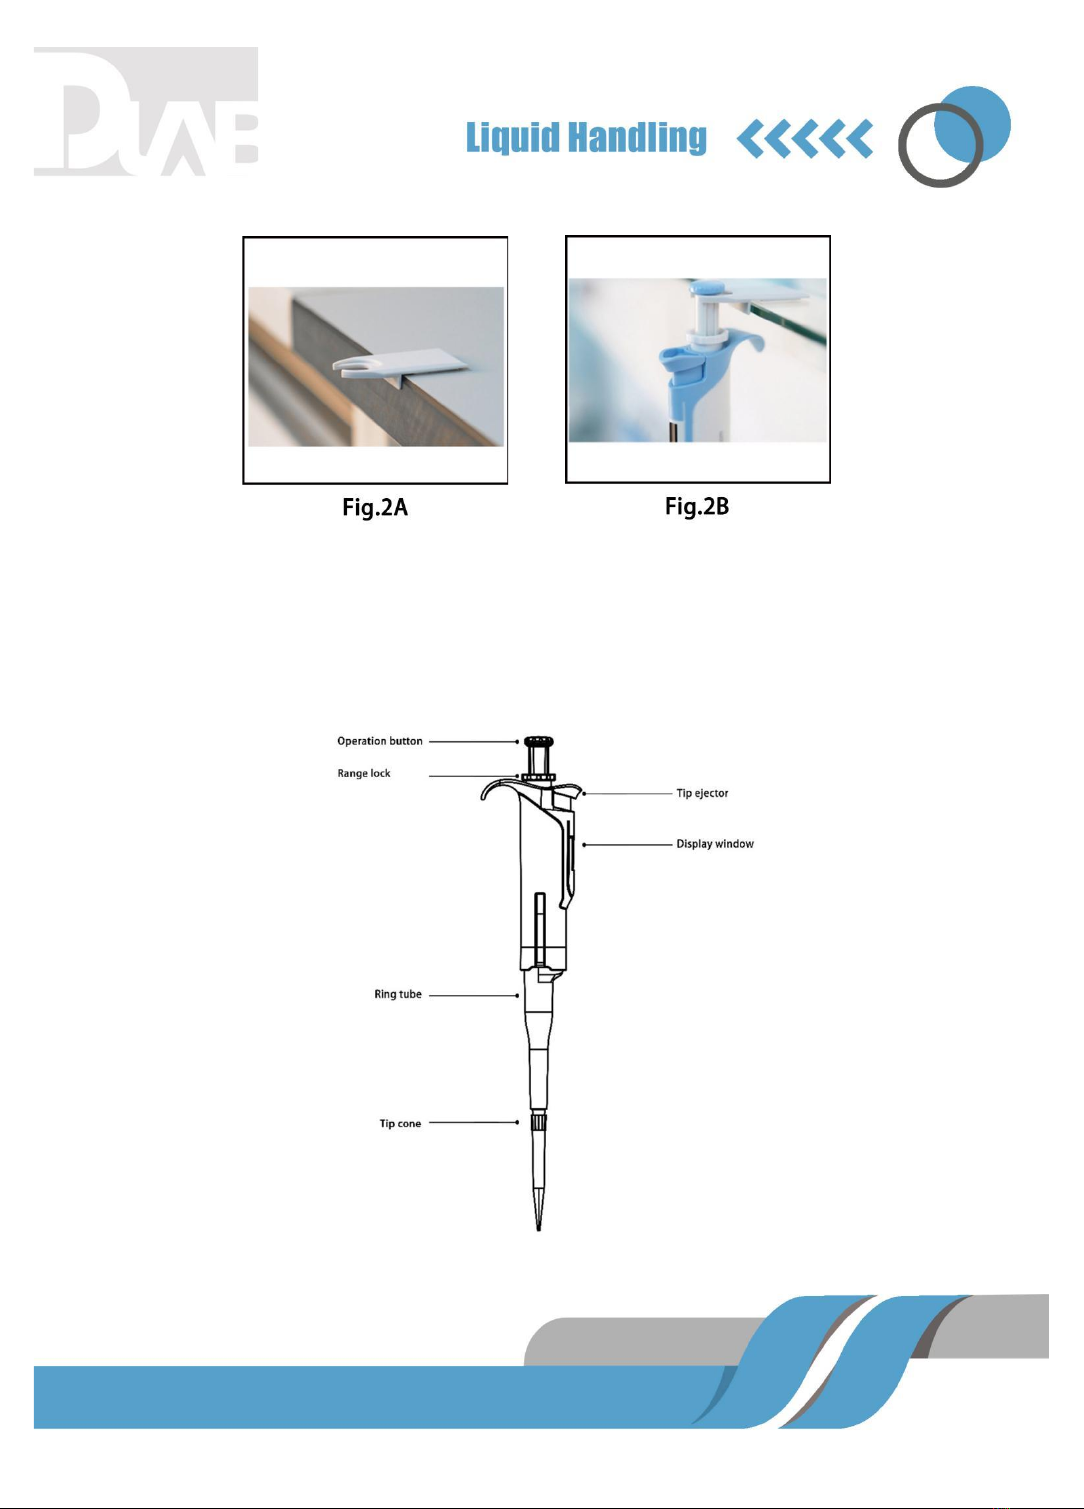
3.INSTALLING THE PIPETTE HOLDER ..............................................................3
4.PIPETTE COMPONENTS.................................................................................4
5.PIPETTE OPERATION......................................................................................5
5.1 VOLUME SETTING ............................................................................................5
5.2 RANGE LOCK ..................................................................................................5
5.3 SEALING AND EJECTING TIPS .............................................................................6
6.PIPETTING TECHNIQUES ...............................................................................6
6.1 FORWARD PIPETTING .......................................................................................7
6.2 REVERSE PIPETTING ........................................................................................7
7.PIPETTING RECOMMENDATIONS..................................................................8
8.STORAGE.........................................................................................................9

9.PERFORMANCE TESTAND RECALIBRATION ...............................................9
9.1 PERFORMANCE TEST (CHECKING CALIBRATION).................................................10
9.2 RECALIBRATION PROCEDURE ..........................................................................11
10.MAINTENANCE.............................................................................................11
10.1 CLEANING YOUR PIPETTE..............................................................................12
10.2 IN-HOUSE MAINTENANCE ..............................................................................13
11.TROUBLE SHOOTING..................................................................................13
12.WARRANTY INFORMATION.........................................................................15
13.SPECIFICATIONS.........................................................................................16

1
1.YOUR NEW PIPETTE
Your new mechanical pipette is a general purpose pipette for the accurate and
precise sampling and dispensing of liquid volumes. The pipettes operate on the air
displacement principle and disposable tips.
The pipettes cover a volume range from 0.1µL to 10mL.
All pipettes have been quality tested according to ISO8655/DIN12650. The quality
control according to ISO8655/DIN12650 involves gravimetric testing of each pipette
with distilled water (quality 3, DIN ISO 3696) at 22℃ using the manufacturer’s
original tips.
1.1Adjustable volume pipettes
Volume Range
Increment
Tips
0.1-2.5μL
0.005μL
10μL
0.5-10μL
0.01μL
10μL
2-20μL
0.02μL
200,300μL
5-50μL
0.05μL
200,300μL
10-100μL
0.1μL
200,300,350μL

2
1.2Fully autoclavable
HiPette can be fully autoclavable under 121℃,1atm for 20 mins, Wrap the pipette
by gauze before autoclave. It must be left for 12 hours to dry before use. Greasing
both sealing ring and piston after every 10 times autoclaving.
2.UNPACKING
The pipette packing contains the following items:
⚫Pipette
⚫Calibration/ remove tool
⚫User manual
⚫Pipette holder
20-200μL
0.2μL
200,300,350μL
30-300μL
0.2μL
200,300,350μL
100-1000μL
1μL
1000μL
1000-5000μL
5μL
5mL
2000-10000μL
10μL
10mL

3
⚫Tips
⚫Silicone Grease
⚫Quality control certificate
⚫Filter element(0.1ul-2.5ul、0.5ul-10ul volume pipette without filter)
3.INSTALLING THE PIPETTE HOLDER
For convenience and safety always keep the pipette vertically on its own holder
when not in use. When installing the holder, please follow the instruction below:
1. Clean the shelf surface with ethanol.
2. Remove the protective paper from the adhesive tape.
3. Install the holder as described in Figure 2A. (Make sure the holder is pressed
against the edge of the shelf.)
4. Place the pipette onto the holder as shown in Figure 2B.

4
4.PIPETTE COMPONENTS

5
5.PIPETTE OPERATION
5.1Volume setting
The volume of the pipette is clearly shown through the handle grip window. The
delivery volume (variable volume pipette only) is set by turning the thumb button
clockwise is anticlockwise. When setting the volume, please make sure that:
⚫The desired delivery volume clicks into place
⚫The digits are completely visible in the display window
⚫The selected volume is within the pipette’s specified range
Using excessive force to turn the push button outside the range may jam the
mechanism and damage the pipette.
5.2Range Lock
Press the range lock to lock the range.
图5

6
Locked
Adjustable
One Key Range Lock:
Press down the range lock to lock the range; lift up the range lock to unlock the
range. Prevent pipetting errors caused by touching the adjusting knob by mistake.
5.3Sealing and ejecting tips
Before fitting a tip makes sure that the pipette tip cone is clean. Press the tip on the
cone of the pipette firmly to ensure an airtight seal. The seal is tight when a visible
sealing ring forms between the tip and the black tip cone.
Each pipette is fitted with a tip ejector to help eliminate the safety hazards
associated with contamination. The tip ejector needs to be pressed firmly
downwards to ensure proper tip ejection. Make sure the tip is disposed of into a
suitable waster container.
6.PIPETTING TECHNIQUES
Fig.4

7
6.1Forward pipetting
Make sure that the tip is firmly attached to the tip cone. For best results the thumb
button should be operated slowly and smoothly at all times, particularly with viscous
liquids.
Hold the pipette vertically during aspiration. Make sure that the liquid and container
vessel are clean and that the pipette, tips and the liquid are at the same
temperature.
1. Depress the thumb button to the first stop .
2. Place the tip just under the surface of the liquid (2-3mm) and smoothly release
the thumb button. Carefully withdraw the tip from the liquid, touching against
the edge of container to remove excess.
3. Liquid is dispensed by gently depressing the thumb button to the first stop.
After a short delay continue to depress the thumb button to the second stop .
This procedure will empty the tip and ensure accurate delivery.
4. Release the thumb button to the ready position .If necessary change the tip
and continue with pipetting.
6.2Reverse pipetting
The reverse technique is suitable for dispensing liquids that have a tendency to

8
foam or have a high viscosity. This technique is also used for dispensing very small
volumes when it is recommended that the tip is first primed with the liquid before
pipetting. This is achieved by filling and emptying the tip.
1. Depress the thumb button all the way to the second stop. Place the tip just
under the surface of the liquid (2-3mm) and smoothly release the thumb button.
2. Withdraw the tip from the liquid touching against the edge of the container to
remove excess.
3. Deliver the preset volume by smoothly depressing thumb button to the first
stop. Hold the thumb button at the first stop. The liquid that remains in the tip
should not be included in the delivery.
4. The remaining liquid should now be discarded with the tip or delivered back
into the container vessel.
7.PIPETTING RECOMMENDATIONS
⚫Hold the pipette vertically when aspirating the liquid and place the only a few

9
millimeters into the liquid
⚫Prerinse the tip before aspirating the liquid by filling and emptying the tip 5 times.
This is important especially when dispensing liquids which have a viscosity and
density different from water
⚫Always control the push button movements with the thumb to ensure
consistency
⚫When pipetting liquids at a temperature different from ambient, prerinse the tip
several times before use.
8.STORAGE
When not in use it is recommended that your pipette is stored in a vertical position.
9.PERFORMANCE TEST AND RECALIBRATION
Each pipette has been factory-tested and certified at 22℃ according to
ISO8655/DIN12650. Note: Pipette specifications are guaranteed only with

10
manufacturer’s tips.
9.1Performance test
⚫Weighting should take place at 20-25℃, constant to ±0.5℃.
⚫Avoid drafts.
1. Set the desired testing volume of your pipette.
2. Carefully fit tip onto the tip cone.
3. Prerinse tip with distilled water by pipetting the selected volume 5 times.
4. Carefully aspirate the liquid, keeping the pipette vertical.
5. Pipette distilled water into a tared container read the weight in mgs. Repeat at
least five times and record each result. Use an analytical balance with a
readability of 0.01 mgs. To calculate the volume, divide the weight of the water
by its density (at 20℃: 0.9982). This method is based on ISO8655/DIN12650.
6. Calculate the F-value by using the following equation:
F=∣inaccuracy (μL) ∣+2×imprecision (μL)
Compare the calculated F-value to the corresponding Fmax user. If it falls within
the specifications, the pipette is ready for use. Otherwise check both your accuracy
and, when necessary, proceed to recalibration procedure.

11
9.2Recalibration procedure
1) Pull out the ejector button, use the calibration tool to push off the ejector button
cover, and then install the ejector button back to the handle;
2) Insert the calibration tool into the button hole of the ejector, and press the
calibration tool down and hold;
3)At this time, it can be calibrated by turning the adjusting knob (the counter is
unchanged at this time); turning clockwise to decrease the volume of liquid, and
turning counterclockwise to increase the volume of liquid;
4)Retest after adjustment, and the pipetting volume can be within the allowable
system error range.
10.MAINTENANCE

12
To maintain the best results from your pipette each unit should be checked every
day for cleanliness. Particular attention should be paid to the tip cone (s).
The pipettes have been designed for easy in-house service. However, we also
provide complete repair and calibration service including a service report and
performance certificate(s). Please return your pipette to your local representative
for repair or recalibration. Before returning please make sure that it is free from all
contamination. Please advise our Service Representative of any hazardous
materials which may have been used with your pipette.
Note: Check the performance of your pipette regularly e.g. every 3 months and
always after in-house service or maintenance.
10.1Cleaning your pipette
To clean your pipette using ethanol and a soft cloth or lint-free tissue. It is
recommended to clean the tip cone regularly.

13
10.2In-house maintenance
1) Pull down the ring tube;
2) Unscrew the nozzle connector directly counterclockwise;
3) Remove the piston and spring;
4) Wipe the piston and nozzle connector with alcohol and a lint-free
cloth;
5) Before installing nozzle connector it is recommended to grease
the Y-shaped sealing ring slightly using the silicone grease
provided.
Note: Excessive use of grease may jam the piston.
6) After reassembling use the pipette (without liquid) several times to
make sure that he grease is spread evenly.
7) Check the pipette calibration.
11.TROUBLE SHOOTING

14
Trouble
Possible cause
Solutions
Droplets left inside
the tip
Unsuitable tip
Use original tips
Non-uniform wetting of the
plastic
Attach new tip
Leakage or
pipetted volume too
small
Tip incorrectly attached
Attach firmly
Unsuitable tip
Use original tips
Foreign particles between tip
and tip cone
Clean the tip cone, attach
new tip
Instrument contaminated or
insufficient amount of grease
on Y-shaped sealing ring
Clean and grease Y-
shaped sealing ring, clean
the tip cone Grease
accordingly
Incorrect operation
Follow instruction carefully
Calibration altered or
unsuitable for the liquid
Recalibrate according to
instructions
Instrument damaged
Send for service
Push button
jammed or moves
Piston contaminated
Clean and grease Y-
shaped sealing ring, clean

15
erratically
the tip cone
Penetration of solvent
vapours
Clean and grease Y-
shaped sealing ring, clean
the tip cone
Pipette blocked
aspirated volume
too small
Liquid has penetrated tip cone
and dried
Clean and grease Y-
shaped sealing ring, clean
the tip cone
Tip ejector jammed
or moves erratically
Tip cone and/or ejector collar
contaminated
Clean the tip cone and
the ejector collar
12.WARRANTY INFORMATION
The pipettes are warranted for one year against defects in materials and
workmanship. Should it fail to function in any period of time, please contact your
local representative immediately. The warranty will not cover defects caused by
normal wear or by using the pipette against the instructions gives in this manual.

16
Each pipette is tested before shipping by the manufacturer. The Quality Assurance
Procedure is your guarantee that the pipette you have purchased is ready for use.
13.SPECIFICATIONS
Single-channel Adjustable Volume Pipettes(10 models, covering 0.1μL~10mL.)
VoLume Range
Increment
Test VoLume
Systematic Error
Random Error
%
μL
%
μL
0.1-2.5uL
0.002uL
2.5uL
1.4%
0.04
0.7%
0.02
1.25uL
2.5%
0.03
1.5%
0.02
0.25uL
12.0%
0.03
6.0%
0.02
0.5-10uL
0.01uL
10uL
1.0%
0.10
0.4%
0.04
5uL
1.5%
0.08
0.8%
0.04
1uL
2.5%
0.03
1.8%
0.02
2-20uL
0.02uL
20uL
1.0%
0.20
0.3%
0.06
10uL
1.2%
0.12
0.6%
0.06
2uL
5.0%
0.10
1.5%
0.03

17
5-50uL
0.05uL
50uL
0.9%
0.45
0.3%
0.15
25uL
1.4%
0.35
0.8%
0.2
5uL
3.0%
0.15
1.6%
0.08
10-100uL
0.1uL
100uL
0.8%
0.80
0.2%
0.20
50uL
1.0%
0.50
0.3%
0.15
10uL
3.0%
0.30
1.0%
0.10
20-200uL
0.2uL
200uL
0.6%
1.20
0.2%
0.40
100uL
1.0%
1.00
0.3%
0.30
20uL
2.5%
0.50
0.7%
0.14
30-300uL
0.2uL
300uL
0.6%
1.80
0.2%
0.60
150uL
1.0%
1.50
0.3%
0.45
30uL
2.5%
0.75
0.7%
0.21
100-1000uL
1uL
1000uL
0.6%
6.00
0.2%
2.00
500uL
1%
5.00
0.2%
1.00
100uL
3%
3.00
0.6%
0.60
1000-5000uL
5uL
5000uL
0.6%
30.00
0.2%
10.00
2500uL
0.6%
15.00
0.3%
7.50
Table of contents
Other DLab Laboratory Equipment manuals

DLab
DLab D2012 User manual

DLab
DLab RE100-Pro User manual

DLab
DLab D3024 User manual

DLab
DLab DM0506 User manual

DLab
DLab MX-T6-Pro User manual

DLab
DLab OS20-Pro User manual

DLab
DLab Thermo Control H100-Pro User manual

DLab
DLab MS7-H550-S User manual

DLab
DLab MS-H380-Pro User manual

DLab
DLab SK-O330-Pro User manual