manuals.online logo
Brands
  1. Home
  2. •
  3. Brands
  4. •
  5. Dobinsons
  6. •
  7. Automobile Accessories
  8. •
  9. Dobinsons BU59-3661 User manual

Dobinsons BU59-3661 User manual

Dobinsons Springs and Suspension www.dobinsonsprings.com
Bullbar Installation Guide
Part Number: BU59-3661& BU59-3511
Fits:
Toyota Prado 120 Series
This Bullbar will take approximately 3 hours to install
Tools required are
•Spanners and socket set.
•Screwdrivers
•Pliers and side cutters
Dobinsons BULLBARS should be installed by a qualified installer and it is
the installer responsibility to ensure correct fitment.
Fully read and understand the instructions before beginning the installation
Dobinsons Springs and Suspension www.dobinsonsprings.com
Fitting Guide
1. Remove the number plate and remove the
grill.
2. Remove the clips along the top of the
bumper, the bolts along the edge of the wheel
arch and lower section of the bumper
attaching the bumper to the vehicle.
3. Carefully unclip the bumper from the edges
and under the headlights and carefully
remove.
4. With the bumper off you can now remove the
steel bumper mount and steel crush cans.
If removing the original bullbar some models
require the bullbar to be removed first, then
there are also bolts in the centre of the bullbar
mounting crush cans that need to be removed
as well before removing the original crush
cans.
5. From inside the chassis rails loosely install the
U-bolts supplied (item 3) facing out as seen on
page 3.
6. Loosely install the small mounting brackets
(item 2) to the outside of the chassis as per
diagram on page 3.
7. Install the bullbar mounting bracket (item 1).
Washers can be placed between the top and
bottom bolts between items 1 and 2 to take
up the gap as per the picture below. Ensure
though that when tightening the bracket
tights correctly and the washers do not sit
behind between the chassis and mounts.
Dobinsons Springs and Suspension www.dobinsonsprings.com
8. Ensure the bracket is central to the vehicle
and tighten all nuts and bolts installed in steps
5-7. Ensure when tightening that the u-bolts
have sufficient clearance to the radiator
support panel.
9. Carefully un-wrap the bulbar taking care not
to scratch it especially on the top loops.
Reinstall the number plate. If installing driving
lights to the bullbar it is easiest to install now.
10. If not installing a winch skip to step 19.
11. See the Installation section of your Dobinsons
4x4 Winch manual for specific detailed fitting
instructions. For a brief overview see the
following steps.
12. Test fit your winch to the mounting bracket
and do up loosely with the clutch handle on
the left hand side of the vehicle.
13. Some vehicles may also require the air
conditioner line to be relocated when
installing a winch. Unclip the passenger side
front mount, cut the mount shorter and drill a
6mm hole at the top of the mount and re-clip
this to its new position.
14. This may require the clutch handle and gear-
box housing to be rotated forward one or 2
bolt holes to allow easy access through the
bulbar holes. See instructions in winch user
manual.
15. Determine where the winch control box will
be located and mount the control box. See
instructions in winch user manual for control
box mounting options. If mounting to the top
of the bullbar using the supplied bracket,
check clearance of control box to grill and also
check where the wires will route as if the
wires are passing through the holes in the top
of the bullbar the control box may not be able
to be wired until the bullbar has been fitted as
below.
16. Wire the winch up as per the winch
instruction manual and bolt the winch to the
mounting bracket, ensure the mounting bolts
are not too long and tighten correctly. Route
Dobinsons Springs and Suspension www.dobinsonsprings.com
the wires and connect to battery and also
route the breather hose.
17. Unwind some cable from the winch, and pass
the cable through the fairlead hole in the
bullbar and through the roller fairlead. This
may require removing a circlip from the
fairlead and re installing once the cable is
passed through.
18. Install the roller fairlead into the bulbar.
19. Check the poly bulbar over riders, fog light
and top loop bolts are tight (Do not over
tighten the stainless steel loop mounting
bolts. Do not over tighten the poly bullbar
over riders as they will pull the over riders out
of shape).
20. If the bullbar has not been colour matched
the install may choose to carefully masking
tape each side of the vehicle to prevent over
spray and paint the lower stepped in lips of
the vehicle satin black for a nicer finish See
before and after pictures below.
21. With help, fit the bulbar onto the vehicle.
22. Align the bulbar to the vehicle and tighten the
mounting bolts, leaving a gap between the
bullbar wing and side guard of about 10-
20mm.
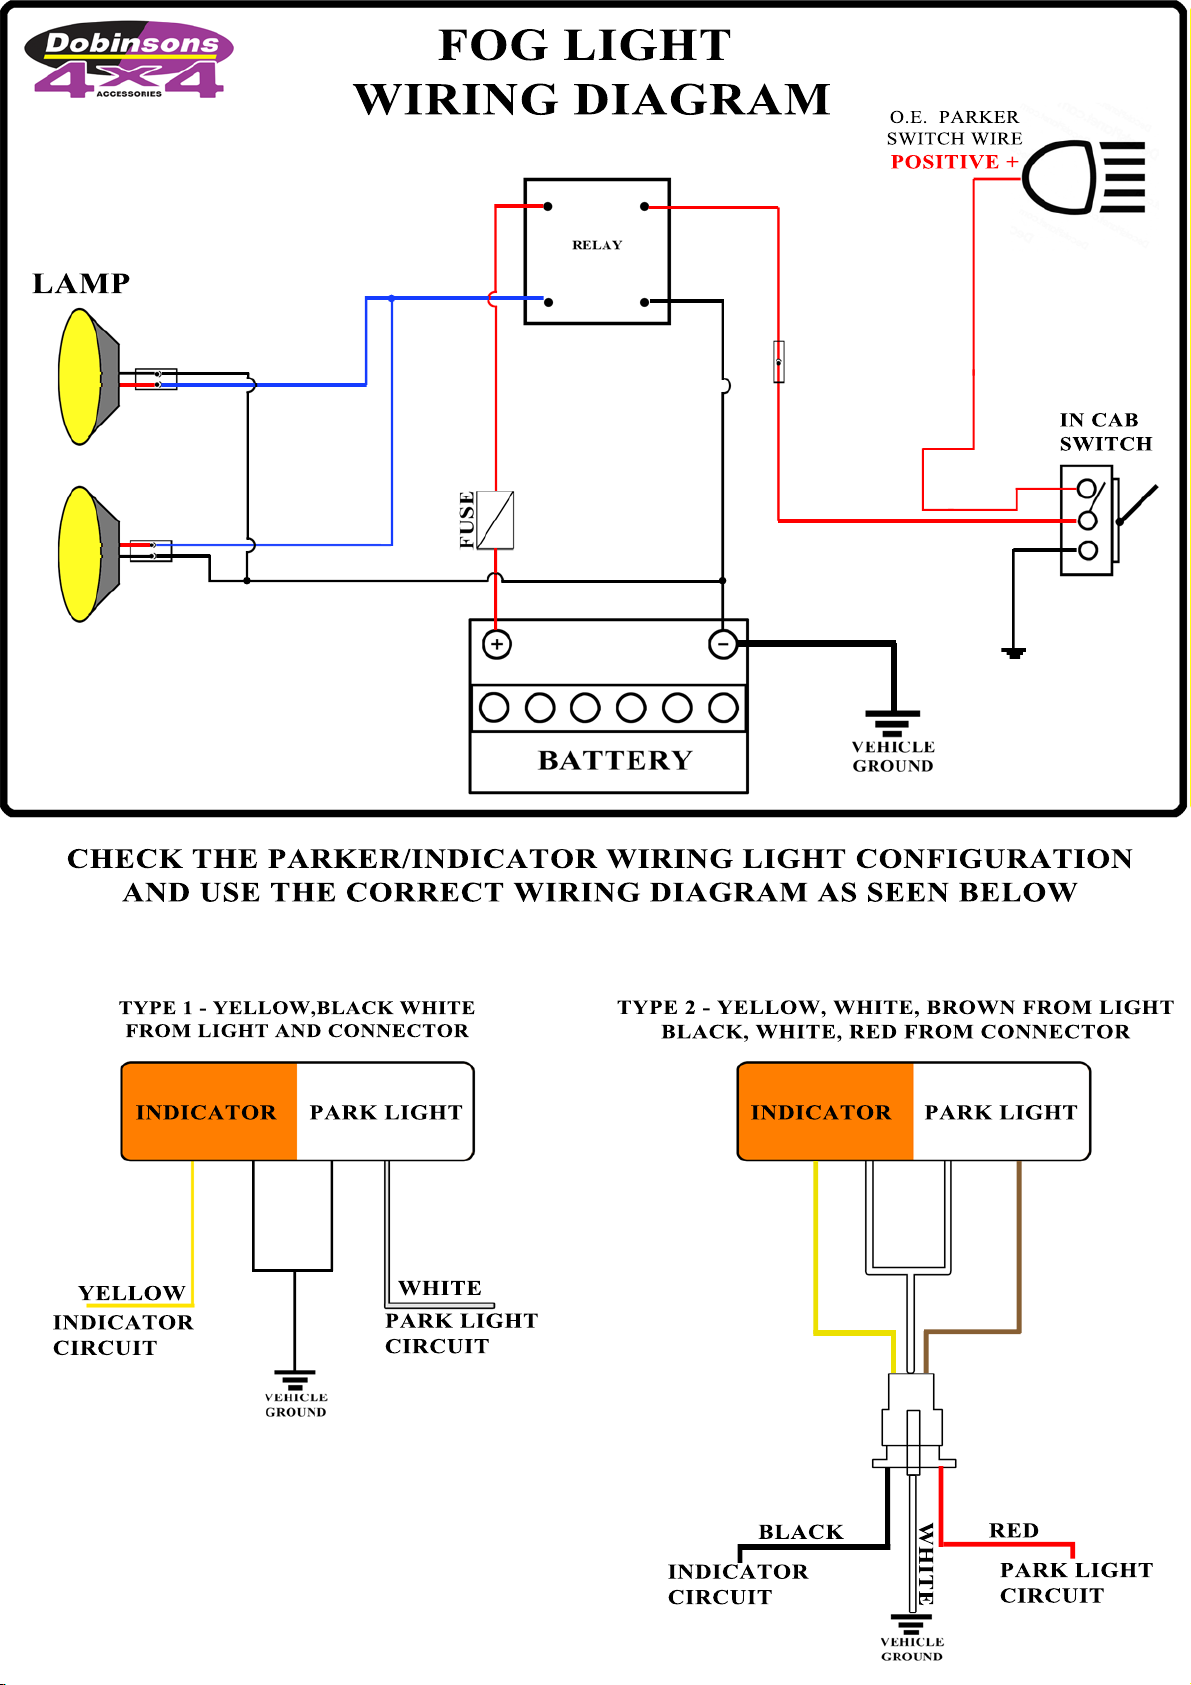
23. Wire up the lights. Using a multimeter or test
light first locate the earth wire, parker positive
and indicator positive wires from the wiring
on the back of the original vehicle lights on
each side.
24. Unclip the wiring from the indicator/parker
lights. Check that the wiring will be long
enough to reach the new bullbar
indicator/parker lights and extend if required.
Using the diagram at the end of this manual,
join the corresponding wires to original
vehicle wires located in the previous step. The
wires can be joined by either using good
quality snap lock crimp connectors or by
soldering. Ensure the connection is secure and
is sufficiently insulated.
25. If fitting a bullbar with fog lights, the fog lights
can be connected using the original vehicle
fog light wires if fitted. If required, cut the old
fog light wiring plugs off and cut the new fog
light wiring plugs and join. If the vehicle is not
fitted with OEM fog lights the wiring loom
supplied can be used. Follow the wiring
diagram at the end of this manual.
26. Check over all bolts to ensure they are tight.
27. Once happy with the alignment of the bullbar
drill 2 x 8mm pinning holes on each side of the
bullbar drilling through both the mounting
bracket mounting plate and bullbar mounting
plate. Fix with 8mm bolts and nyloc nuts to
keep the bullbar in its position. This is easiest
done by drilling from the inside.
Dobinsons Springs and Suspension www.dobinsonsprings.com
28. Plug the wiring clips in for the fog lights and
parker/indicator lights. Test all lights and
adjust the position of the fog lights if
required.
29. Using the fastening hardware supplied fit the
under bar protection kit.
30. Trim the mud guard liners level with the
bottom of the under protection kit and secure
with cable ties.
31. Check over all items removed during
installation.
32. IMPORTANT NOTES: It is important to inform
the customer that headlight adjustment may
also be required due to the change in ride
height. It is also important to inform the
customer that there will be a change in
vehicle handling characteristics. It is also
important to note that due to their nature fog
lights are required to provide a yellow light to
allow clear fog vision. For this reason
Dobinsons bullbars utilise a Halogen bulb.
Halogen bulbs generate a considerable
amount of heat to achieve the yellow colour
and this causes the air inside the fog light lens
to expand and contract. For this reason the
fog light assembly cannot be sealed and has a
small breather on the back. In some cases this
may cause condensation to form inside the
fog light. The customer may choose to seal
the lens of the fog light but must not seal the
rear breather.
Customer Copy: Bullbar Care Instructions
To ensure the surface finish quality it is recommended that the
bullbar be washed and cleaned regularly to prevent build up of
dirt and contaminants which when exposed to the elements can
degrade the surface finish. It is also recommended that the mounting fasteners on the bullbar be checked after
1000km’s. Winch servicing and care should also be carried out as per the winch instruction manual.
Stainless Loop Deluxe Bullbar Loop Care and Maintenance
(Customers with Stainless Loop Deluxe Models Only)
The top loops on your Dobinsons Stainless Loop Deluxe steel bullbar are manufactured from high quality 304 grade
stainless steel. Once formed and welded it is highly polished to provide a high gloss finish. Whilst the material is a
high quality stainless steel, like any other exterior polished surface, care and some maintenance is required to
ensure the surface finish quality.
It is recommended that the stainless loops be kept as clean as possible and is thoroughly washed and dried regularly
to prevent build up of dust and contaminants. This is especially important in coastal and high dust areas. The loops
can simply be cleaned with most regular car cleaning items like a soft sponge, car wash and a chamois, avoid strong
cleaning chemicals. Like many other highly polished exterior metals, over extended periods of time and heavy
weathering can cause some staining of the surface may occur. If this occurs the surface can be simply polished using
the following methods to remove the stains and restore the high gloss surface using simple tools and cheap readily
available polishing items.
Tools Required:
•Electric buffer or Electric drill (an electric/cordless drill is generally more convenient).
•Polishing compound – This can be supplied by Dobinsons Spring and Suspension. Please contact head office
on the details below for polish, as a specific type is used.
•Soft finishing type buffing wheel – The buffing wheel should be a soft, finishing type/Calico loose leaf style to
allow the surface to be polished to a high gloss without further marking the surface. The 2 types of discs
shown below are readily available from most hardware stores (Australian customers – Bunnings etc). The
brand below is Josco, and if purchasing a twin pack ensure that only the finishing buff is used and not the
cutting buff. DO NOT USE METAL OR HARSH BUFFING PADS.
Method
1. The stainless loops may be removed from the bullbar if this makes it easier to work on, however if using a
cordless drill this is not a necessity. If removing the loops, do not over tighten the loop retaining bolts when
re fitting.
2. Ensure the loops are first completely clean and dry.
3. Fit the polishing buff wheel to the drill or buffing tool –take note of the maximum wheel speed and rotation
direction.
4. It is recommended to follow specific instructions on the packaging of the buffing wheel for best results.
However if no instructions are provided the following guidelines can be used:
A). Carefully dress the buff wheel with the compound across the rotating wheel for a few seconds, taking
care not o apply too much compound, it is better to apply a little compound more frequently than to
overdress the buff.
B). Gently buff the work area with the buffing wheel and with light pressure move back and forth across the
job.
C). After polishing use a soft, clean, dry rag to clean the surface and inspect in the light for an even finish.
D). Once complete clean thoroughly again with a sponge and warm water.
Dobinsons Spring and Suspension
www.dobinsonsprings.com

This manual suits for next models

1

Other Dobinsons Automobile Accessories manuals

Dobinsons BU59-3660 & BU59-3510 User manual

Dobinsons

Dobinsons BU59-3660 & BU59-3510 User manual

Dobinsons BU45-3505 User manual

Dobinsons

Dobinsons BU45-3505 User manual

Dobinsons BU59-3533 User manual

Dobinsons

Dobinsons BU59-3533 User manual

Dobinsons BU45-3539 User manual

Dobinsons

Dobinsons BU45-3539 User manual

Dobinsons Isuzu D-Max 2012 on User manual

Dobinsons

Dobinsons Isuzu D-Max 2012 on User manual

Dobinsons BU19-3542 User manual

Dobinsons

Dobinsons BU19-3542 User manual

Dobinsons BU59-3506 User manual

Dobinsons

Dobinsons BU59-3506 User manual

Dobinsons BU59-3508 User manual

Dobinsons

Dobinsons BU59-3508 User manual

Dobinsons BU59-3545 User manual

Dobinsons

Dobinsons BU59-3545 User manual

Dobinsons BU63-3523 User manual

Dobinsons

Dobinsons BU63-3523 User manual

Dobinsons BU59-3541 User manual

Dobinsons

Dobinsons BU59-3541 User manual

Dobinsons BU59-3518 User manual

Dobinsons

Dobinsons BU59-3518 User manual

Popular Automobile Accessories manuals by other brands

Prorack K129 Fitting instructions

Prorack

Prorack K129 Fitting instructions

Compass 01 245 manual

Compass

Compass 01 245 manual

STO N SHO SNS 138a Installation procedures

STO N SHO

STO N SHO SNS 138a Installation procedures

Havis-Shields 2006-2007 Dodge Charger and Magnum... Install instructions

Havis-Shields

Havis-Shields 2006-2007 Dodge Charger and Magnum... Install instructions

HUSKY LINERS 6250 Care and use instructions

HUSKY LINERS

HUSKY LINERS 6250 Care and use instructions

NavLinkz RL4-MZD88 manual

NavLinkz

NavLinkz RL4-MZD88 manual

KT SOLAR KT70743 user manual

KT SOLAR

KT SOLAR KT70743 user manual

EVEXPERT EVECUBE 2C user manual

EVEXPERT

EVEXPERT EVECUBE 2C user manual

Fiamma CARRY-BIKE VOLKSWAGEN T5 PRO Installation and usage instructions

Fiamma

Fiamma CARRY-BIKE VOLKSWAGEN T5 PRO Installation and usage instructions

Techart 086.530.200.001 RDW Mounting instructions

Techart

Techart 086.530.200.001 RDW Mounting instructions

Whelen Engineering Company Micro Edge installation guide

Whelen Engineering Company

Whelen Engineering Company Micro Edge installation guide

Mont Blanc FK213 Fitting instructions

Mont Blanc

Mont Blanc FK213 Fitting instructions

STO N SHO SNS 174 Installation procedures

STO N SHO

STO N SHO SNS 174 Installation procedures

Axxess AXDIS-VW1 installation instructions

Axxess

Axxess AXDIS-VW1 installation instructions

Prorack K894 Fitting instructions

Prorack

Prorack K894 Fitting instructions

Federal Signal Corporation XHK-SD installation instructions

Federal Signal Corporation

Federal Signal Corporation XHK-SD installation instructions

Thule 2018 installation instructions

Thule

Thule 2018 installation instructions

Road Angel RA8100 User's installation guide

Road Angel

Road Angel RA8100 User's installation guide

manuals.online logo
manuals.online logoBrands
  • About & Mission
  • Contact us
  • Privacy Policy
  • Terms and Conditions

Copyright 2025 Manuals.Online. All Rights Reserved.