DOD FS580+ User manual

FS580+
User Manual


1
Safety instructions
About the product
•For your safety, please do not watch the video or operate the product while
driving. To install and set up this product, please park your car in a safe
place first.
•Please read this User's Manual before operating the product.
•Do not install the product in a place where it may cause interference with
the use of the product.
•Do not use the product in high temperature and highly humid
environments.
•Please do not leave this product in direct sunlight for a long time to avoid
reducing the life of the product. When not using the product, please store
the product in a dry environment at room temperature.
•If the machine breaks down during use, do not disassemble or repair it
yourself, but contact your local product dealer.
About car chargers
•Please use the charger provided by the original manufacturer. Using a
non-original charger may cause malfunction or danger.
•Please do not keep inserting and removing the car charger to avoid damage.
•Do not touch the car charger when your hands are wet.
•If the car charger is damaged, do not try to repair it yourself, but replace it
immediately.
About Batteries
•Some models have built-in batteries, please avoid using them in high
temperature environment.
•Because the battery will be automatically discharged even when not in use,
so when the machine needs to be idle for a long time, please put the host in
a dry environment at room temperature to avoid excessive battery
discharge in a low state resulting in the inability to boot up, such as the
occurrence of the host can not boot up, please connect the host to the
power charge for a few minutes and then turn on.

2
Other Description
Product Upgrade
Please go to the DOD website to download the latest software. When
downloading the latest software, please check the system version first (if the
host's current software version is higher than the version released on the
official website, it is recommended not to change the software).
•Connect the memory card in the host to the computer with a card reader.
•Go to the DOD website and search for [corresponding product model]
Support → Update and Download. After downloading, please extract the
update file and copy it to the root directory of your memory card.
•After copying, insert the memory card into the host computer, connect the
power, the machine will automatically run the upgrade program, and the
machine will automatically boot up after the upgrade is completed.
•After the product upgrade is completed, please have the host system
formatted to avoid repeating the update the next time you boot up.
About Memory Cards
•It is recommended to format the memory card about every two weeks to
ensure that the card works properly.
•It is recommended to use Class C10 U3 V30 or above, MLC process memory
card (3000~10000 write count). Memory card capacity depends on the
model: Memory cards up to 256GB are supported.
•Do not remove the memory card directly when the device is turned on. It is
recommended that you turn off the device before removing the memory
card to avoid damaging the recorded files on the memory card.
NOTE:
The memory card is a consumable item and must be replaced by a
new one depending on the usage.

3
Buttons and screen display
* Button functions and screen displays vary by model
A
A B
B C
C D
D E
E
F
F
G
G
H
H
I
I
A. Subnet switching / WiFi
B. Microphone / Downward
C. Confirmation / Playback
D. Upward / Recording
E. Power Switch / Menu
F. Rear lens connection port
G. Power port
H. Memory Card
I. Reset key
Menu Bar
GPS
11/06/2022
00:02:13
Resolution
LOCK
Recording
Time
Date Time

4
Mode
Button
Description
Standby / Recording Mode
Switch on/off
Short press: Lock file
Long press: capture in video
Short press: Go to playback
Press and hold: Switch to record on/off
Short press: Go to setting menu
Press and hold: Switch on/off recording
Short press: switch the front and back lens display
screen
Long press: Switch WiFi on/off
Settings / Playback
Switch on/off
Top Menu
Confirmation
Next Menu
Back
WiFi mode
Switch on/off
Locking File
SSID SSID display
Snapshot in the video
Short press: switch the front and back lens display
screen
Long press: Switch WiFi on/off
LED
Lamp
No.
Lamp Number Description
Red Light In the video
Green Light WiFi mode

5
Installation
Installation location and alignment
*Drawings are for reference only, subject to the real thing
Cleaning windshields
Installation
Find a suitable location on the car, not blocking the driver's view and
safety, install the bracket and hang the machine.
Adjust the lens angle
Adjust the angle of the lens by adjusting the angle of elevation of the main
unit to make sure it is level with the ground.
*Do not forcefully twist the cable set inside the ball head of the bracket to
avoid damage to the bracket.
Memory Card
Please insert the card into the host according to the card slot icon [ ].
To ensure that the card can be used normally, please format the card with
the host first.
*Formatting will delete all the data in the card, so please keep the
important data first.

6
Connected Power
Before connecting the power, please be sure to first connect the host and rear
lens USB cable installation is complete, finally connect the car charging power
to the car to reduce the host and rear lens damage chance.
NOTE:
Please use the
original car charger to avoid damage caused by
non-compliance with the specifications.
If there is oil, fingerprints or other dirt on the inside or outside of
the windshield, wipe it clean before installing it.
When using the bracket, please choose the position carefully. Do
not place the main unit in a position that will obstruct the view
of driving or affect the normal operation of the airbag.
Road
conditions vary from country to country, so it is
recommended to set the gravity sensor to "low" to avoid
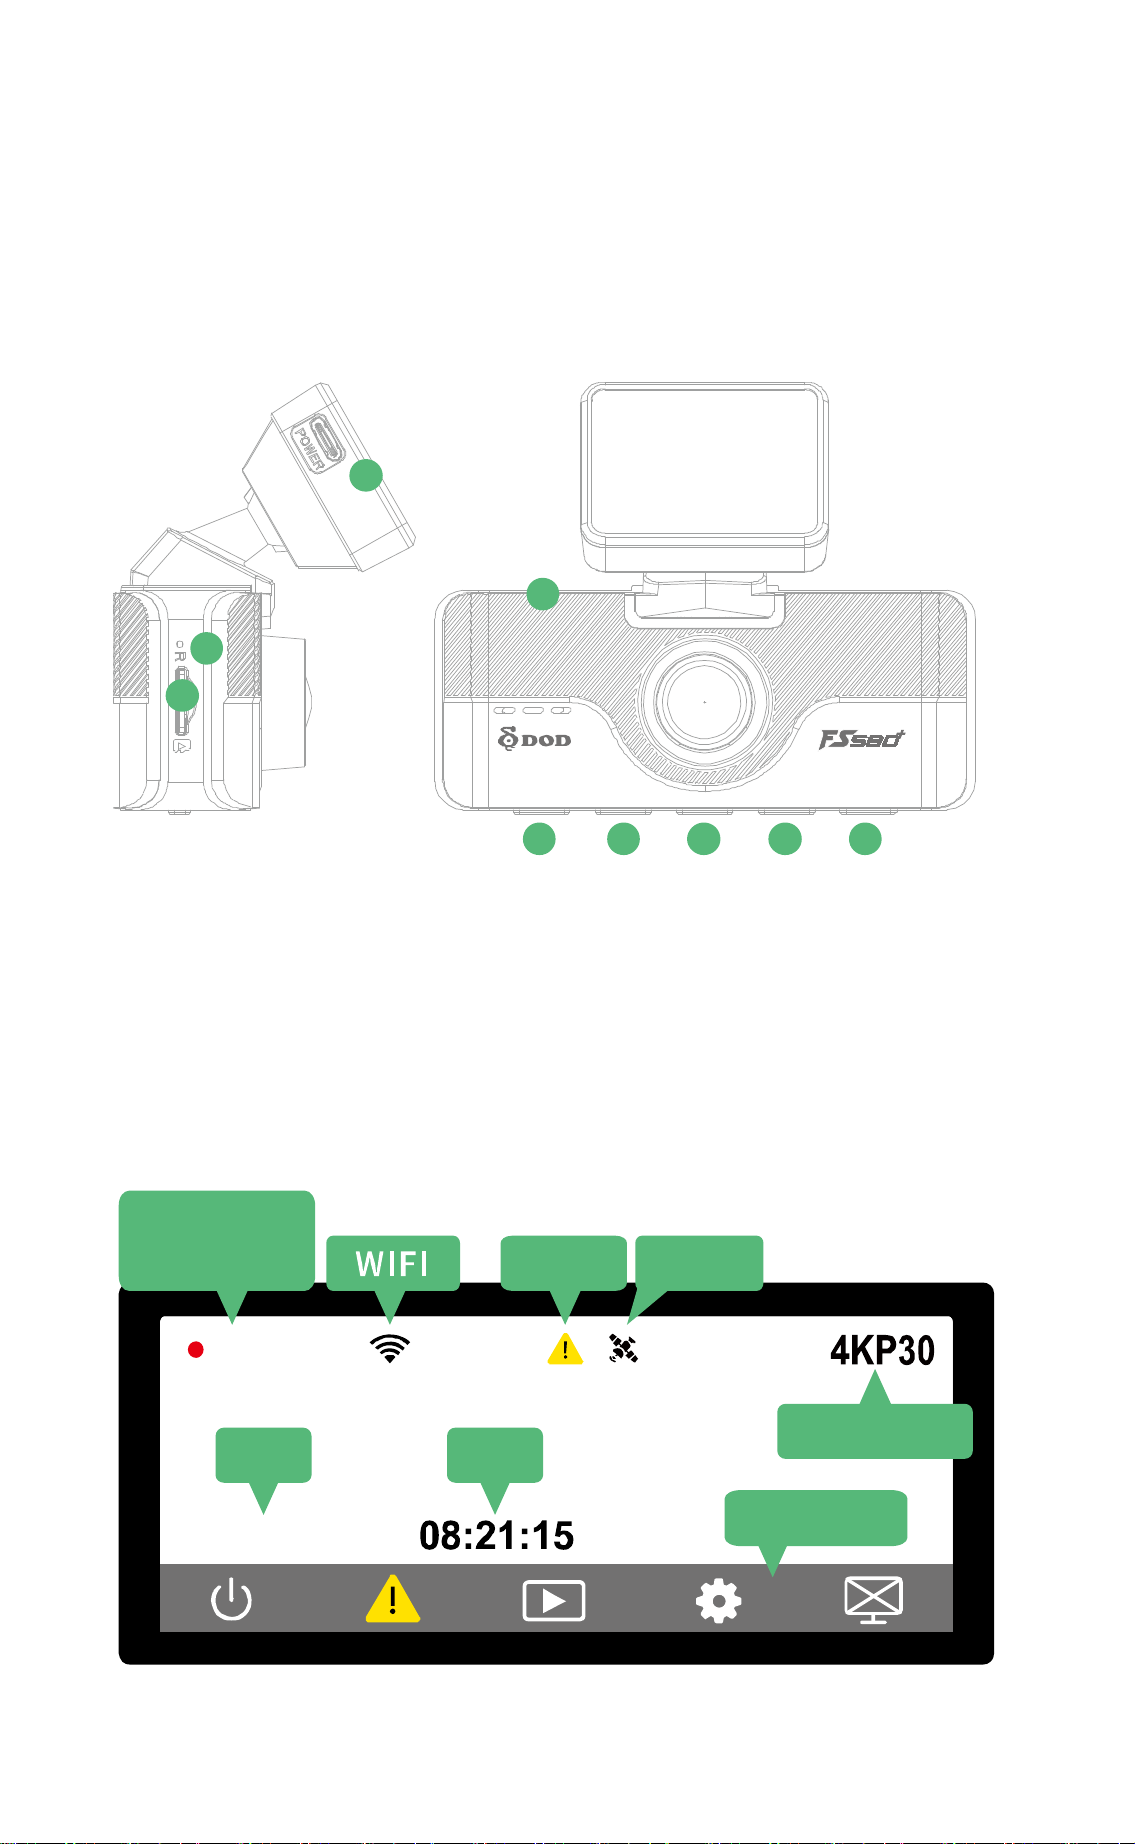
frequent gear locking.
Turn on and off
The machine will automatically turn on and start recording when the vehicle is
started, and will automatically turn off when the vehicle is turned off and the
power is cut.
NOTE:
For certain models, the power will not be cut off immediately
when the vehicle is turned off. This situation may cause the
machine to continue to consume power, which may lead to the
depletion of the vehicle battery.
Constant Power
If your vehicle recorder is connected to a constant power source, simply
unplug the USB power source after the engine is turned off to turn it off.
Watch the video
The video will be stored on a memory card, which can be watched in playback
mode by the camera or by inserting the card into a computer.
The files on the card will be categorized as follows:
Loop recording clip: The length of the video varies depending on user
settings.
Video folder is VIDEO
Lock the file folder to EMERGENCY
Example.
Previous video file name: 20220601192757_000001A
Post-camera video file name: 20220601192757_000001B
*The string represents the date and time the video was shot (in the order of
year, month, day and 24 hours)

7
WiFi
※This function is available for models with WiFi capability.
Please scan the QR code link to APP store to download the latest version of
"DOD Dashcam" APP to your smart device.
Android
iOS
Note:
DOD Dashcam APP supports version iOS7 or above Android4.5 or above.
As each model varies, it is recommended to update your smart device to the latest
version.

8
Link Description
1. Press the Wi-Fi switch on the machine → Open AP mode → Use your phone
or tablet to connect to the machine Wi-Fi and enter the password → After
the connection is completed, you can start the operation.
Preset password: 12345678
SSID:FS580+
PWA2:12345678
SSID
00:02:13
2. After opening the APP, click the camera icon to enter the camera list, click the
link icon of the model you want to connect, then finish the APP connection.
3. Or follow the image step-by-step instructions in the App Help Guide to link.
Note:
•The Wi-Fi password only needs to be entered the first time you connect, and if
it is not changed, you can skip the password entry for the next connection.
•The password can be changed within the app, and is limited to English
semi-formats, with symbols and spaces disabled.
•Wi-Fi connectivity varies depending on the distance and environment, and the
recommended range is within one meter.

9
●1Switching front and rear camera display
●2Capture the moment
●3Cell phone brightness adjustment
●4Turn on/off recording
●5Return to Link Control page
●6File Browse
●7Turn on/off recording
●8Settings
●9Google Map
*Need to turn on the
phone GPS function

10
Function Setting Menu
※The menu varies depending on the model, so please refer to the update
instructions released with the firmware for adding, deleting or changing
features.
Press []once to enter the function setting.
Function
Options
Preset value
Resolution
4KP30 / 1600P30 / 1440P60 / 1440P30 /
1296P30 / 1080P60 / 1080P30 / 720P120
1440P30
Single front
mirror
4KP30+1080P30 / 1600P30+1080P30 /
1440P30+1080P30 / 1296P30+1080P30 /
1080P30+1080P30
4K30+
1080P30
Double Mirror
Video format
TS / MP4
MP4
Screen Display Front lens / Back lens / Sub screen
Mother and
Child Screen
Loop Recording
1 minute / 3 minutes / 5 minutes
1 minute
Date/time
2022 / 01 /01 / 00:00:00
WiFi
Open / Close
Close
Recording
Open / Close
Open
GPS Status
Watch GPS Receiving Status
Parking Monitoring
Close / 1 second 1 shot
Close
Crash Sensitivity
Close / Low / Medium / High
Close
WDR
Open / Close
Close
Film Marker Time / Time + Latitude / Time + Latitude &
Longitude hourly speed
Time
Image editing format
H.264 / H.265
H.265
Rear lens mirroring
Open / Close
Close
Exposure settings (before)
-1.0-2/3-1/3+00+1/3+2/3+1.0
00
Exposure settings (after)
-1.0-2/3-1/3+00+1/3+2/3+1.0
00
Key Tone
Open / Close
Open
Screen Protection
Close / 1 minute / 3 minutes
1 minute
Language
Traditional / Simplified Chinese / English
Formatting Memory Cards All data will be deleted after formatting the
card Cancel/Confirm
Formatting Tips
Close / 15 days / 30 days / 60 days
60 days
Restore the original factory
settings
Restore appearance settings and menu
cancel/confirm

11
Product Specifications
Recording Resolution
Front: 3840x2160@30fps
Rear: 1920x1080@30fps
Light-sensitive element
SONY STARVIS CMOS Sensor
Wide angle lens
140°
Aperture
f/1.7
Video format
MP4 / TS
Compressed Format
H.264 / H.265
EV value
Independent adjustment of front and rear lenses
WiFi
2.4G support
Battery
Jin Danyong
Audio
Built-in microphone/speaker (mono)
Recording Media
SDXC Class 10 or higher, supporting up to 256GB
Memory card (*Recommended to use U3 high-speed read/write
memory card)
GPS speed warning
YES
G-SENSOR
YES
Manual gear lock
YES
Loop Recording
YES
Parking Monitoring
YES (*Optional parking power shield required)
Power
5V 1.5A
Size Front: 95(L) x 48(W) x 73(H) mm
Back: 70(L) x 40(W) x 40(H) mm
Weight
Before: 125g After: 30g
Temperature
-20°C~65°C (-4°F~149°F)

12
DOD Warranty Terms
DOD LIMITED WARRANTY
Product
Category
Warranty Period Note
Camera 1 years
Warranty period is effective on the
date of purchase of the product
from DOD’s authorized dealers.
Malfunctions and damage caused by
misuse, neglect, natural disasters or
abnormal electricity currents will
not be covered by the warranty.
Battery 6 months
Parts &
Accessories 6 months
1. Please keep the invoice and warranty card.
2. If the invoice or warranty card for the camera is missing, please
provide the device's serial number to DOD customer service so
that the warranty can be fulfilled.
The product is not included inside the warranty:
3. Malfunctions and damage caused by misuse, neglect, natural
disasters or abnormal electricity currents will not be covered by
the warranty.
All rights reserved by DOD Tech Co.,Ltd

13
Guarantee Certificate
Product Model No.
Serial No. Date of Purchase
//
DOD authorized distributor
Copyright ©2023 DOD Tech Co., Ltd.
All Rights Reserved
Under the copyright laws, this manual may not be copied,
in any way, shape, or form, without the written consent of DOD Tech Co., Ltd.
Table of contents
Other DOD Dashcam manuals