Doppler EXPERT User manual

Art-Nr.: 428441 (280)
434441 (320)
461441 (2 ×3)
437441 (220 ×140)
Anl.-Nr.: 194546 20220607
EXPERT Auto Tilt
280 / 320 / 2 ×3 / 220 ×140
Aufbau- und
Gebrauchsanleitung

A
C
4
D
5
E
6
7
1
2
F
B
3
2
1

H
5
G
5
I
5
J
4

5
EXPERT Auto Tilt
280 / 320 / 2 × 3 / 220 × 140
Aufbau- und
Gebrauchsanleitung
Lesen Sie diese Aufbau- und
Gebrauchsanleitung, insbe-
sondere die Sicherheitshin-
weise, vollständig und sorgfältig durch.
Die Nichtbeachtung dieser Sicherheits-
hinweise kann zu Verletzungen oder zu
Schäden am Sonnenschirm führen. Be-
wahren Sie die Aufbau- und Gebrauchs-
anleitung zum späteren Nachschlagen
auf, und geben Sie sie stets ebenfalls
mit, wenn Sie den Sonnenschirm an Drit-
te weitergeben.
Ihre Sicherheit
Bitte beachten Sie die folgenden
Sicherheitshinweise. Für Schä-
den infolge von Nichtbeachtung
haftet der Hersteller nicht.
Sonnenschirm nur mit ausreichender Bal-
lastierung benutzen (siehe Technische Da-
ten).
Stellen Sie den Sonnenschirm immer auf
einen festen und ebenen Boden.
Verwenden Sie für den Sonnenschirm ei-
nen stabilen Standfuß.
Der Sonnenschirm sollte von einer kom-
petenten erwachsenen Person aufgestellt
werden.
Beim Öffnen und Schließen des Sonnen-
schirms achten Sie bitte darauf, dass Ih-
re Hände nicht in den Klappmechanismus
geraten.
Bei aufkommendem Wind oder Gewitter
den Sonnenschirm schließen und mit ei-
nem Befestigungsband sichern. Er kann
sonst von einer Böe erfasst und umgewor-
fen werden und dabei Schäden anrichten
oder selbst beschädigt werden.
Niemals offenes Feuer in der Nähe oder
unterhalb des Sonnenschirmes entfachen.
Der Sonnenschirm kann Feuer fangen
oder durch Funkenflug beschädigt werden.
Der Sonnenschirm ist kein Kinderspiel-
zeug. Kinder können sich die Finger
klemmen. Zudem besitzt der Sonen-
schirm ein erhebliches Gewicht und
kann Kinder beim Umfallen verletzen.
An den Querstreben des Sonnenschirms
nichts aufhängen oder gar Klimmzüge
daran machen.
Der Sonnenschirm kann Ihre Haut vor
direkter UV-Strahlung aber nicht vor re-
flektierenden UV-Strahlen schützen.
Deshalb zusätzlich kosmetische Son-
nenschutzmittel verwenden.
Um den Sonnenschirm vor übermäßiger
Beanspruchung zu schützen, Sonnen-
schirm bei Regen oder Schnee schlie-
ßen und mit einem Befestigungsband si-
chern.
Der Bezug ist nicht für Maschinenwä-
sche, Chemisches Reinigen oder Blei-
chen geeignet.
Verwenden Sie keine aggressiven che-
mischen Reiniger oder Flüssigkeiten, Lö-
sungen, scheuernde Substanzen oder
Gegenstände, Bleichmittel, Hochdruck-
reiniger und starke Reinigungsmittel.
Bitte beachten Sie die eingenähten Pfle-
gehinweise.
Verwendungszweck
Der Sonnenschirm ist zum Schutz vor
direkter UV-Strahlung geeignet. Zum
Schutz vor Regen oder Schnee ist er
nicht gedacht.
Der Sonnenschirm ist nur zum Einsatz im
privaten Bereich bestimmt. Garantie er-
lischt bei gewerblicher Nutzung.
DE

6
Schirm aufbauen
Um dem Sonnenschirm sicheren Halt
zu geben, muss folgender Schirmsockel
verwendet werden. Bei Modell
280 85897AGT 50 kg
320 85897AXT 70 kg
2 × 3 85897AXT 70 kg
220 × 140 85897AMT 40 kg
1. Schirmsockel an die gewünschte Stel-
le setzen.
2. Falls noch nicht montiert, Schirmspit-
ze auf das Gewinde schrauben (sie-
he Bild A).
3. Knebel 1gegen den Uhrzeigersinn
lose drehen.
4. Schirmmast 2mindestens 10 cm
tief in den Unterstock 3gleiten las-
sen (siehe Bild B).
5. Knebel 1im Uhrzeigersinn festdre-
hen.
Schirm öffnen
Vergewissern Sie sich, dass der Son-
nenschirm ausreichenden Halt hat, d.h.
der Schirmsockel ein ausreichendes Ge-
wicht besitzt (siehe „Technische Daten“).
1. Befestigungsband 4und gegebenen-
falls Schutzhülle abnehmen (siehe
Bild C).
2. Sonnenschirm mit der Hand leicht öff-
nen (siehe Bild C).
3. Kurbel 5im Uhrzeigersinn drehen,
bis der Sonnenschirm so weit geöff-
net ist, wie Sie es wünschen (siehe
Bild D).
Bitte beachten: Wenn der Sonnen-
schirm vollständig geöffnet ist, befindet
sich der Schieber 6so weit oberhalb des
Knickgelenks 7, dass dieses freiliegt.
Höhe einstellen
1. Knebel 1gegen den Uhrzeigersinn
lose drehen.
2. Sonnenschirm am Schirmmast 2
anfassen und auf die gewünschte
Höhe einstellen.
3. Knebel 1im Uhrzeigersinn festdrehen.
Schirm neigen
Bitte beachten: Der Sonnenschirm
lässt sich nur neigen, wenn er vollstän-
dig geöffnet ist (vgl. dazu auch den Ab-
schnitt „Sonnenschirm öffnen“).
• Um den Sonnenschirm seitlich zu
neigen, die Kurbel 5am bereits völ-
lig geöffneten Sonnenschirm noch
weiter im Uhrzeigersinn drehen (sie-
he Bild G).
Schirm schließen
Bitte beachten:
– Bei aufkommendem Wind, Regen
oder Schnee müssen Sie den Son-
nenschirm schließen. Schäden, die
anderenfalls entstehen, sind von der
Garantie ausgenommen.
– Beim Schließen des Sonnenschirms
kann es vorkommen, dass der Be-
zug sich zwischen den Streben ein-
klemmt. In diesem Fall bitte den Be-
zug vorsichtig zwischen den Streben
hervorziehen.
1. Kurbel 5gegen den Uhrzeigersinn
drehen, bis der Sonnenschirm ge-
schlossen ist (siehe Bild Hund I).
Falls der Bezug zwischen den Stre-
ben eingeklemmt ist, den Bezug vor-
sichtig zwischen den Streben hervor-
ziehen.
2. Zum Schutz vor Windböen den Be-
zug mit einem Befestigungsband 4si-
chern (siehe Bild J).
Zum Schutz vor Verschmutzungen
und Ausbleichen eine Schutzhülle
überziehen (nicht im Lieferumfang).
DE

7
Pflege + Lagerung
Der Bezug besitzt eine Fleckenschutz-
Imprägnierung. Zum Reinigen verwen-
den Sie am besten eine weiche Bürste
und ein wenig Seifenlauge.
Der Stoff kann mit der Handwäsche bei
40 °C gewaschen werden. Verwenden
Sie keinen Wäschetrockner. Nicht bü-
geln. Nicht chemisch reinigen.
Säubern Sie den Schirmmast regelmä-
ßig, um ein einwandfreies Gleiten der be-
weglichen Teile zu gewährleisten. Gege-
benenfalls mit Silicon- oder Teflon-Gleit-
spray einsprühen.
Alle tragenden Teile wie Streben, Schrau-
ben etc. regelmäßig überprüfen.
Bauen Sie den Sonnenschirm in voll-
kommen trockenem Zustand ab und la-
gern Sie ihn über Winter in einem trocke-
nen, gut durchlüfteten Raum.
Lagern Sie den Sonnenschirm wenn
möglich im Stehen und ohne Belastung
auf dem Sonnenschirm.
Zu Saisonbeginn vergewissern Sie sich,
dass alle Komponenten und Befesti-
gungsteile sicher sind. Verwenden Sie
das Produkt nicht, wenn Sie unsicher
sind.
Garantie
Die Garantiefrist für diesen Artikel be-
trägt 36 Monate.
Sollten Sie während dieser Zeit einen
Defekt feststellen, wenden Sie sich bitte
an Ihren Händler. Damit wir Ihnen schnell
helfen können, bewahren Sie bitte den
Kaufbeleg auf und nennen Sie uns den
Modellnamen und die Artikelnummer.
Von der Garantie ausgeschlossen sind:
– Normaler Verschleiß und Farbverän-
derungen der Textilbespannung;
– Lackschäden, die auf normale Abnut-
zung zurückzuführen sind;
– Schäden durch nicht-bestimmungs-
gemäßen Gebrauch (z. B. als Regen-
schutz);
– Schäden durch Wind, Überdrehen der
Kurbel, Umfallen des Sonnenschirms,
starkes Ziehen an den Schirmstreben;
– Schäden durch bauliche Veränderun-
gen an dem Artikel.
Service
Liebe Kundin, lieber Kunde,
obwohl wir unsere Artikel vor der Ausliefe-
rung einer eingehenden Endkontrolle un-
terziehen, kann es vorkommen, dass ein-
mal ein Zubehörteil fehlt oder dass ein Teil
während des Transports beschädigt wur-
de. Wenden Sie sich in diesem Fall an un-
sere Hotline und nennen Sie uns den Mo-
dellnamen und die Artikelnummer.
Hotline
Sie erreichen uns
Mo. bis Do. von 800 bis 1600 Uhr
Fr. von 800 bis 1200 Uhr
unter der Telefonnummer
in Österreich (07722) 632 05-316
in Deutschland (08571) 91 22-316
in Tschechien (0386) 301615
in Polen (0660) 460460
in Slowenien (0615) 405673
in Kroatien (0615) 405673
in Ungarn +43(0)7722 63205–107
in Russland (095) 6470389
Adresse
doppler
E. Doppler & Co GmbH
Schloßstraße 24
A-5280 Braunau am Inn
www.dopplerschirme.com
DE

8
Technische Daten
Modell EXPERT Auto Tilt 280
Artikel-Nr.: 428441
Ballastierung, mind. kg: 50
Höhe gesamt in cm, max.*): 245
Höhe Boden-Schirm in cm, max.*): 205
Durchmesser in cm, ca.: 275
Gewicht in kg: 6,2
Regenabweisend: Ja
Modell EXPERT Auto Tilt 320
Artikel-Nr.: 434441
Ballastierung, mind. kg: 70
Höhe gesamt in cm, max.*): 255
Höhe Boden-Schirm in cm, max.*): 200
Durchmesser in cm, ca.: 317
Gewicht in kg: 6,8
Regenabweisend: Ja
Modell EXPERT Auto Tilt 2 × 3
Artikel-Nr.: 461441
Ballastierung, mind. kg: 70
Höhe gesamt in cm, max.*): 261
Höhe Boden-Schirm in cm, max.*): 220
Durchmesser in cm, ca.: 302 x 198
Gewicht in kg: 6,8
Regenabweisend: Ja
Modell EXPERT Auto Tilt 220 ×140
Artikel-Nr.: 437441
Ballastierung, mind. kg: 40
Höhe gesamt in cm, max.*): 253
Höhe Boden-Schirm in cm, max.*): 205
Durchmesser in cm, ca.: 220 x 140
Gewicht in kg: 5,5
Regenabweisend: Ja
*) ohne Sockel gemessen
Alle Angaben sind Zirka-Werte. Techni-
sche Änderungen vorbehalten.
DE

9
EXPERT Auto Tilt
280 / 320 / 2 × 3 / 220 × 140
Assembly instructions and
user manual
Carefully read through the
complete assembly instruc-
tions and user manual, par-
ticularly the safety instructions. Failure to
heed these safety instructions may result
in severe injury or damage to the sun
shade. Store the assembly instructions
and user manual for future reference and
always include them when passing the
sun shade on to third parties.
Your safety
Please observe the following
safety instructions. The manu-
facturer is not liable for damage
as the result of failure to comply.
Only use the sun shade with sufficient
ballasting (see Technical data).
Always place the sun shade on a firm
and level surface.
Use a stable support foot for the sun shade.
The sun shade should only be erected by
a competent adult.
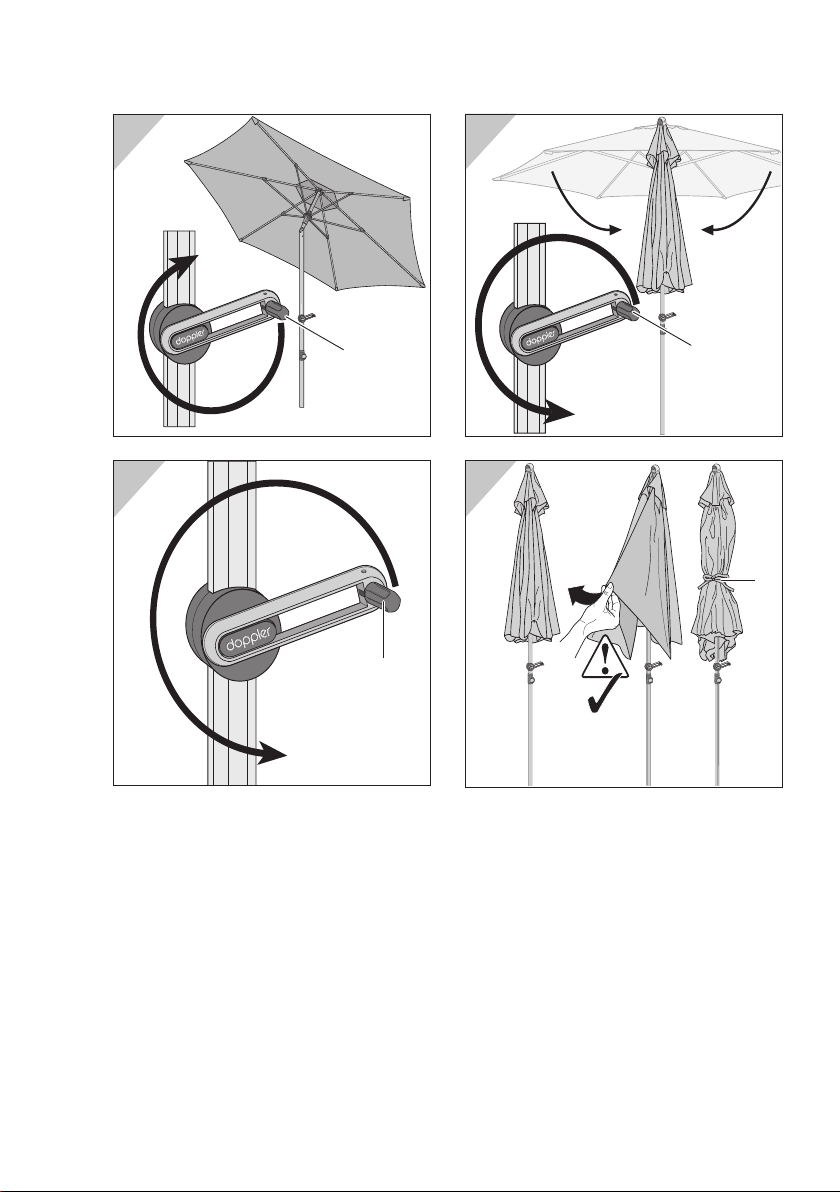
When opening and closing the sun
shade, please make sure to keep your
hands outside of the folding mechanism.
In the case of approaching wind or storm,
close the sun shade and secure with a tie
strap. Otherwise, it could be caught by a
gust and overturned and inflict damage in
the process or sustain damage as a result.
Never ignite an open fire in the vicinity of
or underneath the sun shade. The sun
shade may catch fire or be damaged by
airborne sparks.
The sun shade is not a children’s toy.
Children could trap their fingers. Also,
the sun shade is heavy and could injure
children if it tips over.
Do not hang anything on the lateral brac-
es of the sun shade or even use them for
chin-ups.
The sun shade can protect your skin
from direct UV radiation, but not from re-
flected UV rays. For this reason, please
also use a cosmetic sun block.
In order to protect the sun shade from ex-
cessive strain, close the sun shade in the
event of rain or snow and secure it with
a tie strap.
The cover is not suitable for machine
washing, dry cleaning or bleaching.
Do not use aggressive chemical cleaning
agents or fluids, solvents, abrasive sub-
stances or objects, bleaching agents,
high-pressure cleaners or strong clean-
ing products.
Please note the information on the care
label sewn into the sun shade.
Intended use
The sun shade is suitable for providing
protection against direct UV radiation.
It is not intended to provide protection
against rain or snow.
The sun shade is intended for domestic
use only. If used for commercial purpos-
es, the guarantee becomes void.
Setting up the shade
The following sun shade base must be
used to secure the sun shade. For model
280 85897AGT 50 kg
320 85897AXT 70 kg
2 × 3 85897AXT 70 kg
220 × 140 85897AMT 40 kg
1. Place the sun shade base in the de-
sired location.
2. If you have not yet done so, screw the
shade tip onto the threading (see fig-
ure A).
3. Loosen the knob 1by turning it
counterclockwise.
4. Let the shade mast 2at least 10 cm
into the bottom pole 3(see figure B).
5. Tighten the knob 1by turning it
clockwise.
GB

10
Opening the shade
Make sure that the sun shade is ade-
quately supported; that is, that the weight
of the sun shade base is sufficient (see
“Technical data”).
1. Remove the tie strap 4and, if applica-
ble, the protective sleeve (see figure C).
2. Gently open the sun shade by hand
(see figure C).
3. Turn the crank 5clockwise until the
shade is opened as far as you like
(see figure D).
Please note: Once the sun shade has
been opened all the way, the slider 6will
be located above the swivel joint 7so
that it is not obstructed.
Setting the height
1. Loosen the knob 1by turning it an-
ticlockwise.
2. Take hold of sun shade by the shade
pole 2and set the desired height.
3. Tighten the knob 1by turning it
clockwise.
Tilting the shade
Please note: The sun shade can only be
tilted once it has been opened all the way
(for this, also refer to the section “Open-
ing the shade”).
• To tilt the sun shade to the side, you
must turn the crank 5on the comple-
tely open shade further clockwise
(see figure G).
Closing the shade
Please note!
– If wind, rain or snow is expected, the
shade must be closed. Damages oc-
curring as a result of a failure to do so
are not covered by the warranty.
– When closing the sun shade, the cov-
er could get caught between the brac-
es. If this happens, please careful-
ly pull parts of the cover caught be-
tween the braces out.
1. Turn the crank 5anticlockwise until
the shade is closed (see figure Hand I).
If the cover is caught between the
braces, carefully pull the cover out
from between the braces.
2. To provide protection against wind
gusts, secure the cover with a tie
strap 4(see figure J).
To provide protection against dirt and
fading, pull over a protective sleeve
(not included in pack contents).
Care + storage
The cover has a stain-resistant impreg-
nation. In order to clean it, ideally use a
soft brush and a small amount of soapy
solution.
The fabric is suitable for hand washing at
40 °C. Do not use a tumble-dryer. Do not
iron. Do not dry-clean.
Clean the shade pole regularly to en-
sure that the mobile parts slide properly.
If necessary spray with a silicon or Tef-
lon lubricant spray.
Check all load-bearing parts such as
braces, screws etc. regularly.
Take down the sun shade in a completely
dry state and store it over winter in a dry,
well ventilated room.
If possible, store the sun shade upright
and without any load on the sun shade.
At the start of the season ensure that all
components and fixings are secure. If
you are unsure, do not use the product.
Warranty
The warranty period for this product is
36 months.
If you discover a defect during this time,
please consult your vendor. To help us
assist you quickly, please be sure to hold
onto the proof of purchase and provide
us with the model name as well as the
article number.
The warranty does not cover:
– Normal wear and tear and discoloura-
tion of the textile cover;
GB

11
– Damage to the paint coat attributed to
normal wear and tear;
– Damage as the result of improper use
(e.g. for protection against rain);
– Damages caused by wind, overwin-
ding the crank, the shade falling over,
excessive pulling on the shade bra-
ces;
– Damage due to structural modifica-
tions to the product.
Service
Dear customer,
Although our products are subject to
an in-depth final inspection prior to be-
ing shipped out, it is possible that an ac-
cessory is missing or that a part sustains
damage while in transit. In such a case,
please contact our hotline and provide us
with the model name and article number.
Hotline
You can reach us
Mon. to Thurs. from 8 a.m. to 4 p.m.
Fr. from 8 a.m. to 12 p.m.
at the following phone numbers
in Austria (07722) 632 05-316
in Germany (08571) 91 22-316
in the Czech Republic (0386) 301615
in Poland (0660) 460460
in Slovenia (0615) 405673
in Croatia (0615) 405673
in Hungary +43(0)7722 63205–107
in Russia (095) 6470389
Address
doppler
E. Doppler & Co GmbH
Schloßstraße 24
A-5280 Braunau am Inn
www.dopplerschirme.com
Technical data
Model EXPERT Auto Tilt 280
Article no.: 428441
Ballasting, min. kg: 50
Total height in cm, max. *): 245
Height ground-shade in cm, max.*): 205
Diameter in cm, approx.: 275
Weight in kg: 6.2
Rain repellent: Yes
Model EXPERT Auto Tilt 320
Article no.: 434441
Ballasting, min. kg: 70
Total height in cm, max. *): 255
Height ground-shade in cm, max.*): 200
Diameter in cm, approx.: 317
Weight in kg: 6.8
Rain repellent: Yes
Model EXPERT Auto Tilt 2 × 3
Article no.: 461441
Ballasting, min. kg: 70
Total height in cm, max. *): 261
Height ground-shade in cm, max.*): 220
Diameter in cm, approx.: 302 x 198
Weight in kg: 6.8
Rain repellent: Yes
Model EXPERT Auto Tilt 220 ×140
Article no.: 437441
Ballasting, min. kg: 40
Total height in cm, max. *): 253
Height ground-shade in cm, max.*): 205
Diameter in cm, approx.: 220 x 140
Weight in kg: 5.5
Rain repellent: Yes
*) measured without the base
All data are approximate values. Techni-
cal changes reserved.
GB

12
EXPERT Auto Tilt
280 / 320 / 2 × 3 / 220 × 140
Notice d’installation et
d’utilisation
Veuillez lire cette notice d’ins-
tallation et d’utilisation – parti-
culièrement les consignes de
sécurité – entièrement et avec minutie.
Le non-respect de ces consignes de sé-
curité peut causer des blessures ou des
dommages sur le parasol. Conservez la
notice d’installation et d’utilisation pour
pouvoir la consulter ultérieurement et
donnez-la toujours si vous cédez le para-
sol à une tierce personne.
Votre sécurité
Veuillez impérativement suivre
les consignes de sécurité sui-
vantes. Le fabricant n’est en rien
responsable des dommages
suite à un non-respect de la notice.
Utiliser le parasol uniquement avec un
contrepoids suffisant (voir Données
techniques).
Posez toujours le parasol sur un sol so-
lide et plat.
Pour le parasol, utilisez un pied stable.
Le parasol devra être installé par une
personne adulte et compétente.
En ouvrant et fermant le parasol, veillez
à que vos mains ne soient pas coincées
dans le mécanisme de fermeture.
En présence de vent ou d’orage, fermer le
parasol et le sécuriser avec une bande de
fixation. Sinon, il peut être renversé par un
fort coup de vent et provoquer des dom-
mages ou être endommagé lui-même.
Ne jamais allumer un feu à proximité ou
sous le parasol. Le parasol pourrait s’en-
flammer ou être endommagé par des
étincelles.
Le parasol n’est pas un jouet. Les enfants
peuvent s’y coincer les doigts. De plus, le
parasol est très lourd et peut blesser des
enfants en tombant.
Ne rien suspendre sur les barres trans-
versales du parasol, ne pas s’en servir
de barre de gymnastique.
Le parasol peut protéger votre peau
contre les rayons UV directs mais pas
contre les rayons UV réfléchis. Pour
cette raison, utilisez en plus une protec-
tion solaire cosmétique.
Pour protéger le parasol contre toute
contrainte excessive, fermer le parasol
en cas de pluie ou de neige ou le plier
avec une bande de fixation.
La toile n’est pas conçue pour être lavée
en lave-linge, ni pour le pressing ou le
blanchiment.
N’utilisez aucun produit d’entretien ou li-
quide chimique agressif, aucune solu-
tion, aucune substance abrasive ni au-
cun objet, aucun moyen de blanchiment,
aucun nettoyeur à haute pression ni au-
cun produit d’entretien puissant.
Veuillez respecter les consignes d’entre-
tien cousues.
Utilisation
Le parasol est destiné à protéger contre
les rayons UV direct. Il ne convient pas à
la protection contre la pluie ou la neige.
Le parasol est uniquement destiné à une
utilisation dans le privé. La garantie de-
vient caduque en cas d’utilisation com-
merciale.
Assemblage du parasol
Pour donner une bonne stabilité au para-
sol, il faut utiliser le socle du parasol sui-
vant. Pour le modèle
280 85897AGT 50 kg
320 85897AXT 70 kg
2 × 3 85897AXT 70 kg
220 × 140 85897AMT 40 kg
1. Placer le socle du parasol à l’endroit
désiré.
2. Si elle n’est pas encore assemblée,
vissez le pointe du parasol sur le file-
tage (voir figure A).
FR

13
3. Desserrer la poignée 1dans le sens
inverse des aiguilles d’une montre.
4. Laisser glisser le mât du parasol 2
d’au moins 10 cm dans la barre du
bas 3(voir figure B).
5. Serrer la poignée 1en le tournant
dans le sens des aiguilles d’une
montre.
Ouvrir le parasol
S’assurer que le parasol est suffisam-
ment stable, c’est-à-dire que le socle du
parasol pèse suffisamment lourd (voir
« Données techniques »).
1. Retirer la bande de fixation 4et, éven-
tuellement, la housse de protection
(voir figure C).
2. Ouvrir légèrement le parasol à la main
(voir figure C).
3. Tourner la manivelle 5dans le sens
des aiguilles d’une montre jusqu’à
ce que le parasol soit ouvert comme
vous le souhaitez (voir figure D).
Attention : Lorsque le parasol est tota-
lement ouvert, le coulisseau 6se trouve
au-dessus de l’articulation 7si bien qu’il
et libre.
Régler la hauteur
1. Desserrer la poignée 1dans le sens
inverse des aiguilles d’une montre.
2. Saisir le parasol au niveau du mât du
parasol 2et régler à la hauteur voulue.
3. Serrer la poignée 1en le tournant
dans le sens des aiguilles d’une
montre.
Incliner le parasol
Attention : Le parasol ne peut être incli-
né que s’il est totalement ouvert (voir à ce
sujet le paragraphe « Ouvrir le parasol »).
• Pour incliner le parasol sur le côté,
vous devez tourner (dans le sens des
aiguilles d’une montre) encore plus la
manivelle 5du parasol déjà entière-
ment ouvert (voir figure G).
Fermer le parasol
Attention !
– Lorsque le vent se lève, qu’il pleut ou
qu’il neige, il faut fermer le parasol.
Les dommages qui pourraient sinon
être causés sont exclus de la garantie.
– En fermant le parasol, il se peut que la
toile se coince entre les barres. Dans
ce cas, veuillez relever avec précau-
tion la toile entre les barres.
1. Tourner la manivelle 5dans le sens
inverse des aiguilles d’une montre
jusqu’à ce que le parasol soit fermé
(voir figure Het I).
Si la toile se coince entre les barres,
il faut alors la relever avec précaution
d’entre les barres.
2. Pour protéger contre les rafales de
vent, sécuriser la toile avec une bande
de fixation 4(voir figure J).
Pour protéger contre la saleté et le
blanchissement, passer une housse
de protection (non fournie).
Entretien + Stockage
La toile possède une imprégnation
contre les taches. Pour le nettoyer, utili-
sez de préférence une brosse douce et
un peu d’eau savonneuse.
Le tissu peut être lavé à la main à 40 °C.
N’utilisez aucun séchoir à linge. Ne pas
repasser. Ne pas faire de nettoyage à
sec.
Nettoyez le mât du parasol régulière-
ment pour garantir un parfait glissement
des pièces mobiles. Sinon, pulvériser de
la silicone ou du Téflon.
Toutes les pièces porteuses comme les
jambes de force, les vis etc. doivent être
contrôlées régulièrement.
Démontez le parasol lorsqu’il est totale-
ment sec et rangez-le pour l’hiver dans
une pièce sèche et bien ventilée.
Si possible, rangez le parasol debout et
sans aucune charge s’appuyant sur lui.
FR

14
Au début de la saison, assurez-vous que
tous les composants et toutes les pièces
de fixation sont en sécurité. N’utilisez
pas le produit lorsque vous n’en êtes pas
certain.
Garantie
Le délai de garantie accordé pour cet ar-
ticle est de 36 mois.
Si pendant cette période vous consta-
tiez un défaut, veuillez vous adresser à
votre revendeur. Afin de pouvoir vous ai-
der rapidement, conservez le justificatif
d’achat et indiquez-nous le nom du mo-
dèle et le numéro d’article.
Sont exclus de la garantie :
– Usure normale et décoloration de la
toile ;
– Les dommages sur la peinture provo-
qués par une utilisation normale ;
– Les dommages causés par une uti-
lisation non conforme aux prescrip-
tions (p. ex. comme parapluie);
– Les dommages causés par le vent, la
sur rotation de la manivelle, la chute
du parasol, une forte traction sur les
baleines;
– Les dommages dus à des modifica-
tions constructives apportées à l’ar-
ticle.
Service
Chère cliente, cher client,
Bien que nous soumettions nos articles
à un contrôle final détaillé avant la livrai-
son, il se peut qu’une fois un accessoire
manque ou qu’une pièce soit endomma-
gée durant le transport. Dans ce cas,
veuillez vous adresser à notre service té-
léphonique en indiquant le nom du mo-
dèle et le numéro d’article.
Service téléphonique
Vous nous joignez
du lu. au je. de 8 h à 16 h
le ve. 8 h à 12 h
au numéro de téléphone
en Autriche (07722) 632 05-316
en Allemagne (08571) 91 22-316
en Tchéquie (0386) 301615
en Pologne (0660) 460460
en Slovénie (0615) 405673
en Croatie (0615) 405673
en Hongrie +43(0)7722 63205–107
en Russie (095) 6470389
Adresse
doppler
E. Doppler & Co GmbH
Schloßstraße 24
A-5280 Braunau am Inn
www.dopplerschirme.com
FR

15
FR
Données techniques
Modèle EXPERT Auto Tilt 280
N° réf. : 428441
Contrepoids, au moins kg : 50
Hauteur totale en cm, maxi*) : 245
Hauteur sol-parasol en cm, maxi*) : 205
Diamètre en cm, env. : 275
Poids en kg : 6,2
Repoussant la pluie : oui
Modèle EXPERT Auto Tilt 320
N° réf. : 434441
Contrepoids, au moins kg : 70
Hauteur totale en cm, maxi*) : 255
Hauteur sol-parasol en cm, maxi*) : 200
Diamètre en cm, env. : 317
Poids en kg : 6,8
Repoussant la pluie : oui
Modèle EXPERT Auto Tilt 2 × 3
N° réf. : 461441
Contrepoids, au moins kg : 70
Hauteur totale en cm, maxi*) : 261
Hauteur sol-parasol en cm, maxi*) : 220
Diamètre en cm, env. : 302 x 198
Poids en kg : 6,8
Repoussant la pluie : oui
ModèleEXPERT Auto Tilt 220 ×140
N° réf. : 437441
Contrepoids, au moins kg : 40
Hauteur totale en cm, maxi*) : 253
Hauteur sol-parasol en cm, maxi*) : 205
Diamètre en cm, env. : 220 x 140
Poids en kg : 5,5
Repoussant la pluie : oui
*) mesuré sans socle
Toutes les indications sont des valeurs
approximatives. Sous réserve de modi-
fications techniques.

16
EXPERT Auto Tilt
280 / 320 / 2 × 3 / 220 × 140
Istruzioni di montaggio e
d’uso
Leggere attentamente e fino
alla fine le presenti istruzioni di
montaggio e d’uso, soprattutto
le note relative alla sicurezza. La non os-
servanza di queste note relative alla si-
curezza può comportare lesioni o danni
all’ombrellone. Conservare le istruzioni
di montaggio e d’uso per riferimenti futu-
ri e consegnarle a terzi in caso di cessio-
ne dell’ombrellone.
Per la vostra sicurezza
Si prega di osservare le se-
guenti note relative alla sicu-
rezza. Il produttore rifiuta ogni
responsabilità per i danni in-
sorti in seguito alla loro non osservanza.
Utilizzare l’ombrellone solo con un’ade-
guata zavorra (vedi Dati tecnici).
Collocare l’ombrellone sempre su un fon-
do rigido e in piano.
Utilizzare una base ombrellone stabile e
robusta.
Si consiglia di far installare l’ombrellone
da una persona adulta competente.
Aprendo e chiudendo l’ombrellone, far
attenzione a non infilare le mani nel mec-
canismo di apertura-chiusura.
Chiudere l’ombrellone se minaccia ven-
to o temporale e fissarlo con un laccio di
fissaggio. Altrimenti rischia di essere in-
vestito e travolto da un raffica di vento,
causando o subendo danni.
Non accendere mai fiamme libere in pros-
simità o al di sotto dell’ombrellone. L’om-
brellone può prendere fuoco o subire dan-
ni per via delle scintille svolazzanti.
L’ombrellone non è un giocattolo per
bambini. I bambini possono schiacciar-
si le dita. Inoltre l’ombrellone ha un no-
tevole peso e rovesciandosi può ledere
i bambini.
Non appendere nessun oggetto alle
stecche dell’ombrellone, né usarle come
barre per flessioni ginniche.
L’ombrellone protegge la pelle dai rag-
gi UV diretti, ma non da quelli riflessi.
Si raccomanda pertanto di utilizzare un
prodotto cosmetico anti-sole.
Per non sottoporre l’ombrellone ad ecces-
sivi carichi, chiuderlo e legarlo con un lac-
cio di fissaggio in caso di pioggia o di neve.
Il tessuto della capote non è idoneo al la-
vaggio in lavatrice, a secco e nemmeno
al candeggio.
Non utilizzare detergenti chimici o liqui-
di aggressivi, soluzioni o sostanze abra-
sive e nemmeno corpi estranei, candeg-
gina, pulitrici ad aria compressa o deter-
sivi potenti.
Si raccomanda di osservare le indicazio-
ni riportate in etichetta.
Impiego conforme alla
destinazione
L’ombrellone è destinato a proteggere
dai raggi UV diretti. Non è pensata come
riparo dalla pioggia o neve.
L’ombrellone è destinato esclusivamente
all’uso privato. La garanzia si estingue in
caso d’uso in ambito professionale.
Montare l’ombrellone
Per dare all’ombrellone una stabilità si-
cura, va utilizzata la seguente base. Per
il modello
280 85897AGT 50 kg
320 85897AXT 70 kg
2 × 3 85897AXT 70 kg
220 × 140 85897AMT 40 kg
1. Posizionare la base nel luogo deside-
rato.
2. Se non ancora montata, avvitare la
punta dell’ombrellone sulla filettatura
(vedi figura A).
3. Svitare la manopola 1ruotandola in
senso antiorario.
IT

17
4. Far scorrere il bastone dell’ombrello-
ne 2per almeno 10 cm nel palo infe-
riore 3(vedi figura B).
5. Avvitare la manopola 1ruotandola in
senso orario.
Aprire l’ombrellone
Assicurarsi che l’ombrellone abbia un’a-
deguata stabilità, cioè che la base abbia
un peso adeguato (vedi “Dati tecnici”).
1. Rimuovere il nastro di fissaggio 4ed
evtl. il fodero protettivo (vedi figura C).
2. Aprire leggermente l’ombrellone con
la mano (vedi figura C).
3. Ruotare la manovella 5in senso ora-
rio fino a che l’ombrellone è aperto
come si desidera (vedi figura D).
Attenzione: Se l’ombrellone è comple-
tamente aperto, il manicotto scorrevole 6
si muove sul giunto articolato 7, fino a
quando è esposto.
Regolare l’altezza
1. Svitare la manopola 1ruotandola in
senso antiorario.
2. Afferrare l’ombrellone dal bastone
dell’ombrellone 2e regolarlo sull’al-
tezza desiderata.
3. Avvitare la manopola 1ruotandola in
senso orario.
Inclinare l’ombrellone
Attenzione: L’ombrellone può essere
inclinato solo quando è completamente
aperto (vedere anche la sezione “Aprire
l’ombrellone”).
• Per inclinare l’ombrellone lateralmen-
te, ruotare ulteriormente in senso ora-
rio la manovella 5a ombrellone già
completamente aperto (vedi figura G).
Chiudere l’ombrellone
Attenzione!
– Chiudere l’ombrellone se minaccia
vento, pioggia o neve. In caso contra-
rio, i danni risultanti saranno esclusi
dalla garanzia.
– Durante la chiusura dell’ombrellone, è
possibile che il tessuto si blocchi tra le
stecche. In questo caso, sfilarlo con
attenzione dalle stecche.
1. Ruotare la manovella 5in senso an-
tiorario, fino a che l’ombrellone sia
chiuso (vedi figura He I).
Se il tessuto si blocca tra le stecche,
sfilarlo delicatamente dalle stecche.
2. Per protezione contro folate di vento,
fissare il tessuto con un nastro di fis-
saggio 4(vedi figura J).
Affinché la capote non si sporchi o
scolorisca, infilare una fodera protet-
tiva (non in dotazione).
Manutenzione + stoccaggio
Il tessuto del rivestimento è impregna-
to con una protezione da macchie. Per
pulire il tessuto, utilizzare preferibilmen-
te una spazzola morbida e un po’ d’ac-
qua saponata.
Il tessuto può essere lavato a mano a
40 °C. Non mettere nell’asciugatrice.
Non stirare. Evitare la pulitura a secco.
Pulire regolarmente il bastone dell’om-
brellone, affinché le parti mobili scorra-
no alla perfezione. Se necessario, spruz-
zare un po’ di spray al silicone o teflon.
Controllare periodicamente tutte le parti
portanti quali stecche, viti e simili.
Smontare l’ombrellone solo se comple-
tamente asciutto e riporlo per l’inverno in
un luogo asciutto e ben areato.
Conservare l’ombrellone, se possibile, in
verticale e senza poggiare carichi su di
esso.
All’inizio della stagione assicurarsi che
tutti gli elementi e le viti siano saldi in se-
de. Non utilizzare l’articolo se non sie-
te sicuri.
IT

18
Garanzia
Il periodo di garanzia per questo artico-
lo è di 36 mesi.
Se durante il periodo di validità della ga-
ranzia riscontrate un difetto, vogliate ri-
volgervi al vostro rivenditore. Per riceve-
re un rapido aiuto, si raccomanda di con-
servare lo scontrino e di comunicarci il
nome del modello ed il numero articolo.
Sono esclusi dalla garanzia:
– normale usura ed alterazione del co-
lore della capote in tessuto;
– danni della verniciatura riconducibili
alla normale usura;
– danni per uso non conforme (ad
esempio come ombrello parapioggia);
– danni causati dal vento, da eccessi-
va rotazione della manovella, cadu-
ta dell’ombrellone, sovraccarico del-
le stecche;
– danni per modifiche strutturali dell’ar-
ticolo.
Servizio assistenza
Gentili clienti,
sebbene i nostri articoli vengano sotto-
posti prima della consegna ad un accu-
rato controllo di qualità, può a volte suc-
cedere che un pezzo manchi o si sia
danneggiato durante il trasporto. In tale
eventualità vogliate rivolgervi alla nostra
hotline, indicando il nome del modello ed
il codice articolo.
Hotline
Siamo a Vostra disposizione
da lunedì a giovedì
dalle ore 800 alle ore 1600
il venerdì
dalle ore 800 alle ore 1200
al numero telefonico
Austria (07722) 632 05-316
Germania (08571) 91 22-316
Repubblica Ceca (0386) 301615
Polonia (0660) 460460
Slovenia (0615) 405673
Croazia (0615) 405673
Ungheria +43(0)7722 63205–107
Russia (095) 6470389
Indirizzo
doppler
E. Doppler & Co GmbH
Schloßstraße 24
A-5280 Braunau am Inn
www.dopplerschirme.com
IT

19
IT
Dati tecnici
Modello EXPERT Auto Tilt 280
Cod. art.: 428441
Zavorra, min. kg: 50
Altezza totale in cm, max.*): 245
Altezza suolo-ombrellone
in cm, max.*): 205
Diametro in cm, circa: 275
Peso in kg: 6,2
Idrorepellente: Sì
Modello EXPERT Auto Tilt 320
Cod. art.: 434441
Zavorra, min. kg: 70
Altezza totale in cm, max.*): 255
Altezza suolo-ombrellone
in cm, max.*): 200
Diametro in cm, circa: 317
Peso in kg: 6,8
Idrorepellente: Sì
Modello EXPERT Auto Tilt 2 × 3
Cod. art.: 461441
Zavorra, min. kg: 70
Altezza totale in cm, max.*): 261
Altezza suolo-ombrellone
in cm, max.*): 220
Diametro in cm, circa: 302 x 198
Peso in kg: 6,8
Idrorepellente: Sì
Modello EXPERT Auto Tilt 220 ×140
Cod. art.: 437441
Zavorra, min. kg: 40
Altezza totale in cm, max.*): 253
Altezza suolo-ombrellone
in cm, max.*): 205
Diametro in cm, circa: 220 x 140
Peso in kg: 5,5
Idrorepellente: Sì
*) senza misurare la base
Tutti i dati sono approssimativi. Con ri-
serva di modifiche tecniche.

20
EXPERT Auto Tilt
280 / 320 / 2 × 3 / 220 × 140
Instrucciones de montaje y
manual de instrucciones
Lea detenidamente estas ins-
trucciones de montaje y ma-
nual de instrucciones en su to-
talidad, sobre todo las indicaciones de
seguridad. La inobservancia de las indi-
caciones de seguridad puede provocar
lesiones o daños en el parasol. Conser-
ve las instrucciones de montaje y manual
de instrucciones para consultarlos en el
futuro, y entréguelos asimismo siempre
que ceda el parasol a terceros.
Su seguridad
Tenga en cuenta las siguientes
indicaciones de seguridad. En
caso de daños debidos al in-
cumplimiento de las instruccio-
nes, el fabricante no se considerará res-
ponsable.
Utilice el parasol solo con suficiente con-
trapeso (véanse los datos técnicos).
Coloque el parasol siempre sobre una
superficie sólida y plana.
Para el parasol, emplee un soporte estable.
El parasol debería ser montado por un
adulto competente.
Al abrir y cerrar el parasol, asegúrese de
no pillarse las manos con el mecanismo
de cierre.
Si aparece viento o alguna tormenta, cie-
rre el parasol y asegúrelo con una cinta
de fijación. De lo contrario, una ráfaga
podría volcarlo y causar daños o dañar-
se el propio producto.
Nunca atice un fuego abierto cerca o de-
bajo del parasol. El parasol puede incen-
diarse o dañarse por las chispas.
El parasol no es un juguete. Los niños
pueden pillarse los dedos. El parasol tie-
ne además un peso considerable y pue-
de herir a los niños en caso de caerles
encima.
No cuelgue nada en los travesaños del
parasol, ni intente hacer dominadas en
ellos.
El parasol puede proteger su piel de la
radiación UV directa, pero no de los ra-
yos UV reflectantes. Por tanto, utilice
también cremas de protección solar.
Para salvaguardar el parasol frente a
cargas excesivas, ciérrelo si llueve o nie-
va, y asegúrelo con una cinta de fijación.
El tapizado no se puede lavar a máquina,
limpiar en seco ni blanquear.
No emplee limpiadores o líquidos químicos
agresivos, soluciones, ni sustancias u ob-
jetos abrasivos, blanqueadores, limpiado-
res de alta presión ni detergentes fuertes.
Tenga en cuenta las indicaciones de cui-
dado cosidas.
Uso previsto
El parasol está indicado para proteger de
la radiación UV directa. No está pensado
para proteger de la lluvia o nieve.
El parasol está concebido únicamente
para usar en el ámbito privado. La ga-
rantía queda sin validez en caso de uso
comercial.
Montaje del parasol
Para fijar bien el parasol, se debe usar
el siguiente pedestal del parasol. Con el
modelo
280 85897AGT 50 kg
320 85897AXT 70 kg
2 × 3 85897AXT 70 kg
220 × 140 85897AMT 40 kg
1. Coloque el pedestal del parasol en el
lugar deseado.
2. Si aún no está montado, atornille la
cubierta del parasol sobre la rosca
(véase la imagen A).
3. Afloje la muletilla 1en sentido con-
trario a las agujas del reloj.
4. Meta el mástil del parasol 210 cm co-
mo mínimo en el palo inferior 3(véa-
se la imagen B).
ES

21
5. Apriete la muletilla 1en el sentido de
las agujas del reloj.
Apertura del parasol
Cerciórese de que el parasol esté esta-
ble; es decir, que el pedestal del para-
sol tenga suficiente peso (consulte “Da-
tos técnicos”).
1. Retire la cinta de fijación 4y, dado el
caso, la funda protectora (véase la
imagen C).
2. Abra un poco el parasol con la mano
(véase la imagen C).
3. Gire la manivela 5en el sentido de
las agujas del reloj hasta que el pa-
rasol esté abierto como quiera (véase
la imagen D).
Tenga en cuenta: Cuando el parasol es-
tá totalmente abierto, el pasador 6queda
por encima de la articulación 7ya libre.
Ajuste de la altura
1. Afloje la muletilla 1en sentido con-
trario a las agujas del reloj.
2. Agarre el parasol por el mástil del pa-
rasol 2y ajústelo a la altura deseada.
3. Apriete la muletilla 1en el sentido de
las agujas del reloj.
Inclinación del parasol
Tenga en cuenta: El parasol se incli-
na solo cuando está abierto del todo (cf.
también con el apartado “Apertura del
parasol”).
• Para inclinar el parasol a un lado, siga
girando en el sentido de las agujas del
reloj la manivela 5con el parasol to-
talmente abierto (véase la imagen G).
Cierre del parasol
¡Tenga en cuenta!
– Si aparece viento, lluvia o nieve, debe
cerrar el parasol. De lo contrario, los
daños derivados quedarán excluidos
de la garantía.
– Al cerrar el parasol, puede ocurrir que
el tapizado se enganche entre los tra-
vesaños. En este caso, tire del tapiza-
do con cuidado entre los travesaños.
1. Gire la manivela 5en sentido con-
trario a las agujas del reloj hasta
que el parasol esté totalmente cerra-
do (véase la imagen Hy I).
Si se engancha el tapizado entre los
travesaños, sáquelo con cuidado de
entre estos.
2. Para protegerlo de las ráfagas de
viento, asegure el tapizado con una
cinta de fijación 4(véase la imagen J).
Para proteger frente a la suciedad y la
decoloración, emplee una funda pro-
tectora (no incluida en el volumen de
suministro).
Cuidado y almacenamiento
El tapizado posee una impermeabiliza-
ción que protege contra las manchas.
Para su limpieza, lo mejor es que use
un cepillo suave y un poco de lejía ja-
bonosa.
El material se puede lavar a mano a
40 °C. No utilice la secadora. No lo plan-
che. No lo limpie en seco.
Limpie periódicamente el mástil del para-
sol para que las piezas móviles se des-
licen bien. En caso necesario, rocíe con
pulverizador de silicona o teflón.
Revise a menudo las piezas portantes co-
mo travesaños, tornillos, etc.
Desmonte el parasol cuando esté total-
mente seco, y guárdelo en un espacio
seco y bien ventilado durante el invierno.
En caso de ser posible, guarde el para-
sol de pie y sin cargas sobre él.
Cuando comience la temporada, ase-
gúrese de que todos los componentes y
piezas de fijación sean seguros. No use
el producto si no está seguro.
ES
Table of contents
Languages:
Other Doppler Outdoor Furnishing manuals