manuals.online logo
Brands
  1. Home
  2. •
  3. Brands
  4. •
  5. Dragonfly
  6. •
  7. Projection Screen
  8. •
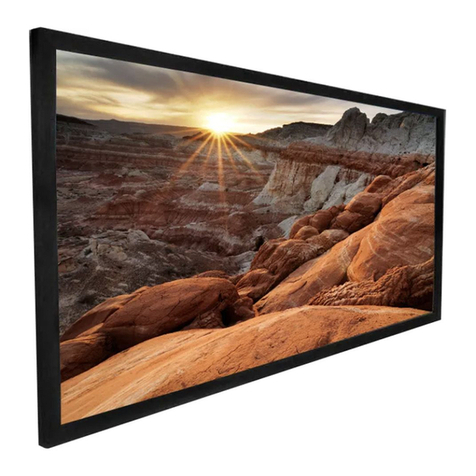
  9. Dragonfly Acoustiweave DF-SL-160-MW Programming manual

Dragonfly Acoustiweave DF-SL-160-MW Programming manual

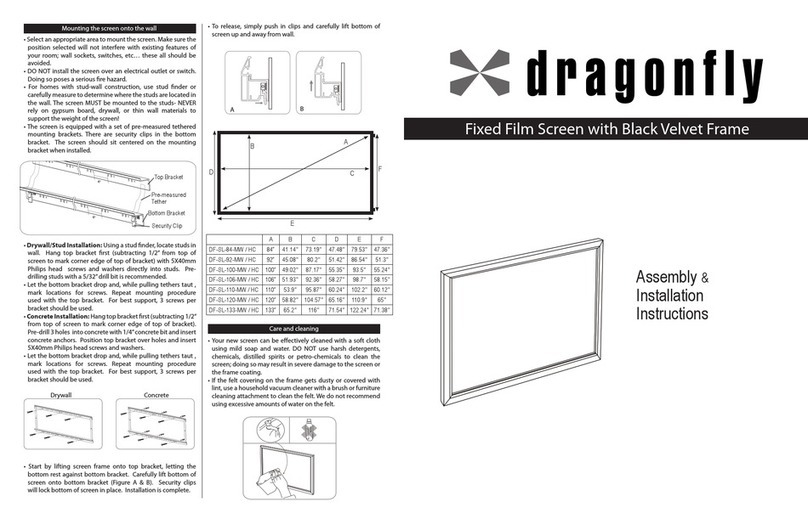
Care and cleaning
•Yournewscreencanbeeectivelycleanedwithasoftcloth
 using mild soap and water. DO NOT use harsh detergents,
 chemicals, distilled spirits or petro-chemicals to clean the
 screen;doingsomayresultinseveredamagetothescreenor
 theframecoating.
•Ifthefeltcoveringontheframegetsdustyorcoveredwith
 lint,useahouseholdvacuumcleanerwithabrushorfurniture
 cleaningattachmenttocleanthefelt.Wedonotrecommend
 usingexcessiveamountsofwateronthefelt.
A B C D E F
DF-SL-160-MW/HC 160” 78.53” 139.54” 86.4” 147.3” 85.75”
FixedFilmScreenwithBlackVelvetFrame
Assembly &
Installation
Instructions
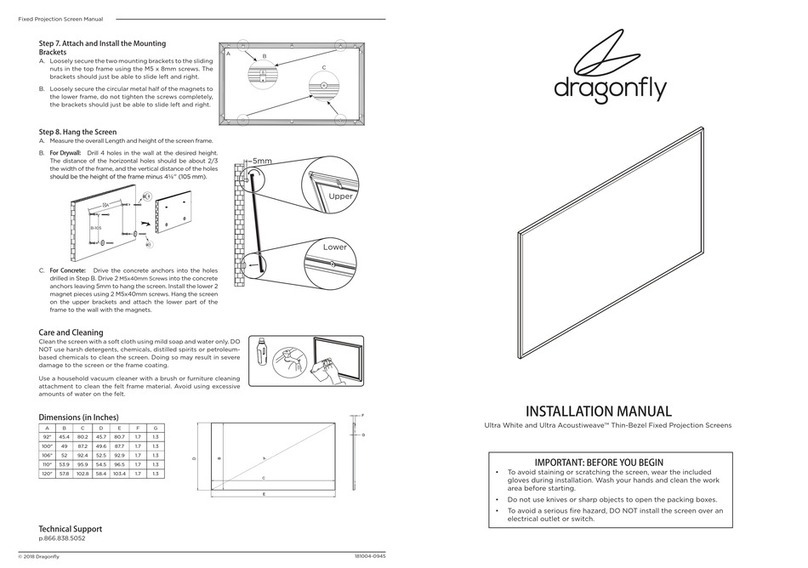
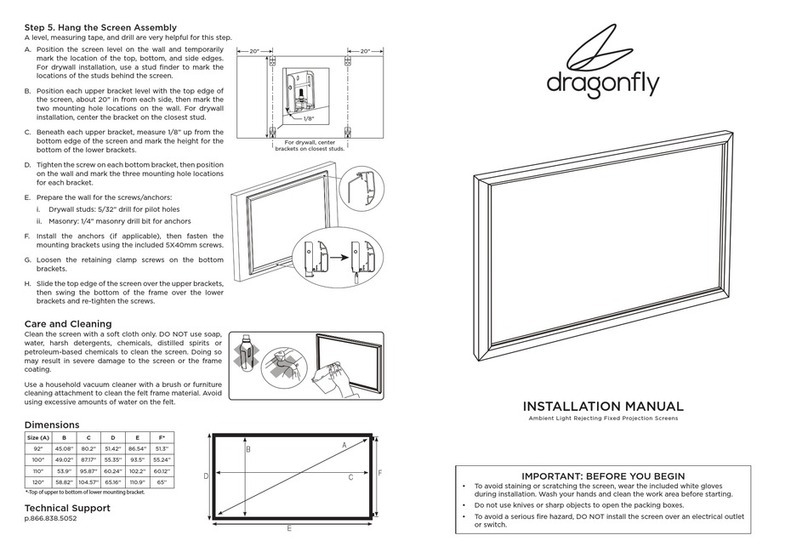
•Thescreenisequippedwithasetofmountingbrackets.Align
the brackets according to the diagram below, measuring
from the outside edge of each bracket. Drill two holes for
eachbracket.Insert 5x40mm screwsforastuddedwall,or
5x40mmscrews+anchorsfordrywall/concretewithoutstuds,
andhang.The screenshouldsitcenteredonthemounting
brackets when installed. Set the resting pin of the sliding
frameconnectors,locatedontheinsideoftheframe,tothe
bracket’s pin slot. Thread two screws through each bracket
andslidingframeconnector.
•Drywall/Stud Installation:Usingastudnder,locatestudsin
 wall.  Hang top bracket rst (subtracting 1/2” from top of
 screentomarkcorneredgeoftopofbracket)with5X40mm
 Philips head  screws and washers directly into studs.  Pre-
 drillingstudswitha5/32”drillbitisrecommended.
•Concrete Installation:Hangtopbracketrst(subtracting1/2”
 from top of screen to mark corner edge of top of bracket).
 Pre-drill3holesintoconcretewith1/4”concretebitandinsert
 concreteanchors.Positiontopbracketoverholesandinsert
 5X40mmPhilipsheadscrewsandwashers.
BlackAcousticallyTransparentMaterial(Optionalinstallation)
BlackacousticallytransparentmaterialisfortheAcoustiweave™
screenonly.
•Lightreectioncanbeanissuewithanyacoustically
 transparentmaterial.Ifpaintingreectivesurfacesisnot
 anoptiontocontrollightreection,anacoustically
 transparentblackfabrichasbeenincluded.Simplyhang
 thefabricdirectlybehindthescreeninanymannerthat
 tsyourinstallation.
E
D
BA
F
C
48”
85.75”
Pleasefollowtheassemblyandinstallationinstructions
carefully. With proper assembly and installation, your
newscreenwilldeliveryearsoftrouble-freeservice
Preparingyourscreenforinstallation
PartList
•Carefullyopenthepackageandlayoutallthepartsonaclean,
 atsurface
•Useextremecautionwhenunpackingthescreen;donotuse
 knivesorsharpobjectstoopenthepackingboxes.
•Donotunpackthescreenmaterialatthistime.
AluminumFrameTube
TensioningRod
Corner Brackets
Screwsx4
5x10mm
Screwsx8
SnapLugx34 TopandBottomBracketsx4
5x10mmPhillips
HeadScrewsX8
Concrete
Anchorsx8
x2
x2
x2
x2
Installingthesnaplugs
•Slidethesnaplugsintothesectionoftheextrudedaluminum
 frameasshowninDiagram1.
a
Snap Lug
b
• The snap lugs line up with the arrow decals on the frame
 tubes.Alignmentisnotcriticalatthisstageoftheinstallation.
 Notethatthescreenissuppliedwith2extrasnaplugs;should
 youloseorbreakasnaplug,oneofthesparesisaconvenient
 replacement.
Installingthescreenmaterial
•Placealloftheframetubesfacedownontheworksurfaceand
 carefully line up the ends to form shape of the nished
 screen.
•Slidethesnaplugsintothegroovesonthereversesideofthe
frameandalignwiththearrowsasshownindiagram2.
Loosenthecornerbracket,andslidetheframeintotheframe
groovesofthecornerbracket.Alignandinsertcornerbracket
screwforeachcornerbracket.
•It willhelptoleavethescrewslooseuntilyougetallofthe
 bracketsinplace.
• Note that you may have to loosen and adjust the brackets
 andframetubesinordertogettheframeperfectlysquare.A
 carpenters square is very helpful with this stage of the
 assembly.
•Once the screen is in place and the tensioning rods are
 seated behind all of the snap lugs, inspect the front
 of the screen. Make sure that the screen material is at
 and wrinkle-free. Also, check the corners to make sure that
 the screen is properly positioned. If there are any wrinkles
 or positioning issues, simply lay the screen face down and
 adjustaccordingly.
•Notethatsomeverysmallfoldlinesorwrinklesmayexist
 forafewhours;thisisduetothepackingofthescreenand
 theywilldisappearwithinashorttime.
•Makesurethathandsandworkareaarecleanbeforeworking
 withthescreenmaterials
• Carefully unpack the screen material- Use caution as the 4
 tensioningrodsarecontainedinsidethecardboardtube.
• Carefully lay out the screen material so that it roughly lines
 upwiththeframe-Exactpositionisnotcriticalatthisstageof
 theassembly.Itisimportantthatthescreenmaterialisfacing
 thecorrectdirection.Itiseasytoidentifythebacksideofthe
 screenasitwillhavethestitchedorweldedseamvisible.
•Unpackthe4metaltensioningrods.
•Insertthelongmetaltensioningrodsintothe longer edges
 of the screen material, one rod per side. It is easier if the
 screen is at on the oor. Use care when installing the rod;
 donotforceitordamagetothescreenmaterialmayoccur
 (SeeDiagram3).
• Insert the shorter tensioning rods into the corresponding
 sides of the screen; as with the longer rods, use caution to
 avoiddamagetothescreen(SeeDiagram3).
•Lineupthesnaplugsandthescreenmaterialwiththeframe
 and press the snap lug through the corresponding hole in
 the material. Some adjustment and re-adjustment is often
 necessary;thisisnormal.Notethatthetensioningrodgoesto
 theoutsideofthesnaplug(SeeDiagram4).
• Repeat this process all the way around the frame. As you
 positionthetensioningrodbehindthesnaplugs,
 the screen will become tighter on the frame and any
 wrinkles or creases will disappear. It may also be helpful or
 necessarytotemporarily“unsnap”orloosenthesnaplugfor
 adjustment,especiallyasyouworktothenalcornersofthe
 screen.
Assemblingtheframe
Diagram1
Diagram2
Diagram3
TensionRod a
c
b
Diagram4
a
b
c
d
e
screen
SideView
screen
screen
screen
Mountingthescreenontothewall
•Selectanappropriateareatomountthescreen.Makesurethe
 position selected will not interfere with existing features of
 yourroom;wallsockets,switches,etc…theseall should be
 avoided.
•DONOTinstallthescreenoveranelectricaloutletorswitch.
 Doingsoposesaseriousrehazard.
• For homes with stud-wall construction, use stud nder or
 carefullymeasuretodeterminewherethestudsarelocatedin
 thewall.ThescreenMUSTbemountedtothestuds-NEVER
 rely on gypsum board, drywall, or thin wall materials to
 supporttheweightofthescreen!
Acoustic
Scrim
Material
Rev: 140919-1655
Fixing Lugs
Aluminum corne r
connecto r piec e
Side Frame Pieces
Top and Bottom
Frame Pieces
TopBrackets
BottomBrackets
Top Frame Bar
Side
Frame
Bar
Back ViewFrontView
Top View
This manual suits for next models

7

Other Dragonfly Projection Screen manuals

Dragonfly DFRM-TAB-100-MW User manual

Dragonfly

Dragonfly DFRM-TAB-100-MW User manual

Dragonfly DF-SL-92-ALR User manual

Dragonfly

Dragonfly DF-SL-92-ALR User manual

Dragonfly 92-145 User manual

Dragonfly

Dragonfly 92-145 User manual

Dragonfly DF-SL-84-MW/HC User manual

Dragonfly

Dragonfly DF-SL-84-MW/HC User manual

Dragonfly DF-TB-XXX-ALR Series User manual

Dragonfly

Dragonfly DF-TB-XXX-ALR Series User manual

Dragonfly Thinline 92" User manual

Dragonfly

Dragonfly Thinline 92" User manual

Dragonfly DFRM User manual

Dragonfly

Dragonfly DFRM User manual

Dragonfly DFM-TAB-84 User manual

Dragonfly

Dragonfly DFM-TAB-84 User manual

Dragonfly Ultra White User manual

Dragonfly

Dragonfly Ultra White User manual

Dragonfly DFM-NTT User manual

Dragonfly

Dragonfly DFM-NTT User manual

Popular Projection Screen manuals by other brands

Qeedji SLATE Series user manual

Qeedji

Qeedji SLATE Series user manual

Da-Lite B Instruction book

Da-Lite

Da-Lite B Instruction book

Akuart Shelter Me instruction manual

Akuart

Akuart Shelter Me instruction manual

Optoma BigVizion HDBV5100P Specification sheet

Optoma

Optoma BigVizion HDBV5100P Specification sheet

Elite Screense Evanesce B Series user guide

Elite Screense

Elite Screense Evanesce B Series user guide

SI ZERO EDGE PRO owner's manual

SI

SI ZERO EDGE PRO owner's manual

Elite Screens Evanesce Tension Series user guide

Elite Screens

Elite Screens Evanesce Tension Series user guide

OmniMed Economy Assembly instructions

OmniMed

OmniMed Economy Assembly instructions

LP Morgan Rondo Opus user manual

LP Morgan

LP Morgan Rondo Opus user manual

Optoma Panoview DS-3084PMS installation guide

Optoma

Optoma Panoview DS-3084PMS installation guide

Elite Screens Spectrum Series user guide

Elite Screens

Elite Screens Spectrum Series user guide

Pyle PRJOS80 user guide

Pyle

Pyle PRJOS80 user guide

Samo lineabeta Open B4600 Assembly instruction

Samo

Samo lineabeta Open B4600 Assembly instruction

Reflecta Motor Silverline Series user manual

Reflecta

Reflecta Motor Silverline Series user manual

Draper Foundation installation manual

Draper

Draper Foundation installation manual

Da-Lite Designer Contour Manual Instruction book

Da-Lite

Da-Lite Designer Contour Manual Instruction book

Akia Screens EDGE FREE Series user guide

Akia Screens

Akia Screens EDGE FREE Series user guide

VEVOR LX803-1BL quick start guide

VEVOR

VEVOR LX803-1BL quick start guide

manuals.online logo
manuals.online logoBrands
  • About & Mission
  • Contact us
  • Privacy Policy
  • Terms and Conditions

Copyright 2025 Manuals.Online. All Rights Reserved.