manuals.online logo
Brands
  1. Home
  2. •
  3. Brands
  4. •
  5. Dragonfly
  6. •
  7. Projection Screen
  8. •
  9. Dragonfly DF-SL-84-MW/HC User manual

Dragonfly DF-SL-84-MW/HC User manual

Mounting the screen onto the wall
Care and cleaning
•Yournewscreencanbeeectively cleanedwithasoftcloth
using mild soap and water. DO NOT use harsh detergents,
chemicals, distilled spirits or petro-chemicals to clean the
 screen;doingsomayresultinseveredamagetothescreenor
 theframecoating.
•Ifthefeltcovering on the framegetsdusty or coveredwith
 lint,useahouseholdvacuumcleanerwithabrushorfurniture
 cleaningattachmenttocleanthefelt.Wedonotrecommend
 usingexcessiveamountsofwateronthefelt.
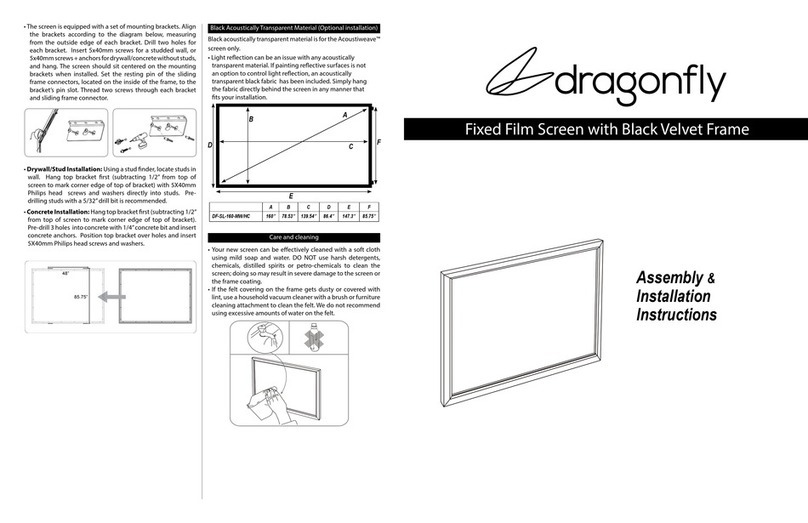
A B C D E F
DF-SL-84-MW / HC 84” 41.14'' 73.19'' 47.48'' 79.53'' 47.36''
DF-SL-92-MW / HC 92” 45.08'' 80.2'' 51.42'' 86.54'' 51.3''
DF-SL-100-MW / HC 100” 49.02'' 87.17'' 55.35'' 93.5'' 55.24''
DF-SL-106-MW / HC 106” 51.93'' 92.36'' 58.27'' 98.7'' 58.15''
DF-SL-110-MW / HC 110” 53.9'' 95.87'' 60.24'' 102.2'' 60.12''
DF-SL-120-MW / HC 120” 58.82'' 104.57'' 65.16'' 110.9'' 65''
DF-SL-133-MW / HC 133” 65.2'' 116'' 71.54'' 122.24'' 71.38''
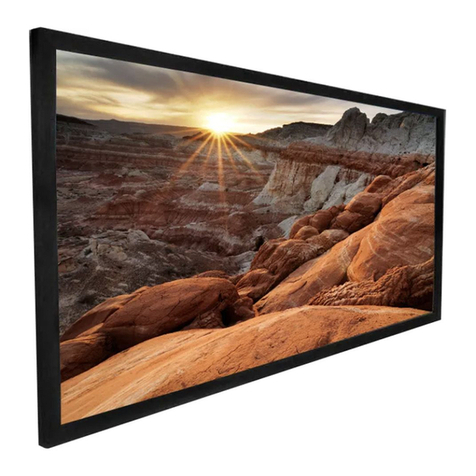
FixedFilmScreenwithBlackVelvetFrame
Assembly &
Installation
Instructions
4”
4”
Top Bracket
Bottom Bracket
Security Clip
Pre-measured
Tether
•Selectanappropriateareatomountthescreen.Makesurethe
 position selected will not interfere with existing features of
 yourroom;wallsockets,switches,etc…these allshould be
 avoided.
•DONOTinstallthescreenoveranelectricaloutletorswitch.
Doing so poses a serious re hazard.
• For homes with stud-wall construction, use stud nder or
 carefullymeasuretodeterminewherethestudsarelocatedin
 thewall.ThescreenMUST be mountedto the studs-NEVER
 rely on gypsum board, drywall, or thin wall materials to
 supporttheweightofthescreen!
•The screenisequipped withaset of pre-measuredtethered
 mounting brackets. There are security clips in the bottom
 bracket.  The screen should sit centered on the mounting
 bracketwheninstalled.
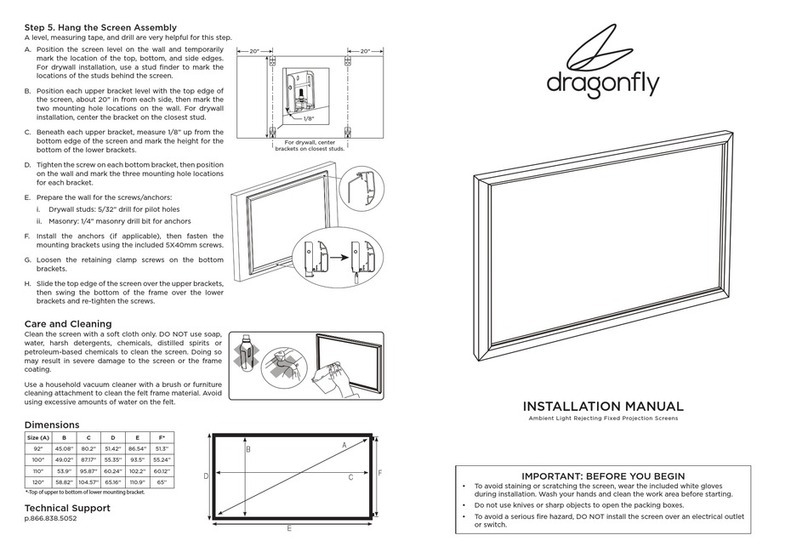
•Drywall/Stud Installation: Using a stud nder, locate studs in
 wall.  Hang top bracket rst (subtracting 1/2” from top of
 screentomarkcorneredgeoftopofbracket)with5X40mm
 Philips head  screws and washers directly into studs.  Pre-
 drillingstudswitha5/32”drillbitisrecommended.
•Letthebottombracketdropand,whilepullingtetherstaut,
 mark locations for screws. Repeat mounting procedure
 used with the top bracket.  For best support, 3 screws per
 bracketshouldbeused.
•Concrete Installation:Hangtopbracketrst(subtracting1/2”
 from top of screen to mark corner edge of top of bracket).
 Pre-drill3holesintoconcretewith1/4”concretebitandinsert
 concreteanchors.Positiontopbracketoverholesandinsert
 5X40mmPhilipsheadscrewsandwashers.
•Letthebottombracketdropand,whilepullingtetherstaut,
 mark locations for screws. Repeat mounting procedure
 used with the top bracket.  For best support, 3 screws per
 bracketshouldbeused.
• Start by lifting screen frame onto top bracket, letting the
 bottomrestagainstbottombracket.Carefullyliftbottomof
 screen onto bottom bracket (Figure A & B).  Security clips
 willlockbottomofscreeninplace.Installationiscomplete.
• To release, simply push in clips and carefully lift bottom of
 screenupandawayfromwall.
Drywall Concrete
B
A
E
D
BA
F
C
Pleasefollowtheassemblyandinstallationinstructions
carefully. With proper assembly and installation, your
newscreenwilldeliveryearsoftrouble-freeservice
Preparingyourscreenforinstallation
PartList
•Carefullyopenthepackageandlayoutallthepartsonaclean,
 atsurface
•Useextremecautionwhenunpackingthescreen;donotuse
 knivesorsharpobjectstoopenthepackingboxes.
•Donotunpackthescreenmaterialatthistime.
AluminumFrameTube
TensioningRod
“L”Bracket
Assemblyx4 SnapLugx34
Washersx8
Top and Bottom Bracket with
Pre-measuredTetherx1each
5x40mmPhillips
Head ScrewsX8
Concrete
Anchorsx8
x2
x2
x2
x2
Installingthesnaplugs
•Slidethesnaplugsintothesectionoftheextrudedaluminum
 frameasshowninDiagram1.
a
Snap Lug
b
• The snap lugs line up with the arrow decals on the frame
 tubes.Alignmentisnotcriticalatthisstageoftheinstallation.
 Notethatthescreenissuppliedwith2extrasnaplugs;should
 youloseorbreakasnaplug,oneofthesparesisaconvenient
replacement.
Installingthescreenmaterial
•Placealloftheframetubesfacedownontheworksurfaceand
 carefully line up the ends to form shape of the nished
screen.
•The4supplied“L”shapedcornerbracketassembliesareused
 tojointheindividualframetubestogether.
• Loosen the 4 screws on the “L” brackets. Next, carefully
 slipthebracketsintothealuminumframechannelasshown
 indiagram2.
•Itwillhelptoleave the screwslooseuntilyouget all of the
 bracketsinplace.
• Carefully line up the frame corners and tighten the screws
 slightly;repeatthisstepateachcorner.
• Note that you may have to loosen and adjust the brackets
 andframetubesinordertogettheframeperfectlysquare.A
 carpenters square is very helpful with this stage of the
 assembly.
•Lineupthesnaplugsandthescreenmaterialwiththeframe
and press the snap lug through the corresponding hole in
 the material. Some adjustment and re-adjustment is often
 necessary;thisisnormal.Notethatthetensioningrodgoesto
 theoutsideofthesnaplug(SeeDiagram4).
• Repeat this process all the way around the frame. As you
 positionthetensioningrodbehindthesnaplugs,
 the screen will become tighter on the frame and any
 wrinkles or creases will disappear. It may also be helpful or
 necessarytotemporarily“unsnap”orloosenthesnaplugfor
 adjustment,especiallyasyouworktothenalcornersofthe
screen.
•Once the screen is in place and the tensioning rods are
 seated behind all of the snap lugs, inspect the front
 of the screen. Make sure that the screen material is at
 and wrinkle-free. Also, check the corners to make sure that
 the screen is properly positioned. If there are any wrinkles
 or positioning issues, simply lay the screen face down and
 adjustaccordingly.
•Notethatsomeverysmallfoldlinesorwrinklesmayexistfora
 fewhours;thisisduetothepackingofthescreenandthey
 willdisappearwithinashorttime.
•Makesurethathandsandworkareaarecleanbeforeworking
with the screen materials
• Carefully unpack the screen material- Use caution as the 4
 tensioningrodsarecontainedinsidethecardboardtube.
• Carefully lay out the screen material so that it roughly lines
 upwiththeframe-Exactpositionisnotcriticalatthisstageof
 theassembly.Itisimportantthatthescreenmaterialisfacing
 thecorrectdirection.Itiseasytoidentifythebacksideofthe
 screenasitwillhavethestitchedorweldedseamvisible.
•Unpackthe4metaltensioningrods.
•Insert the long metal tensioning rodsintothelongeredges
 of the screen material, one rod per side. It is easier if the
screen is at on the oor. Use care when installing the rod;
 donotforceit or damage to the screenmaterialmayoccur
 (SeeDiagram3).
• Insert the shorter tensioning rods into the corresponding
 sides of the screen; as with the longer rods, use caution to
 avoiddamagetothescreen(SeeDiagram3).
Assemblingtheframe
b
d
c
a
topframe
strip nuts
sideframe
L Bracket
Diagram1
Diagram2
Diagram3
TensionRod a
c
b
Diagram4
a
b
c
d
e
Top Frame Bar
Side
Frame
Bar
Top Bracket
screen
Front View Back View Side View
Top View
Bottom Bracket
screen
screen screen
This manual suits for next models

6

Other Dragonfly Projection Screen manuals

Dragonfly Ultra White User manual

Dragonfly

Dragonfly Ultra White User manual

Dragonfly DFM-NTT User manual

Dragonfly

Dragonfly DFM-NTT User manual

Dragonfly DF-SL-92-ALR User manual

Dragonfly

Dragonfly DF-SL-92-ALR User manual

Dragonfly DFRM User manual

Dragonfly

Dragonfly DFRM User manual

Dragonfly Acoustiweave DF-SL-160-MW Programming manual

Dragonfly

Dragonfly Acoustiweave DF-SL-160-MW Programming manual

Dragonfly DFM-TAB-84 User manual

Dragonfly

Dragonfly DFM-TAB-84 User manual

Dragonfly DFRM-TAB-100-MW User manual

Dragonfly

Dragonfly DFRM-TAB-100-MW User manual

Dragonfly 92-145 User manual

Dragonfly

Dragonfly 92-145 User manual

Dragonfly Thinline 92" User manual

Dragonfly

Dragonfly Thinline 92" User manual

Dragonfly DF-TB-XXX-ALR Series User manual

Dragonfly

Dragonfly DF-TB-XXX-ALR Series User manual

Popular Projection Screen manuals by other brands

KwickScreen Kin V1 Assembly manual

KwickScreen

KwickScreen Kin V1 Assembly manual

SohoWerks KwickScreen user manual

SohoWerks

SohoWerks KwickScreen user manual

3M Digital Walldisplay 9000PD Plus Quick reference guide

3M

3M Digital Walldisplay 9000PD Plus Quick reference guide

Draper 220V Ultimate Access Installation and operating instructions

Draper

Draper 220V Ultimate Access Installation and operating instructions

Kauber FRAME Series installation guide

Kauber

Kauber FRAME Series installation guide

Gecko GG750030 Fitting instructions

Gecko

Gecko GG750030 Fitting instructions

Reflecta Motor Silverline Series user manual

Reflecta

Reflecta Motor Silverline Series user manual

Severtson Cinema Series instruction manual

Severtson

Severtson Cinema Series instruction manual

Elite Pro AV TE92HW2 user guide

Elite Pro AV

Elite Pro AV TE92HW2 user guide

HAPRA Home Cinema CT operating instructions

HAPRA

HAPRA Home Cinema CT operating instructions

Elite Screens Spectrum Series user guide

Elite Screens

Elite Screens Spectrum Series user guide

Da-Lite Designer Contour Manual Instruction book

Da-Lite

Da-Lite Designer Contour Manual Instruction book

Vivid VFS390SM user manual

Vivid

Vivid VFS390SM user manual

Epson PowerLite W16SK Setup guide

Epson

Epson PowerLite W16SK Setup guide

Stewart Audio Gemini owner's manual

Stewart Audio

Stewart Audio Gemini owner's manual

VEVOR LX803-1BL quick start guide

VEVOR

VEVOR LX803-1BL quick start guide

DNP Supernova XL installation guide

DNP

DNP Supernova XL installation guide

Shopify MotoMask PRO user manual

Shopify

Shopify MotoMask PRO user manual

manuals.online logo
manuals.online logoBrands
  • About & Mission
  • Contact us
  • Privacy Policy
  • Terms and Conditions

Copyright 2025 Manuals.Online. All Rights Reserved.