manuals.online logo
Brands
  1. Home
  2. •
  3. Brands
  4. •
  5. Duka
  6. •
  7. Bathroom Fixture
  8. •
  9. Duka VR4P Installation guide

Duka VR4P Installation guide

Montageanleitung
Istruzioni di montaggio
Montage - instructie
Assembling instructions
Instructions de montage
Instrucciones para el montaje
Instrukcja monta˝u
VR4P
Rundkabine
Quarto tondo
1/4 rond
1/4 round
Quart/ronde
Redonda
Kabina po∏ókràg∏a
F
GB
NL
I
D
E
PL
1
2
1
VR4P 80R.. = Min 767 Max 792
VR4P 90R.. = Min 867 Max 892
VR4P 10R.. = Min 967 Max 992
13 mm
ideal
13 mm
ideal
VR4P 80R.. = Min 767 Max 792
VR4P 90R.. = Min 867 Max 892
VR4P 10R.. = Min 967 Max 992
VR4P
13 mm
ideal
13 mm
ideal
4
3
VR4P
6 mm
12
2
2
2
2
3
3,9 x 38
3
3,9 x 38
1
3
1
3
+_
+_
6
5
VR4P
1
1
2
2
1
1
2
2
2
8
7
VR4P
2
1
1
3
2
1
1
2
2
5 mm
VR4P
5
14
2
1
4
15 mm
3
9
5
14
1
4
2
6
Mit dem beiliegendem Sechskant -Schlüssel
die Schrauben (1) lösen, das Glas soweit
möglich zur Mauer schieben (2) und anschließend
mit den Schrauben (3) fixieren.
Anschließend Kabine und Fließen reinigen
und die Gläser von außen mit Silikon abdichten.
Vor Benutzen der Dusche Silikon mindestens 24
Stunden aushärten lassen.
Con la chiave esagonale in dotazione
allentare le viti (1), spingere il vetro a muro (2)
e riavvitare totalmente le viti (3).
Successivamente prego pulire la cabina
doccia e le piastrelle e siliconare lungo i profili di
compensazione e lungo il cristallo. Prima di
utilizzare la cabina doccia fare indurire il silicone
per minimo 24 ore.
Met de meegeleverde inbussleutel de
schroeven (1) losdraaien, het glas zoveel
mogelijk tegen de muur schuiven (2) en daarna
met schroeven fixeren (3).
Eerst de cabine en tegels schoonmaken,
dan het muurprofiel en het glas aan de
buitenzijde siliconeren. De siliconen moet eerst 24
uur drogen voordat u een douche kunt nemen.
Zum herausnehmen • foglio da staccare • om mee te nemen • take out the folder • à enlever • oja a extraer
1
4
14
1
4
14
1
4
14
WICHTIG! Montieren Sie die fixen Gläser
innerhalb der unten angegebenen Maßen.
Posizionare il vetro secondo le misure sotto
indicate.
Het Glas tussen de hieronder opgegeven
maten monteren.
Das Türelement laut Zeichnung einfügen.
Griff an der Tür anbringen.
Inserire la porta come da disegno.
Fissare la maniglia sulla porta.
La regolazione della porta avviene agendo sulle viti di
regolazione con la chiave in dotazione avendo cura di
mantenere una distanza vetro-piatto di 15 mm.
Het deurdeel volgens tekening plaatsen.
Greep op de deur plaatsen.
Het precieze afstellen van de deur wordt bereikt door
het draaien van de stelschroeven met de bijgeleverde sleutel.
De afstand van 15 mm tussen glas en douchebak moet
aangehouden worden.
6
8
9
6
8
6
8
9
Qualora dopo aver regolato le antine, il profilo
magnetico non dovesse chiudersi per tutta sua lunghezza
basterà semplicemente battere leggermente (nel punto in cui
si è formata la fessura) tra il profilo e il vetro. Indien na de afstelling het magneetprofiel nog niet
over de volledige lengte sluitkan men het magneetprofiel
op de desbetreffende plaats uitkloppen.
Die Justierung der Tür erfolgt über die
Regulierungsschrauben mittels dem mitgelieferten Schlüssel.
Die Distanz von 15 mm zwischen Glas und Duschtasse muss
beibehalten werden.
9
Falls nach der Regulierung das Magnetprofil
immer noch nicht entlang der gesamten Länge schließt,
genügt es, das Magnetprofil an besagter Stelle leicht
vom Glas herauszuklopfen.
Die Abtropfleiste am unteren Glasrand einfügen.
Die Schwallschutzleiste auf der Duschtasse fixieren.
Hierzu den unteren Kanal mit Silikon füllen. Die
Schwallschutzleiste muss sich vor dem Türelement befinden.
Applicare la guarnizione gocciolatoio inserendola nel
vetro sotto porta.
Applicare il profilo anti-allagamento sul piatto doccia
riempiendo la canalina inferiore con il silicone avendo cura
che si trovi all’esterno del vetro-porta.
De lekstrip onder de deur plaatsen.
De lekdorpel op de douchebak monteren. Hiervoor de
holle ruimte aan de onderkant van de lekdorpel
vullen met siliconenkit . De lekdorpel moet vóór het deurdeel
zitten.
12
13
12
13
12
13
Den Stützarm am Glas anbringen und anschließend die
Position an der Wand markieren.
Den Stützarm an der Wand fixieren.
10
Applicare il braccetto di sostegno al vetro, quindi
segnare la posizione sulla parete. Fissare il sostegno a muro.
10
De steun op het glas plaatsen en daarna het voetje op
de muur aftekenen. De steun op de muur monteren.
10
333
Achtung: Kontrollieren Sie die Beschaffenheit der
Wand, Licht-, Gas- und Wasserleitungen.
Die mit der Kabine mitgelieferten Dübel und Schrauben sind
nur für sämtliche Beton- und Mauerwerkbaustoffe geeignet.
Für Wände anderer Bauart müssen Sie dafür geeignetes
Befestigungsmaterial verwenden.
Verwenden Sie nur Silikon oder Dichtungsmasse, welche für
die Oberflächen und Materialien geeignet sind, an denen die
Duschkabine montiert wird. Die Befestigung an der Wand, die
Montage und die Silikonierung der Duschkabine müssen
sorgfältig und professionell durchgeführt werden. Falls Fragen
bezüglich der Montage entstehen sollten, wenden Sie sich
bitte an Ihren Wiederverkäufer.
Attenzione: controlli le condizioni nelle quali si trovano
sia la parete che le linee di gas, corrente ed acqua.
I tasselli e le viti fornite a corredo alla cabina doccia sono
adatti per materiale edile in cemento armato e di costruzione
per pareti. Per pareti di tipo costruttivo diverso deve utilizzare
materiale di fissaggio in funzione del materiale edilizio. Utilizzi
solo silicone o materiale isolante adatto alle superfici sulle
quali verrà montata la cabina doccia. Il fissaggio a parete, il
montaggio e la siliconatura della cabina doccia devono essere
eseguiti in modo preciso e professionale. Se dovesse avere
domande in riferimento al montaggio, si rivolga per favore al
grossista.
Let op: Controleer de muur op licht, gas- en
waterleidingen.
De bij de douchecabine meegeleverde pluggen en schroeven zijn
uitsluitend voor beton en steen geschikt. Voor wanden van een
ander bouwmateriaal dient u daarvoor geschikt
bevestigmateriaal aan te schaffen.Gebruik uitsluitend siliconen
of een andere applicatiekit, welke geschikt is voor het oppervlak
en het materiaal wat aan de douchecabine gemonteerd wordt.
De bevestiging aan de wand, de montage en het siliconeren van
de douchecabine moet zorgvuldig en professioneel worden
uitgevoerd. Indien u vragen heeft tijdens de montage wordt
vriendelijk verwezen naar uw wederverkoper.
Wichtig!
Bitte überprüfen Sie Ihre
Duschkabine vor der Montage auf
Transportschäden. Für Schäden an bereits
montierten Produkten kann keine Haftung
übernommen werden.
Werkzeuge für die Montage:
Wasserwaage, Bleistift, Körner, Hammer,
Bohrmaschine, Steinbohrer 6mm, Kreuz-
schraubenzieher, Schraubenzieher,
Stahlbohrer 3mm, Silikon.
D
Importante!
Prima del montaggio controllare se il prodotto ha
subito danni di trasporto. Per danni su prodotti
già montati non possiamo assumerci alcuna
responsabilità.
Utensili per il montaggio:
livella, matita, bulino, martello, trapano, punta da
muro 6 mm, per acciaio 3 mm, cacciavite a croce,
cacciavite piatto, silicone.
I
NL
Belangrijk!
Vóór montage dient U het artikel op eventuele
transport-
beschadigingen of fabrieksfouten te kontroleren.
Voor schade aan reeds gemonteerde onderdelen
kunnen wij niet aansprakelijk gesteld worden.
Benodigd gereedschap:
Kruisschroevendraaier, schroevendraaier,
waterpas, potlood, boormachine, steenboor
6mm, staalboor 3mm, silicon.
Zur Reinigung benutzen Sie ein PH-neutrales
Reinigungsmittel oder den von uns empfohlenen
Spezialreiniger. Nicht zu verwenden sind Verdünner,
sowie alkalische, Lösungs-
mittel-, säure- und chlorhaltige oder scheuernde Mittel.
Per la pulizia utilizzare un detergente con un PH
neutrale oppure il detergente neutrale da noi
consigliato. Non utilizzare diluenti e/o sostanze
alcaline, sostanze contenenti solventi, acidi, cloro o
abrasivi.
Voor de reiniging dient u een PH neutraal
reinigingsmiddel of de aanbevolen Sealskin
douchereiniger te gebruiken. Geen verdunner,
alkalische, zuur, chloor of schurende middelen
gebruiken.
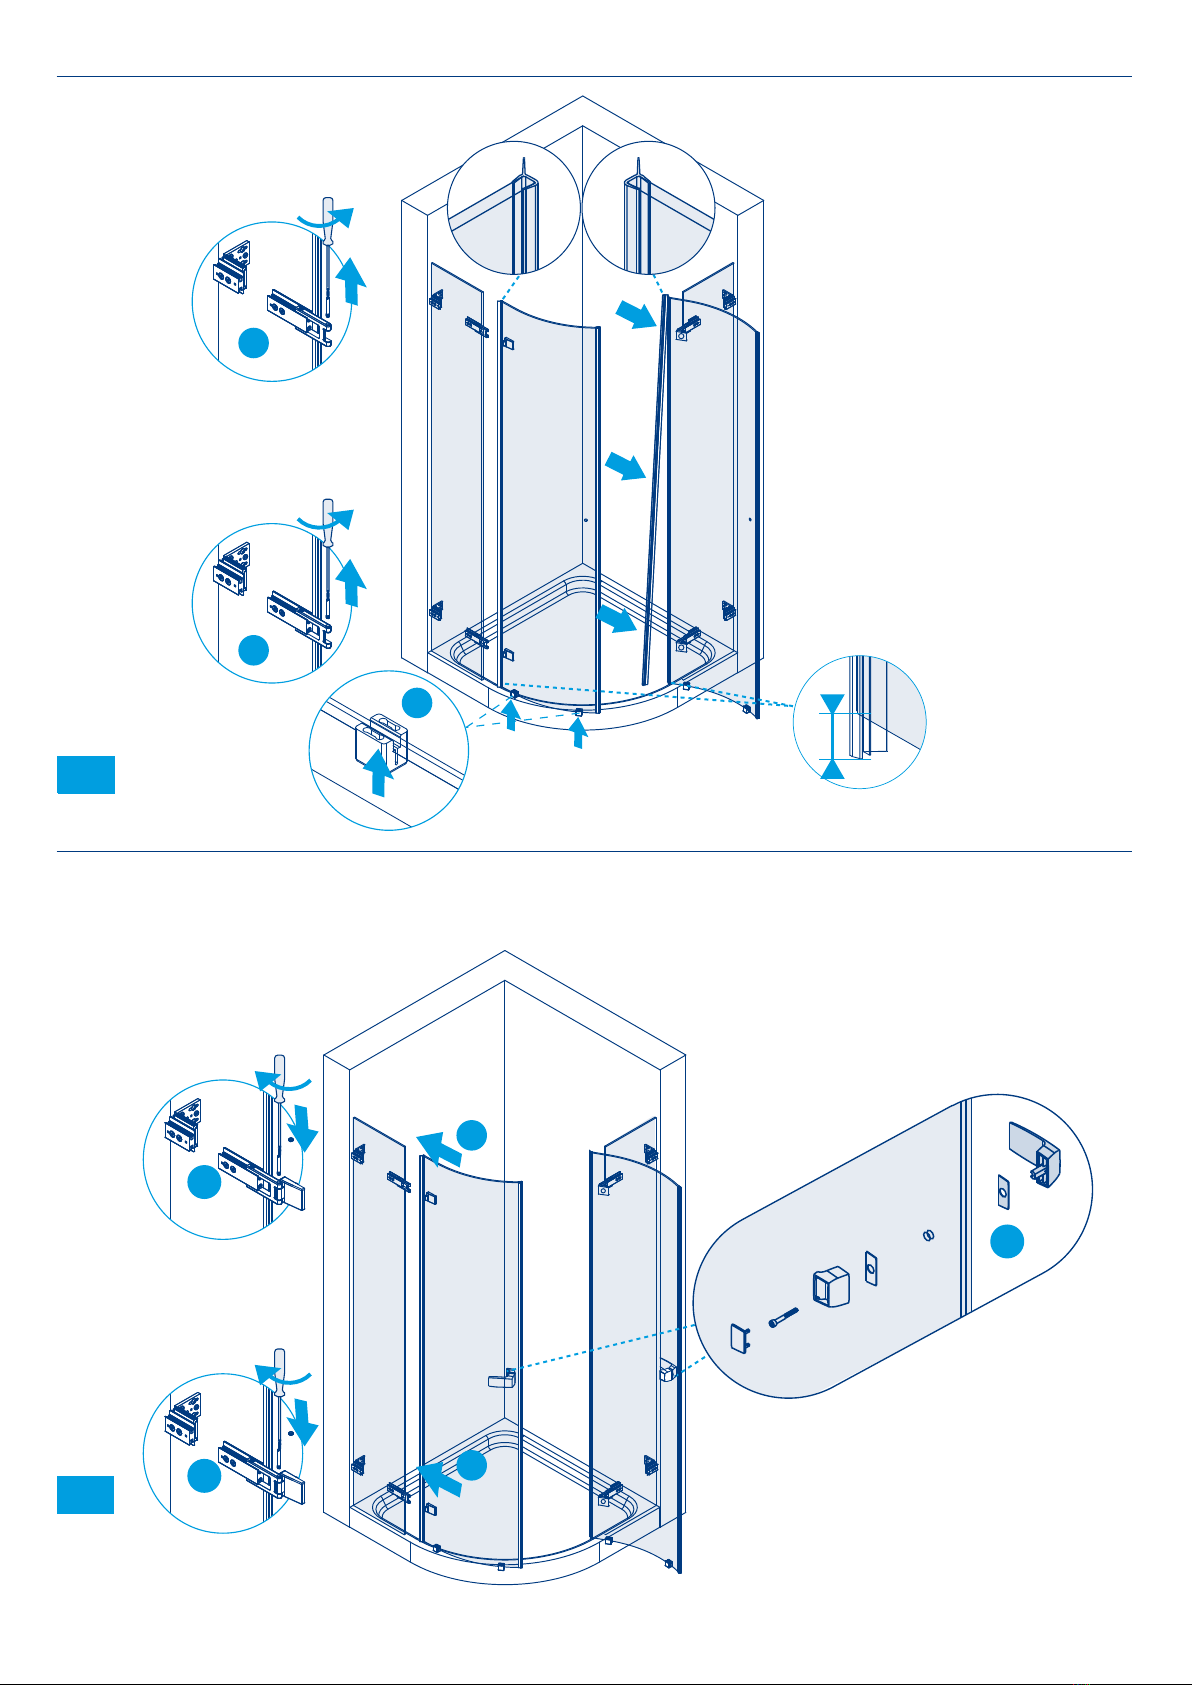
Please putt he the screws (1) on and
adjust the fix panel. After that put the glass to the
wall (2) and fix totall the screws (3).
At least please clean the shower enclosure
and the tiles and proof the compensation profiles
and the glass from outside with silicone. Before
using the shower enclosure let pass minimum 24
hours.
Avec la clé hexagonale fournis, desserrer
les vis (1), appuyer sur la vitre à mur (2) et
revisser totalement des vis (3).
Nettoyer la cabine et les carreaux et
rejointoyer au silicone la cabine du côté extérieur.
Respecter un délai de durcissement de 24 heueres
pour le silicone.
Destornillar con la llave hexagonal que
encuentra en el set de montaje los tornillos
(1), prensar el cristal a la pared y atornillar
totalmente los tornillos.
Después limpiar la cabina de ducha y los
azulejos y siliconar los perfiles de compensación y
el cristal desde afuera. Antes de utilizar la cabina
de ducha esperar para mínimo 24 horas, así que
se seca el silicón.
Zum herausnehmen • foglio da staccare • om mee te nemen • take out the folder • à enlever • oja a extraer
1
4
14
1
4
14
1
4
14
PL
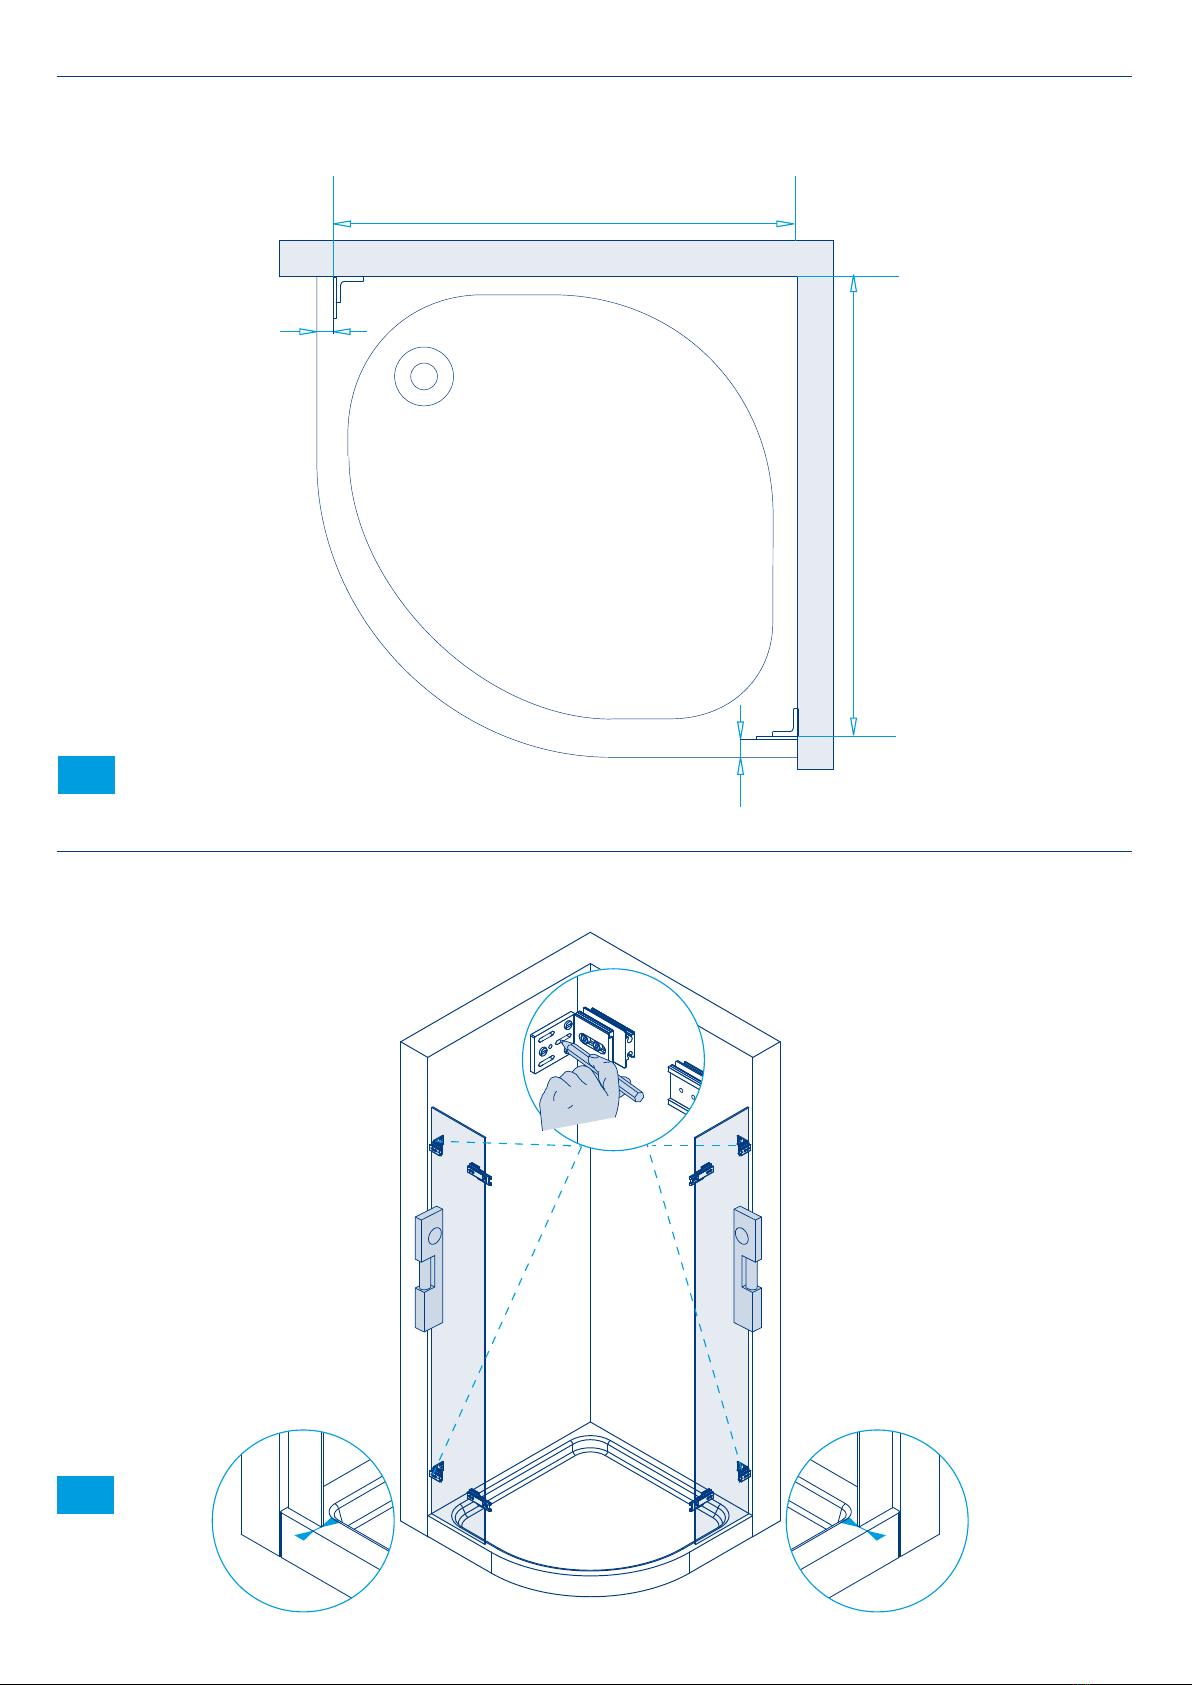
Please install the wall jamb within the
bottom indicated sizes.
Placer le verre entre les dimensions
indiquées ci-aprés.
Montar el vidrio entre las medidas
indicadas aajo.
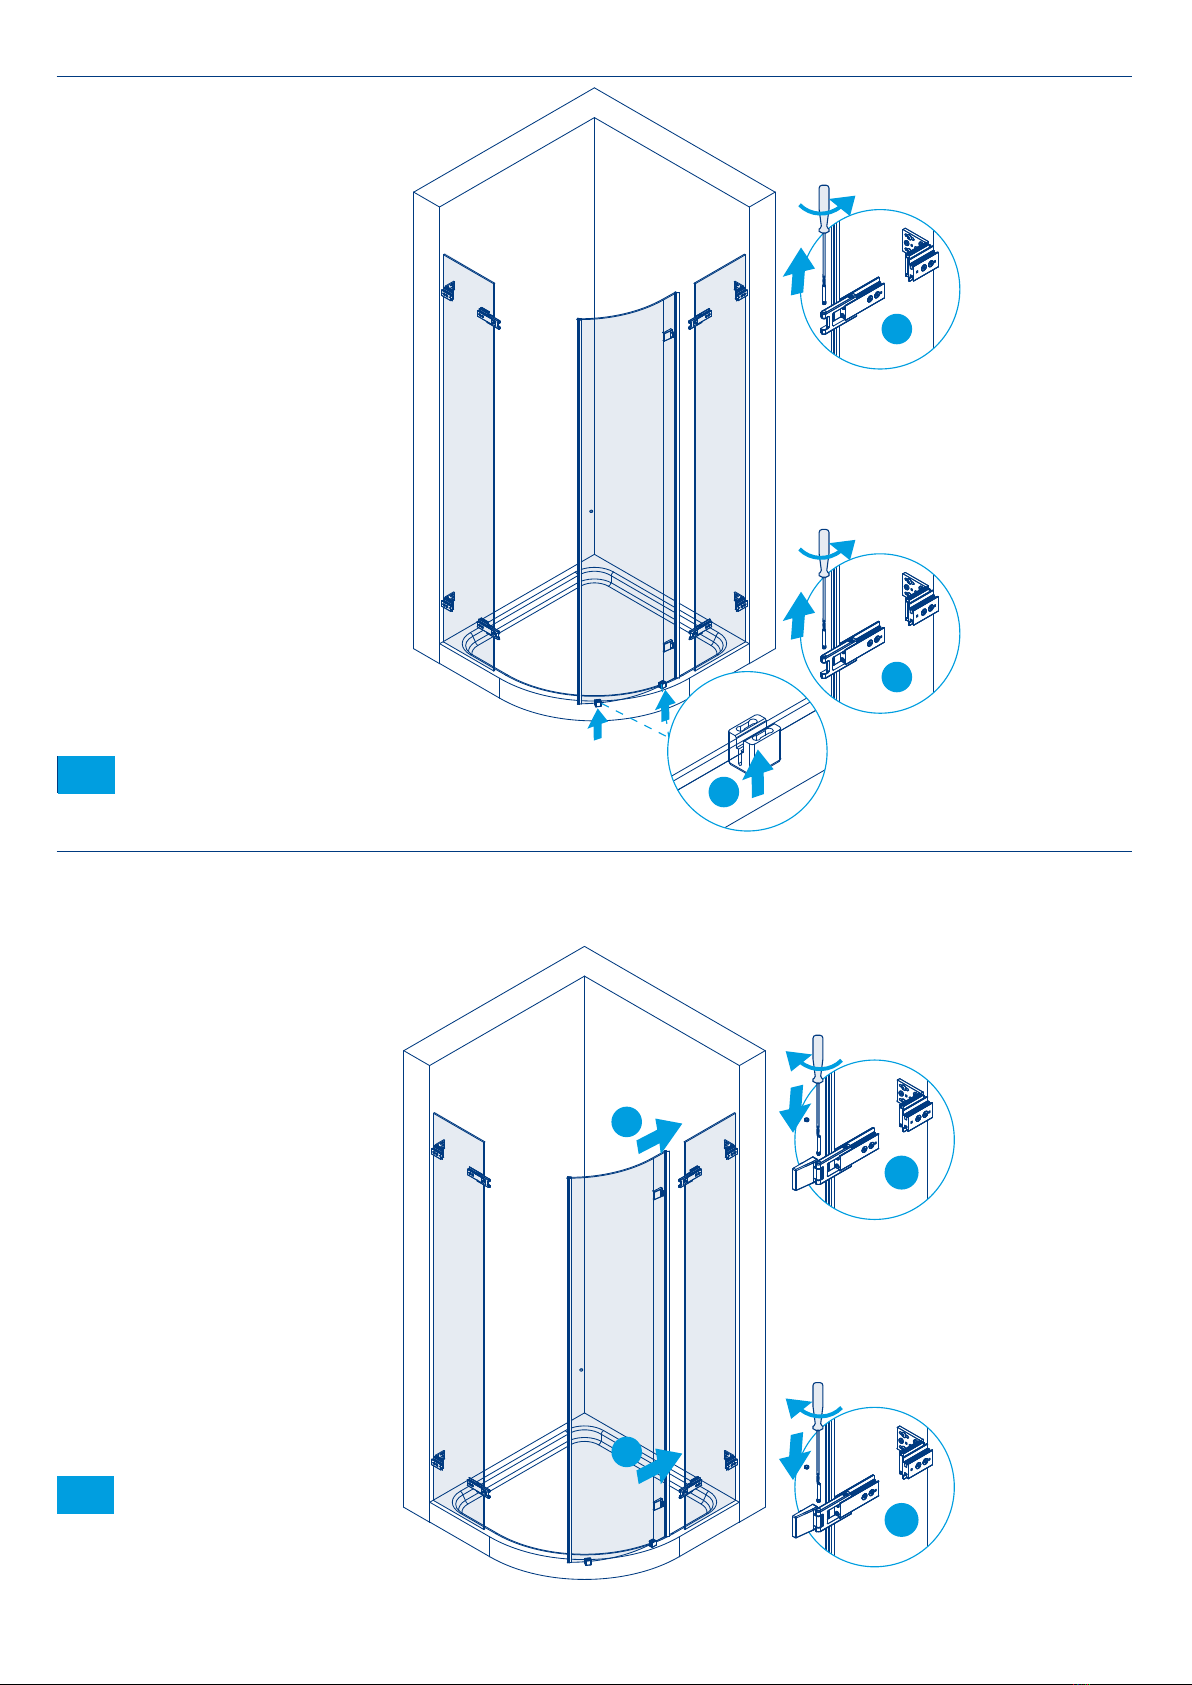
Insert the door element as shown in the drawing.
Fix the hand grip on the door.
The adjustment of the door has to be done by means of
the regulation-screws with the supplied key. The distance
between glass and shower tray has to be always 15 mm.
Placer l’element de la porte selon le dessin
Monter la poignée sur la porte
L ‘ajustement de la porte séffectue par les vis de
réglages, livrées avec leur clé. Veuiller à garder une distance
de 15mm entre le bac à douche et le verre.
Inserir el elemento puerta como da dibujo.
Fijar la manija a la puerta.
La regulación de la puerta se hace mediante los
tornillos de regulación con la llave provista. La distancia entre
vidrio y plato de ducha tiene que ser de 15 mm.
6
8
9
6
9
6
8
9
8
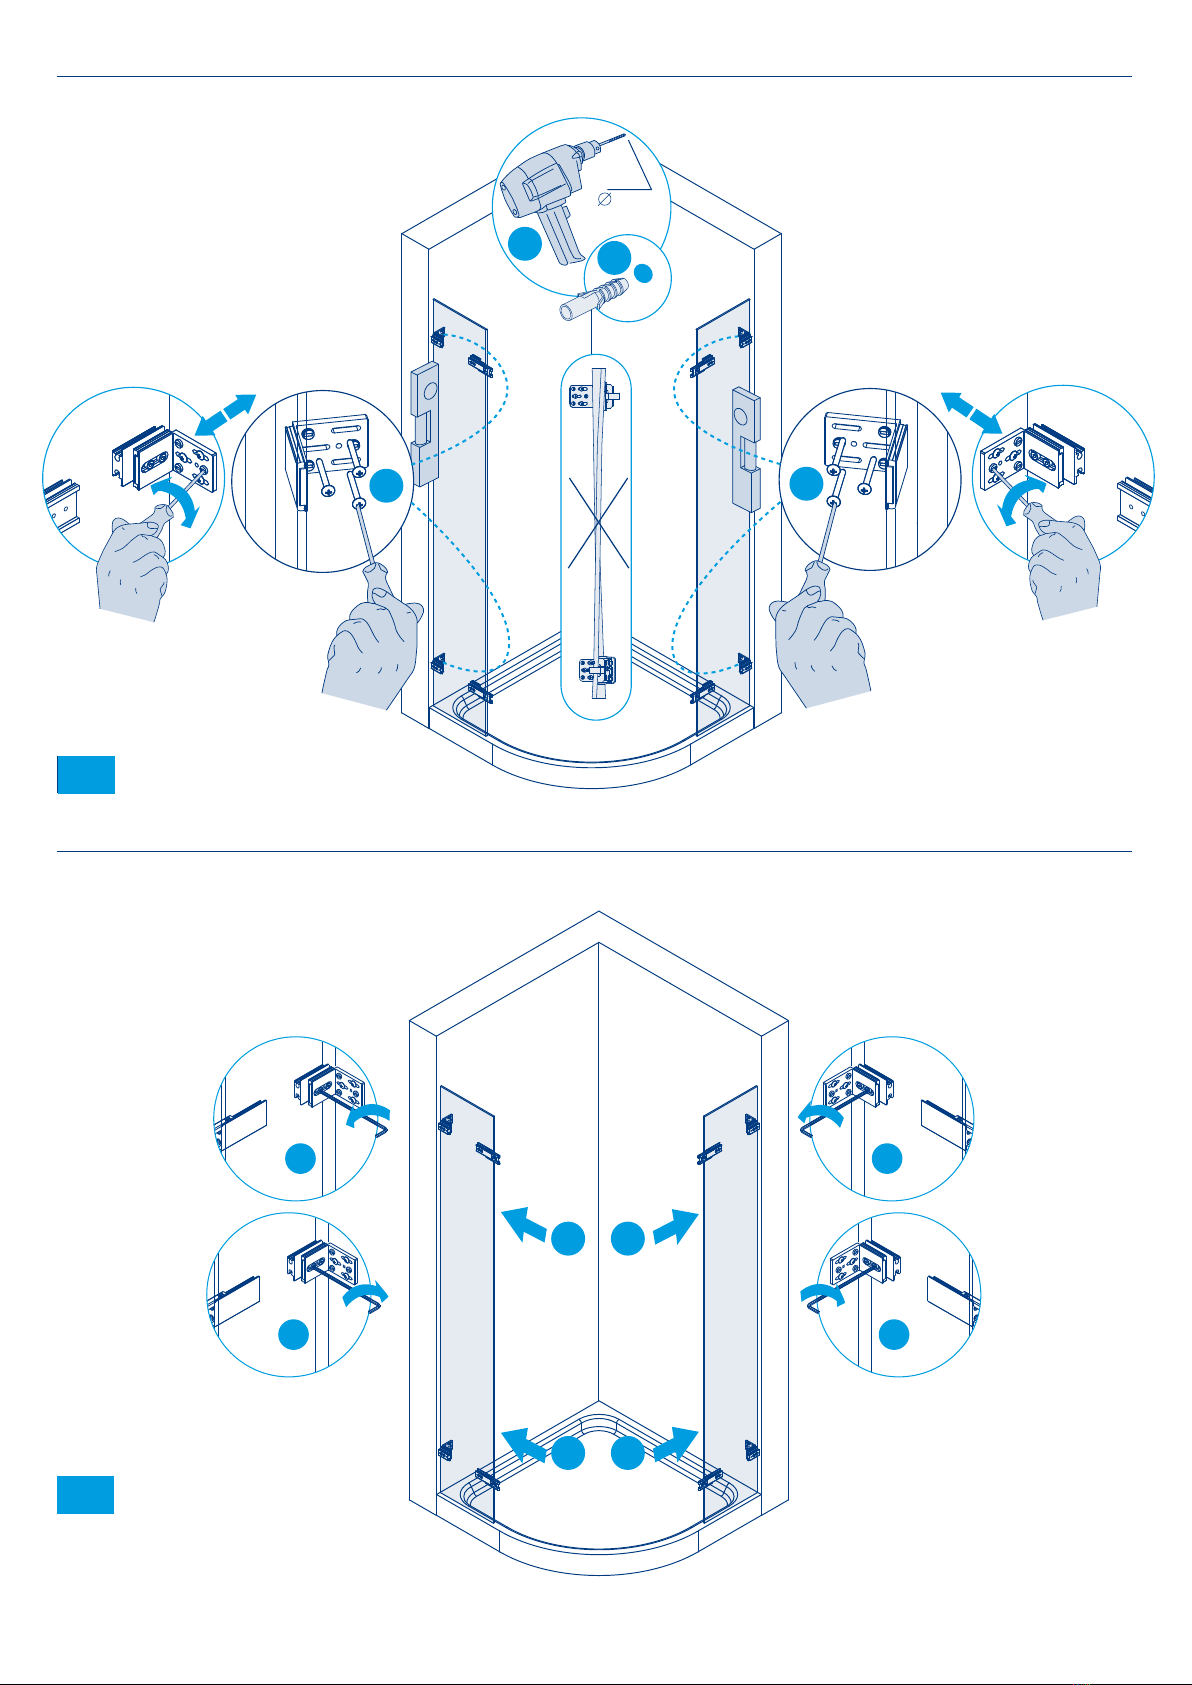
If the magnetic profiles after the regulation
does not meet each other on the whole length, You have
the possibility to knock out of the glass the
magnetic profile fixed on it.
Si après cette manipulation le profilé magnétique
ne ferme toujours pas correctement, ressortir l’aimant
légèrement de son logement à l’aide d’un marteau.
Si después de la regulación de los perfiles de
compensación, los dos perfiles con el imán no cierran
totalmente la cabina de ducha, Ud. tiene también la
posibilidad de golpear un poco el perfil con el imán
afuera del vidrio.
Fix the drip-off rubber on the lower edge of the door-
glass.
Fix the anti-inundation profile on the shower tray.
Therefore fill the channel on the lower side with silicon. The
anti-inundation profile has to be positioned in front of the door
element.
Placer le joint égouttoir en bas de la verrerie.
Monter le seuil dé’tanchéité sur le bac à douche. A
cet effet, remplir le rail du bas avec du silicone. Le seuil
d’étanchéité doit se trouver devant l’èlément de la porte.
Fijar la goma de escurrimiento sobre el borde abajo
del vidrio de la puerta.
Fijar el perfil anti-inundación sobre el plato de ducha.
Para esto llenar el canal inferior con silicón. El perfil anti-
inundación tiene que ser puesto enfrente a la puerta.
12
13
12
13
12
13
Fix the support on the fix panel, align it with the spirit
level and sign the drilling points for the support on the wall.
Fix the support on the wall.
10
Fixer le bras de support sur la verrerrie et marquer sa
position au le mur. Fixer le support au mur.
Monta el soporte sobre la hoja fija, arreglar con
el nivel y marcar la posición perfecta del soporte a la pared.
Fijar el soporte a la pared.
10 10
33
3
Attention: please ensure to check the wall condition
and the position of electrical wiring, gas and water piping.
Plugs and screws, provided with the shower enclosure, are
only suitable for masonry walls. For different wall
constructionand material types, please use the appropriate
fixing means.
Use only sealants suitable for the surfaces and materials on
which the shower enclosure will be installed. Erection,
installation, fixing on the wall and sealing of the shower
enclosure must be properly done according to good practice.
In case of doubt on erection and installation procedures,
please contact the reseller.
Attention: il est important de vérifier l'absence de
canalisations d'eau, de gaz ou de câbles électriques dans le
mur.Les chevilles et vis fournies avec la cabine ne sont
appropriées pour tous les matériaux de maçonnerie et bétons.
Pour des murs réalisés avec d’autre matériaux veuillez utiliser
pour cela du matériel de fixation approprié. N'utilisez que du
silicone ou un produit d'étanchéité qui est approprié aux
surfaces et matériaux, auxquels la cabine douche sera
installée. La fixation au mur, l'assemblage et le siliconnage de
la cabine de douche doivent être mis en oeuvre
soigneusement et professionnellement. Si des questions
devaient naître concernant l'assemblage, veuillez vous
adresser à votre détaillant.
Atención: controlar por favor las condiciones de
las paredes y la ubicación de líneas de gas, energía y
agua.Los tacos y los tornillos enviados juntos a la
mampara son adecuados para material edil en cemento
y para material de construcción de paredes. Para paredes
realizadas con material constructivo diferente tiene que
utilizar material de fijación en función del material de
construcción. Utilizar solo silicón o material de insolación
adapto a las superficies sobre las que se fija la mampara.
La fijación a pared, el montaje y la siliconatura de la
mampara tienen que ser hechas en manera precisa y
profesional. Si tiene preguntas al respecto del montaje,
las rogamos de contactar el distributor.
GB
Important!
Before assembling the shower, please control if
the product has been damaged by the transport.
We don’t assume responsibility for damaged
products which are already assembled.
Required assembly tools:
Water level, pencil, hammer,
drill, drill 6 mm, cross-shaped
screwdriver, screwdriver, steeldrill 3mm, silicon.
F
Attention!
Avant de commencer les opérations de montage,
assurez-vouz que votre cabine n'a subi aucun
dommage durant le transport. Les réclamations
pour cause de dommage ne peuvent être
acceptées lorsque la cabine est déjà placée.
Outils requis:
tournevis criciforme, niveau à bulle, crayon,
perceuse, mèche de 6 mm pour la pierre, mèche
da 3 mm pour l'acier et silicon.
E
Importante!
Antes del montaje controlar si el producto tiene
daños de trasporte. Para daños a productos ya
montados no asumamos alguna responsabilidad.
Limpiar cada semana con agua y jabón, no utilizar
diluentes, detergentes rasgueantes, bencina, ...
Herramientas por el montaje:
Nivel, lápiz, puntero, martillo, tallador, punta de 6
mm, 3 mm por acero, destornillador a cruz,
destornillador plano y silicón.
For cleaning use a pH-neutral cleaning agent or the
special cleaner recommended by us. Not to use are
solvents, as well as alkaline, solvent -, acid- and
chloric or scrubbing agents.
Pour nettoyer veuillez utiliser s’il vous plaît un produit
de nettoyage avec pH neutre ou le produit spéciale
recommandé par nous. N’utilisez pas des solvants, ainsi
qu’alcalins, acides ou produits avec du clore ou agressif.
Para la limpieza utilizar un detergente con un PH
neutral o el detergente neutral recomendado de duka.
No utilizar diluentes y/o substancias alcalinas,
substancias que contienen solventes, ácidos, cloro o
materias abrasivas.
Za pomocà zawartego w komplecie dostawy
klucza z ∏bem 6-kàtnym nale˝y odkr´ciç Êruby (1),
element szklany przesunàç tak dalece, jak jest to
mo˝liwe, w kierunku Êciany, a na koniec zamontowaç
go za pomocà Êrub (3).
Na koniec nale˝y wyczyÊciç kabin´ oraz p∏ytki,
a tak˝e uszczelniç silikonem od zewnàtrz elementy
szklane. Silikon musi twardnieç co najmniej 24
godziny przed rozpocz´ciem korzystania z kabiny.
do wyciàgni´cia
1
4
14
WA˝NE!Sta∏y elementy szklane nale˝y
zamontowaç wewnàtrz podanego poni˝ej zakresu.
Wprowadziç element drzwiowy wed∏ug rysunku.
Uchwyt nale˝y umieÊciç na drzwiach
Dok∏adne ustawienie drzwi odbywa si´ za pomocà Êrub
regulacyjnych oraz klucza zawartego w komplecie dostawy. Nale˝y
zachowaç dystans 15 mm pomi´dzy elementem szklanym oraz
brodzikiem.
6
8
9
JeÊli po tej regulacji uszczelka magnetyczna nie
domyka∏aby si´ jeszcze na ca∏ej d∏ugoÊci, wówczas nale˝y w
odpowiednim miejscu lekko jà wybiç z elementu szklanego.
Na dolnà kraw´dz´ elementu szklanego wsunàç uszczelk´
odprowadzajàcà wod´.
Profil chroniàcy przed rozpryskujàcà si´ wodà nale˝y
zamontowaç na brodziku. Spodni kana∏ profila nale˝y wczeÊniej
wype∏niç silikonem. Profil musi si´ znajdowaç przed elementem
drzwiowym.
12
13
Rami´ wsporcze umieÊciç na elemencie szklanym, a nast´pnie
zaznaczyç jego pozycj´ na Êcianie.
Zamontowaç rami´ wsporcze na Êcianie.
10
3
Uwaga!Prosz´ sprawdziç jakoÊç i stan Êciany oraz
przebieg instalacji elektrycznej, gazowej i wodnej.
Dostarczone w komplecie z kabinà ko∏ki rozporowe i wkr´ty
nadajà si´ wy∏àcznie do Êianmurowanych. Do Êian
wykonanych w systemie lekkiej zabudowy lub innych nale˝y
zastosowaç odmiennesystemy mocowaƒ. Prosz´ zwróciç
uwag´ na to, aby zastosowany zosta∏ rodzaj silikonu w∏aÊciwy
dla powierzchni na jakiej zamontowano kabin´. Monta˝
kabiny i jej uszczelnienie musi zostaç wykonane zgodnie z
instrukcjà! W wypadku wàtpliwoÊci prosimy zwróciç si´ o
pomoc do dystrybutora lub naszego przedstawicielstwa.
PL
Wa˝ne!
Przed rozpocz´ciem monta˝u kabin´ nale˝y
sprawdziç pod kàtem ewentualnych uszkodzeƒ
transportowych. Nie ponosi si´ odpowiedzialnoÊci
za szkody wykryte na w∏aÊnie montowanych
produktach.
Narz´dzia niezb´dne do monta˝u: poziomica,
o∏ówek, punktak, m∏otek, wiertarka, wiert∏o do
kamienia 6 mm, Êrubokr´t krzy˝akowy, Êrubokr´t,
wiert∏o do stali 3 mm.
Do mycia i piel´nacji prosz´ u˝ywaç Êrodków czyszczàych o
odczynie PH oboj´tnym lub polecany przez nas specjalny preparat.
Nie nale˝y stosowaç rozpuszczalników, jak równie˝ preparatów
alkalicznych, kwaÊnych, zawierajàcych chlor lub posiadajàych w∏
aÊciwoÊci Êcierne.
1
16 mm
1
11
10
VR4P
6 mm
2
2
1
2
2
3,9 x 38
7
2
3
4
5
5
6
8
9
VR4P
12
3
4
5
23
4
5
1
1
1
2
2
33
4
4 4
13
VR4P
14
14
VR4P
76
Montageset
75
Mo
nta
g
e
a
n
l
e
i
t
u
n
g
80
VERMONVR4P 04.04.2008
Bei Ersatzteillieferungen sind folgende Angaben erforderlich: • Per ordini di pezzi di ricambio sono necessari i seguenti dati: • Bij onderdeelbestellingen zijn de volgende gegevens gewenst:
Spare parts need the following specification: • Pour toute commande de pièces détachées,il est nècessaire de fournir • Para pedir los repuestos, necesitamos de los siguientes datos:
W przypadku dostaw cz´Êci zamiennych wymagane sà nast´pujàce dane:
Breite / larghezza / breedte / width / largeur / anchura / szerokoÊç:
Höhe / altezza / hoogte / hight / hauteur / altura / wysokoÊç:
Farbe / colore / kleur / colour / couleur / color / kolor:
Glas / vetro / glaspaneel / Glas-type / verre / vidrio / element szklany:
Pos. Art.
21 EL0387
21.1 PLT162
21.2 KLEN005-01
21.3 KLEN010
21.4 BGRN234
21.5 KLET164
21.6 PLN027
21.7 KLEN028
21.8 KLEE407
21.9 KLEMD030
21.10 SRAM512KV
21.11 SRAM48KZ
21.12 KLET165-01
21.13 PLT163
22 BGRN144
22.1 KLEN002
22.2 KLEN004
22.3 KLEN007
22.4 PLN136
22.5 KLEN137
22.6 KLEMD030
22.7 SRAM58KZ
22.8 SRAM512KV
22.9 SRAKFB39x38
22.10 KLE001
23 GLN263
20 EL0386
Pos. Art.
41 PRB36912
42 PLN032
43 PLN033
40 EL0044
Pos. Art.
31 EL0385
31.1 KLEN012-02
31.2 PLN026
31.3 PLT162
31.4 KLET164
31.5 KLET165-01
31.6 PLT163
32 BGRN143
32.1 KLEN141
32.2 KLEN142
32.3 PLN191
32.4 KLEN192
32.5 PLN225
32.6 SRAM5x40KZ33
33 GLN265
34 EL0052
34.1 PRHL022
34.2 GUML016
34.3 PLL045
35 GUML023
36 EL0148
36.1 GUMC192
36.2 BGRT070
36.3 BGRT071
36.4 PLC217
30 EL0388
43 42
41
Pos. Art.
10.1 PRBE408
10.2 KLEE407
10.3 PLE349
10.4 KLEN099
10.5 KLEN100
10.6 KLEN101
10.7 KLEN102
10.8 KLEMD030
10.9 GUMN103
10.10 SRAM4x10KZ
10.11 SRAKV35x16
10.12 SRAKV35x16
10.13 SRAKFB39x38
10.14 KLE001
10 BGRN104
35 35
34.1
34.2
34.3
34.1
34.2
34.3
34.3 34.3
36.1
36
36.2
36.3
36.4
36.2
36.3
36.1
36.4
34
36
31,2
31,2
31,1
31
31,3
31,4
31,5
31,6
31,2
31,2
31,1
31
31,3
31,4
31,5
31,6
21,1
21,5
21,12
21,13
21,2
21,4
21,6
21,11
21,7
21,3
12,8
12,9
12,11
21,10
21
21,1
21,5
21,12
21,13
21,2
21,4
21,6
21,11
21,7
21,3
12,8
12,9
12,11
21,10
21
21,1
21,5
21,12
21,13
21,2
21,4
21,6
21,11
21,7
21,3
12,8
12,9
12,11
21,10
21
21,1
21,5
21,12
21,13
21,2
21,4
21,6
21,11
21,7
21,3
12,8
12,9
12,11
21,10
21
VR4P
40
30 30
34
31,2
31,2
31,1
31
31,3
31,4
31,5
31,6
31,2
31,2
31,1
31
31,3
31,4
31,5
31,6
10.12
10.7
10.13 10.5
10.10
10.3
10.2
10.2 10.10
10.3
10.5 10.11
10.8 10.4
10.6
10.9
10.14
10
10.1
10.12
10.7
10.13
10.5 10.10
10.3
10.2
10.2
10.10 10.3
10.5
10.11
10.8
10.4
10.6
10.9
10.14 10
10.1
23
20
22,4
22,9
22,1
22,10
22,7
22,2
22,8
22,3
22,5
22,6
22
22,4
22,9
22,1
22,10
22,7
22,2
22,8
22,3
22,5
22,6
22
23
20
22,4
22,9
22,1
22,10
22,7
22,2
22,8
22,3
22,5
22,6
22
22,4
22,9
22,1
22,10
22,7
22,2
22,8
22,3
22,5
22,6
22
32.3
32.2
32.5
32.4
32.4
32.5
32.6
32.1
32
32.3
32.2
32.5
32.4
32.4
32.5
32.6
32.1
32
VERMONVR4P 26.03.2019
Der Produzent behält sich jederzeit das Recht, ohne Vorbescheid Abänderungen vorzunehmen.
D
I
NL
GB
F
Il produttore si riserva il diritto di apportare modifiche al prodotto senza preavviso.
De producent houdt zich het recht voor, ten alle tijde zonder tegenbericht, veranderingen door te voeren.
The producer reserves the right to modify the product at any time without prior notice.
Le producteur se réserve le droit de modifier le produit sans aucun préavis.
E
El productor se reserva el derecho de aportar modificaciones al producto sin previo aviso.
PL
Producent zastrzega sobie prawo do wprowadzania zmian bez uprzedniego powiadamiania.

Other Duka Bathroom Fixture manuals

Duka PE 6WZ Installation guide

Duka

Duka PE 6WZ Installation guide

Duka TN2 L WV2 Installation guide

Duka

Duka TN2 L WV2 Installation guide

Duka VR1 Installation guide

Duka

Duka VR1 Installation guide

Duka VTW1 L Installation guide

Duka

Duka VTW1 L Installation guide

Duka VTW4 L Installation guide

Duka

Duka VTW4 L Installation guide

Popular Bathroom Fixture manuals by other brands

Oceanic OCEAMIXSC05 Instruction booklet

Oceanic

Oceanic OCEAMIXSC05 Instruction booklet

ATOMI AT1817 user manual

ATOMI

ATOMI AT1817 user manual

Kohler K-2515 installation guide

Kohler

Kohler K-2515 installation guide

Jacuzzi Moove 90x70 Instructions for preinstallation

Jacuzzi

Jacuzzi Moove 90x70 Instructions for preinstallation

Hansa ELECTRA 0087 0010 Installation and maintenance guide

Hansa

Hansa ELECTRA 0087 0010 Installation and maintenance guide

Hans Grohe Novus 100 71031010 Instructions for use/assembly instructions

Hans Grohe

Hans Grohe Novus 100 71031010 Instructions for use/assembly instructions

Grohe EUROECO COSMOPOLITAN E 36324001 manual

Grohe

Grohe EUROECO COSMOPOLITAN E 36324001 manual

Decor Star PL-023-SS manual

Decor Star

Decor Star PL-023-SS manual

Artecristal VENECIA instruction manual

Artecristal

Artecristal VENECIA instruction manual

DURAVIT Delos DL 7447 L installation instructions

DURAVIT

DURAVIT Delos DL 7447 L installation instructions

Fleurco Horizon NH148-40-75 instruction manual

Fleurco

Fleurco Horizon NH148-40-75 instruction manual

Simpsons NBDSC0850 installation instructions

Simpsons

Simpsons NBDSC0850 installation instructions

RIHO Nautic 3000 N107 manual

RIHO

RIHO Nautic 3000 N107 manual

Helvex Clásica II 206 installation guide

Helvex

Helvex Clásica II 206 installation guide

Gessi SPOTWATER 57287 manual

Gessi

Gessi SPOTWATER 57287 manual

BELLOSTA Micheli 5808/E Installation instruction

BELLOSTA

BELLOSTA Micheli 5808/E Installation instruction

Calflex CARIMALI RIGOLETTO 21510-CR Installation

Calflex

Calflex CARIMALI RIGOLETTO 21510-CR Installation

VEDUM Flow 500 installation guide

VEDUM

VEDUM Flow 500 installation guide

manuals.online logo
manuals.online logoBrands
  • About & Mission
  • Contact us
  • Privacy Policy
  • Terms and Conditions

Copyright 2025 Manuals.Online. All Rights Reserved.