DWT KGS12-210 User manual


2
www.dwt-pt.com
CH Merit Link International AG
Switzerland [0041] 916000888 [0041] 916000888 [email protected]
DE ML Meritlink Hardware Germany GmbH
Deutschland [0049] 3068055522 [0049] 3068055994 [email protected]
BR DWT do Brasil Ferramentas Ltda
Brasil [0055] 4121012600 té[email protected]
PL HANMAR
Polska [0048] 338587829 [0048] 338586100 [email protected]
CZ GARLAND distributor, s.r.o.
GR A. Mattes industrial products SA
Ελλαδα [0030] 2109851000 [0030] 2109839721 [email protected]
RU ООО "БОКС МУВИНГ"
BY ОДО "Планета ДВТ"
Беларусь [00375] 175109545 [00375] 175109545 [email protected]
UA ТОВ "Eдіссон"
Україна [0038] 563749060 [0038] 563749066 [email protected]
LT UAB "Balimpeksas"
Lietuva [00370] 52444077 [00370] 52499280 [email protected]
LV DWT.LV
MD BEM INNA SRL
Moldova [00373] 921180 [00373] 429368 [email protected]
EG AL Hurria for Suppliers, Trading Agents Public
Import & Export
Egypt [0020] 033919328
IQ Arkan Ali Mohammad Ali Mandalawi
Iraq [00964] 7702975399 [00964] 7702975399
LY Bitrek Company
Libya [00218] 512611882 [00218] 51262812
IR DWT Iran
Iran [0098] 2163498 [0098] 2189787426 [email protected]
KZ ТОО "TECHNOSECTOR"
Қазақстан [007] 7273748325 [email protected]

3
Content / Sommaire / Содержание / Зміст / Мазмұны /
English
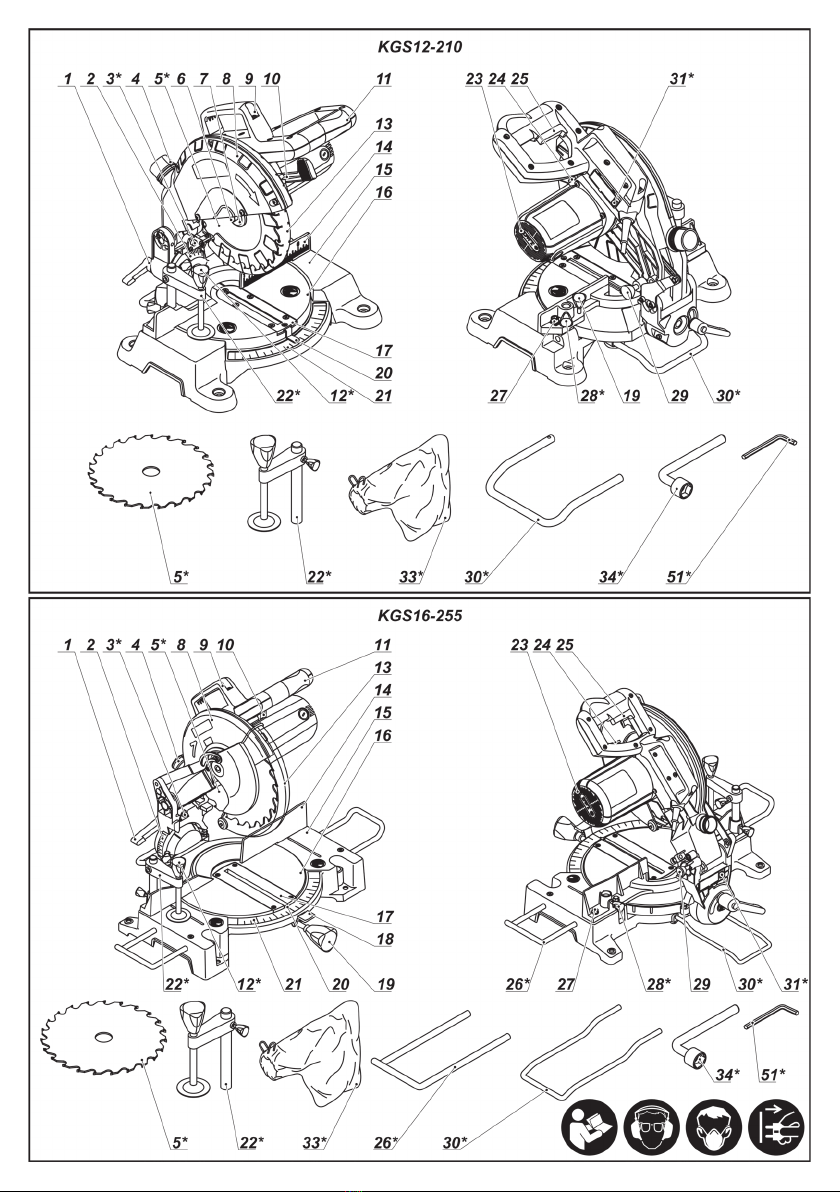
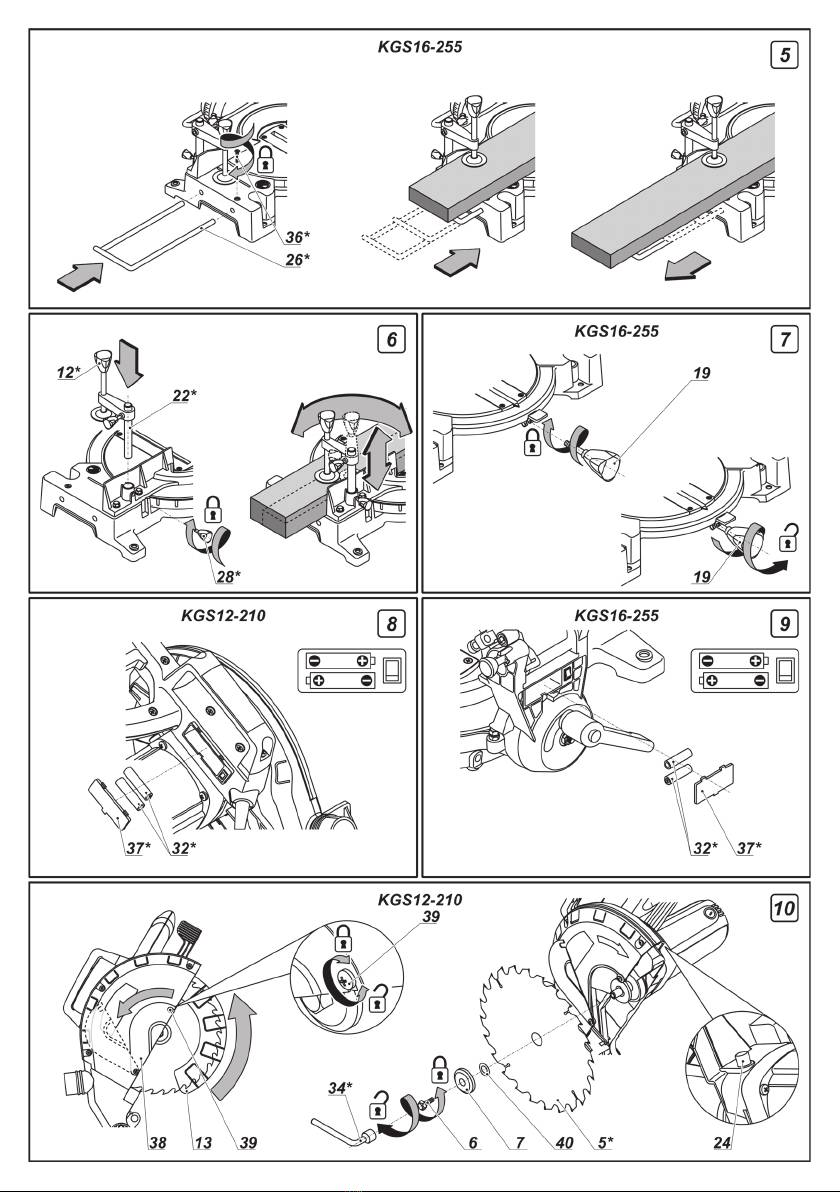
Explanatory drawings .............................................................................................................pages
General safety rules, instructions manual ............................................................................. pages
Parts diagrams ...................................................................................................................... pages
Service centres ...................................................................................................................... pages
DWT warranty .......................................................................................................................... page
Warranty card and service cards ........................................................................................... pages
4 - 10
11 - 17
54 - 57
58 - 62
63
76 - 78
Français
Dessins explicatifs ..................................................................................................................pages
Recommandations générales de sécurité, mode d'emploi .................................................... pages
Schéma des pièces ............................................................................................................... pages
Centres d'assistance ............................................................................................................. pages
Garantie DWT .......................................................................................................................... page
Garantie coupon et cartes de service .................................................................................... pages
4 - 10
18 - 24
54 - 57
58 - 62
64
76 - 78
Русский
Пояснительные рисунки .............................................................................................. страницы
Общие указания по ТБ, инструкция по эксплуатации ............................................ страницы
Схемы запчастей ........................................................................................................ страницы
Сервисные центры ..................................................................................................... страницы
Гарантия DWT .............................................................................................................. страница
Гарантийный талон и сервисные талоны .............................................................. страницы
4 - 10
25 - 32
54 - 57
58 - 62
65
76 - 78
Украïнська
Пояснювальні малюнки ...................................................................................................сторінки
Загальні вказівки по ТБ, iнструкція з експлуатації ..................................................... сторінки
Схеми запчастин ............................................................................................................ сторінки
Сервісні центри .............................................................................................................. сторінки
Гарантія DWT ................................................................................................................. сторінки
Гарантійний талон i сервісні талони ...........................................................................сторінки
4 - 10
33 - 40
54 - 57
58 - 62
66 - 71
76 - 78
Қазақ тілі
Түсіндіргіш әлеміштер ....................................................................................................беттер
Жалпы қауіпсіздік жөніндегі ұсыныстар, пайдалану нұсқаулығы ................................... беттер
Бөлшектер тәсімі ........................................................................................................... беттер
Қызмет орталықтары ................................................................................................... беттер
DWT кепілдігі .......................................................................................................................... бет
Гарантиялы талон және қызмет көрсету карталары ...............................................беттер
4 - 10
41 - 47
54 - 57
58 - 62
72
76 - 78
.........................................................................................................................
...................................................................................................
...........................................................................................................................
...............................................................................................................................
.................................................................................................................................
........................................................................................................
4 - 10
48 - 53
54 - 57
58 - 62
73
76 - 78

4

5

6

7

8

9

10

11
English
Noise
information
Always wear ear protection if the sound
pressure exceed 85 dB(A).
Declaration of
conformity
We declare under our sole responsibility that the prod-
uct described under "Power tool specications" is in
conformity with all relevant provisions of the direc-
tives 2006/42/EC including their amendments and
complies with the following standards: EN 61029-1,
EN 61029-2-9.
Managing director V.Kobzar
Merit Link International AG
Switzerland
Stabio, 10.11.2015
General
safety recommendations
CAUTION! Make sure you have read
and understood all recommendations.
Failure to observe the following recom-
mendations may result in electric shock,
cause re and / or serious injuries. The term "pow-
er tool", used in this manual refers to the tools
equipped with a power supply cord or a battery.
Working space
•The workstation should be kept tidy and well-lit.
Disorder at the workstation and inadequate lighting
may result in accidents.
Power tool specications
Mitre saw KGS12-210 KGS16-255
Power tool code [127 V ~50/60 Hz]
[230 V ~50/60 Hz] 742449
743606 742456
743613
Rated power [W] 1200 1600
Power output [W] 607 928
Amperage at voltage 127 V [Amps]
230 V [Amps] 9
615
7
No-load speed [RPM] 5000 4800
Min. / max. Ø of saw blade [mm] 205 / 210 250 / 255
Min. / max. bore Ø of saw blade [mm] 30 / 30 30 / 30
Max. thickness of saw blade [mm] 2,8 3
Max. cutting depth 0° / 90° [mm]
[inches] 65x105
2-9/16"x4-9/64" 70x150
2-3/4"x6"
Max. cutting depth 45° / 90° [mm]
[inches] 65x75
2-9/16"x2-61/64" 70x110
2-3/4"x4-1/4"
Max. cutting depth 0° / 45° [mm]
[inches] 30x105
1-3/16"x4-9/64" 40x150
1-37/64"x6"
Max. cutting depth 45° / 45° [mm]
[inches] 30x75
1-3/16"x2-61/64" 40x110
1-37/64"x4-1/4"
Weight [kg]
[lbs] 9
19.84 11
24.25
Safety class
Sound pressure [dB(A)] 94,2 86,3
Acoustic power [dB(A)] 107,2 99,3
Weighted vibration [m/s2]2,13 2,13

12
English
• Do not use power tools in environment exposed
to the risk of explosion, e.g. near ammable liquid
vapours, gases or ammable particles in the form of
dusts. During operation, sparks are generated, which
may ignite dust or vapours.
•Do not allow children and unauthorised persons near
places where operations with the use of an electric tool
are carried out. Third parties may distract the operator's
attention, and he may loose control over the tool.
Electric safety recommendations
•The tool plug should always be inserted to an appro-
priate socket. This reduces the risk of electric shock.
Do not use plug adapters with grounding contacts.
• Avoid touching grounded items, such as metal pipes,
heaters, cookers and refrigerators. If the worker's body
comes into contact with a grounded item, the danger of
electric shock increases.
•Protect the power tool against rain and moisture.
Penetration of water into the tool increases the danger
of electric shock.
•Do not use the power supply cable for purposes
other than designed. Under no circumstances should
one use the cable to carry the tool or pull it; also, it is
forbidden to switch off the tool by pulling the power
supply cable. Protect the cable against heating, contact
with kerosene-based bodies, with sharp edges or
mobile parts of the tool. A power cable that is damaged
or spliced increases the danger of electric shock.
• When working in open air, use extension cords
designed for this type of work, which will reduce the
danger of electric shock.
Personal protection recommendations
•Be cautious when working with power tools, and
carefully plan your actions. Do not use the tool when fa-
tigued, or under the inuence of drugs, alcohol or medi-
cines. Careless handling may result in serious injuries.
•Use personal protection equipment. Always wear
protective goggles. When necessary, use respirators,
non-slipping boots, hard hats and earplugs. The use
of personal protection equipment is one of the factors
that reduce the risk of injuries.
• Avoid incidental activation of power tools. Before
inserting the plug, make sure that the power switch is in
OFF position. When carrying the tool, take your ngers
off the main switch, which will reduce the possibility of
incidental activation.
• Before switching on the tool, remove any wrenches
and other objects from its rotating parts. A wrench left
in the rotating unit may result in serious injuries.
• Do not apply excessive force, take a stable position
and always try to keep balance - this will facilitate
control over the tool.
•Do not wear loose clothes or freely-hanging
jewellery. Hair, parts of garment and gloves should
be protected against contact with moving parts of the
power tool.
• If the tool is equipped with a dust collection device,
make sure that the device has been activated and
used properly. Use of such devices helps reduce the
concentration of dust at the workstation.
Use and handling of power tools
•The persons with lowered psychophysical or mental
aptitudes as well as children can not operate the power
tool, if they are not supervised or instructed about use of
the power tool by a person responsible for their safety.
• Do not overload the tool. Power tools are to be used
only in operations, to which they have been designed,
which will ensure safety and help achieve better
results.
•Do not use power tools with a damaged power
switch. A tool that cannot be switched on and off in a
controlled manner is potentially dangerous and must
be repaired immediately.
• Before adjustment operations, replacement of
attachments, and during storage, remove the power
tool plug from the mains socket. This eliminates the
risk of the tool being unintentionally activated.
•The tool should be stored out of children's reach.
Do not allow the use of power tools by persons who
have not read this manual and are inexperienced.
In the hands of an inexpert person, the tool may be
dangerous both for the operator and his environment.
•Take proper care of the tool condition. Monitor the
axial run-out and stability of movable parts' joints, and
pay proper attention at any faults that may result in the
tool damage. Bad condition of power tools is a frequent
cause of accidents.
•Cutting tools should be kept clean and must be well-
sharpened. Cutting tools with sharp cutting edges,
which are properly xed reduce the risk of seizure and
facilitate the control over power tools.
•When using power tools and its accessories, follow
the instructions listed in this manual. During work with a
specic type of power tools, follow recommendations,
taking into account operational conditions and the type
of job performed.
Service of power tools
Your power tool should be serviced only by qualied
specialists, with the use of recommended spare parts.
This will guarantee labour safety, when your tool is
being applied.
Safety guidelines during
power tool operation
Before commencing operation
•Use the power tool only for cutting material
recommended by the manufacturer.
•Before use, place the power tool on a steady
horizontal base.
•Use saw blades with maximum allowable rotation
speed higher than that of the power tool spindle. Saw
blades must be used in accordance with manufacturers’
recommendations. Do not use saw blades which fail to
meet the technical requirements contained in this manual.
•The saw blade arrow must always point in the same
direction as the guard cover arrow.
•Use sharp and undamaged saw blades only.
Cracked, dented or dull saw blades have to be
replaced.
•Do not use saw blades with dimensions (outside and
mounting diameter) different from recommended.
•Do not use saw blades made of high-speed steel.
• Never use other types of cutting blades (abrasive,
diamond, etc.) for this power tool.
• Ensure that all devices preventing accidental
touching of the saw blade are properly mounted,
functional and in perfect order.

13
English
• Never work with protection devices dismounted.
Damaged protection devices must be replaced
immediately.
• During operation never x (bind, wedge, etc.) the
sliding guard cover open.
•Avoid blocking of the sliding guard cover or its clogging
with sawdust If this is the case switch off the power tool,
x the malfunction and only then continue operation.
•Do not use the power tool with a damaged insert.
•Before you start work, ensure that the saw blade
does not touch the turntable at any tilt angle.
• Remove all nails or any other metal objects from
blanks before cutting.
During operation
• Never stand on the power tool - if it turns over or
if you accidentally touch the saw blade, you can be
seriously injured.
Keep your hands at a safe distance from
the saw blade. Dangerous areas are
marked with a special sign.
•During operation watch the position of a power cable
(it should always be positioned behind the tool). Do not
allow it to whip around your legs or arms.
• Never start cutting until the saw blade reaches its
full speed.
•When processing small blanks, use clamping
devices. If the blanks are too small to be xed
properly - do not process them.
•Always process only one blank - this is the only way
to x it properly.
•While processing long blanks use the clam ping
devices and be sure to provide a support under the
long end of the blank. Never make a third person hold
the working blank.
•After cutting remove all blank waste-ends from the
turntable surface - they may block up the saw blade, or
the rotating saw blade may throw them at a high speed
at the user.
• Never keep your hands behind the saw blade (when
holding blanks, removing waste ends, etc.). In this
case the distance between the saw blade and your
hands is too small - and there is an increased risk of
serious injury.
• Never remove sawdust or blank waste-ends while
the power tool motor is running.
•If during operation the saw blade gets stuck in the
blank or is blocked by the waste-ends, immediately
switch off the power tool and only then eliminate the
cause of the saw blade failure.
•Do not work materials containing asbestos. Asbestos
is considered carcinogenic.
• Do not use the power tool to cut rewood.
•Avoid stopping the power tool motor when under load.
• Avoid overheating your power tool, when using it for
a long time.
•If your power tool is equipped with a kerf indicating
laser, observe the necessary safety measures.
Never look at the beam or point it at other people or
animals - if the la ser beam strikes the eyes, it can
damage the eyesight.
After nishing operation
• The power tool can be removed from the workplace
only after the saw blade has been switched off and
stopped completely.
• Never try to slow down the inertial rotation of the
saw blade with the spindle lock or by applying effort
to the saw blade lateral surface. If you use the spindle
lock for this purpose, the power tool will fail and your
warranty will be cancelled.
• The saw blades can get very hot during operation -
do not touch them until they have cooled down.
Symbols used in
the manual
Following symbols are used in the operation manual,
please remember their meanings. Correct interpretation
of the symbols will allow correct and safe use of the
power tool.
Symbol Meaning
Serial number sticker:
KGS ... - model;
XX - date of manufacture;
XXXXXXX - serial number.
Read all safety regulations
and instructions.
Wear safety goggles and ear
protectors.
Wear a dust mask.
Disconnect the power tool
from the mains before instal-
lation or adjustment.
Movement direction.
Rotation direction.
Locked.
Unlocked.
Prohibited.
Double insulation / protec-
tion class.
Attention. Warning of possi-
ble user health damage.

14
English
Symbol Meaning
A sign certifying that the
product complies with es-
sential requirements of the
EU directives and harmo-
nized EU standards.
Danger zone. During opera-
tion, keep hands out of the
danger zone.
Attention. Important.
Useful information.
Wear protective gloves.
Vertical position of the saw
blade.
Inclined position of the saw
blade.
During operation, remove
the accumulated dust.
Do not dispose of the power
tool in a domestic waste
container.
DWT
power tool designation
Mitre saw is designed for cutting timber blanks and is
best for clean angular cuts. Using special saw blades
enables you to cut plastic and aluminum blanks. The
power tool is designed for right-handed users only.
1
Power tool
components
Lock lever
2 Body tilt angle scale
3 Kerf indicating laser *
4 Dust removing coupler
5 Saw blade *
6 Saw blade xing bolt
7 External ange
8 Guard cover
9 Carrying handle
10 Blocking lever
11 Handle
12 Cramp screw
13 Sliding guard cover
14 Retaining bar
15 Base plate
16 Turntable
17 Insert
18 Fixing lever
19 Turntable lock
20 Indicator
21 Turntable swivel angle scale
22 Clamp *
23 Ventilation slots
24 Spindle lock
25 On / off switch
26 Extension bracket *
27 Retainer bolt
28 Buttery screw *
29 Body angle lock (for carrying)
30 Turn-over protection bracket *
31 Kerf indicating laser on / off switch *
32 Batteries *
33 Dust bag *
34 Wrench *
35 Turn-over protection bracket xing screw *
36 Extension bracket xing screw
37 Battery compartment cover *
38 Plate
39 Fixing screw
40 Mounting ring
41 Cutting depth adjustment bolt
42 Cutting depth adjustment bolt lock-nut
43 Body vertical position adjustment bolt
44 Body vertical position adjustment bolt lock-nut
45 Body tilt angle adjustment bolt
46 Body tilt angle adjustment bolt lock-nut
47 Body tilt angle indicator
48 Screw
49 Kerf indicating laser adjustment screw *
50 Insert screw
51 Allen key *
* Optional extra
Not all of the accessories illustrated or described
are included as standard delivery.
Installation and regulation
of power tool elements
Before carrying out any works on the power tool it
must be disconnected from the mains.
Do not draw up the fastening elements
too tight to avoid damaging the thread.
Mounting / dismounting / setting-up of
some elements is the same for all power
tool models, in this case specic models
are not indicated in the illustration.
Carriage position (see g. 1-2)
The power tool can be moved only when positioned
for carriage (the body pulled down and xed). When
moved, the power tool has to be held only by carrying
handle 9, or underneath baseplate 15.
Before starting any work, position the power tool for
operation.

15
English
•Slightly press handle 11.
•Pull lock 29 all the way out. For KGS16-255 turn
lock 29, 90° in any direction and slightly press to x in
this position.
•Lift the body up smoothly.
•To position the power tool for carriage, do the indi-
cated operations in a reverse order.
Dust bag mounting / dismounting (see g. 3)
Before operation put dust bag 33 on dust removing
coupler 4 (see g.3). Dump and clean dust bag 33 in
due time.
Turn-over protection bracket mounting / dismount-
ing (see g. 4)
If you are planning to operate the power tool without
xing it to the worktable (using bolts or cramps), you
should mount bracket 30 and x it using screw 35 be-
fore starting any work (see g.4).
Extension bracket mounting / dismounting (see g. 5)
[KGS16-255]
If you are planning to cut long blanks, you should
mount extension brackets 26, adjust them properly
(depending on the blank length) and x them using
screws 36 (see g. 5).
Cramp mounting / dismounting (see g. 6)
In order to x the blanks properly, mount cramp 22 and
x it using buttery screw 28 (see g. 6). Adjust cramp 22
depending on the length and thickness of the blank.
Turntable lock mounting / dismounting (see g. 7)
[KGS16-255]
Lock 19 is intended for setting and xing the rotation
angle of table 16. Mount / dismount lock 19 as illus-
trated in gure 7.
Installation / replacement of the batteries for the
kerf indicating laser (see g. 8-9)
• Take off cover 37 (see g. 8-9).
• Install / replace batteries 32 (AA type). Caution:
during installation of batteries 32, observe correct
polarity.
• Place cover 37 back.
Replacement of the saw blade (see g. 10-11)
After prolonged operation, the saw blade
can become very hot, remove it using
gloves. This will also reduce the risk of
injury by the cutting edge.
•Lift the body to the uppermost position.
•Press blocking lever 10 to the left with one hand (see
g. 21) and move sliding guard cover 13 to the uppermost
position with the other hand as shown in gures 10-11.
• Loosen xing screw 39 and turn plate 38 back (see
g. 10-11).
•Press spindle lock 24 and manually turn saw blade 5
in order to immobilize it. While pressing spindle lock 24,
turn off bolt 6with wrench 34. Caution: bolt 6 is left-
hand threaded.
•Take off external ange 7, saw blade 5, mounting ring 40.
• Clean the xing elements with a soft brush and
put mounting ring 40, new saw blade 5 and external
ange 7on the spindle.
•While pressing spindle lock 24, tighten bolt 6 with
wrench 34. Release spindle lock 24.
•Return plate 38 to its original position and tighten
xing screw 39.
• Move sliding guard cover 13 to its original position.
• Ensure that saw blade 5does not touch any power
tool elements and can rotate freely.
Adjustment of the cutting depth (see g. 12-13)
Using bolt 41 and lock-nut 42 adjust the cutting depth
so that saw blade 5goes into the slit of insert 17 by
max. 5 mm in its lowest position.
•Loosen lock-nut 42.
• Adjust the cutting depth by turning bolt 41 in or out.
•Tighten lock-nut 42.
Vertical alignment of the body and adjustment of
the 45° tilt (see g. 14-17)
•Position the body for carriage.
• Loosen lock lever 1and set the body tilt
angle (90° or 45°). Tighten lock lever 1.
•Place the sides of an alignment setsquare 90° or 45°
(depending on the angle to align) to the surface of saw
blade 5and turntable 16. If the setsquare sides join
the surfaces of saw blade 5and table 16 tightly, then
alignment is not needed, otherwise you have to do it.
Use bolt 43 and lock-nut 44 for vertical align-
ment of the body (see g. 14, 16).
Use bolt 45 and lock-nut 46 for adjustment
of the body tilt angle 45° (see g. 15, 17).
• Loosen lock lever 1.
•Loosen the lock-nut.
• Turning the adjustment bolt in or out, makethe sides
of the 90° or 45° setsquare (depending on the angle
to adjust) join the surfacesof saw blade 5and table 16
tightly.
•Tighten the lock-nut.
•Loosen screw 48 and place indicator 47 to the 0° (on
scale 2) or 45° position (depending on the angle to ad-
just), then tighten screw 48.
Retaining bar alignment (see g. 18-19)
•Set the 0° horizontal cutting angle (the procedure is
described below).
•Position the body for carriage.
•Place the sides of an alignment setsquare 90° to the
surface of saw blade 5and re taining bar 14. If the
setsquare sides join the surfaces of saw blade 5and
retaining bar 14 tightly, then alignment is not needed,
otherwise you have to do it.
•Loosen retainer bolts 27, and by moving retaining
bar 14 make the sides of the 90° setsquare join the
surfaces of saw blade 5and retaining bar 14 tightly.
•Tighten retainer bolts 27.
Kerf indicating laser alignment (see g. 20)
Before starting any work, ensure that the kerf indicat-
ing laser is properly aligned.

16
English
•Make a kerf in the blank, but do not cut it (the proce-
dure is described below).
• Turn on the kerf indicating laser (using on / off
switch 31) - the laser beam should accurately point at
the kerf, otherwise - align the laser.
•Loosen screws 49.
•Move the body of kerf indicating laser 3to theright and
left until the laser beam points accurately at the kerf.
•Tighten screws 49.
Initial operating
of the power tool
Always use the correct supply voltage: the power sup-
ply voltage must match the information quoted on the
power tool identication plate.
Switching the power
tool on / off
[KGS12-210]
Switching on:
Press blocking lever 10 with thumb of the right hand
(see g. 21) - this will enable you to pull the power tool
body down. Press on / off switch 25.
Switching off:
Release on / off switch 25.
[KGS16-255]
Switching on:
Press blocking level 10 to the left with your right hand
(see g. 21) - this will enable you to press on / off
switch 25 easily and pull the power tool body down.
Press on / off switch 25.
Switching off:
Release on / off switch 25.
Dust suction during
the power tool operation
Dust suction allows reducing dust concen-
tration in the air and prevents its accumula-
tion at the workplace.While operating the
power tool, always use dust
bag 33 or a vacuum cleaner suitable for collecting pro-
cess-generated dust. A special adapter is used to join
the vacuum cleaner to coupler 4.
Recommendations
on the power tool operation
Alignment of the horizontal cutting angle (see
g. 22-23)
[KGS12-210]
•Loosen lock 19 (see g. 22).
•Set the cutting angle by turning the powertool body.
Indicator 20 shows the set cuttingangle on scale 21.
•Tighten lock 19.
[KGS16-255]
•Loosen lock 19 and press xing lever 18 (see g. 23).
• While pressing lever 18, set the cutting angle by
turning table 16 by lock 19. Indicator 20 shows the set
cutting angle on scale 21.
• Release xing lever 18 and tighten lock 19.
You can preset the most frequent
angles (45°, 22.5°, 0°, etc.).
•Loosen lock 19 and press xing lever 18.
• While pressing lever 18, set the cutting angle by
turning table 16 by lock 19. As soon as indicator 20
shows one of the frequent angles (45°, 22.5°, 0°, etc.)
on scale 21 - release xing lever 18, and the chosen
angle will be properly xed, you do not have to tighten
lock 19 in this case.
Alignment of the vertical cutting angle (see
g. 24)
• Loosen lock lever 1.
•Set the cutting angle by tilting the power tool body.
Indicator 48 shows the set cutting angle on scale 2.
• Tighten lock lever 1.
Cutting (see g. 25)
•Place the power tool on the worktable and prefer-
ably x it with bolts or cramps.
• If the power tool is equipped with extension
brackets 26, adjust their length depending on the
length of the processed blank.
• Set the desired cutting angles as described above.
Caution: if you are going to do the cut-ing with
body tilt and turn at the same time, rst set the tilt
angle and then the turn angle.
•Turn on the indicating laser, If your power tool is
equipped with a kerf indicating laser.
• Set the blank and x it using cramp 22.
•Turn on the power tool, allow saw blade 5to reach
the full rotation speed.
•Smoothly pull the body down and make the cut.
While cutting, do not cross your hands and keep them
at a safe distance from saw blade 5 (see g. 25).
•Turn off the power tool and wait until saw blade 5
stops completely.
•Lift the power tool body up smoothly.
Power tool maintenance /
preventive measures
Before carrying out any works on the power tool it
must be disconnected from the mains.
Replacement of the insert (see g. 26-27)
•Replace the worn or damaged insert 17 in due time.
•Turn off screws 50 (see g. 26-27).
•Replace the worn insert 17.
•Tighten screws 50.
Cleaning of the power tool
An indispensable condition for a safe long-term
exploitation of the power tool is to keep it clean.
Regularly ush the power tool with compressed air
thought the ventilation slots 23.
After-sales Service and Application Service
Our after-sales service responds to your questions
concerning maintenance and repair of your product as

17
English
The manufacturer reserves the possibility to introduce changes.
well as spare parts. Information about service centers,
parts diagrams and information about spare parts can
also be found under: www.dwt-pt.com.
•
Transportation
of the power tools
Categorically not to drop any mechanical impact on
the packaging during transport.
• When unloading / loading is not allowed to use any
kind of technology that works on the principle of clamp-
ing packaging.
Environmental
protection
Recycle raw materials instead of
disposing as waste.
Power tool, accessories and packaging should be
sorted for environment-friendly recycling.
The plastic components are labelled for categorized
recycling.
These instructions are printed on recycled paper
manufactured without chlorine.

18
Français
Spécications de l’outil électrique
Scie à onglet KGS12-210 KGS16-255
Code de l’outil électrique [127 V ~50/60 Hz]
[230 V ~50/60 Hz] 742449
743606 742456
743613
Puissance absorbée [W] 1200 1600
Puissance en sortie [W] 607 928
Ampérage tension 127 V [A]
230 V [A] 9
615
7
Régime à vide [min-1]5000 4800
Ø mini / maxi de la lame de scie [mm] 205 / 210 250 / 255
Ø mini / maxi de l’alésage de la lame
de scie [mm] 30 / 30 30 / 30
Épaisseur maxi de la lame de scie [mm] 2,8 3
Profondeur de coupe maxi 0° / 90° [mm]
[pouces] 65x105
2-9/16"x4-9/64" 70x150
2-3/4"x6"
Profondeur de coupe maxi 45° / 90° [mm]
[pouces] 65x75
2-9/16"x2-61/64" 70x110
2-3/4"x4-1/4"
Profondeur de coupe maxi 0° / 45° [mm]
[pouces] 30x105
1-3/16"x4-9/64" 40x150
1-37/64"x6"
Profondeur de coupe maxi 45° / 45° [mm]
[pouces] 30x75
1-3/16"x2-61/64" 40x110
1-37/64"x4-1/4"
Poids [kg]
[lbs] 9
19.84 11
24.25
Classe de protection
Pression acoustique [dB(A)] 94,2 86,3
Puissance acoustique [dB(A)] 107,2 99,3
Vibration [m/s2]2,13 2,13
Bruit
d'information
Portez toujours des protections pour les
oreilles (casque) lorsque le niveau de pres-
sion acoustique est supérieur à 85 dB(A).
Déclaration
de conformité
Nous declarons sous notre propre responsabilite que
le produit decrit sous "Spécications de l’outil élec-
trique" est en conformite avec toutes les dispositions
des directives 2006/42/EC et leurs modications ainsi
qu’avec les normes suivantes : EN 61029-1,
EN 61029-2-9.
Le directeur général V.Kobzar
Merit Link International AG
Suisse
Stabio, 10.11.2015
Recommandations générales
de sécurité
AVERTISSEMENT! Assurez-vous que
vous avez lu et compris toutes les
recommandations. La nonobservation
des recommandations suivantespeut
conduire à une décharge électrique, un incendie
et / ou de graves blessures. Le terme "outil
électrique" utilisé dans ce manuel fait allusion
aux outils équipés d'un cordon d'alimentation
électrique ou d'une batterie.
Espace de travail
• L'espace de travail devrait toujours être bien rangé
et bien éclairé. Du désordre dans l'espace de travail

19
Français
et un éclairage insufsant peuvent conduire à des
accidents.
•Ne pas utiliser d'outils électriques dans un
environnement sujet au risque d'explosion, par ex. à
proximité de vapeurs liquides inammables, de gaz ou
de particules inammables sous forme de poussières.
Pendant l'opération, les étincelles sont produites, ce
qui pourrait enammer la poussière ou les vapeurs.
•Ne pas laisser des enfants et des personnes non
autorisées s'approcher des endroits où sont effec-
tuées des opérations avec un outil électrique. Des
personnes extérieures pourraient distraire l'attention
de l'opérateur et il pourrait perdre le contrôle de l'outil.
Recommandations concernantla sécurité
électrique
• La prise de courant de l'outil doit toujours être insérée
dans une prise appropriée. Cela réduit le risque de
décharge électrique. Ne pas utiliser d'adaptateurs de
prise de courant avec des prises de mise à la terre.
• Éviter de toucher des articles reliés à la terre, comme
des tuyaux métalliques, des radiateurs, des cuisinières
et des réfrigérateurs. Si le corps de l'ouvrier entre du
contact avec un article relié à la terre, le danger de
décharge électrique augmente.
•Protégez l'outil électrique contre la pluie et l'humidité.
Si de l'eau pénètre dans l'outil, cela augmente le
danger de décharge électrique.
•Ne pas utiliser le câble d'alimentation électrique pour
un but autre que celui pour lequel il est conçu. Sous
aucune circonstance le câble ne doit être utilisé pour
porter ou tirer l'instrument; ne jamais non plus éteindre
l'outil en tirant sur le câble d'alimentation électrique.
Protéger le câble contre la chaleur, le contact avec des
corps à base de pétrole, avec des bords pointus ou
les parties mobiles de l'outil. Un câble d'alimentation
endommagé ou entortillé augmente le danger de
décharge électrique.
• Lors du travail en plein air, utiliser des rallonges
conçues pour ce type de travail, ce qui réduira le
danger de décharge électrique.
Recommandations de protection personnelle
• Soyez prudent lorsque vous travaillez avec des
outils électriques et planiez soigneusement vos
actions. Ne vous servez pas de l'outil lorsque vous
êtes fatigué ou sous l'inuence de drogues, d'alcool
ou de médicaments. Une manipulation négligente peut
conduire à de graves blessures.
•Utilisez un équipement de protection personnelle.
Portez toujours des lunettes de protection. Si
nécessaire, utilisez un respirateur, des bottes
antidérapantes, un casque et des protèges-tympan.
L'utilisation d'un équipement de protection personnelle
est un des facteurs qui réduit le risque de blessures.
• Évitez de mettre accidentellement en marche
l'outil électrique. Avant d'insérer la prise de courant,
assurez-vous que l'outil est en position OFF. Lorsque
vous portez l'outil, retirez vos doigts de l'interrupteur
de mise en marche, cela réduira la possibilité de mise
en marche accidentelle.
• Avant d'allumer l'outil, enlevez toute clé et autres
objets laissé dans ses parties rotatives. Une clé
oubliée dans l'unité rotative peut conduire à de graves
blessures.
•Ne forcez pas trop, prenez une position ferme et
essayez toujours de garder l'équilibre; cela facilitera
votre contrôle sur l'outil.
• Ne portez pas de vêtements lâches ou de bijoux qui
pendent. Les cheveux, les parties de vêtement et les
gants devraient être protégés contre le contact avec
les parties mobiles de l'outil électrique.
•Si l'outil est équipé d'un accessoire ramasse-
poussière, assurez-vous que l'accessoire est activé et
utilisé correctement. L'utilisation de tels accessoires
permet de réduire la concentration de la poussière
dans l'espace de travail.
Utilisation et emploi des outils électriques
•Les personnes physiquement ou mentalement
handicapées, ainsi que les enfants, ne peuvent utiliser
cet outil que sous contrôle ou selon instructions des
personnes responsables de leur sécurité.
•Ne surchargez pas l'outil. Les outils électriques
ne doivent être utilisés que pour des opérations
pour lesquelles ils ont été conçus, ce qui garantira
que la sécurité et permettra d'accomplir de meilleurs
résultats.
• N'utilisez pas d'outils électriques avec un
interrupteur de mise en marche endommagé. Un
outil qui ne peut pas être allumé et éteint de manière
contrôlée est potentiellement dangereux et doit être
réparé immédiatement.
• Avant les opérations de réglage, de remplacement
des accessoires et pendant l'entreposage, débranchez
la prise de l'outil électrique. Cela élimine le risque de
mise en marche involontaire de l'outil.
• L'outil devrait être entreposé hors de portée des
enfants. Ne pas laisser des personnes qui n'ont pas
lu ce manuel se servir de l'outil électrique. Dans les
mains d'une personne inexpérimentée, l'outil peut
être dangereux à la fois pour l'utilisateur et pour son
environnement.
• Prenez bien soin de l'état de l'outil. Surveillez l'usure
des axiaux et la stabilité des articulations des parties
mobiles et faites attention aux défauts qui peuvent
conduire à l'endommagement de l'outil. Un outil
électrique en mauvais état est une cause fréquente
d'accidents.
• Les instruments coupants devraient être gardés
propres et bien aiguisés. Les instruments coupants dont
les lames sont bien aiguisées et qui sont correctement
attachées réduisent le risque de grippage et facilitent
le contrôle sur les outils électriques.
• Lorsque vous utilisez des outils électriques et des
accessoires, suivez les instructions données dans ce
manuel. Pendant le travail avec un type spécique
d'outil électrique, suivez les recommandations, en
tenant compte des conditions opérationnelles et du
type de travail effectué.
Service des outils électriques
L'entretien de votre outil électrique ne devrait être
coné qu'à des spécialistes qualiés, avec l'utilisation
de pièces de rechange recommandées. Cela garantira
la sécurité de la main-d'œuvre appliquée à votre
instrument.
Directives de sécurité pendant l'utilisation de
l'outil électrique
Avant de commencer
• Utiliser l’outil électrique pour couper les matériaux
recommandés par le fabricant.

20
Français
• Avant utilisation, mettre l’outil électrique sur une
surface stable et horizontale.
• Utiliser les lames de scie à une vitesse de rotation
maximale plus élevée que l’arbre de l’outil électrique.
Les lames de scie doivent être utilisées conformément
aux recommandations des fabricants. Ne pas utiliser de
lames de scie ne correspondant pas aux spécications
techniques de ce manuel.
• La èche de la lame de scie doit toujours être
tournée dans le même sens que celle du capot de
protection.
•N’utiliser que des lames de scie en bon état et
affutées. Les lames fêlées, tordues ou mal affûtées
doivent être remplacées.
•Ne pas utiliser de lames de scie dont les dimensions
(diamètre de montage et extérieur) diffèrent de celles
recommandées.
•Ne pas utiliser de lames de scie faite en métal pour
la haute vitesse.
• Ne jamais utiliser d’autres types de lames de scies
(abrasive, diamant, etc.) pour cet outil électrique.
• S’assurer que tous les appareils empêchant de
toucher accidentellement la lame de scie soient
correctement installés, fonctionnels et en bon état.
• Ne jamais travailler alors que les appareils de pro-
tection sont démontés. Il faut remplacer immédiate-
ment les appareils de protection endommagés.
• En cours d’utilisation, ne jamais tenir (avec une
cale, aggloméré, etc.) le capot de protection coulissant
ouvert.
• Éviter de bloquer le capot de protection coulissant
ou sa gorge avec de la poussière de bois. Si tel est le
cas, éteindre l’outil, remédier au problème et reprendre
vos activités.
•Ne pas utiliser l’outil électrique alors qu’une pièce
insérée est endommagée.
• Avant de commencer le travail, s’assurer que la
lame de scie ne touche pas au plateau dans n’importe
quel angle.
• Retirer tous les clous ou tous autres objets
métalliques des pièces avant de couper.
Pendant l’opération
• Ne jamais monter sur l’outil électrique. S’il se
retourne ou si vous touchez par accident la lame de
scie vous pouvez vous blesser.
Conserver vos mains à une distance
prudente de la lame de scie. Les parties
dangereuses sont marquées d’un signe
spécial.
• Faire attention où se trouve le câble d’alimentation
(il devrait se trouver derrière l’outil). Ne pas le laisser
s’enrouler autour de vos jambes ou de vos bras.
• Ne jamais commencer à couper avant que la lame
n’ait atteint sa pleine vitesse.
• Lorsque vous coupez de petites pièces, utilisez les
outils de serrage. Si les pièces sont trop petites pour
être bien tenues, ne pas les couper.
• Ne couper qu’une pièce à la fois ; c’est le seul
moyen de pouvoir bien les maintenir.
• En coupant de longues pièces, utilisez les appareils
de serrage et assurez-vous de soutenir le côté long de
la pièce. Ne jamais faire tenir la pièce à couper par une
tierce personne.
•Après la découpe, retirer les parties résiduelles de
la pièce de la surface du plateau ; elles pourraient
bloquer la lame de scie ou cette dernière pourrait les
envoyer à grande vitesse sur l’utilisateur.
• Ne jamais laisser vos mains derrière la lame de scie
(lorsque vous tenez les pièces, retirez les résidus, etc.)
Dans ce cas, la distance entre la lame et vos mains est
trop faible et vous pouvez vous blesser.
• Ne jamais retirer la sciure ou les résidus lorsque
l’outil électrique fonctionne.
• En cours d’utilisation, si la lame se bloque ou est
bloquée par des résidus, éteindre immédiatement
l’outil puis, et seulement à ce moment-là, retirer ce qui
cause le blocage de la lame.
• Ne pas travailler les matériaux contenant de l’as-
beste. L’asbeste possède les propriétés cancérigènes.
•Ne pas utiliser l’outil électrique pour couper du bois
de chauffage.
• Éviter d’arrêter le moteur de l’outil électrique lorsqu’il
est en charge.
• Éviter de surchauffer votre outil électrique lorsque
vous l’utilisez longtemps.
• Si votre outil électrique est équipé d’un laser
indicateur de voie, observez les mesures de sécurité
nécessaires. Ne jamais regarder le faisceau ou le
pointer vers d’autres personnes ou animaux. Le
faisceau peut endommager la rétine oculaire.
Après l’opération
•Il est possible de retirer l’outil électrique du lieu de
travail seulement après avoir éteint la lame et qu’elle
soit complètement arrêtée.
• Ne jamais essayer de ralentir la lame en train de
tourner à l’aide du blocage de l’arbre ou en appuyant
sur la surface latéral de la lame. Si vous utilisez
le blocage de l’arbre à cet effet, l’outil électrique ne
marchera pas et votre garantie sera annulée.
•Les lames de scie peuvent chauffer en étant utilisées;
ne pas les toucher avant qu’elles n’aient refroidies.
Les symboles utilisés dans
le manuel d’utilisation
Le manuel d’utilisation utilise les symboles ci-dessous.
Pensez à lire attentivement leur signication. La bonne
interprétation des symboles permet de bien utiliser
l’instrument en toute sécurité.
Symbole Légende
Etiquette avec le numéro
d’usine:
KGS ... - modèle;
XX - date de fabrication;
XXXXXXX - numéro d’usine.
Lisez attentivement toutes
les consignes de sécurité et
les instructions.
Portez les lunettes et les
casques de protections.
Portez le masque antipous-
sière.
This manual suits for next models
1
Table of contents
Languages:
Other DWT Saw manuals
Popular Saw manuals by other brands

Shop fox
Shop fox SHOP FOX M1014 instruction manual

Craftsman
Craftsman 320.28060 owner's manual

Black & Decker
Black & Decker Quantum Pro 633526-00 instruction manual

Bosch
Bosch 0 601 6B3 0L1 Original instructions

Baumr-AG
Baumr-AG BTS90 user manual

EINHELL
EINHELL TE-CC 1825 U Original operating instructions