manuals.online logo
Brands
  1. Home
  2. •
  3. Brands
  4. •
  5. dynarex
  6. •
  7. Medical Equipment
  8. •
  9. dynarex 10522 User manual

dynarex 10522 User manual

CLINICAL CARE RECLINER
Frame
Upholstered
Arm Support
Padded
Push Handle
Gas Spring
Actuating Lever
Articulating Headrest
Upholstered Back
Upholstered Seat
Upholstered
Leg Rest Skirt
Upholstered
Footrest
Clevis Pin Clevis Pin
Bolt & Nut
Back Brace
with “U”
Brackets
Bridge Clip
WARNING/CAUTION
• DO NOT use this product or any available optional
equipment without first completely reading and
understanding these instructions and any additional
instructional material such as owner’s manuals, service
manuals or instruction sheets supplied with this product or
optional equipment. If you are unable to understand the
warnings, cautions or instructions, contact a healthcare
professional, dealer or technical personnel before
attempting to use this equipment otherwise, injury or
damage may occur.
• ALWAYS keep hands and fingers clear of moving parts
to avoid injury.
• DO NOT use near an open flame or heat source, as all
upholstery materials, even though treated with flame
retardant, can ignite when exposed to open flame.
• Rear caster wheels MUST be locked during user transfer to
or from recliner and while tilting and/or reclining or inclining
(sitting up).
• Ensure that casters are free of debris.
• DO NOT enter or exit the recliner when footrest is elevated.
• DO NOT sit on the footrest when recliner is extended. The
recliner will tip and bodily injury may occur.
• DO NOT push or pull footrest to position the recliner.
• DO NOT place hands or feet into any openings when
adjusting the recliner. Attendant or care provider should
always verify placement of user’s hands and feet prior to
adjusting the recliner. Failure to do so may result in serious
bodily injury.
• Operation of recliner with missing or broken footrest or
recline mechanism guards may result in bodily injury.
Periodic inspection of the footrest guard and recline
mechanism guard MUST be made four times a year. Torn,
cracked or otherwise damaged guards MUST be replaced
prior to use. Recliner MUST be removed from service until
replacement guards are installed.
• DO NOT lift the recliner by the footrest. Lifting by means of
the footrest may result in injury to the user and/or damage
to the recliner.
• DO NOT attempt to stop the recliner with the wheel locks,
while in motion. Wheel locks are not brakes.
• Before attempting to transfer in or out of the recliner, every
precaution should be taken to reduce the gap distance.
Turn the recliner toward the object you are transferring
onto. When transferring to and from the recliner, ALWAYS
engage both wheel locks. Special care MUST BE taken
with people that have physical limitations which may
require an assistant.
• DO NOT traverse, climb or go down ramps or slopes
greater than 9°.
• Test the recline feature of the recliner first without an
occupant to ensure the gas cylinder is operational. DO
NOT operate the recline option if the gas cylinder is not
operational.
• ALWAYS make sure that the recliner is stable before using
the recline option. Make sure the patient is properly
positioned in the recliner before reclining or inclining to
maintain maximum stability and safety.
• Excessive force or effort is never necessary to change the
seating position of the chair. Do not operate recliner by
applying force or pressure to leg rest.
• When returning the occupant of the recliner to the full
upright position, more body strength will be required for
approximately the last twenty degrees of incline (sitting up).
Make sure to use proper body mechanics (use your legs)
or seek assistance to avoid injury.
• Physical limitations of a user and larger occupants of the
recliner can present conditions that can injure the assistant.
When in doubt, assure that additional assistants are
present before operating the recline feature.
• Check all parts for shipping damage. In case of
damage, DO NOT use. Contact Carrier/Dealer for
further instructions.
Reorder Nos. 10522
10523
10528
Geri Chair Recliner
Infinite Position
IMPORTANT SAFETY GUIDELINES:
• Weight Capacity: 300 lb.
• Casters must be locked except during transport.
Infinite Position
Manufactured for: Dynarex Corporation
10 Glenshaw Street • Orangeburg, NY 10962
USA • www.dynarex.com
Made in China
ASSEMBLY INSTRUCTIONS
SIDE TABLES AND HEADREST
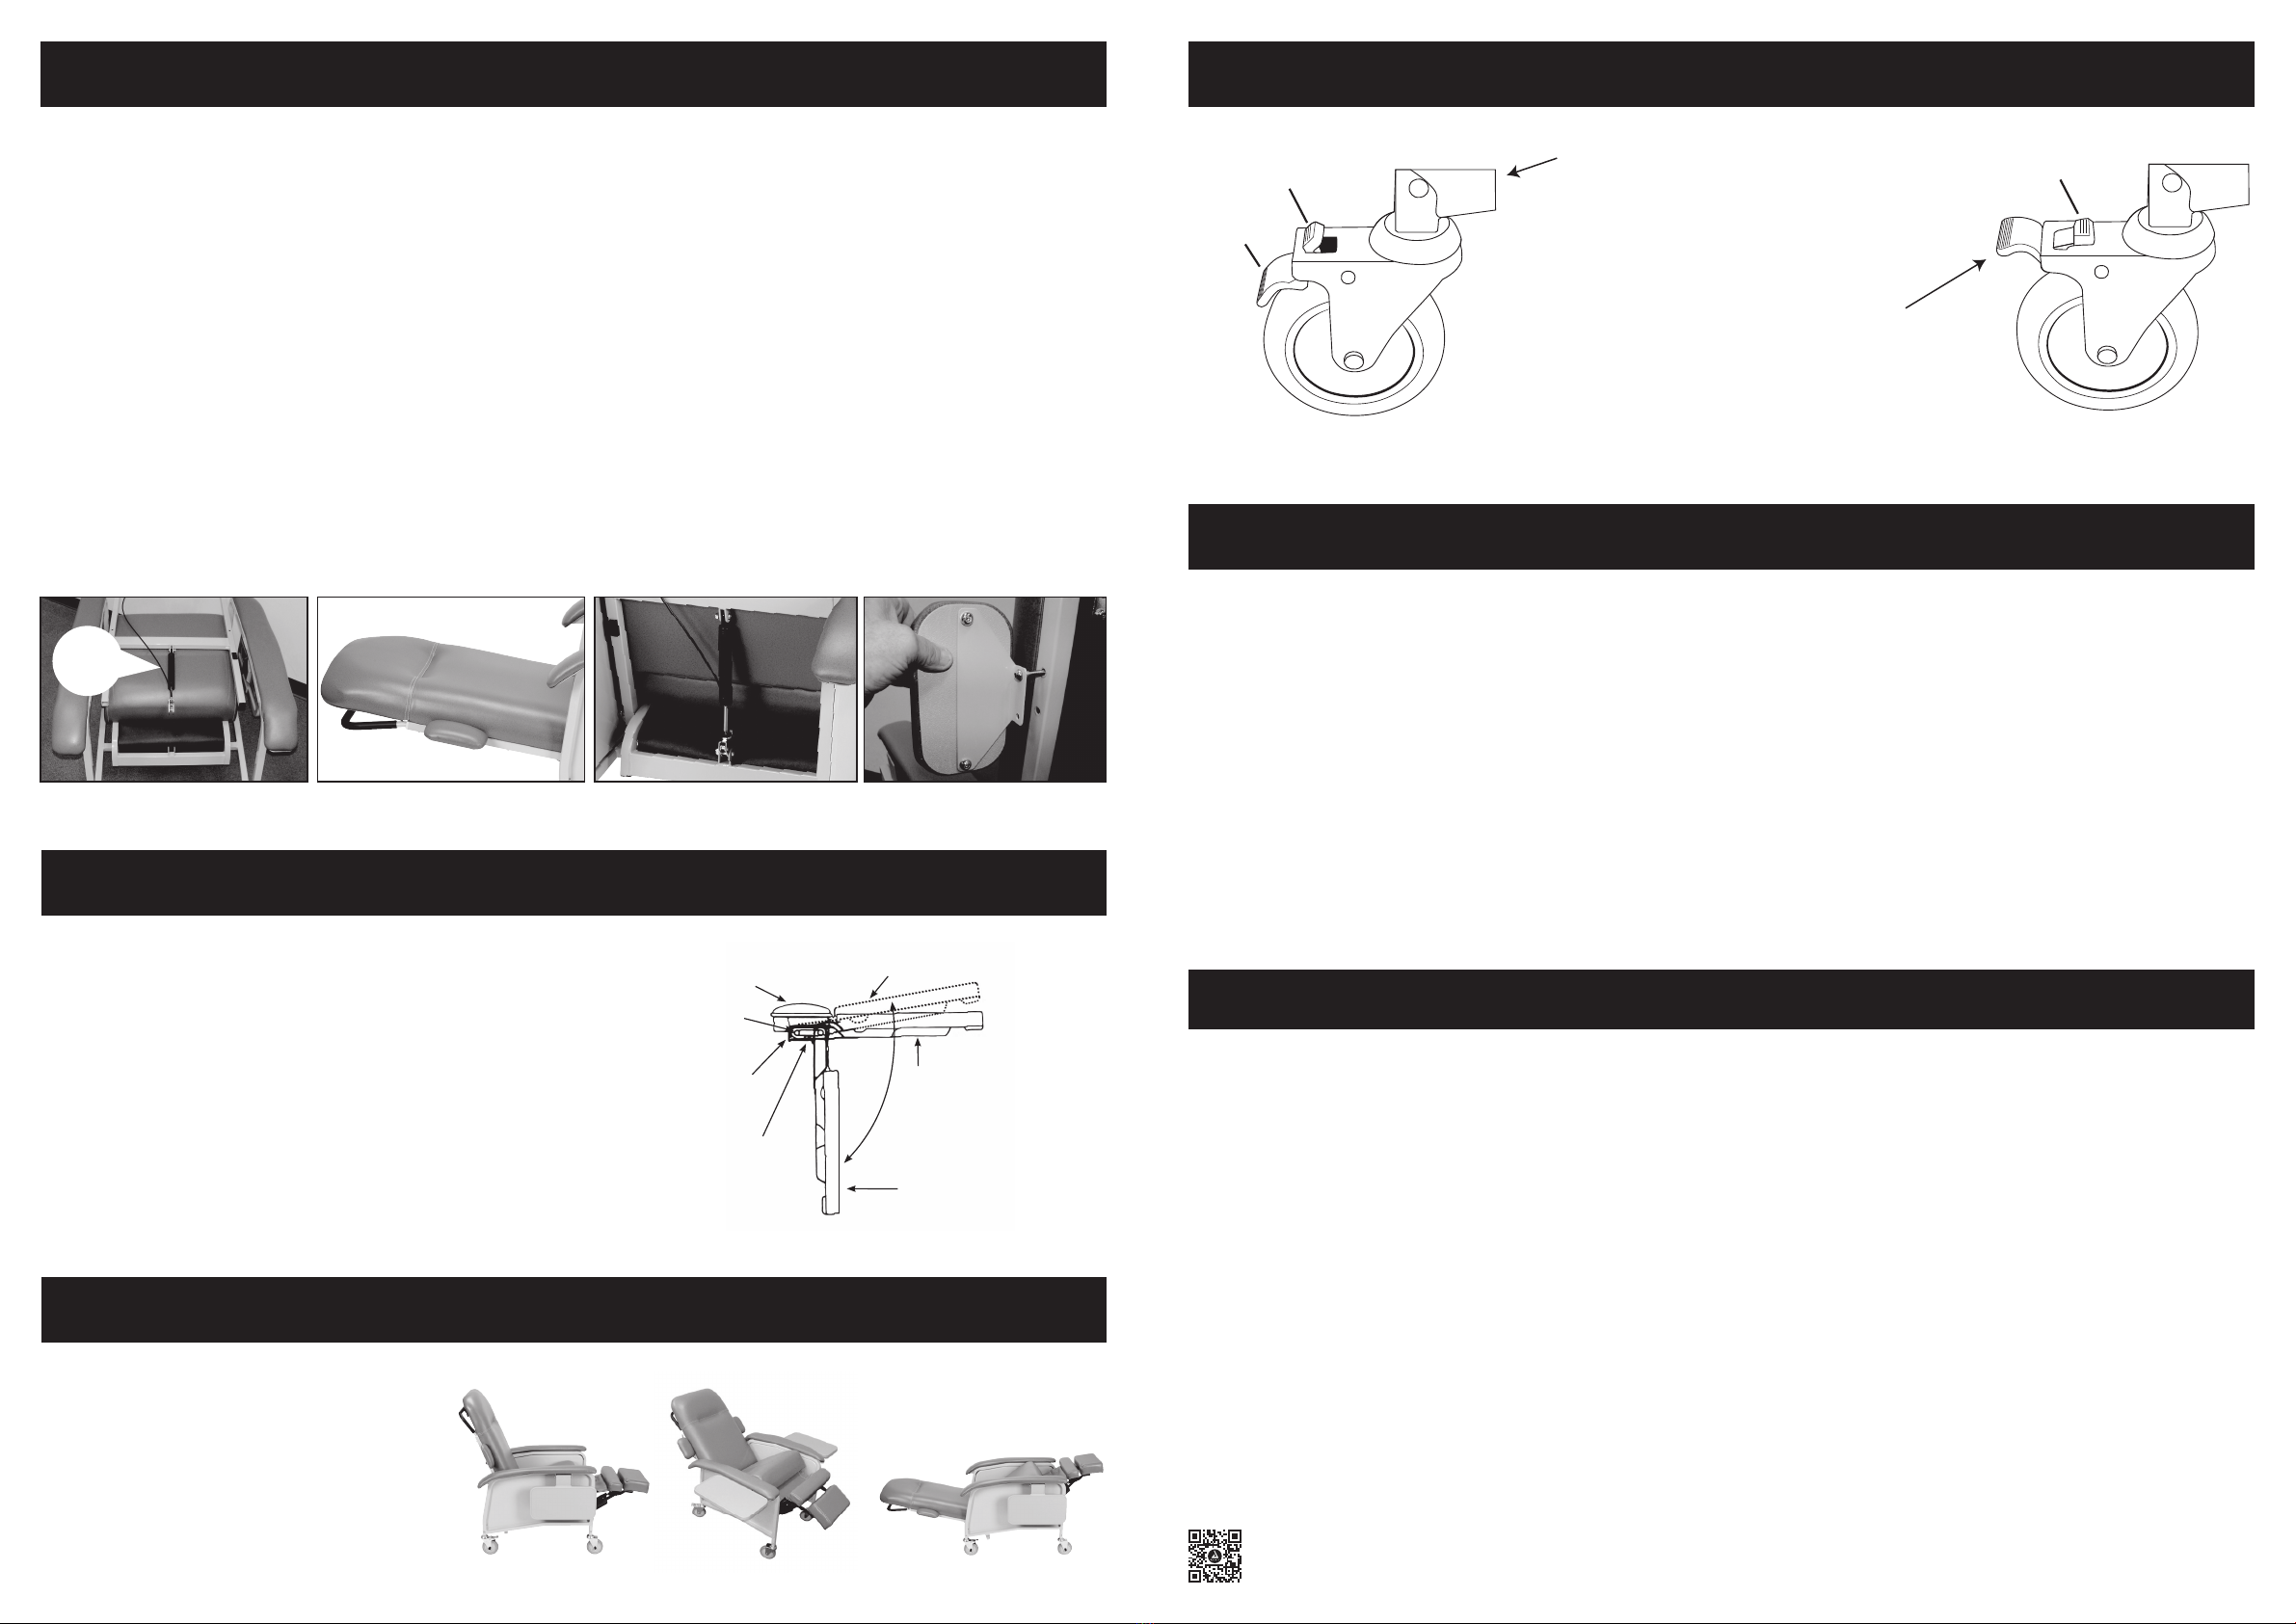
CASTER OPERATIONS
NOTE: After removing all components from the carton, engage the two caster locks before beginning assembly..
Side Tables:
1. To place either table in raised position: raise table all the way up
and slide in until tabs engage slots in mount bracket. Press down
lightly on table to ensure lock tabs are engaged.
2. To return table to self-storing position: Lift table up until tabs
disengage from slots. Slide out and allow table to lower. (See
figure 5)
Articulating Headrest:
Articulating headrest may be adjusted to a comfortable position by
pulling forward or pushing back.
Upholstered Back:
1. Remove cardboard shipping retainers from around Gas
Spring Cylinder. Rotate the hinge on the gas spring so that
it is perpendicular to the upholstered back. (See figure 1)
2. Lift the upholstered back from the sides and place it
horizontally with the upright back tubes resting on the
recliner frame. (See figure 2)
3. Undo hook and rings on side panels, both sides so
mounting holes are exposed. Align the holes on the upright
back tubes of the upholstered back with the holes on the
seat frame. Replace the clevis pins through the mounting
holes.
4. Secure the two clevis pins by replacing the bridge clips.
5. Raise the upholstered back to vertical position. Tuck the
plastic skirt at rear of upholstered back behind cross brace
of seat frame. Align the hinge at the bottom of the gas
spring with the holes in the “U” bracket in the seat frame
cross brace. While holding the back with one hand, secure
the gas spring hinge to the “U” bracket by replacing the
bolt with the other hand. Secure the bolt by replacing the
nut. (See figure 3)
Seat Frame:
1. Align holes in arm support mount to mounting holes in seat
frame. (See figure 4)
2. Insert screws through arm support mount and seat
frame holes. Secure screw with nut.
3. Repeat for other side.
NOTE: This chair is equipped with four swivel
casters for improved maneuverability. The rear
casters are also equipped with locking features.
FIGURE 4
SEAT POSITIONING
Adjusting the recline:
Lock the rear casters. While holding the push
bar, squeeze the piston spring release handle.
To lower, push back on padded push handle.
To raise, pull forward on padded push handle.
To achieve the Shock Position, follow the
above steps and continue to lower the back
until the shock position pictured is achieved. Recline Position 1 Shock PositionRecline Position 2
TOTAL LOCK: Step on the rear pedal
of the caster until the pedal engages.
The front of pedal will protrude from
wheel cover.
Push down
Pedal protrudes
Push down
SYMBOL GLOSSARY
For an explanation of symbols
used in Dynarex packaging, visit
dynarex.com/symbols.php R200701
WARRANTY
Your Dynarex Geri Chair Recliner is warrantied to be
free of defects in materials and workmanship for a
limited lifetime on the frame, and one (1) year on
upholstery and all moving parts, from original date of
purchase, for use by the original purchaser. This item
was built to exacting standards and carefully inspected
prior to shipment. This Warranty is an expression of our
confidence in the materials and workmanship of our
products and our assurance to the consumer of
dependable service.
The Warranty shall not apply under the following
conditions: problems arising from normal wear;
problems arising from failure to adhere to the product
instructions; problems arising from misuse, negligence,
accident or improper operation, maintenance or
storage; problems arising from modifications or
unauthorized repairs, parts or attachments; products
where the serial number has been removed or defaced;
problems with non-durable components, such as
rubber accessories, casters, and grips, which are
subject to normal wear and need periodic replacement.
Dynarex shall not be liable for any consequential or
incidental damages whatsoever. Dynarex shall repair or
replace defective products at its option. The foregoing
warranty is exclusive and in lieu of other express
warranties, if any, including the implied warranties of
merchantability and fitness of a particular purpose. The
remedy for any violation of the implied warranty shall
be limited to repair or replacement of the defective
product pursuant to the terms contained herein.
If you have a question about your Dynarex device or
this warranty, please contact an authorized Dynarex
dealer.
MAINTENANCE/CLEANING
Every Three Months:
• Check and clean casters.
• Tighten nuts.
• Check brakes on casters.
• Check and clean lock recline mechanism.
For upholstery maintenance and stain removal,
the following hints will be helpful:
• Ordinary Dirt: Wash with warm water and a mild
soap or detergent.
• Stubborn Dirt: Using a soft bristle brush, follow
directions above.
• Ground-in Dirt: Scrub with powdered cleanser or
similar detergent.
• Chewing Gum: Scrape carefully.
• Nail Polish and Remover: Blot immediately to prevent
damage.
• Ball Point Pen: Blot immediately with a white cloth
dampened in water or mineral oil.
• Waxing and Refinishing: Improve wearability. Use any
quality paste wax.
NOTE:
A diluted solution of 10% (or less) of bleach or
Clorox®may be used when cleaning this chair.
FIGURE 2 FIGURE 3FIGURE 1
Gas
Spring
Armrest
Table Mount
Bracket
Clevis Pin
Table (Disengaged Position)
Table (Engaged Position)
Table (Stored Position)
Tabs engage into
slots on table
mount bracket
FIGURE 5
UNLOCK: Step on the protruding front
part of the pedal to disengage lock to unlatch.

This manual suits for next models

2

Other dynarex Medical Equipment manuals

dynarex 10408 User manual

dynarex

dynarex 10408 User manual

dynarex 10131 User manual

dynarex

dynarex 10131 User manual

dynarex Aluminum Crutches User manual

dynarex

dynarex Aluminum Crutches User manual

dynarex D200 User manual

dynarex

dynarex D200 User manual

dynarex Bari+Max 10670 User manual

dynarex

dynarex Bari+Max 10670 User manual

dynarex 7089 User manual

dynarex

dynarex 7089 User manual

dynarex 10375 User manual

dynarex

dynarex 10375 User manual

dynarex D100 User manual

dynarex

dynarex D100 User manual

dynarex Bari+Max DB300 User manual

dynarex

dynarex Bari+Max DB300 User manual

dynarex Bari+Max DB600 User manual

dynarex

dynarex Bari+Max DB600 User manual

dynarex D400 User manual

dynarex

dynarex D400 User manual

dynarex Resp-O2 36400 User manual

dynarex

dynarex Resp-O2 36400 User manual

dynarex Resp-O2 User manual

dynarex

dynarex Resp-O2 User manual

dynarex 10712 User manual

dynarex

dynarex 10712 User manual

dynarex D500 User manual

dynarex

dynarex D500 User manual

dynarex Bari+Max 10403 User manual

dynarex

dynarex Bari+Max 10403 User manual

dynarex Resp-O2 36402 User manual

dynarex

dynarex Resp-O2 36402 User manual

dynarex MD300C25 User manual

dynarex

dynarex MD300C25 User manual

dynarex DB200 User manual

dynarex

dynarex DB200 User manual

dynarex D100 User manual

dynarex

dynarex D100 User manual

dynarex 10462 User manual

dynarex

dynarex 10462 User manual

dynarex 10520 User manual

dynarex

dynarex 10520 User manual

dynarex Adjustable Full Length Bed Rail User manual

dynarex

dynarex Adjustable Full Length Bed Rail User manual

dynarex Bariatric Shower Chair User manual

dynarex

dynarex Bariatric Shower Chair User manual

Popular Medical Equipment manuals by other brands

Kanmed GE-1380 user manual

Kanmed

Kanmed GE-1380 user manual

Vitlab micropipette operating manual

Vitlab

Vitlab micropipette operating manual

Carestream CS 8100 3D user guide

Carestream

Carestream CS 8100 3D user guide

Gima CONTEC21 manual

Gima

Gima CONTEC21 manual

ResMed AirSense 10 user guide

ResMed

ResMed AirSense 10 user guide

Invacare Marina H112 user manual

Invacare

Invacare Marina H112 user manual

DanMedical D-MAS HyperSat 2540 Instructions for use

DanMedical

DanMedical D-MAS HyperSat 2540 Instructions for use

TERMA DRACO user guide

TERMA

TERMA DRACO user guide

Ramsey Medical petMAP+ II Operator's manual

Ramsey Medical

Ramsey Medical petMAP+ II Operator's manual

EMS AIR-FLOW handy 3.0 Operation instructions

EMS

EMS AIR-FLOW handy 3.0 Operation instructions

Invacare microAIR 3500S Owner's operator and maintenance manual

Invacare

Invacare microAIR 3500S Owner's operator and maintenance manual

GIBAUD MALLEOGIB Instructions for use

GIBAUD

GIBAUD MALLEOGIB Instructions for use

Revitive Medic 5573AQ user manual

Revitive

Revitive Medic 5573AQ user manual

Chattanooga Group TRITON 200 operating instructions

Chattanooga Group

Chattanooga Group TRITON 200 operating instructions

Darco Web Ankle Brace quick guide

Darco

Darco Web Ankle Brace quick guide

Energy-Laser L500 PRO user manual

Energy-Laser

Energy-Laser L500 PRO user manual

Sirona Galaxis operating manual

Sirona

Sirona Galaxis operating manual

DJO Global Vectra Genisys user manual

DJO Global

DJO Global Vectra Genisys user manual

manuals.online logo
manuals.online logoBrands
  • About & Mission
  • Contact us
  • Privacy Policy
  • Terms and Conditions

Copyright 2025 Manuals.Online. All Rights Reserved.