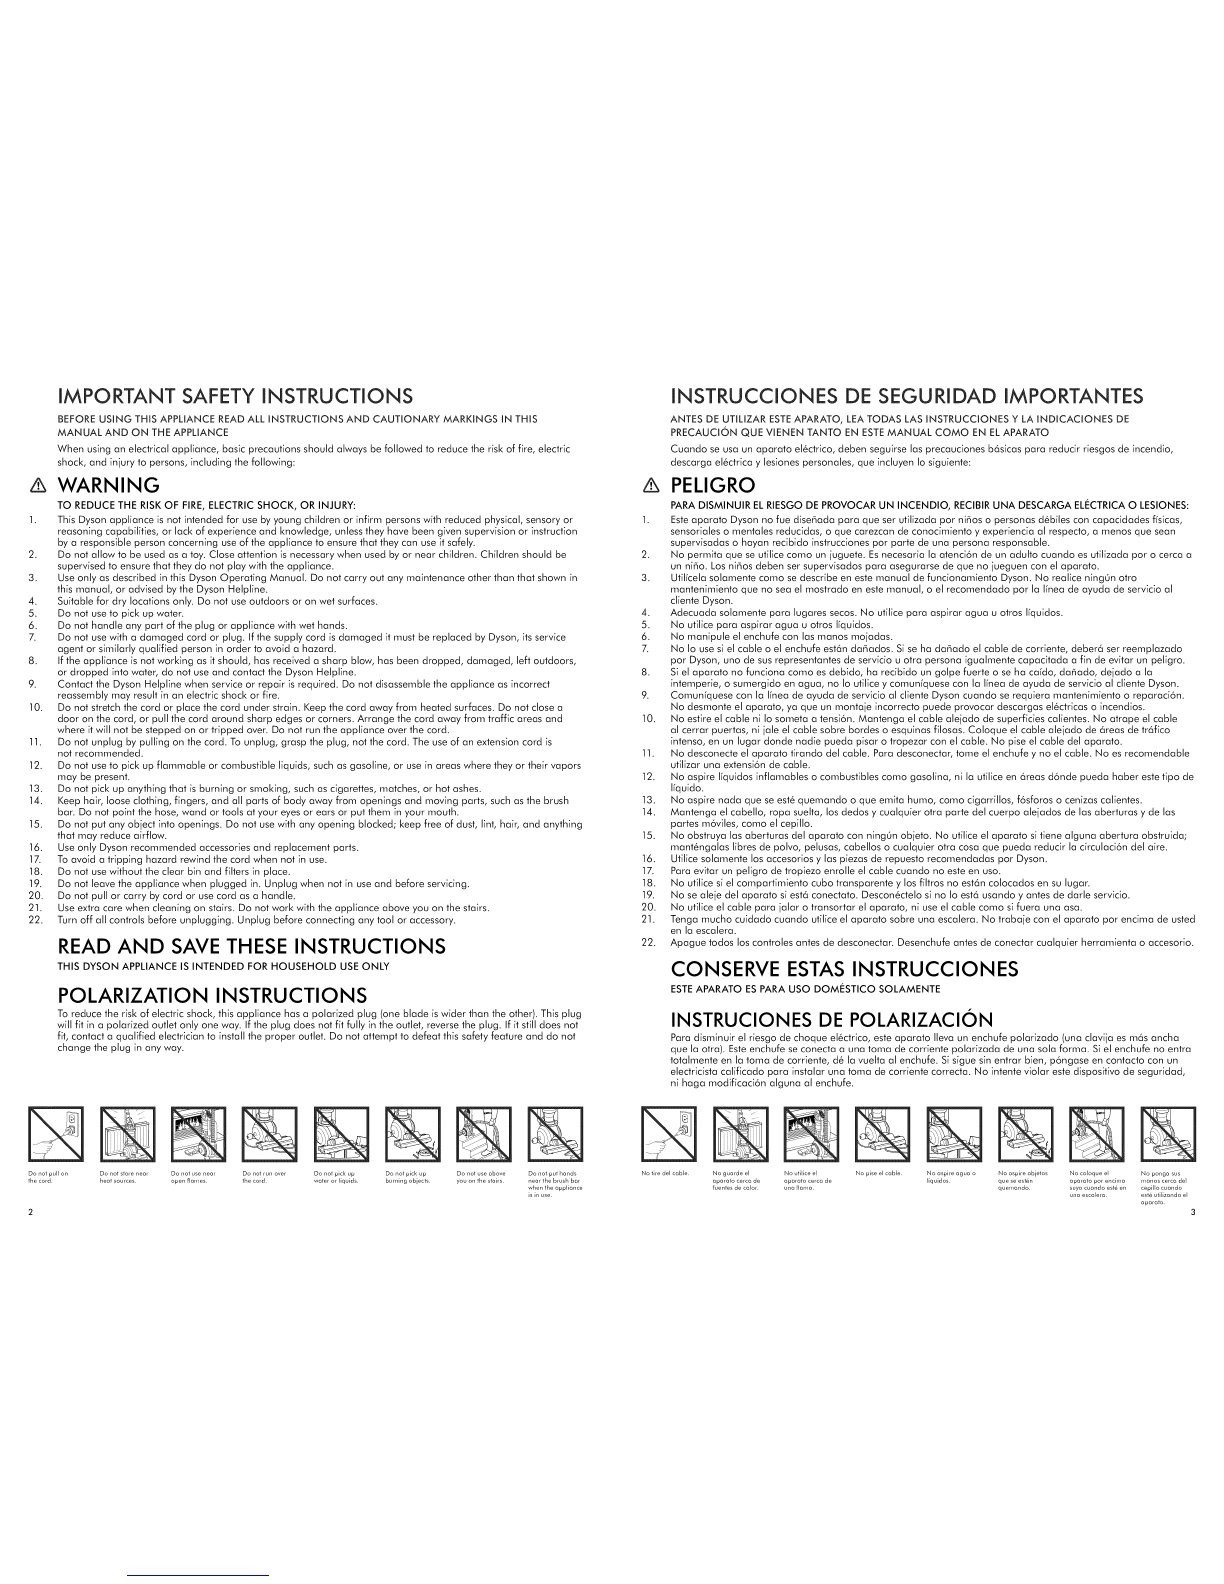
usa DE SU APARATO DYSON
ANTES DE CONTINUAR, SIRVASE LEER LAS "INSTRUCCIONES
DE SEGURIDAD IMPORTANTES" DE ESTE MANUAL DE
FUNCIONAMIENTO DYSON.
LA PLACA DE ESPECIFICACIONES
La place de espec;ficaciones se encuentra (a) detr6s del compartimiento
transparente o (b) en la parte superior del operate, arriba de los interruptores,
debajo de la manija del tuba. Anote el n6mero de serie antes de ajustar el
mango del tuba al aparato.
S; necesita toner acceso a la placa de especificaciones despu_s de ensamblar
el aparato, siga estas instrucciones:
- abra la tapa del tuba y jale hacia arriba el tuba rojo para separarlo del mango
- presione el broche negro en la ranura del conducto
- jale el mango del tuba hacia arriba para desprenderlo del aparato; ejerza
una presi6n constante y firme.
Compruebe que la corriente el6ctrica corresponde a la que se indica en la
place de especificaciones. El aparato s61o debe utilizarse conforme a las
especificaciones.
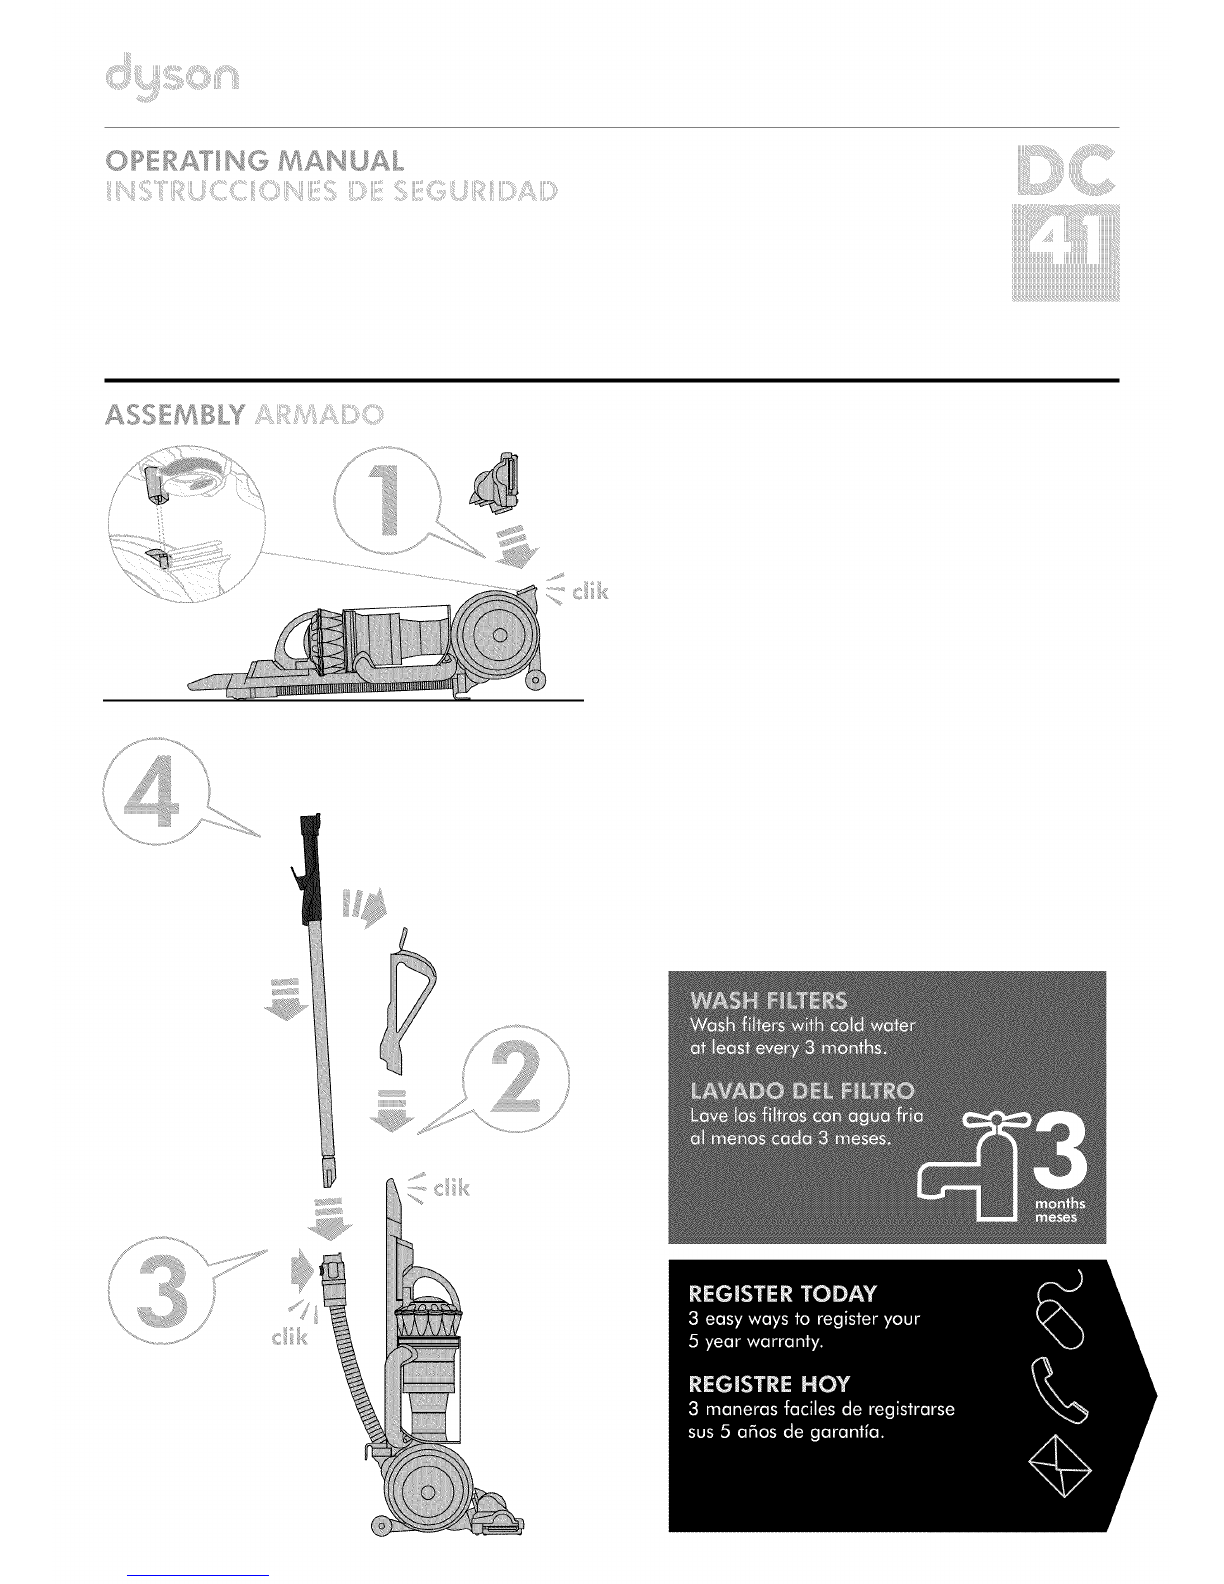
ARMADa
Coloque el aparato en posici6n horizontal.
Fije el cabezal de la aspiradora desliz6ndolo sabre las conexiones de la porte
delantera inferior de la esfera giratoria. Compruebe que el enchufe el6ctrico
del cabezal se ajusta en la conexi6n de bloque doble en el cuerpo del aparato,
qua est6 directamente arriba del conducto de ventilaci6n. Empuje con firmeza:
el cabezal emitir6 un chasquido al ajustarse en su lugar.
Coloque el aporato en posici6n vertical.
Fije la manija del tuba desliz6ndola en la parte superior del aparato. Lo presilla
de la manija emitir6 un chasquido al ajustarse en su lugar.
Compruebe que la manguera est6 recta. Presione el bot6n en la manguera.
Inserte el tuba en la manguera.
Compruebe que la manguera yla varilla se asientan en el hueco de la manija.
Deslice el extreme de la varilla hacia abajo en la manija para asegurarla.
Cierre la tape del tuba.
Deslice el portaherramientas sabre el lateral del conducto, coma se muestra.
Compruebe que la unidad de extractor del polvo y cuba transparente est6
sujeta al cuerpo principal del aparato.
Fije los accesorios seg6n se ilustra, 6stos se pueden flier a la manguera o al tuba.
Enrolle el cable en sentido opuesto al movimiento de las manecillas del reloj,
alrededor de los ganchos especioles para el cable. Suj6telo con el broche.
Para ver un breve video en I[nea, visite: www.dyson.com/DC41gettingstarted
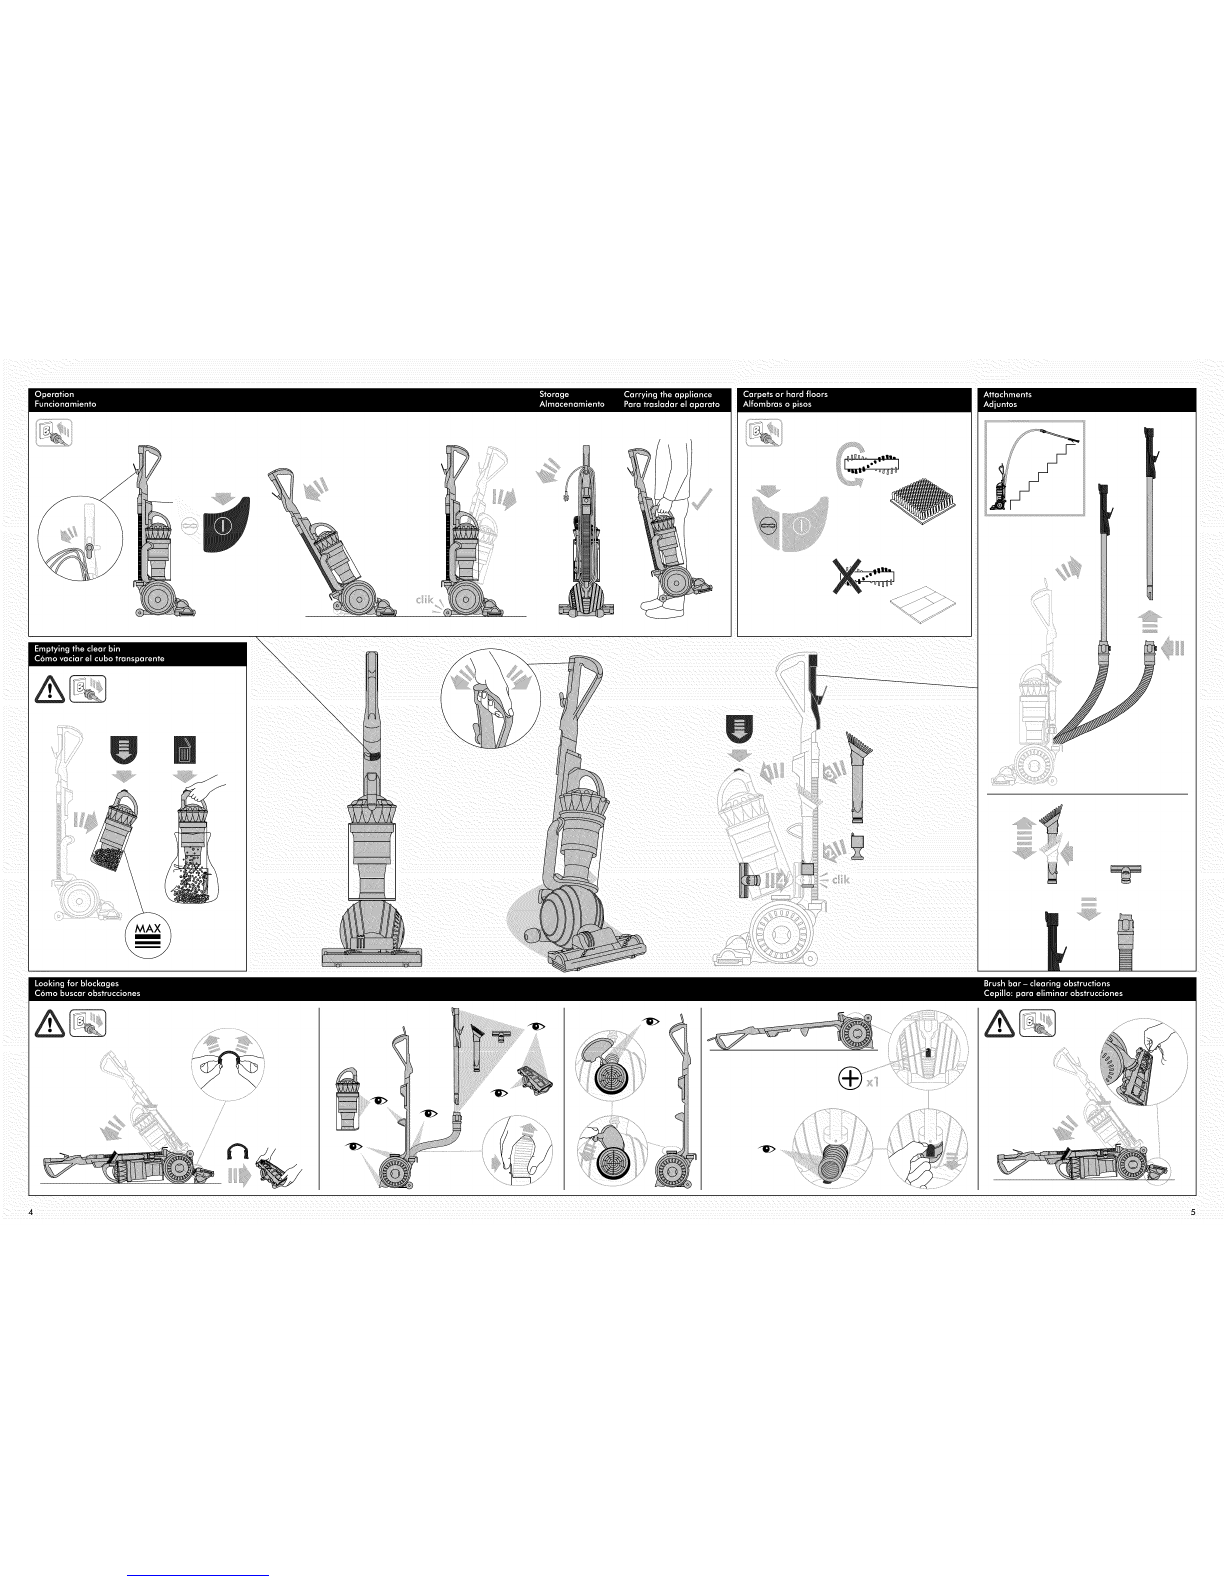
FUNCIONAMIENTO
Desenrolle el ceble.
Conecte el apareto el suministro de corriente el6ctrice.
Para encender o apagar el operate, presione el bot6n de encend/do, Iocalizedo
en el luger que se ilustra.
Para utilizarlo, recline el mango. El soporte estabilizedor se elever6
autorn6ticornente.
Despu6s de ufilizarlo, regrese el aparato a la posic;6n vertical, empuiando con
firmeza para que quede en su lugar. Las ruedas estab;lizadoras descender6n
autom6ticamente.
Luego: desconecte el aparato, enrolle el cable de manera segura, guarde el
aparato.
Apague el aparato, descon6ctela ycol6quela en posici6n vertical antes de:
- cambior o usar accesorios
- quitar la manguera o las piezas para inspeccionar el paso del aire.
Utilice la manija del extractor de polvo pare trasladar el aparato.
ADJUNTOS
Para liberar el tuba, abra la tapa del tuba yiale hacia arriba el tuba rojo para
separarlo del mango.
Extra;ga el tuba de la manguera hasta escuchar un chasquido qua indica qua
est6 en su lugar.
ALFOMBRAS O PISOS
El cepillo est6 siempre active (girando) en mode predeterminado, coda vez que
usted enciende el aparato y la recline para efectuar la limpieza.
El cepillo no gira si el operate est6 en posici6n vertical.
Pare apagar el cepillo (par ejemplo, par ejemplo, al Ihnpiar pisos o alfombras
delicedes):
- encienda el aparato
-recline el aparato
- presione el bot6n de encendido-apagado del cepillo, 6ste dejar6 de girar.
El cepillo deja de funcionar autom6ticamente si se produce una obstrucci6n.
Consulte "Cepillo: pare eliminar obstrucciones'.
Antes de aspirar sus pisos, tapetes y alfombras, consulte las instrucciones de
Ihnpieza qua recomienda el fabricante.
Algunas alfombras pueden salter pelusa si se emplea un cepillo giratorio
al aspirar. Si esto ocurre, recomendamos qua aspire en el mode de "piso
expuesto" y consulte al fabricante del piso.
El cepillo de este aparato puede da_ar ciertos tipos de alfombras. Si desconfia,
desactive el cepillo.
COMa CUIDAR SU APARATO DYSON
No efect6e ning6n mantenim;ento o reparac;6n distintos a los que se ilustran en
este Manual de Funcionamiento Dyson, o qua se le sugiera en la linea de ayuda
de Dyson.
Utilice Onicamente las piezas qua recomienda Dyson. De no hacerlo podria
anular su garanfia.
Ahnacene el operate en un espacio cerrado. No Io utilice si la temperature es
menor de 32 ° F. Compruebe qua el aparato est6 a temperatura ambiente antes
de ponerlo en funcionamiento.
Lhnpie el aparato Onicamente con un pa_o seco. No utilice ningOn lubricante,
agente de Ihnpieza, pulidor o aromaflzador en ninguna porte del aparato.
Si se utilize en una cochera, Ihnpie siempre la placa base, la esfera giratoria
ylas ruedas estabilizadoras con un pa_o seco luego de aspirar para Ihnpiar
arena, residues o grava qua puedan da_ar pisos delicados.
PARA ASPIRAR
PRECAUCIONES
No Io utilice si el compartimiento cuba transparente y los filtros no est6n
colocados en su lugar.
$61o deben aspirarse cantidades peque_as de polvo fine coma par ejemplo
residues de yeso o harina.
No ufilice el operate para recoger objetos duros cortantes, juguetes peque_os,
alfileres, sujetapapeles, etc., ya que podr[an da_ar el aparato.
AI aspirar, algunas alfombras se pueden generar peque_as descargas de
est6fica en el cuba transparente o en el tuba. Estas son totahnente inofensivas
yno est6n asociadas al suministro de corriente el6ctrica. Pare minhnizar
sus efectos, no coloque su mane ni introduzca ningOn objeto en el cuba
transparente, a menos que prhnero Io haya vaciado ylavado con agua fr[a.
Si el operate aspire a la m6xima potencia, la manguera puede retraerse.
Tenga mucho cuidado.
No trabaie si el aparato est6 arriba de usted en las escaleras.
No suba el operate a sillas, mesas, etc.
Antes de aspirar pisos con alto grade de pulido, coma los de madera o lin61eo,
verifique primero qua el lade inferior del accesorio para pisos y sus cepillos no
tienen objetos extra,as que puedan producir marcas.
No deje el cabezal de la aspiradora en un solo lugar si est6 sabre pisos
delicedos.
No ufilice este aparato a la intemperie. El Kit de limpieza para el cache Dyson
(Modelo 08909) s61o se puede utilizar dentro de una cochera.
COMa VACIAR EL CUBa TRANSPARENTE
Apegue y desconecte el operate antes de vacier el cuba trensporente.
Vec[e el compertimiento cuando la besuro llegue el nivel m6ximo. Evite
sobrecargarlo.
Pare quitar le unided de extractor de polvo y cuba transparente, presione el
bot6n rojo que se encuentre en le porte trasera de manijo del extractor
de polvo.
Pare descergar la suciedad, presione completamente hasta abejo el bot6n rojo
que se encuentra en la porte tresere de menije del extractor de polvo.
Pare minimizer el contacto con polvo/el6rgenos al efectuar el vaciodo,
introduzce el cuba trensporente en una balsa de pl6stico y vecie el contenido.
Extreiga con cuidado el cuba trensperente.
Selle perfectamente la balsa, eliminela coma acostumbra hacerlo.
Pare reajuster:
- cierre la base del cuba transperente haste que emita un chesquido
al ajustarse
- empuje la unidad de extractor de polvo y cuba transporente en el cuerpo
principal del operate; se escuchar6 un chasquido cuando se esiente en su lugor
- compruebe que la unidad de extractor de polvo y cuba trensporente est6
bien sujeta.
COMa LIMPIAR EL CUBa TRANSPARENTE
Quite el extractor de polvo y el cuba trensporente (conforme e los instrucciones
que enteceden).
Pare seporer el extractor de polvo del cuba tronsperente presione el bot6n rojo
pare ebrir la bose del cuba. Esto revela un bot6n plateedo peque_o situedo
detr6s del mecanismo rojo de aperture. Presione el bot6n plateedo y desprende
la unided del extractor de polvo del cuba trensporente.
Lave el compertimiento cuba tronsporente 0nicamente con ague frio.
Aseg0rese de que el comportimiento est6 totalmente seco antes de colocarlo.
No utilice detergente I liquido pore encerer ni desodorante de ambientes pore
limpiar el compartimiento.
No limpie el compertimiento en un levavejillas.
No sumerje totalmente el extractor de polvo en ague ni ponge ague dentro
de 6ste.
Lhnpie la rejilla con un pe_o seco un cepillo seco pore eliminar la pelusa y el
polvo.
Pare reajustar:
- ajuste la tapa del extractor de polvo en el cuba transparente, de manera que
el bot6n plateado emita un chasquido al acoplarse
- cierre la base del cuba transparente haste que escuche un chasquido cuando
se aiuste en su lugor
- empuje la unidad de extractor de polvo y cuba transparente en el cuerpo
principal del operate; se escuchar6 un chasquido cuando se asiente en su lugar
- compruebe que la unidad de extractor de polvo y cuba transparente est6
bien fija.
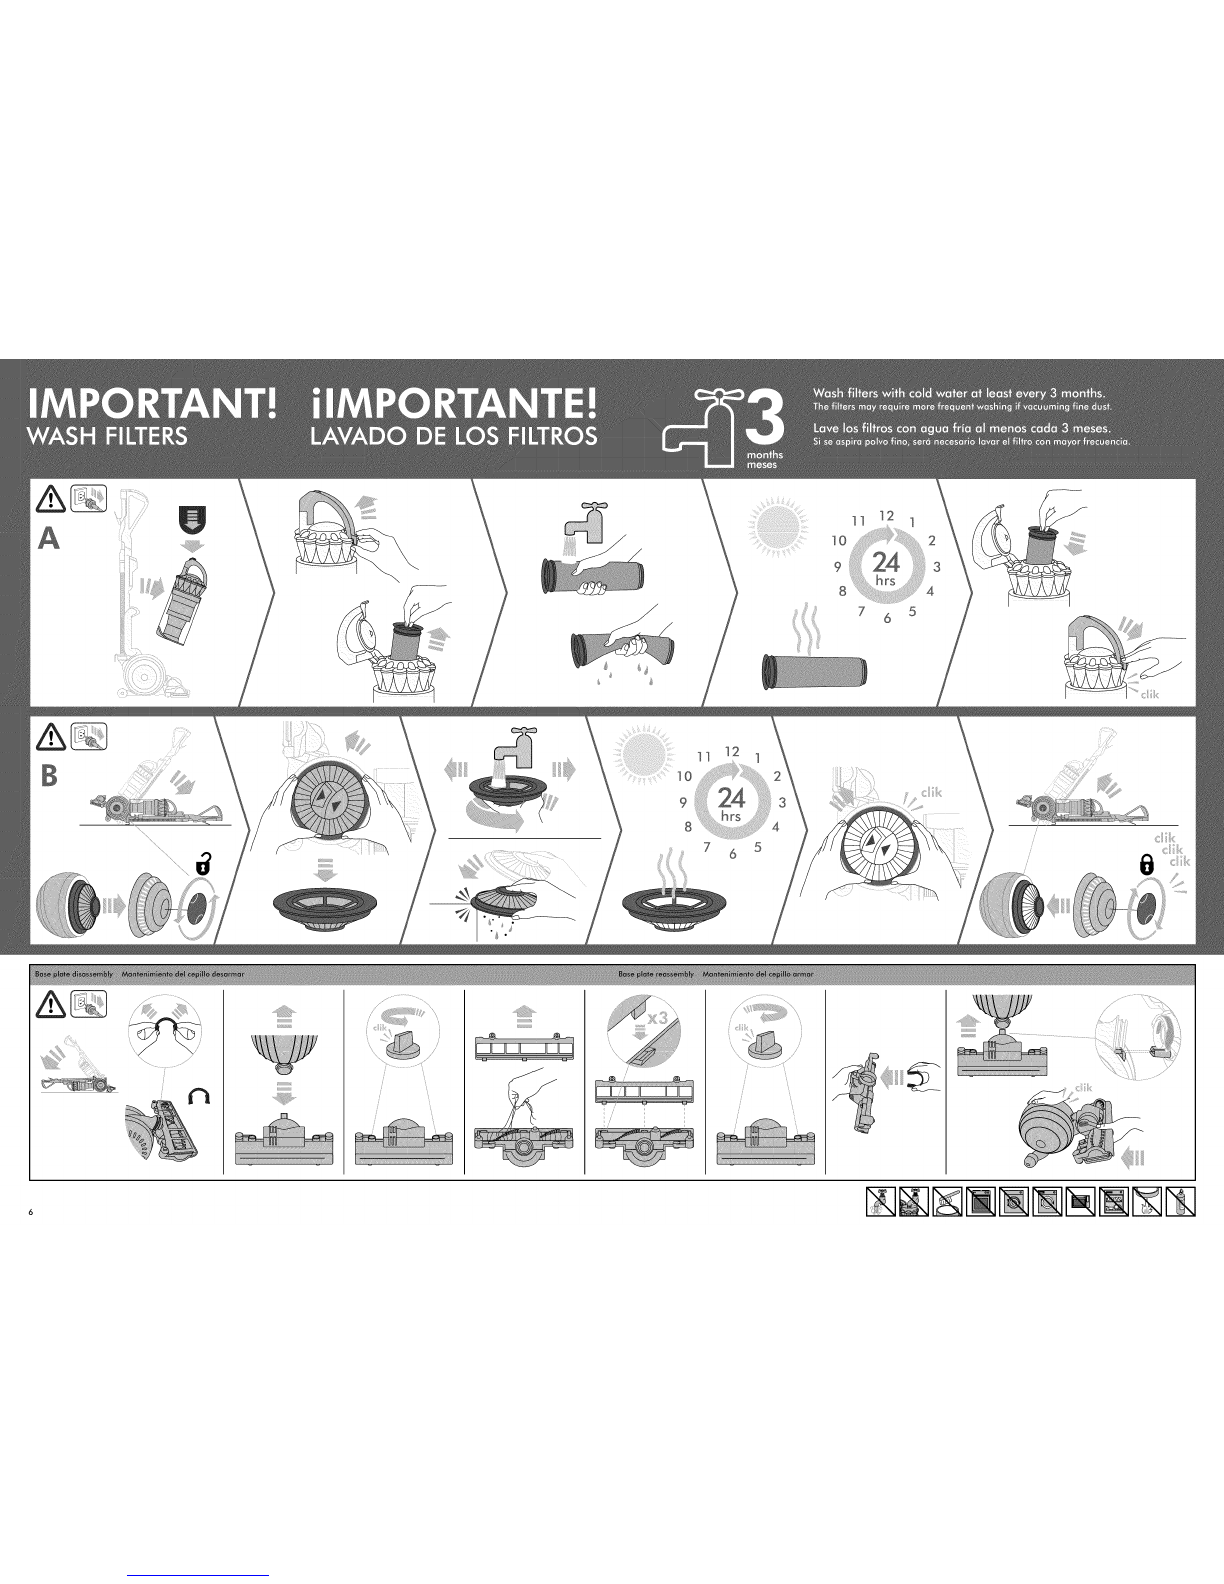
COMa LAVAR LOS FILTROS
Este aparato tiene dos filtros, ubicados corno se muestra en las ilustraciones.
Revise ylove los filtros con period;cidad, conforme a los instrucciones, pare
mantener el rendimiento.
Apague el aparato y descon6ctelo antes de quitar los filtros.
Si se aspire polvo fine, set6 necesario lavar los filtros con mayor frecuencia.
Lave 6nicamente con ague fria. No ufilice detergentes.
No coloque los filtros en el lavavajillas, el lavarropas, la secadora, el homo, el
microondas o cerca del fuego.
Pare quitar el filtro A, consulte la secci6n "Pare laver los filtros" de este Manual
de Funcionamiento Dyson.
Despu_s de lavarlo, exfienda el filtro sabre su costado y d6ielo secar
completamente al menos durante 24 horas antes de reajustarlo.
Pare quitar el filtro B:
- gire el selector central de bloqueo en la cubierta externa de la esfera giratoria
en senfido opuesto a las manecillas del reloj hasta qua la cubierta se libere
- desprenda la cubierta
- gire el filtro un cuarto de vuelta en sentido opuesto a los manecillas del reloj
para liberarlo.
El filtro B se debe lavar ygolpear levemente gasta que fluya agua limpia, luego
golpee levemente otra vez pare comprobar qua haya desaparecido todo exceso
de ague. D6jelo secar completamente durante 24 horas.
Es normal qua el filtro que se encuentra en la porte inferior se vuelva de
color gris.
Pare reajustar el filtro B:
-reajuste el filtro en la esfera giratoria
-fijelo girando un cuarto de vuelta en el senfido de los manecillas del reloj.
Cuando reajuste la cubierta exterior de la esfera giratoria, siga girando el
selector central de bloqueo en el sentido de las manecillas del reloj. Cuando
comience a emitir chasquidos, quedar6 bloqueada.
Pare ver un breve video en linea, visite: www.dyson.com/DC41filterwash
COMa BUSCAR OBSTRUCCIONES
Apague y desconecte antes de buscar obstrucciones. S; no Io hace, podria sufrir
lesiones.
Inspeccione el tuba, los conductos de aire y el cabezal de la aspiradora en
busca de obstrucciones.
Pare quitar la placa base y poder tenor acceso a la obstrucci6n, consulte "Place
base - desmontaje/reinstalaci6n".
Pare inspecc;onar posibles obstrucciones en el conducto de aire entre la esfera y
la aspiradora, tendr6 que desmontar el cabezal de la aspiradora: pare hacerlo,
consulte "Place base- desmontaje/reinstalaci6n", a confinuaci6n.
Tenga cuidado con los objetos filosos cuando inspeccione las obstrucciones.
Reinstale todas las partes correctamente antes de utilizarlo.
Su garantia Ihnitada no cubre la elhninaci6n de obstrucciones.
PARA ELIMINAR BLOQUEOS: SISTEMA DE
DESCONEXION TERMICA
Este operate posee un sistema de desconexi6n t6rrnica.
Los objetos grandes pueden obstruir los accesorios o la entrada del tuba. S; se
produce una obstrucci6n en cualquier porte, el aparato se puede sobrecalentar
ydesconectarse autom6ticamente.
Apague ydesconecte. Permita que se enfrie durante 1-2 hares antes de
inspeccionar los filtros en busca de obstrucciones.
Elhnine cualquier obstrucc;6n antes de reinic;ar el funcionamiento.
Su garantia Ihnitada no cubre la elhninaci6n de obstrucciones.
CEPILLO: PARA ELIMINAR OBSTRUCCIONES
SI la se obstruye el cepillo, se puede epegor. SI esto ocurre, neceslter6 ellmlner
el bloqueo.
Apogue y desconecte antes de preceder. Si no lo hace, podr[e sufrir lesiones.
Tenga cuidado con los obietos filosos cuando elimine las obstrucciones.
Si no puede liberer la obstrucci6n, sige los instrucciones que se indican a
continuaci6n pore quiter la place bose. Esto permitir6 mayor acceso a le
obstrucci6n. De farina elternativa, contecte a un experto de Dyson en la Unea
Directa de Asistencia al Cliente de Dyson o visite el sitio web. Lo limpieza de
obstrucciones del cepillo no tiene cobertura de gerantio.
PLACA BASE - DESMONTAJE/REINSTALACION
Apogue y desconecte antes de preceder. Si no lo hece, podrie sufrir lesiones.
Recueste el operate sabre su porte delentere.
Desprende el broche rojo en "C' que se encuentra en la conexi6n entre el
cabezal de la espirodore y el operate. Est6 fijo con firmeza, pete no lo jele con
demasiade fuerza. Ejerze una presi6n constente y firme.
Extreige el cebezal de la aspirodora del operate. Ejerza une presi6n constente
y firme.
En el cobezel tiene dos selectores: gire cede uno un cuerto de vuelta en sentido
contrerio e las menecillas del reloj hasta que emiten un chasquido.
Coloque el cobezel sabre su porte tresere:
- levante el borde superior de la place bose, de manera que se abate e la
posici6n vertical
- extr6;gala.
Tenga cuidado con los objetos filosos cuando elhnine las obstrucciones.
Pare reajustar la placa base:
- ajuste las 3 orejetas del borde inferior de la placa base en las 3 ranuras de la
base del cabezal de la aspiradora
- abate hacia abajo el borde superior de la placa base; se escuchar6 un
chasquido cuando se asiente en su lugar.
Pare fijar le place base:
- presi6nela contra el cabezal de la aspiradora
-fije el primer selector gir6ndolo un cuarto de vuelta en el sentido de las
manecillas del reloj hasta que emita un chasquido y se acople
- repita Io rnisrno con el segundo selector.
Reajuste el broche rojo en "C' en el cebezal de la aspiradora. El borde m6s
piano del broche se aiusta contra el cabezal. Es m6s f6cil deslizar las orejetas
uno par uno.
Recueste el operate sabre su porte trosero.
F;je el cabezal de la aspiradora desliz6ndolo sabre las conexiones de la parte
delantera inferior de la esfera giratoria. Compruebe que la conexi6n el6ctrica
del cabezal se aiusta en la conex;6n de bloque doble del cuerpo del aparato, la
cual se encuentra directamente arriba del conducto de venfilaci6n. Empuie con
firmeza: el cabezal emitir6 un chasquido al ajustarse en su lugar.
Para ver un breve video en linea, v;site:
www.dyson.com/DC41 brushbarmaintenance
REPARACION DE AVERJAS DE LA BARRA
DE CEPILLO
Si el cepillo ha dejodo de girar, sige las instrucciones anteriores pore eliminer
obstrucciones. Alternativamente, comuniquese con un experto de Dyson a le
linea de ayude de Dyson o visite el sitio web.
SERVICIO DE ATENCION AL CLIENTE DYSON
GRACIAS PaR ELEGIR COMPRAR UN APARATO DYSON
Si tlene olgune dude ecerce de su operate Dyson, II0me 0 le I_neo de oyudo
de Dysonal con el n6mero de serie e informaci6n de cu6ndo yd6nde compr6
el producto.
Sitiene m6s preguntas, puede consultar par tel6fono a alg6n miembro de la
linea de ayuda.
Si su aparato necesita reparaci6n Ilame a la Linea de ayuda de Dyson para
poder analizar las opciones disponibles. Si su aparato fiene garanfia y la
reparaci6n necesaria est6 incluida dentro de esa garantia, se reparar6 sin
costa alguno.
La placa de especificaciones se encuentra en la parte superior del aparato,
arriba de los interruptores ydebaio de la mango del tuba.
PaR FAVOR REGJSTRESECOMa PROPIETARIO DE
UN APARATO DYSON
Para ayudarnos a asegurarle que rec;ba un servic;o r6pido yeficaz, par favor
registrese coma propietario de un operate Dyson. Hay dos maneras de hacerlo:
En I[nea en www.dyson.com
Llamando par tel6fono a la Linea de ayuda de Dyson, 1-866-693-9766.
Enviando par correo el formulario de garantia que se anexa, dirigido a nuestra
direcci6n.
Esto confirmar6 qua el aparato Dyson es de su propiedad en case de qua
ocurra una p6rd;da cubierta par el seguro, y nos permitir6 contactarle si
fuese necesario.
5 AI'T,IOS DE GARANTJA
TERMINOS Y CONDIClONES DE LA GARANTJA LIMITADA DE
5 ANOS DE DYSON.
QUE EST,_CUBIERTO
Su operate Dyson est6 garenfizado centre defectos originales de materiel o
mane de obra par un per[ode de cinco a_os a partir de la fecha de compra,
cuando se ufilice para fines dom6sticos privados y de acuerdo con el Manual
de Instrucciones de Dyson. Esta garanfia proporc;ona, sin costa pare usted,
toda la mane de obra y p;ezas pare poner su aparato en perfectos cond;ciones
de func;onamiento durante el plaza de garantia. Esta garantia est6 sujeta a los
siguientes t6rminos:
QUE NO EST,_CUBIERTO
Dyson, Inc. no set6 responsable de los castes incurridos coma resultado de:
Aparatos comprados a proveedores no autorizodos.
El funcionamiento o menejo descuidado, use indebido y/o falta de
mantenimiento o el use de forma contraria al Manual de Instrucciones
de Dyson.
El use del aparoto controrio a los uses dom6sticos normales dentro de los
Estados Unidos de Am6rica, per ejemplo, pare el use comercial o alquiler.
El use de piezas que no est6n contempladas en el Manual de Instrucciones
de Dyson.
El use de piezas y accesorios que no seen los producidos orecomendados per
Dyson, Inc.
Foctores externos, come per ejemplo el clime.
Reparaciones o alterociones Ilevadas a cabo per portes o agentes no
autorizados.
Eliminar obstrucciones de su m6quina.
Use y desgaste normal, incluido desgaste normal de partes come cube
tronsparente banda, filtro, cepillo, ensemble de la manguera, y cable de
corriente (o donde se diagnostique da_o o abuse externo), da_o a la alfrombra
o piso debido al use no de acuerdo con las instrucciones del fabricante dado al
case de no apager el cepillo cuando es necesario.
SERVICIO DE GARANTJA
Par favor complete y devuelva el Formulario de registro del producto, o
registrese en l[nee en www.dyson.com
Antes de poder realizer el servicio, los t6rnlinos de la gerent[e exigen que se
ponge en contecto con le Linea Directo de Asistencie al Cliente de Dyson y que
proporcione el nornbre/n0mero del modelo, n0rnero de serie, y la feche y sitio
de compra.
Par favor mantenga la factura de compra en un sitio seguro para asegurarse de
tener esta informaci6n.
Todo el trabajo Io Ilevor6 a cabo Dyson, Inc. o sus agentes autorizados.
El cambio de cualquier pieza defectuosa no extender6 el per[ode de la m;sma.
El servicio seg6n esta garantia no extender6 el periodo de esta goranfia.
Si su aparato no func;ona correctamente, par favor Ilame a la Linea Directa
de Asistencia al Cliente de Dyson. La mayoria de los problemas pueden
solucionarse par tel6fono a trav6s de nuestro personal capacitado en atenci6n
al cliente. S; esto no es posible, Dyson, Inc. har6 que se repare y se le devuelva
su aparato en perfectas condiciones sin costa adicional pare usted.
10 11