Eachine E110 User manual

User Manual
E110
Company: Lotus NL B.V.
Address: Koningin Julianaplein 10, 1e Verd, 2595AA, The Hague,
Netherlands.
E-mail: [email protected]
Tel: +31644168999

1.Recommended age of users: Not suitable for children under 14 years old.
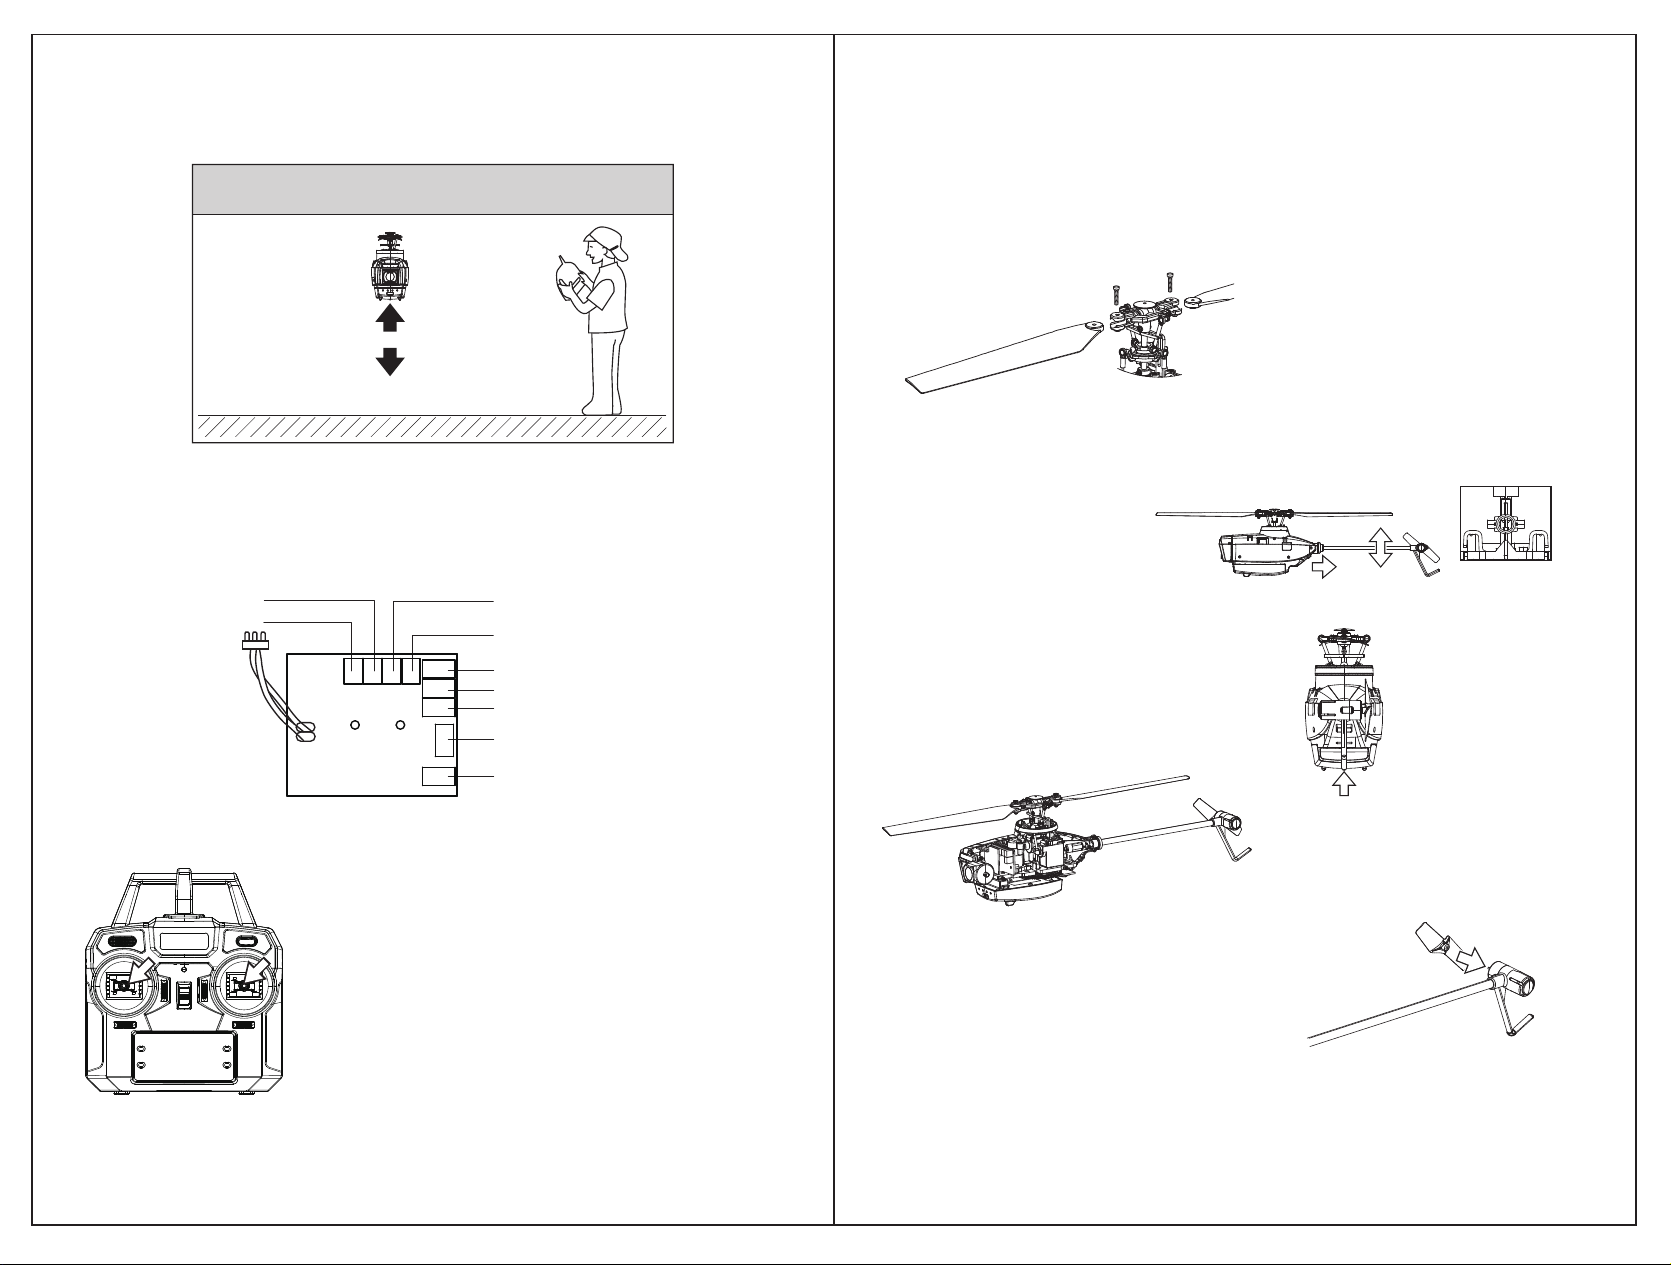
2.Operate it in an open space, away from the traffic and people.
3.Obey the instructions and warnings, includes the use of optional equipment.
4.It has to stay away from chemicals. Small parts and electric equipment must be out of the
reach of children.
5.Keep away from water because this product has no waterproof function.
6.Do not put any parts in the mouth, it will cause injury or death.
7.Don’t operate the model if the transmitter’s battery is in low voltage.
8.Don’t view the beam of the light emitting diodes, it would effect the eyesight.
9.The motor and electric equipment will be heat after flight. Please do not touch them
to avoid scald.
10.In order to avoid causing damage, please do not touch the high-speed.
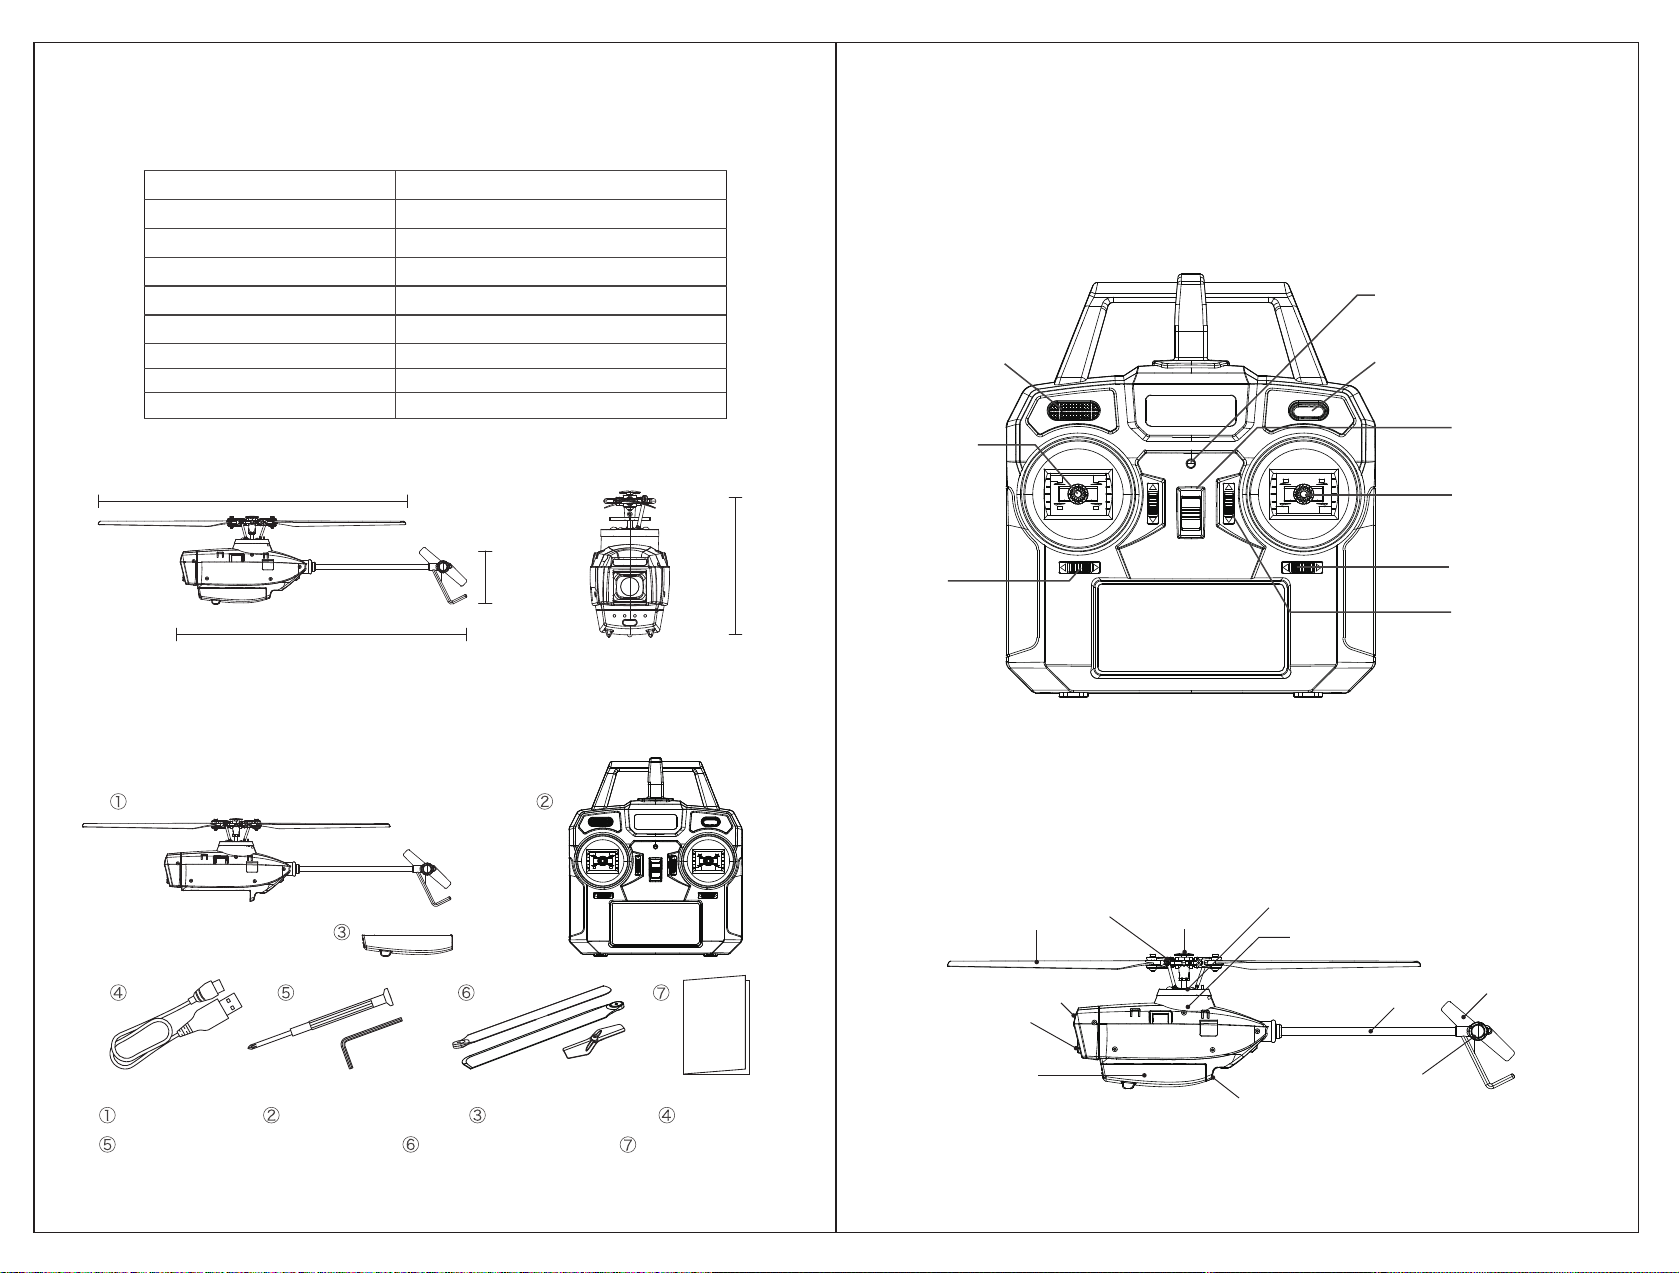
Please read the manual to learn the function of the this product before operation.
Damage to the product and potential personal injury may occur if you make an
operational error.
This is a RC helicopter, not a toy. You should not only have a prudent operation, but
also to have an operational basis. All children using it should be under adult supervision.
The manual includes safety, operation and maintenance. In order to avoid causing
damage or serious injury, please obey the instructions and warnings before you
using this product.
Important Note
Additional Safety Precautions And Warnings
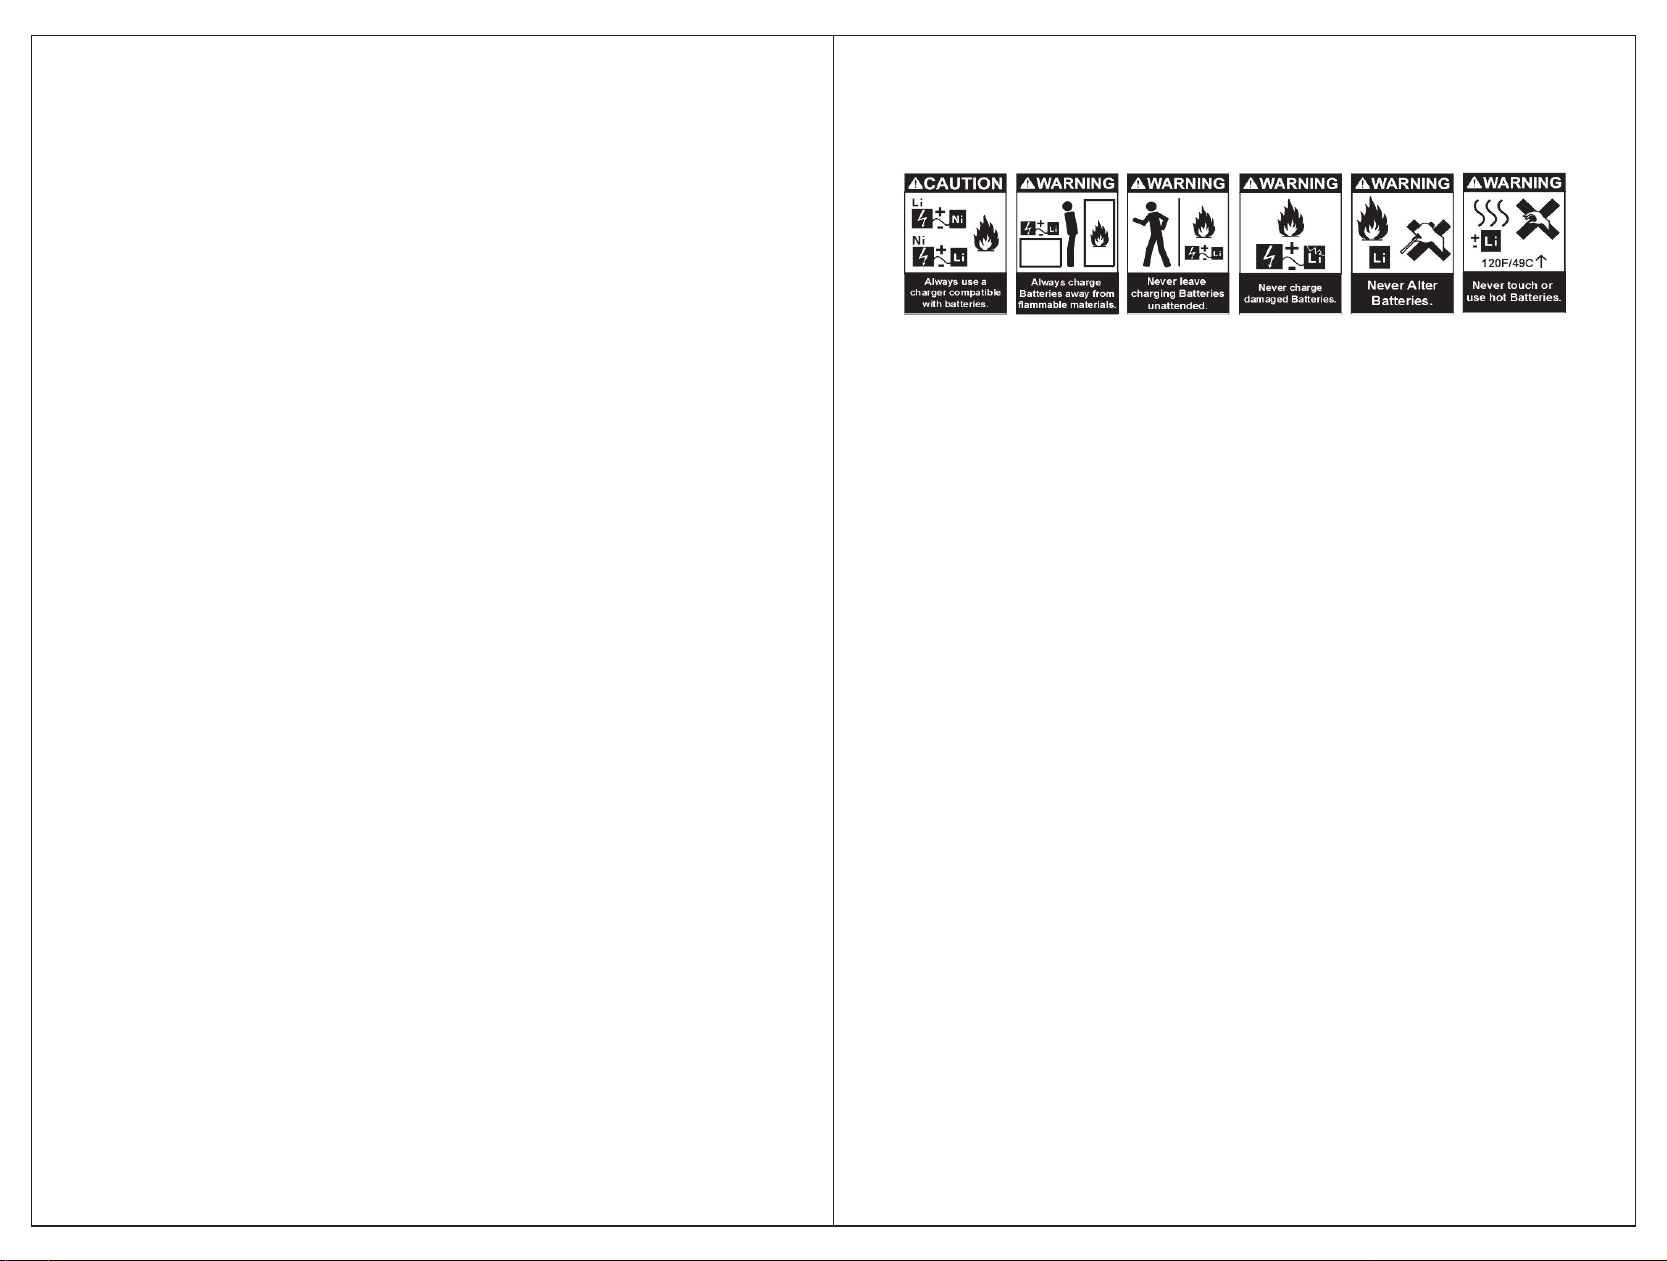
Warnings! The battery will fire, explode or leak if not strictly observing this item described
below. :
1. Do not immerse the battery in water or seawater, and keep the battery in a cool dry
environment during stands by period.
2. Keep all batteries out of the reach of little children. Consult a doctor immediately if a
battery is swallowed.
3. Do not use or leave the battery near a heat source such as fire or heater.
4. Use the battery charger specifically for that purpose when recharging.
5. Do not reverse the positive (+) and negative (-) terminals.
6. Do not connect the battery to an electrical outlet.
7. Do not dispose the battery in fire or heat.
8.Do not short-circuit the battery by directly connecting the positive (+) and negative (-)
terminals with metal objects such as wire.
9.Do not transport or store the battery together with metal objects such as necklaces,
hairpins etc.
10.Do not strike or throw the battery against hard surface.
11.Do not directly solder the battery.
12.Do not unpack the battery with a nail or other sharp object.
13.Never disassembling the battery in any way.
Note:The battery can not be placed for a long time under full power and low power.
Otherwise, the battery will not be charged or the battery will be wrapped. For long-term
storage, please charge the battery to 3.7V and store it in a dry and safe place.
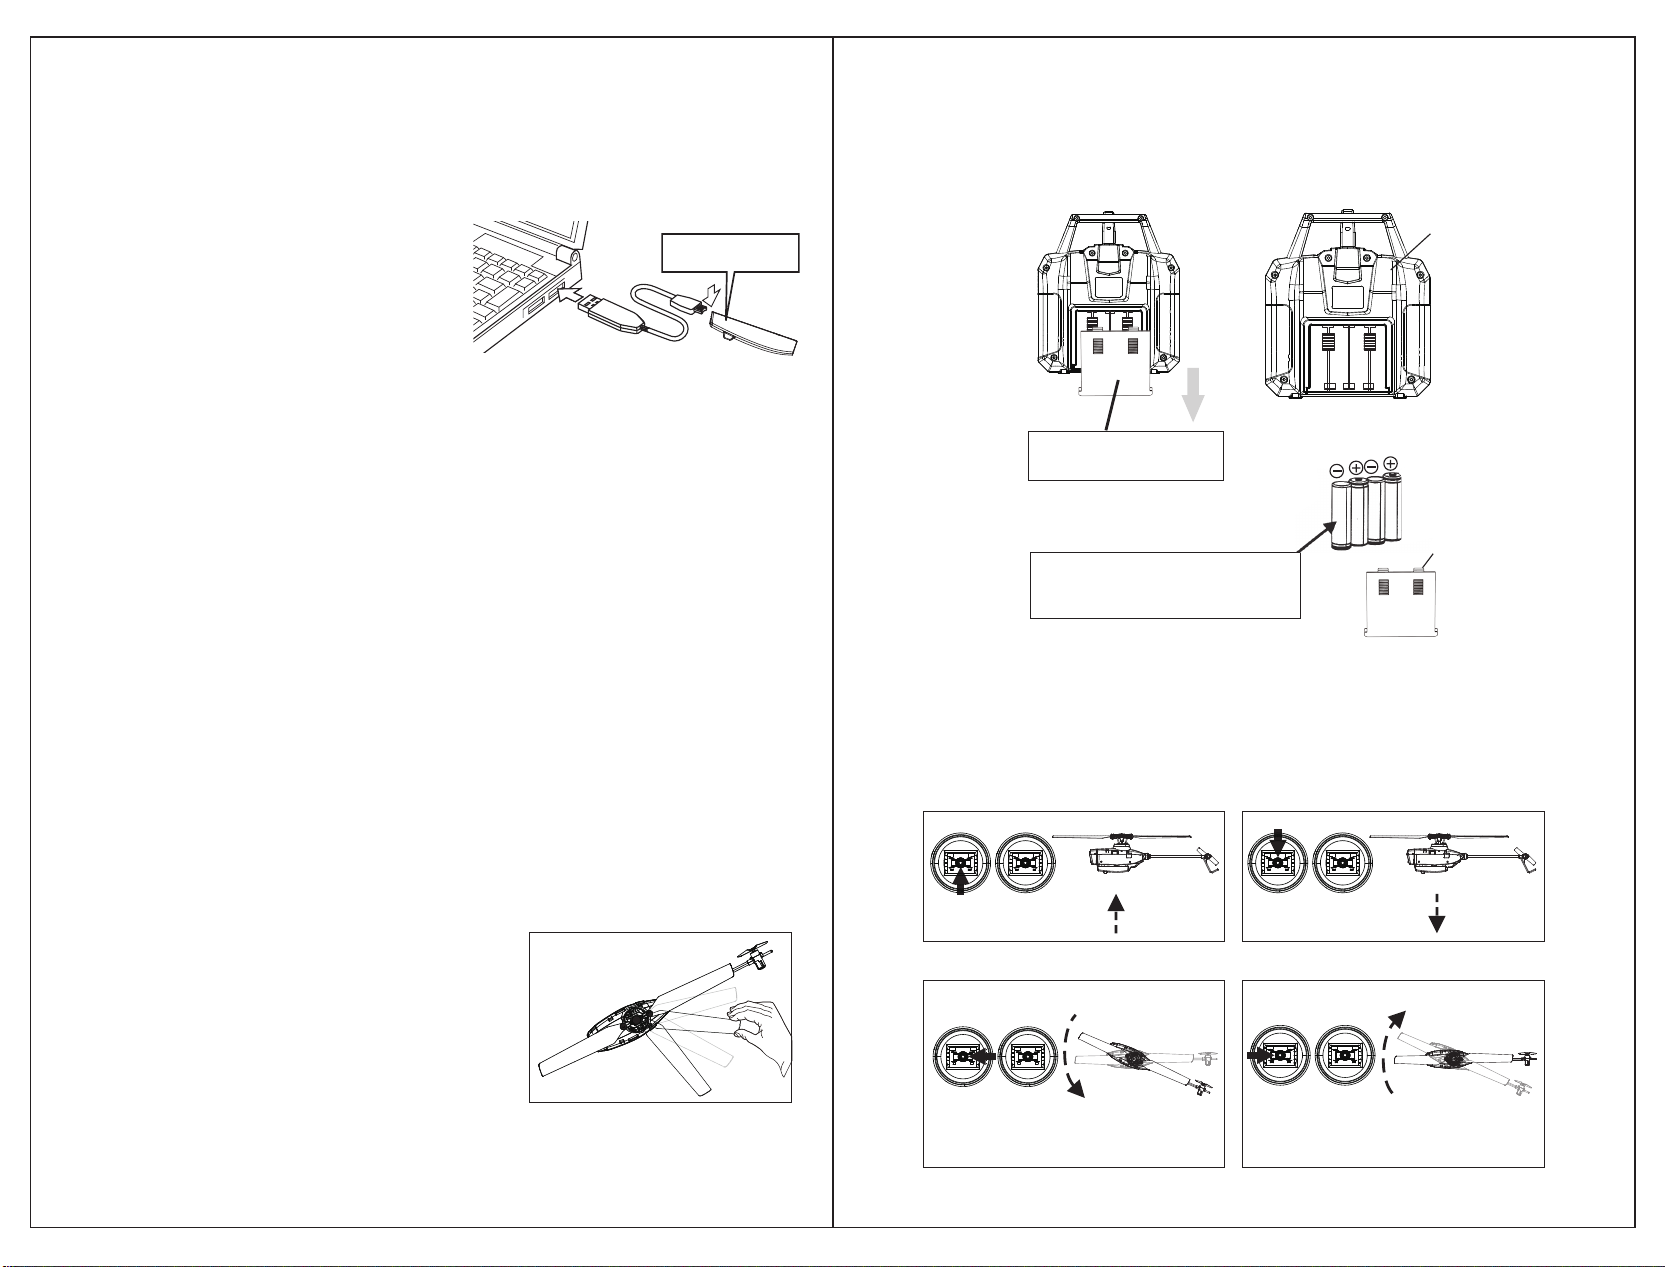
Note: Using the original factory USB charger can ensure charging safety. Suggest you use
the original factory USB charger part, other chargers may cause battery damage and property
damage.
Warning And The Guide Of Using Battery

249 mm
268 mm
80 mm
Remote Control USB chargerLipo battery
Phillips screwdriver+hex wrench Instruction manual
Helicopter
Propeller / tail rotor
37 mm
Helicopter Parameters
88 mm
720P
75G
580 mAh
About 15 min
249 mm
37 mm
268 mm
About 60 min
Pixel
Length
Height
Weight
Propeller length
Tail rotor blade diameter
Battery specification
Filght time
Charge Time
Packaging list
Power Indicator
Up, Down, Left,
Right Rotation
Power switch
Forward,backward,
left, right side fly
Fine-tuning Fine-tuning
Fine-tuning
(Press this button, meanwhile
turn on the TX power, to change
Mode 1 / Mode 2)
One key take off
One key landing
Speed
Introduction of transmitter function
PARTS
LED
Propeller Rotor Clip Swashplate Center Shaft
Battery Box
Canopy Tail Rod Tail Rotor
Cross plate
Camera
Optical flow localization

Blue light ladder flashes while
charging
Fully charged, four lights on
Charging method 2:Charging battery by power supply adapter.
Charging method 3:Charging battery by power bank
1. Connect the USB charger with power supply adapter.
2. Connect the battery with USB charger: Blue light ladder flashes while charging Fully charged,
four lights on
Description:
1. Connect the USB charger with USB port.
2. Connect the battery with USB charger: Blue light ladder flashes while charging Fully charged,
four lights on
1. Connect the USB charger with power bank .
2. Connect the battery with USB charger: Blue light ladder flashes while charging Fully charged,
four lights on
Charging method 1
Charging battery by the USB port on a computer.
1.ensure suffcient power supply of the transmitter and helicopter.
2.Keep a flight in a suitable space which away from the traffic,
people, electricity pylons and pool.
3.Do not lock the main rotor screws too tightly to keep folding
smoothly. If the main rotor screws are too tight, the helicopter
will shake when flying.
4.Under emergency situation, you can press "sharp stop" button
for 3" to land the helicopter without rotating.
(Note: this acticon may cause helicopter crash.)
Batteries Charging Method
First Flight Preparation CAUTION
Throttle
Throttle up
Rudder left Rudder rightNose yaws lett Nose yaws right
Throttle down Decendclimb
If you're not familiar with the controls, take a few minutes to familiarize yourself with them
and then try your first flight.
Direction of operation
Installation method of remote controller battery
Transmitter
Push
Slide the battery lid to open
by following the arrow.
Please use 4AA sized batteries,installed
based on polarity indicated case. Do not
mix batteries of different chemistry/spec.
Battery lid
Rudder

Corresponding to step 1 Corresponding to step 3 Corresponding to step 4
Flight Operation Steps
1.Turn on the transmitter and let helicopter stay near to transmitter.
2.Install the aircraft battery in the battery compartment safely and securely. Press the power switch
for 2 seconds to turn on the aircraft power.
3.The lights of the helicopter and the remote control flash at the same time. Then push the throttle
stick from top to bottom quickly. The remote control makes a 'DI' sound, and the indicator lights of
the helicopter and remote control are always on, which means binding successful.
4.Pull the two joysticks to outer eight angles to start the helicopter. (You can also press the one-key
takeoff button to take off the helicopter directly.)
5.Keep the helicopter head forward, and keep safe distance with the helicopter.
6.When manually operating the aircraft to land, please keep the throttle stick at the bottom
for 2-3 seconds, and then release it after the propeller has completely stopped rotating.
(This operation is not required when using the one-key landing function)
Note:1.In order to avoid hitting, do not look at the helicopter at hip level when it fly.
2.In order to avoid distractions, please confirm without other transmitters at work around.
Elevator
Aileron
Elevator up forward Elevator down backward
Aileron left Left Aileron right Right
Note:Beginner should pay attention to the direction of flight. Keep the head forward to
avoid causing injury.
Forward flight
Corresponding to step 2
Keep a safe distance of more than 2 meters
Forward/
backward Yaw
Side fly Yaw
Fine-tune according
to the direction
of the arrow
Fine-tune according
to the direction
of the arrow
Flight Yaw correction method
The helicopter has set up hovering. If you are dissatisfied with hovering or the helicopter have
a yaw, please follow there steps to adjust.
Take off with the throttle joystick. According the direction of yaw, press the fine-tuning button
in the opposite direction until the plane hovering.
Press the triming button when helicopter has yaw problems.
Left/right Yaw
Fine-tune according
to the direction
of the arrow

Use Hexagon wrench to remove the propeller, so that the propeller rotation smoothly,
pay attention to a with A, B with B, to ensure that the two propeller balance, installation
of the new propeller should not be too tight
When changing the steering gear, pay attention to the direction of connecting Rod.
When changing other internal parts, pay attention to the installation order and position
When removing and replacing the tail rotor, please
pay attention to the direction, align the motor shaft
and press it slowly to ensure smooth rotation.
Parts replacement instructions
When replacing the tail rod, first disassemble the housing,
then remove the tail motor plug,
Pull out backwards and pay attention to the direction of installation
After installing the tail Rod,
fix the machine shell screw
When fixing the screw, please
note that the direction of the tail
skid should be vertical and not
deflected
Introduction of the corresponding socket of receiver
Gyro calibration method
1. When flying yaw, first land and calibrate the gyroscope.
2. When calibrating the gyroscope, the aircraft must be
placed on a level ground.
3. The indicator light will flash quickly during the calibration process,
the indicator light stops flashing to take off.
LED
LED
Optical flow localization
The tail motor
Main motor
Before and after the steering gear
Aileron steering gear right
Aileron steering gear left
Gyroscope
Warning
Maintain a flying altitude above one meter
Trimming Notes

Turn on the helicopter power
switch, taillight continuously
flashing, no response to
operation.
After turning on the chopper
power switch, the chopper
Nothing happened.
Push the throttle but the motor
not at work, the receiver’s
signal light keep flashing
Turn on the helicopter after
bind, the main blade can rotate
but the helicopter can not take
off
The helicopter is violently
shaking
Main rotor deformed
cross shaft bent
tail rotor bent
Blade clamp screws are too
tight to cause the main blade
can not rotate
Change the rotor head,;
Change the cross shaft;
Change tail rotor;
Loose the blade clamp screw.
Helicopter battery low voltage,
tail propeller Loose or stuck.
Charge the battery or change a
full charge battery;
Press the main shaft and gear
tightly
Helicopter’s battery has a low
voltage;
The lipo battery has a poor
connecting.
Charge the battery or change
a full charge battery;
Connect the battery with
receiver again.
Check the power supply of
helicopter and transmitter;
Check the battery’s voltage of
the helicopter and transmitter;
Batteries had a poor
connecting.
Check the installation site of
Transmitter’s batteries;
Use full voltage batteries;
Install the batteries again;
Confirm the batteries have a
good connecting.
The helicopter without bind
with the transmitter. Bind the transmitter again
Abnormal Problem Solving Method
Helicopter spinning to left after
take off.
The helicopter has a little yaw:
The helicopter has a serious
yaw.
Check the servo if work properly;
Check the swash plate;
Check the rod sticks if loosing.
made a operational error of the
trimming button
Steering gear damage
Cross disc fracture
Connecting rod fall off
1.According to its yaw direction,
push the trimming button in the
opposite direction;
2.Reset the hovering point.
7
8
Tail motor has a poor power;
The blades loose;
Tail motor was broken.
Check the connection of tail
blade and motor shaft. if loose,
change tail blade or tail motor.
Problem Possible Cause Solution
Table of contents
Other Eachine Toy manuals