Power and volume
Press and hold the button for 3 seconds to power on/off.
M32 Mark 3 MilPro is a new model of headset that can protect hearing
and improve situational awareness and communication in noisy
environments. With more advanced functions and levels, it can be
adapted to different scenarios for environmental listening. In addition,
a replaceable bracket is designed to be installed on the helmet rail for
the convenience of users.
M32 MARK 3 MILPRO TACTICAL
COMMUNICATION & HEARING
PROTECTION HEADSET
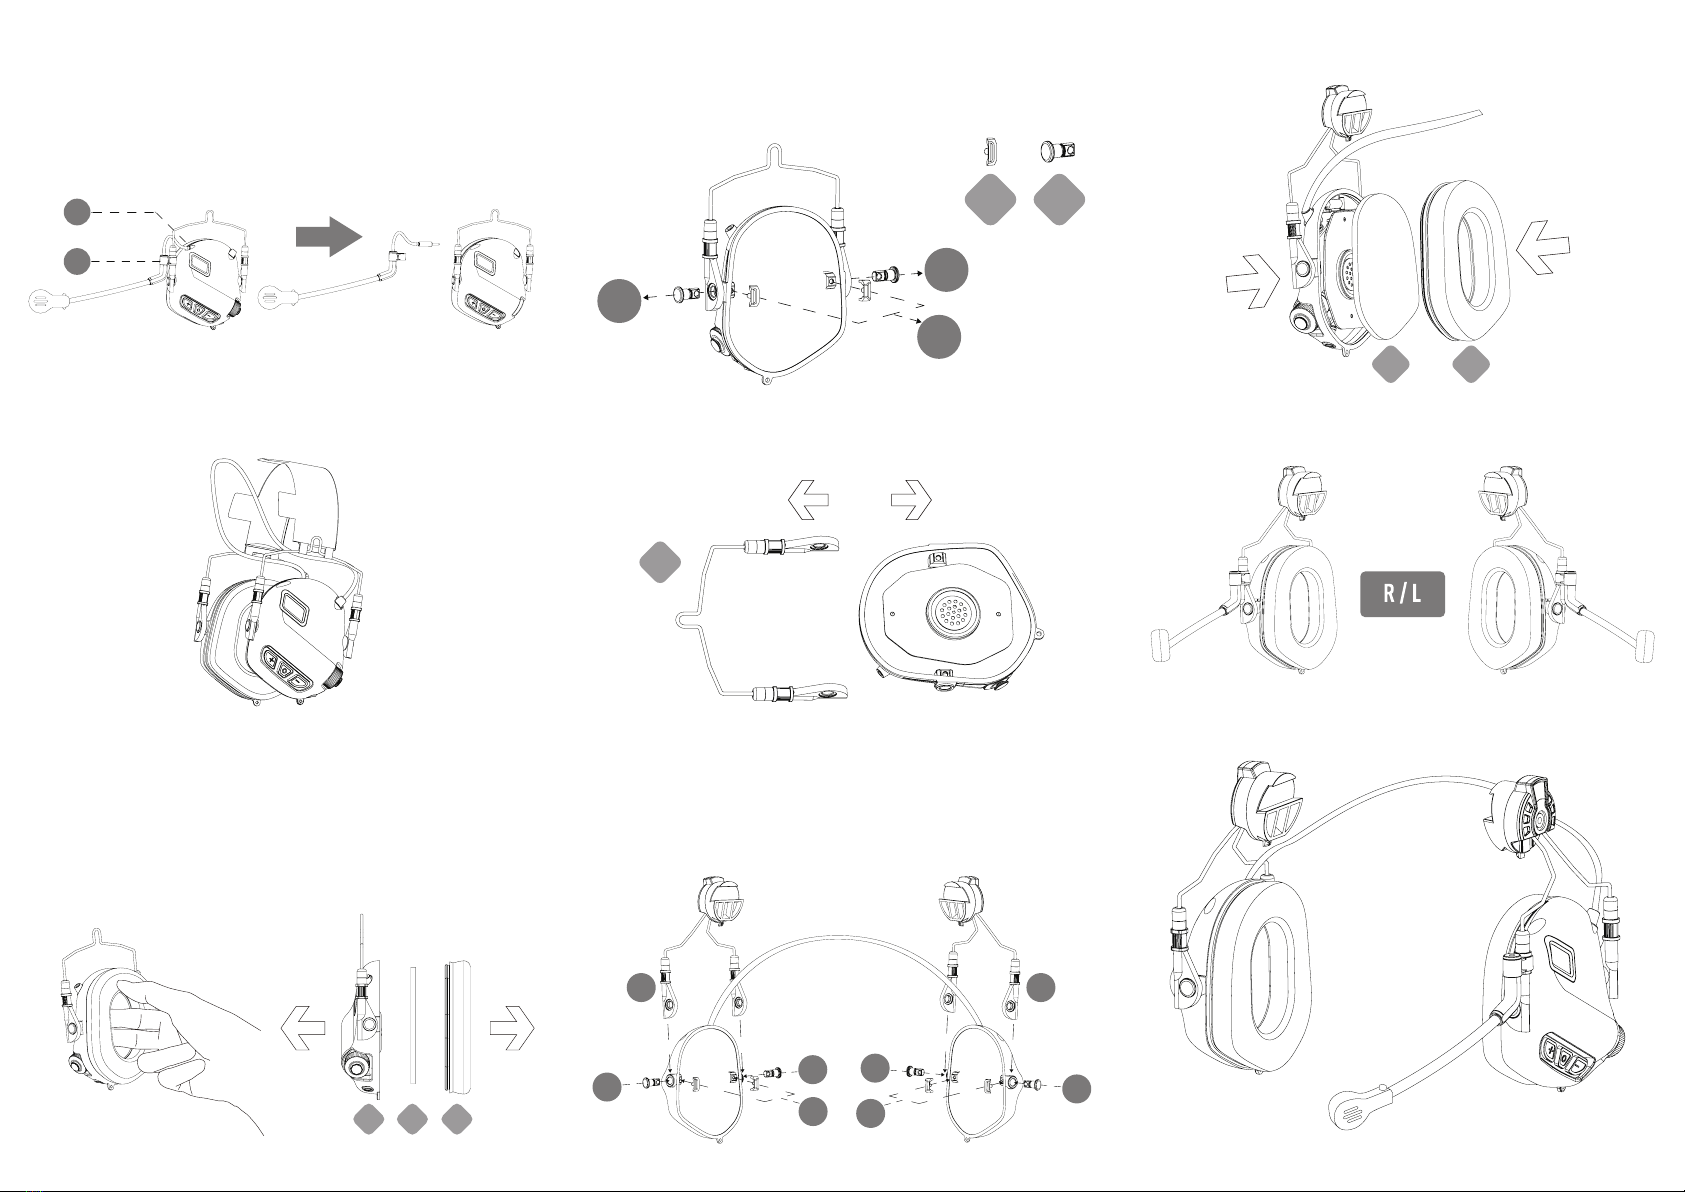
Installing Batteries
Twist open the cover
counterclockwise to insert the
battery and turn clockwise to
close the battery cover.
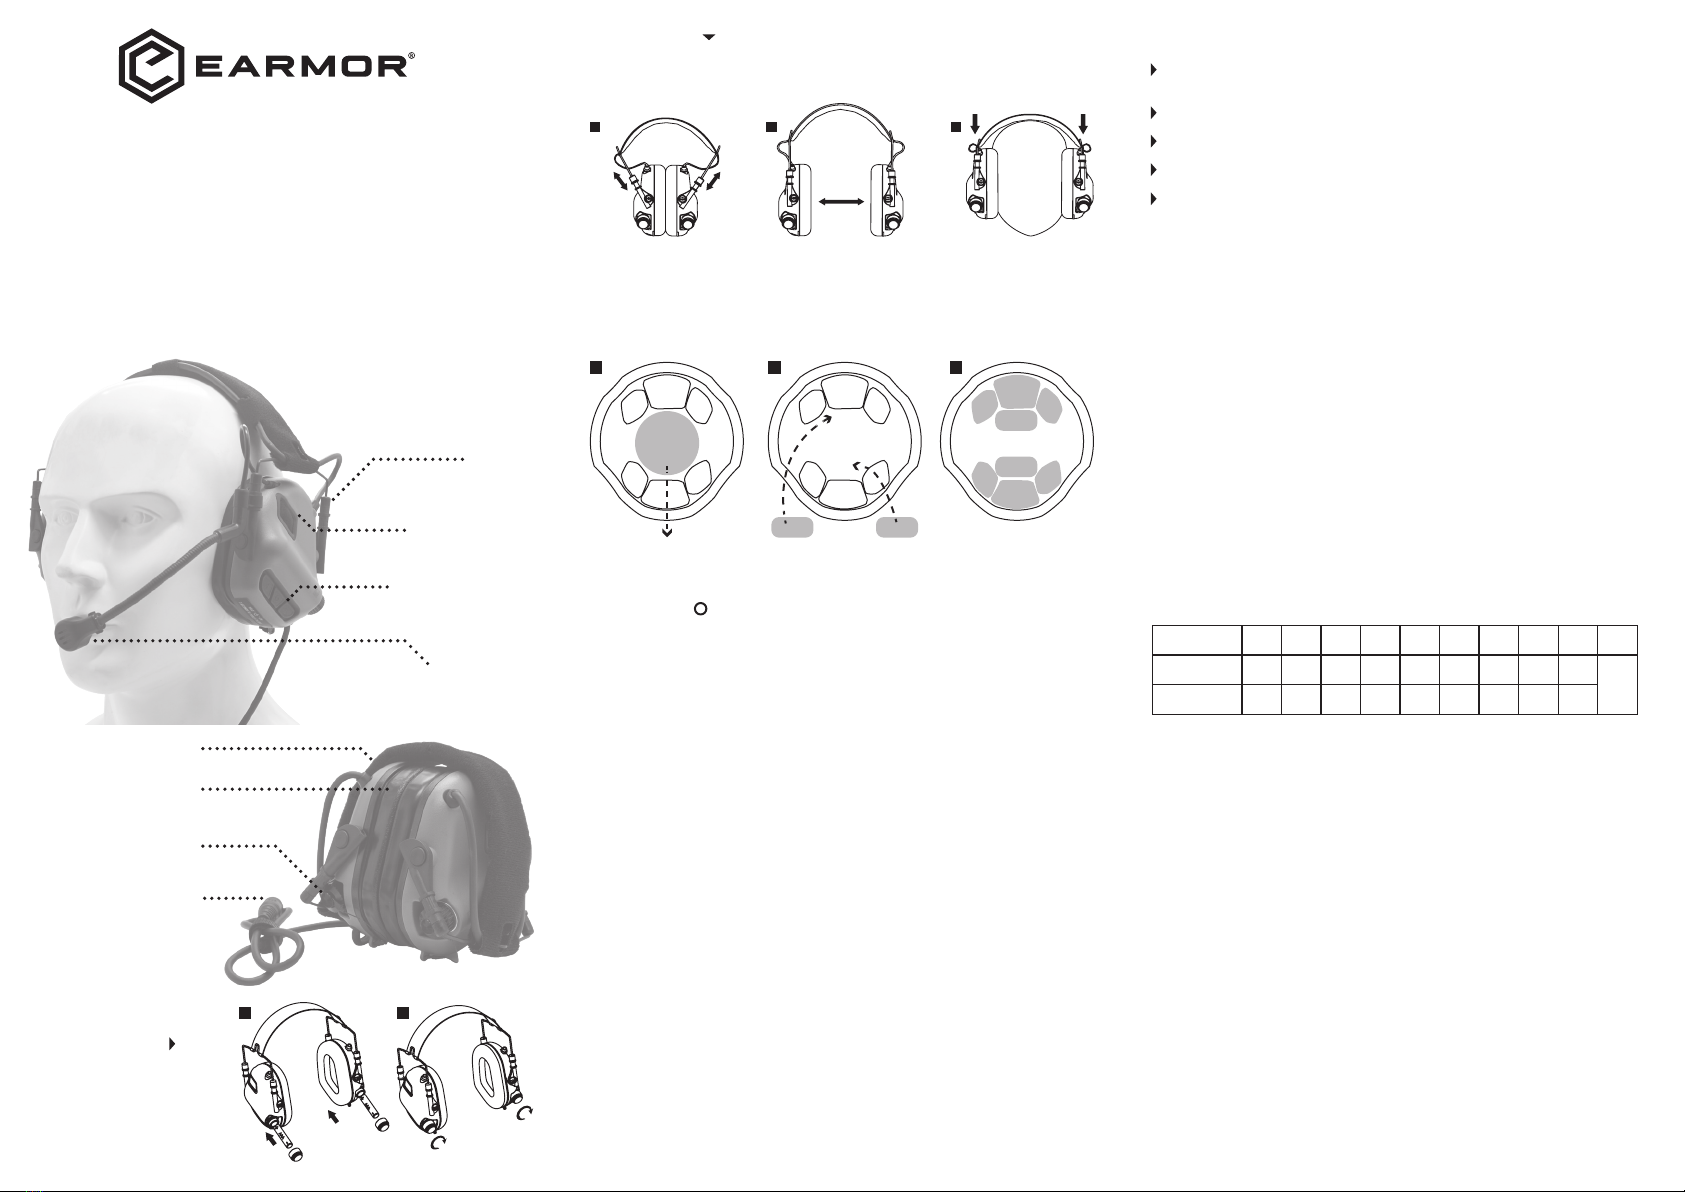
Fitting Headset
fully extend sliders and place cups over ears so that microphones are facing
forward.then tighten headband using sliders.
INSTRUCTIONS 1
1 2 3
2
Detachable microphone
Detachable external communications boom microphone for both left or right handed
assembly.
Press ”+” ”-”button to switch different mode:
1. Quiet Mode - In a high-noise environment, it can automatically shield outside sounds and
use radio to communicate
2. suitable for in-car or indoor noisy environment, long release time to prevent echo damage
3. Conversation - restore the real environmental sound, completely simulate the normal
hearing of human
4. Patrol mode-amplify the ambient sound appropriately to more clearly perceive the
surrounding environmental sound
5. Observing mode - maximum amplification of the surrounding environment sound to
enhance hearing acuity and make it easier to hear subtle sounds
Adjust Helmet Padding for Proper Fit
1. Remove dome pad from top of helmet.
2. Replace dome pad with two oblong pads creating a channel for the headband.
3. Complete.
Auto shut-off
After 4 hours of non-activity, the hearing protector will automatically powers down with 3
times beep. Simply press ON/OFF button again to turn it back on when necessary.
Clear voice tracking
Clear voice tracking seeks voice in background/environmental noise and reduces the noise to
improve speech intelligibility.
Increased RF immunity for EMI environments
EMI (Electromagnetic Interference) and RFI (Radio Frequency Interference) Filter can
suppress interference generated by the device or other equipment, making headset
M32 MARK3 able to suppress the electromagnetic interference signals presented in the
environment.
Super fast attack time
The super fast attack time is less than 1 ms, which can instantly suppress the ambient sound
and protect the user's hearing from damage.
IMPORTANT USER INFORMATION
For the best protection, ear cushion sealing ring should seal firmly against head, Anything
that interferes with the seal - such as long hair(pull back to the extent possible), thick or
poorly fitting eyeglass temples, pencils or caps - will lessen the protection.
Earmuffs must be regularly inspected for cracks or worm parts, it may affect the acoustic
performance of the earmuffs. Typical life for foam cushion sealing rings is 12 months.
Clean the exterior of the hearing protector regularly with soap and warm water. Do not
immerse the whole headset in water.
Do not store the hearing protector behind a windshield or at temperatures above 131°F
(55°C).
Certain chemical substances may damage this product. Contact the manufacturer for more
information.
TEST FREQ.(HZ) 125 250 500 1000 2000 3150 4000 6300 8000 NRR
MEAN
ATTENUATION(DB) 17.7 19.1 24.7 29.6 30.1 37.6 40.0 41.7 40.5
22
STANDARD
DEVEATION(DB) 3.1 1.9 2.3 2.3 2.2 3.2 3.4 2.7 3.1
APPROVAL
EARMOR M32 MARK 3 is tested and approved in accordance with ANSI S3.19-1974 Standard
Noise Reduction Rating 22dB(A)
Earmor M32 MARK3 Attenuation data according to American National Standards
Institute Specifications ANSI S3.19-1974(in passive mode, electronics switched off)
WARRANTY
M32 MARK 3 electronic headphone is warranted to be free of defects in material and
workmanship for a period of 1 year from the date of original purchase.
OPSMEN/EARMOR will repair or replace without charge, except for the transportation costs,
parts that fail under normal use and service when operated and maintained in accordance
with our instructions.
The warranty is nullified in all of the following situations:
1. The product(s) is/are broken down, reconstructed and/or modified by unauthorized parties.
2. The product(s) is/are damaged through improper use.
3. The product(s) is/are damaged by leakage of batteries.
CONTACT
For the latest information on OPSMEN/EARMOR products and services,
OPSMEN official website WWW.OPSMEN.COM shall prevail in case of any product data
changes.
OPSMEN TECH CO., LTD.
Add: Room 601, Building A, No.94 Liwan Road, Liwan District,
Guangzhou, Guangdong Province, China
CAUTION
To reduce the risks associated with harmful noise or chemicals:
If instructions are not followed, bodily injury may result or protection may be severely
affected.
When interference increases or the sound level becomes too weak, it is time to change the
batteries.
Do not store the batteries installed. A leaking battery may cause bodily injury or damage to
the hearing protector.
These hearing protectors help reduce exposure to hazardous noise and other loud sounds.
Misuse or failure to wear hearing protectors at all times when you are exposed to noise may
result in hearing loss or injury.
If there is any drainage from your ear or if you have an ear infection, consult with your
physician before wearing hearing protection. Failure to do so may result in hearing loss or
injury.
For proper use, see user instructions or contact EARMOR Technical Service via Email:
Slides
Microphones
Detachable
microphone
for both side
FEATURES
Silicone cushioned
sealing rings
Metal Battery cap
Nexus TP-120 U-174
Connector (NATO STD)
for PTT
Velcro headband
Power ON/OFF &
Volume button
23
1