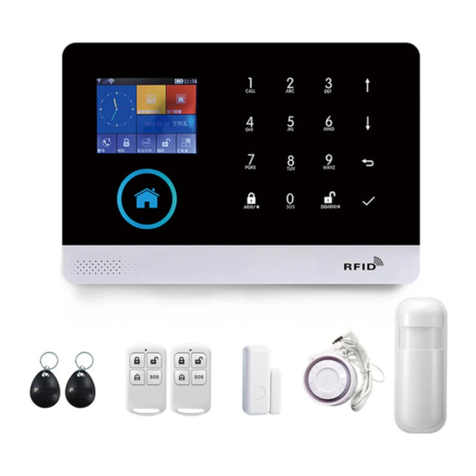
Earykong G4 User manual

Cellular
Home Security System
USER’S GUIDE
2
1
5
46
789
X
3
0
RFID

CONTENTS
1 DO THIS FIRST
1 Things to be Noted Before Getting Started
1 System Requirements
2 IN THE BOX
3 MEET YOUR ALARM SYSTEM
3 How the Alarm System Works
4 Getting to Know Your System
4 Smart Hub
6 Remote Tag
6 RFID Tag
7 Door/Window Sensor
8 PIR Motion Detector
10 PLACEMENT/INSTALLATION
10 Where to Place/Install Smart Hub
10 Where to Place Door/Window Sensor
11 How to Install PIR Motion Detector
12 GETTING STARTED
12 Install the SIM Card
12 Cellular Network Connection
12 Quick view of voice items
13 How to Set Phone Numbers for SMS and Phone Calls
13 Exit/Entry Delay
14 How to Record a Voice Message
14 How to Pair a Remote Tag or RFID Tag
15 How to Pair a Wireless Sensor
15 How to Delete Sensors / Remote Tags / RFID Tags
16 Setting Some Parameters by Instruction Mode
16 How to Pair a Wireless Siren
17 APP
17 Download App
17 USING SMART SECURITY SYSTEM
17 Security Modes
17 How to Arm or Disarm
18 Smart Hub Features
18 RESET TO FACTORY SETTINGS
19 SPECIFICATIONS

1
DO THIS FIRST.
Things to be Noted Before Getting Started
If using 4G SIM card, make sure the 2G network of your wireless service provider is
still available in your country. You should purchase the hub with 4G cellular
communicator if the 2G network is unavailable.
System Requirements
To set up and useAlarm System, you’ll need an unused indoor power outlet, and a
micro SIM card supporting 2G/GSM(for 2G version) or 4G network (for 4G version).

2
IN THE BOX.
Smart Hub (Panel)
Alarm, indicators and
keypad.
RFID Tags x2 (Optional)
Key fob to quickly arm
and disarm your home.
Remote Tag x2
Wireless key to quickly
away-arm, home-arm and
disarm your home, and to
trigger an emergency
alarm.
PIR Motion Detector x1
Senses when someone
walks nearby.
Door/Window Sensor
x1(x2 optional)
Senses when a door or
window is opened.
Power Adapter
For Smart Hub installation
.
Screws x2
Screws x2
Extra Adhesive
Mounting Strips
For door/window installation
PIR Motion
Detector Bracket
For PIR Motion Detector installation
Hub Bracket
Wireless Siren (Optional)
Sounds when the alarm
goes off.
2
1
5
46
789
X
3
0
RFID
Bottom Cover
Extra Adhesive
Mounting Strips

3
MEET YOUR ALARM SYSTEM.
How the Alarm System Works
The hub internal siren
sounds at 85dB on-site
The hub sends text message
and makes call to each
preset phone numbers, lets
you know what’s happening
at home.
The hub receives the
command and enters
“Armed” mode.
Arm the system by the
remote, RFID tag, the
ARM button of hub
touchscreen or the APP.
When an optional
external wireless siren
has been placed there
will be a signal to be sent
to the siren.
When a Door/Window
Sensor detects a
door/window is being
opened, the sensor sends
a signal to the panel letting
the hub know that there
has been an intrusion.
2
1
5
46
789
X
3
0
RFID
2
1
5
46
789
X
3
0
RFID

4
Tamper switch
The tamper switch (lever
underneath the bracket)
will trigger an alarm
notification if an attempt
is made to remove the
hub from its installed
location. And the alarm
sounds.
Getting to Know Your System
All sensors are wirelessly connected to the hub. In the event of alarm activation, for
example, when a sensor is triggered, a text message will be sent automatically and an
alarm call will be made to all registered users.
The system can be controlled and monitored both on-site by the remote control
supplied or remotely from anywhere with our free dedicated mobile application through
SMS.
The system can connect with up to 100 wireless sensors, 10 remote tags and 10 RFID
tags.
Smart Hub
Alarm, display, keypad and the brains of the system
Overview
2
1
5
46
789
X
3
0
RFID
RFID tag reader
Tap RFID tag here to
arm and disarm.
Regular SIM card slot
Plug in the SIM card here.
Power port (Micro USB)
Plug in the power cable here.
Speaker
For voice prompt
and the alarm.
Backup battery ON/OFF
Push to ON to turn on the
built-in backup battery.
Keypad
ARM,ARM STAY,DISARM
and DIAL buttons. Keypad
for entering passcode and
setting.
Cellular network indicator
Indicates the cellular network working status
Status indicator
Indicates the ARM/DISARM/ARM STAY/ALARM status.
Microphone
For monitoring and
two-way talking.

5
Cellular network indicator
Status indicator
What you see
What it means
Dark
No SIM card is inserted or SIM card faulty
Blinking
Searching network
Solid
Registered on cellular network
Blinking very fast
Calling/Recording
What you see
What it means
Solid red
Armed
Solid yellow
Armed stay
Solid green
Disarmed
Blinking red
Alarm
Blinking yellow
Entry delay
Blinking green
Low battery
Alternates between green and red
Setting/Dialling

6
Remote Tag (Wireless Key)
Remote Tag to quickly away-arm, stay-arm and disarm your home, and to trigger an
emergency alarm.
RFID Tag
RFID tag lets you arm or disarm without entering a password.
2
1
5
46
789
X
3
0
RFID
Arm button
Use when no one is at home.
The alarm will sound in armed
mode, when a door or window
is opened, or when motion is
detected.
SOS button
Use in case of
emergency. The alarm
sounds and sends an
alert notification to
registered users .
Disarm button
Use when you don’t
want the security from
the system. The alarm
won’t sound in disarmed
model.
Disarm with a tap
Tap and hold RFID tag on the RFID area of
your panel to arm or disarm when you’re
leaving and coming home.
LED indicator
Stay arm button
Use when you’re at home and
want security. The alarm
sounds when a door or
window is opened.
Key loop
Attach to your key ring.

7
Tamper switch
tamper switch (small black
lever underneath the bracket)
will trigger an alarm notification
If someone tampers the sensor
and removes it from its installed
location.
Door/Window Sensor
Door/window sensors are set to Stay Arm Active mode in default and are ideal for
protecting entry/exit locations, such as front/back doors and all windows. When the
system is armed or home armed and a sensor is triggered (magnet is separated from
the sensor), a push notification including the sensor name will be sent automatically
to the registered users, and the alarm will sound.
LED Indicator
Lights up when door/window is
opened. And blinks in case of
low battery, please replace the
battery soon.
Top view
Inside view
Mounting strips
Attaches sensor and
magnet to a flat surface.
Open-close magnet
Works with sensor to sense
when a door or window
open or close.
Battery receptacle
Contains one
CR2032 3V lithium
battery.
Power on/off
Slide it up to ‘ON’to
power up the sensor.
Setting/Panic Button
Press to send a transmission
signal to the hub for pairing or
alarm.

8
PIR Motion Detector
The motion detector is designed for the usage on interior walls and is set to Out Arm
Active Mode in default. Whenever the sensor detects movement (only while the alarm
is armed), a push notification including the sensor name will automatically be sent to
the registered users, and the alarm will sound .
Battery receptacle
Contains threeAA 1.5V
battery.
Top view
Bottom view
Inside view
LED Indicator
Blinks for 30 seconds after
detector powers on. Lights up
when there’s motion in the
room.And blinks in case of low
battery, please replace the
battery soon.
Bracket
Setting jumpers
Detection window
Power on/off
Slide it up to ON to
power up the detector.
Pairing button
Press it to send a
transmission signal for
pairing with your hub.

9
Setting Jumpers
Setting the Pulse Counter (PULSE2 & PULSE1 jumpers)
The motion detector is equipped with a programmable pulse counter which can be set
to count 1,3 or 5 pulses. Place the pulse count jumpers at the desired setting as shown
below.
Working mode (TEST & NORMAL jumpers)
To save battery power in normal use, if the detector is triggered twice within 3 minutes,
it enters sleeping state immediately. During this period, any movement detected does
not generate an alarm. After no movement within the next 3 minutes, it goes back to
working state again.
For effective walk testing, set jumpers as shown on the right.
When walk testing is done, set jumpers to save power as shown on the
right .
LED jumper
CLOSED enables LED on.
12346
5
P A R T O F IN F R A R E D
S E N S ITIV E B E A M
A R R A Y
C rossing one beam
causes detection
C rossing 3 beam s
causes detection
C rossing 5 beam s
causes detection
FO R F A S T C A T C H
P E R FO R M A N C E
FO R E X C E LLE N T
FA LS E A LA R M
P R O T E C T IO N
FO R M A X IM U M
FA LS E A LA R M
P R O T E C T IO N IN
H O S T ILE
E N V IR O N M E N T
P U LS E 2
P U LS E 1
P U LS E 2
P U LS E 1
P U LS E 2
P U LS E 1
O P E N
C LO S E D
TE S T
N O R M A L
TE S T
N O R M A L

10
PLACEMENT/INSTALLATION TIPS
Where to Place/Install Smart Hub
Where to Place Door/Window Sensor
On a door
On a window
0.6 inches(1.5cm) max
Find a spot with a good cellular signal.
The hub needs a cellular network so it can
send notifications and text message to your
phone.
The magnet should be
aligned with the middle of
sensor and placed within
0.6 inches (1.5cm) of
sensor when the door or
window is closed, as shown
in the image on the left.
It should be close to where you come and go.
So it’s easy to access on your way in and out.
Use an unswitched wall outlet.
Choose an outlet that’s not controlled by
a switch, so you don’t accidentally turn
off the hub. The included bracket helps
keep the hub is plugged in.
On a door
2
1
5
46
789
X
3
0
RFID

11
How to Install PIR Motion Detector
Detection Area
Top view
Mount the bracket with the included
screws as shown above. Then place the
motion detector in the bracket. Specify
the right direction of the detection range
of the motion sensor. Test the operation
of the motion detector by putting it into
testing mode which has been described
at the former page.
Side view
Mounting height
Motion Detector must be
mounted 79 to 87 inches(2 to
2.2m) above the floor.
Side view
Special considerations
Don’t install PIR Motion Detector outdoors, in a garage and on the glass.
PIR Motion Detector can’t detect motion through glass, like if someone’s moving
outside a window.
Don’t install in places where PIR Motion Detector could get wet, like swing-out
windows that could be rained on.
Don’t install PIR Motion Detector within 3 feet (1 meter) of a heat source like an
electric heater, heat vent or fireplace or another source that may produce
turbulent air.
Don’t install PIR Motion Detector behind large appliances or furniture that may
obstruct its motion sensors.
2.2m
G roun d

12
GETTING STARTED
Install the SIM Card
Cellular Network Connection
If the blue cellular indicator turns solid, your hub is connected to a cellular network.
Operation following Voice Prompt by Panel
With system disarming, enter “system password + √”, operate through ◄►▼▲
choosing voice item. “X”for quit. System password default to be “8888”.
Quick view of voice items
What you hear
What it is used for
Set Phone Number
Set Phone Number
Setting phone number and mode,
Deleting phone number
DeleteAll
Delete all phone numbers
Exit Delay
Adjusting exit delay
Entry Delay
Adjusting entry delay
Voice Message
Record
Recording voice message and playback
Play
Listening to the recorded message
Delete
Deleting the recorded message
Pairing
Wireless Sensor
Pairing a wireless senor, setting a
number and mode for it.
Remote Tag
Pairing a remote tag and setting a
number for it.
RFID Tag
Pairing a RFID tag and setting a number
for it.
Deleting Device
Deleting a sensor/remote tag/RFID tag
specified by number.
Deleting all sensor/remote tag/RFID tag
Instruction Mode
Setting some parameters by instruction
code.
NOTE: If the indicator is always dark or blinking, the hub has not been connected
to a network. Make sure the SIM card has been put in the hub when it was off
and the security code of the SIM card is permanently deactivated.
Important: A regular SIM card is required
in order to use cellular services when
connecting to GSM/4G networks. The
availability of cellular capabilities
depends on the wireless network.

13
How to Set Phone Numbers for SMS and Phone Calls
Up to 5 stored Phone Numbers will receive text messages (SMS) and phone calls in
case of triggered alarms. Each number could be set independently to one of three
alarm modes: ①SMS notification only, ②call only, ③both SMS notification and call.
Setting Steps
Enter System Password + √”
Choose “Set Phone Number”+ √
Input Phone Number + √
Choose the mode + √
Phone Number Mode:
①Delete the specified phone number ②SMS (SMS notification only) ③Alarm call
(call only) ④SMS, Alarm call (both SMS notification and call)
The hub will make phone calls to the stored phone numbers successively (up to 2
rounds in turn). If the phone call is answered and any Keypad Command has been
operated by one of these users, it will stop calling the next phone number; otherwise it
will continue to remind users until it is up to 2 rounds.
When the stored phone calls the hub, two-way talk is connected automatically.
Keypad Commands
How to
Delete All Phone Numbers
Enter System Password + √”
Choose “Set Phone Number”+ √
Choose “Delete All”+ √
Enter √
Exit / Entry Delay
Entry Delay and Exit Delay are countdowns that allow you to enter and leave your
home easily without causing the alarm to sound.
Exit Delay
Exit Delay allows you to leave your home once you’ve armed the security system.
When you place the system intoAway Arm Mode, it makes a countdown tick to let you
know that it is preparing to arm. Once the Exit Delay period ends, The system is
armed.Give yourself enough time to exit your home before the countdown ends. You
can adjust the countdown timing from 0(No Exit Delay) to 255 seconds. The default
WHICH BUTTON YOU
PRESS ON PHONE
WHAT HAPPENS
1
Arm
2
Disarm or silence when the alarming is sounding
3 or 4
Two-way talk

14
Exit Delay is 40 seconds.
How to change the Exit Delay
Enter System Password + √”
Choose “Exit Delay”+ √
Input Exit Delay value + √
Entry Delay
Entry Delay allows you to enter your home and disarm your system while the system is
in AwayArm Mode. When you enter your home while the system is in Away Arm Mode,
your hub makes a countdown tick to let you know that you have a short time until your
alarm goes off. When you hear this, you should disarm your system as soon as
possible. You can adjust the countdown timing from 0(No Entry Delay) to 255 seconds.
The default Entry Delay is 30 seconds.
How to change the Entry Delay
Enter System Password + √”
Choose “Entry Delay”+ √
Input Entry Delay value + √
How to Record a Voice Message
Your system can Record/Play/Delete a brief voice message (up to 20 seconds) that
can be played back later. The voice message will be played to the remote when a
alarm call is connected.
Enter System Password + √”
Choose “Voice Message”+ √
Choose “Record”+ √
Speak a brief voice message (up to 20 seconds) into the hub + √
The hub plays back the message automatically
Enter √to save the voice message.
Choose “Voice Message”and “Play”to playback the voice message recorded.
Choose “Voice Message”and “Delete”to delete the voice message recorded.
How to Pair a Remote Tag or RFID Tag
Enter System Password + √”
Choose “Pairing”+ √
Choose “Remote Tag”or “RFID Tag”+ √
Do below before the 20 seconds countdown tick ends:
Press any button of remote tag for paring a Remote Tag.
Tap the RFID Tag on the panel for paring a RFID Tag.
Input a number from 0 to 9 to specify a number for this Remote/RFID Tag + √.

15
How to Pair a Wireless Sensor
Enter System Password + √”
Choose “Pairing”+ √
Choose “Wireless Sensor”+ √
Press the setting button of wireless sensor to send a transmission signal to your hub
before the 20 seconds countdown tick ends as shown below.
Input a number from 0 to 99 to specify a number for this sensor + √.
Choose the defence mode + √.
Defence mode:
①NORMAL: Sensors set to Normal Zone are activated inArm (full arm) or STAY
Mode (partial arm). We recommend setting door/window sensor to Normal Zone.
②HOME: Sensors set to Home Zone are only activated inArm (full arm). If StayArm
Mode (partial arm) is used, these sensors are not armed and will not activate the alarm
if triggered. We recommend setting PIR Motion Detectors to Home Zone.
③24 HOUR: Sensors set to 24-Hour Zone will activate the alarm when triggered,
regardless of the alarm status (Armed or Disarmed).
④DELAY: If sensors set to Delay Zone are triggered, the Hub will sound the alarm
after the delay time passed. We recommend setting door sensors with a delay if they
are used as primary entryways.
⑤DOORBELL: As a doorbell, alarm with “Ding-Dong”when triggered.
How to Delete Sensors / Remote Tags / RFID Tags
Deleting All
Enter System Password + √”
Choose “Deleting Device”+ √
Choose “Wireless Sensor”, “Remote Tag”or “RFID Tag”+ √
Choose “Delete All”+ √
Enter √to confirm deleting
Deleting One
Enter System Password + √”
Choose “Deleting Device”+ √
Choose “Wireless Sensor”, “Remote Tag”or “RFID Tag”+ √
Choose “Delete”+ √
Input the number that you want to delete it + √
Enter √to confirm deleting
Door/Window Sensor
PIR Motion Detector

16
Setting some parameters by Instruction Mode
You can input instruction and setting code to set some parameters in Instruction Mode.
1.Enter System Password + √”
2.Choose “Instruction Mode”+ √
3.Input Instruction Code + √
4.Input Setting Code and √to set a parameter you specified by Instruction Mode.
5.Go to Step 3 to set the next parameter.
This table shows the available instructions.
e.g., how to change your User Passcode to “4321”
Enter “8888”+ √
Choose “Instruction Mode”+ √
Input “38”+ √
Input the new User Passcode “4321”and enter √to finish setting.
How to Pair a Wireless Siren
Press and hold the SET button of the siren until you hear two
beeps, then the siren goes into the paring mode and the light
ring blinks quickly.
Press the tamper switch of your hub to trigger an alarm and
send a transmission signal to the siren be paired with.
The siren gives a long beep of successful indication.
If you want to unbind the wireless siren with the hub, press and hold the SET button of
the siren until you hear three beeps.
Instruction
What it is used for
Setting
Default
31
Turning the external siren beep on
or off when armed or disarmed.
Turned on @1, off @0
1(on)
32
Changing the alarm sounding
duration.
0~255 in minute
3 minutes
38
Changing User Passcode
0000~9999 in 4 digits
1234
39
Changing System Passcode
0000~9999 in 4 digits
8888
46
Turning Arm/Disarm text
notification on or off
Turned on @1, off @0
1(on)
80
Turning Door Open text notification
on or off if you leave a door or
window and arm.
Turned on @1, off @0
1(on)
81
Turning Sensor Low Battery text
notification on or off .
Turned on @1, off @0
1(on)

17
APP
Download App
Scan the QR codes via a smart phone to download and install the application.
You can arm, stay arm, disarm your system by sending text messages using the APP.
You can also name your accessories, set Phone Number, Change Exit/Entry Delay or
Enable/Disable some features by APP.
USING SMART SECURITY SYSTEM.
Security Modes
Your security system can be set to one of three security modes:Away, Home/Stay, and
Disarmed.
How to Arm and Disarm
You can arm and disarm your home in three ways:
Entering your passcode on the panel to disarm or tap Arm/Stay Arm icons to away
arm and stay arm, tapping RFID Tag on the panel, or using the app.
When you hear the hub’s chime alert, the screen will also show you a countdown so
you know how much time you have before the alarm sounds.
2
5
46
789
X
3
0
RFID
RFID tag
Tap the tag on the panel to: .
Disarm in case of arm
mode.
Arm in case of disarm
mode.
Away Mode
All sensors in your home
are monitored. This is
useful when you’re going
out and want to be notified
if anything happens
to your home.
Home Mode
All NORMAL and DELAY
(exterior and perimeter )
sensors are monitored, but
interior sensors are not
monitored. This is useful if
you’re at home but want to be
alerted if anyone tries to break
in through a door or window.
Disarmed Mode
No sensors but 24 HOUR
sensors in your home are
monitored. This is useful
when you’re at home and
want the freedom to go in
and out easily.

18
Smart Hub Features
Battery backup
If the building has lost electrical power, Smart Hub includes a backup battery that will
last for more than 6 hours. So even if the power is out, Smart Hub can still detect when
an intruder is in your home and sound the alarm.
If the backup battery is very low,the status indicator will flash green, and for up to 30
minutes before the hub works well. And Low Battery notifications will be sent to the
registered phone number.
The battery is fully charged in 8 to 12 hours.
Loss/Restoration of AC power
If the event of ACpower loss or restoration, the hub will send you an alert notification to
let you know that.
Tamper detection
If someone tampers with Smart Hub and removes it from the back plate, the hub will
send you an alert notification to let you know that.
RESET TO FACTORY SETTINGS
Press the Tamper Switch of the panel 5 times to reset Smart Hub to factory settings.
Note: All the paired accessories will be deleted when reset is done.
2
1
5
46
789
X
3
0
RFID
Press to home arm.
Press to disarm.
Press to trigger an emergency
alarm.
Tap to home arm.
Tap to disarm.
Tap to trigger an emergency
alarm.
Tap to home arm.
To disarm, enter your user passcode,
then tap .
Table of contents
Other Earykong Security System manuals