manuals.online logo
Brands
  1. Home
  2. •
  3. Brands
  4. •
  5. Eaton
  6. •
  7. Industrial Equipment
  8. •
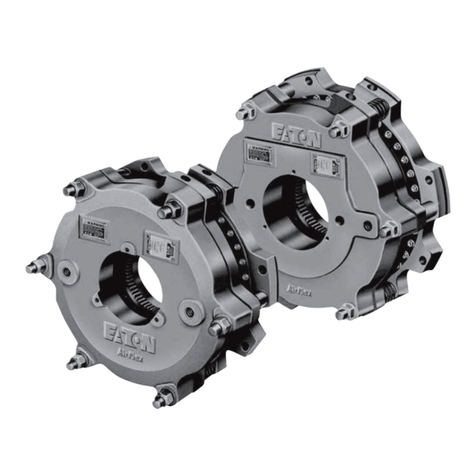
  9. Eaton GH505 Owner's manual

Eaton GH505 Owner's manual

MADE IN U.S.A PAGE 1
PUBLICATION NO. 17228
0210
DESCRIPTION OF OPERATION
On this brake, the magnet coil is a separately enclosed unit mounted between an inner and outer armature. When the coil is
properly energized, the armatures are attracted to each other until their outer poles seal. The action of the armatures moves the
shoes away from the wheel. The inner armature moves the inner shoe and the outer armature moves the outer shoe. When the
coil is de-energized, the compression spring forces the armatures apart and presses the shoes againstthe wheel.
PROCEDURE FOR INSTALLATION AND OPERATION
(Refer To Dimension Drawing For Mounting Dimensions)
1. Assemble brake wheel “B” on motor shaft
2. Back off lock nut “U” and pull rod nut “P” about
one inch.
3. Back off lock nut “T”. Turn screw “C” clockwise to
lift the wedge at the top of the inner shoe lever “L”.
4. Slide the brake into place around the brake wheel
“B” and start bolts into the base mounting surface.
5. Loosen the holding screws “K” on both shoe
levers leaving only a light grip.
6. Push the shoe levers “N” and “L” against the
brake wheel “B” and check to insure shoes fit
evenly across the wheel face.
7. Bump the base into the best position to get the
most favorable fit of the shoes against the wheel
“B”. C/L of the wheel must be aligned with the
punch mark of base to obtain proper horizontal
positioning of the brake, and with C/L of shoe
pivot sockets to obtain the proper vertical
positioning of the brake.
8. If the mounting surface is not flat or is not parallel
to the shaft axis, shimming may be necessary.
Tighten the holding bolts to hold the base firmly in
place.
INSTRUCTION SHEET
For Type GH505 23” DC Magnetic Shoe Brake
MADE IN U.S.A PAGE 2
PUBLICATION NO. 17228
9. Be sure there is some spring pressure tending to
separate the two armatures “D” and “F”. This can
be tested by turning nut “G” clockwise. If nut “G”
cannot be turned, the gland inside is tight against
the stop on the screw and a maximum spring
pressure is applied.
10. Turn the screw “C” on the top of the inner shoe
lever counter-clockwise to move the wedge
downward until the inner armature “D” sounding
pin “E” is flush when pressed. Tighten locknut “T”.
Readjust after wheel has reached normal
operating temperature to allow for thermal
expansion of the brake wheel. Re-inspect and
adjust if necessary after several operations.
11. Tighten the pull rod nut “P” until the outer armature
“F” sounding pin “E” is flush when pressed. Tighten
locknut “U”. Readjust after wheel has reached
normal operating temperature to allow for thermal
expansion of the brake wheel. Re-inspect and
adjust if necessary after several operations.
12. Full torque is obtained by turning the torque
adjuster “G” until the gland inside is snug against
the stop. Less than full torque is obtained by
turning the torque adjuster “G” counter-clockwise.
Check the nameplate on the brake and the table in
paragraph 14 for maximum torque setting for the
duty rating of the brake.
13. With the brake set, tighten screws “K” on the shoes.
14. Note that when the brake is correctly adjusted for proper
stroke, the torque adjuster washer face stands clear of the
armature “F” surface. As the lining wears this clearance
decreases. If the adjustment is neglected, the brake
operation can become sluggish and when the torque
adjuster washer touches the armature, the torque drops
rapidly reaching zero when the flexure of the lever is used
up. The clearance dimension is not a measurable value
but is determined by proper adjustment of individual
brakes.
TORQUE ADJUSTMENT
Size
Of
Brake
Coil
Winding Duty Rated
Torque
Turn
“G”
Clock
wise
To
Solid
Back Off
Turns If
“G” From
Solid
Shunt Int. 4000 X0
Shunt Int. 3000 X1-5/6
Series ½ Hour 4000 X0
23”
Series 1 Hour 2600 X2-3/6
Minimum Torque 1000 X3-4/6
PROCEDURE FOR INSTALLATION AND OPERATION –(Continued)
MADE IN U.S.A PAGE 3
PUBLICATION NO. 17228
RENEWAL PARTS
(Refer to Fig. 2, Page 2)
Item
No. Description Of Part No.
Req.
Part No. Item
No.Description Of Part No.
Req. Part No.
1
Locknut 1½-6 …………………….
1
15-673 18 Angle Bracket ……………………... 279-15572-5
2Spring ……………………………… 169-1987 19 5/8-11 X 1.25 Hex Head Bolt .........
5/8 Helical Washer ........................ 4
411-3558
916-1363Z
3Spring Pin .3125 X 2.25” Long ..... 113-3186-13 20 Stop Block ..................................... 219-972-6
4Pull Rod (includes items 2 & 3) ..... 161-1008 21*
Stop Plate ......................................
.093 thickness ...............................
.102 thickness ...............................
.105 thickness ...............................
219-3220-9
19-3220-11
19-3220-12
5Locknut ……………………….……. 1915-1682Z 22 Gasket ........................................... 232-467-11
6Wedge Adj Screw Assembly……...
(includes item 5).………………….. 154-11507-423 Inner Shoe Lever (includes item 7) 124-3304-8
7Adjusting Wedge …………….……. 154-2764 24 Base (includes items 22, 26, 27,
28, 29) ……………………………… 117-8047
8Inner Armature …………………….
Sounding Pin ……………………...
Sounding Pin Bushing …………….
1
1
1
48-636-4
13-3485-3
29-2762-3
25 Brake Wheel (give complete
nameplate data) …………………… 1…………..
9Pin ……….…….............................. 113-1181-16 26 Screw 5/8-11 X .625” Long ........... 411-2051-2
10 Outer Armature ……………………
Sounding Pin ……………………...
Sounding Pin Bushing …………….
1
1
1
48-636-12
13-3485-3
29-2762-327 Lock Bracket ………………………. 479-4180-28
11 Rubber Guard …………………….. 173-1017-628 Retainer ......................................... 455-1548
12 Spring Pin .3125 X 1.75” Long 113-3186-12 29 Gasket ……………………………… 232-467-6
13 Torque Adjusting Screw ………….
(includes items 12 & 14) …………. 111-4625-630 Outer Shoe Lever …………………. 124-3305-4
14 Gland ………………………………. 149-2201-231 Shoe Lining (for riveted shoe only
Groov-Pin (rivet) …………………... 2
80 48-1818-6
13-4762
15 Torque Spring …………………….. 169-1692 32 Clamp ……………………………… 455-1039
16 Coil (Give No. On Coil) …………... 1………… 33 Self-Locking Bolt 5/8-11 X 2.75” … 411-3046-4
17 Self-Locking Screw 5/8”-11 X 1.25 411-4642 34 Shoe (w/ riveted lining) …………… 248-633-4
Angle Brkt Bushing (not shown) 429-5535-435 Spherical Washer .......................... 116-1598-5
36 Hex Jam Nut 1-1/2-6 ……………… 1915-2382Z
* Choose the plate thickness which gives the minimum gap between armature item 10, the stop block item 20, and the base item 24.
RENEWAL OF BRAKE SHOE LININGS
(Linings Fastened with Groov-Pins)
1. After removing the old lining and groov-pins,
clamp the new lining so it lies closely in the shoe.
2. Drill through the lining from the rear of the shoe
with no. 13 (.185) drill.
3. Counter-bore 9/16” to dimensions shown in the
sketch to the right. Bottom of counter-bore to be
135°included angle. (number of holes required
per table below)
BRAKE LININGS FASTENED WITH GROOV-PIN
Groov-Pin
Brake Size No. Req’d
Per Shoe Part No. Hole In Lining Hole in Shoe Counter-BoreLining
23” 48 13-4762 # 13 (.185”) drill 3/16” Ream and 20°Cts’k to
.210-.220 Diameter 9/16” Diameter Depth
Per Above Sketch
PROCEDURE FOR REMOVAL OF A SHOE
(Refer to Fig. 1 page 1)
1. Back off locknut “U” and nut “P” on the pull rod
“A”. or loosen locknut “T” and turn screw “C”
clockwise to lift the wedge to relieve the pressure
between the chosen shoe and wheel.
2. Remove screws “K” from the shoe being
removed.
3. Slide the shoe out sideways
4. Re-assemble new shoe into groove in shoe
lever. Do not tighten screws at this time.
5. Press the shoe against the wheel and tighten
screws “K”.
6. Readjust brake.
MADE IN U.S.A PAGE 4
PUBLICATION NO. 17228
PROCEDURE FOR REMOVAL OF A SHOE LEVER
(Refer to Fig. 1, Page 1)
1. If removal of the outer shoe lever “N” is
required, loosen locknut “U” and back off nut
“P” until the pull rod “A” may be lifted up
around the pivot in the outer armature “F”.
2. Refer to shoe retainer “M”. Both sides of the
shoe lever are equipped with a lock bracket,
screw, and retainer plate. Bend back tab of
the lock bracket. Remove screw and retainer
plate. When re-installing and after tightening
the screw, bend the tab of the lock bracket
against the flat of the screw.
3. With the retaining plate removed, slide the
outer shoe lever “N” to either side of the
brake.
4. To remove the inner shoe lever “L”, loosen
locknut “T” and turn screw “C” clockwise until
the pressure of the shoe against the wheel is
relieved. Refer to shoe retainer “M”. Both
sides of the shoe lever are equipped with a
lock bracket, screw, and retainer plate. Bend
back tab of the lock bracket. Remove screw
and retainer plate. When re-installing and
after tightening the screw, bend the tab of the
lock bracket against the flat of the screw.
5. With the retaining plate removed, slide the
outer shoe lever “L” to either side of the
brake.
REPLACEMENT OF A COIL
(Refer to Fig. 1, Page 1)
1. Turn torque adjuster “G” counter clockwise
until the torque spring is loose.
2. Disconnect thee pull rod end from the outer
armature “F”.
3. Remove screws “H” from base.
4. Lift the outer armature “F” out of the pocket
in the base and pull outward.
5. Remove the screws “J” used to attached the
coil to the base pedestal and slide coil from
basepedestal.
6. Set the new coil on the pedestal and install
mounting screws “J”. Do not tighten at this
time.
7. Set the armature “F” back into position. The
spring gland of the torque adjuster must be
centered in the hole of the inner armature
”D”. Assemble angle bracket and screws “H”
and “R” with screws hand tight only.
8. Attach pull rod “A” to armature “F”.
9. Pull armatures “F” and “D” together
magnetically or by using a clamp. Tighten
screws “H” and the base such that a
clearance of 0.25 ±0.015 will be maintained
between the armature “F” and bracket “S”.
The clearance should be uniform. Remove
clamp (if used).
10. Adjust the torque spring and shoe positions
as described in the installation instructions.
PROCEDURE FOR RE-ADJUSTMENT FOR LINING WEAR
(Refer to Fig. 1, Page 1)
Periodic checks should be made on the
installation and when the sounding pins depress
more than 1/64” below surface, adjustments
should be made to compensate for normal lining
wear. This check and the adjustments should be
made when the wheel is at normal operating
temperature to allow for thermal expansion of the
wheel. Re-inspect after several operations.
1. Loosen the locknut “U” and tighten nut
“P” on the outer end of pull rod “A” until
the sounding pin in the outer armature
is flush with the surface when it is
pressed.
2. Loosen locknut “T”. Turn screw “C”
counter-clockwise to move the wedge
downward until the inner armature
sounding pin is flush when it is pressed
inward.
3. Tighten locknuts “U” and “T”.
It is recommended the brake shoe linings be
replaced when the lining thickness at the
center of the shoe has decreased to .125”
for riveted construction and .062 for bonded
construction. Use genuine OEM lining
material only to insure brake maintains
rated torque.
(See paragraph 14, Page2)

Other Eaton Industrial Equipment manuals

Eaton Current-Limiting Reactor User manual

Eaton

Eaton Current-Limiting Reactor User manual

Eaton SL7-CB-D-M12A4 Manual

Eaton

Eaton SL7-CB-D-M12A4 Manual

Eaton AT-S PLus ESF30 KV Service manual

Eaton

Eaton AT-S PLus ESF30 KV Service manual

Eaton MTL770 Series User manual

Eaton

Eaton MTL770 Series User manual

Eaton NZM4-XKV95-2KB Manual

Eaton

Eaton NZM4-XKV95-2KB Manual

Eaton Power XL SmartWire-DT DX-NET-SWD3 Manual

Eaton

Eaton Power XL SmartWire-DT DX-NET-SWD3 Manual

Eaton MSFB Series Manual

Eaton

Eaton MSFB Series Manual

Eaton CI/E-PKZ01-X Series Manual

Eaton

Eaton CI/E-PKZ01-X Series Manual

Eaton DILM-XS1 Series Manual

Eaton

Eaton DILM-XS1 Series Manual

Eaton HP User manual

Eaton

Eaton HP User manual

Eaton MSFA Series Manual

Eaton

Eaton MSFA Series Manual

Eaton DILM580-SOND699 Manual

Eaton

Eaton DILM580-SOND699 Manual

Eaton Pow-R-Line 3FQS Manual

Eaton

Eaton Pow-R-Line 3FQS Manual

Eaton TE series Supplement

Eaton

Eaton TE series Supplement

Eaton PBHT-F Manual

Eaton

Eaton PBHT-F Manual

Eaton AT4 Manual

Eaton

Eaton AT4 Manual

Eaton Cutler-Hammer S801N User manual

Eaton

Eaton Cutler-Hammer S801N User manual

Eaton NZM1-XBR Manual

Eaton

Eaton NZM1-XBR Manual

Eaton SL4-PIB Series Manual

Eaton

Eaton SL4-PIB Series Manual

Eaton BZM3 - XTVD Manual

Eaton

Eaton BZM3 - XTVD Manual

Eaton RS2 Series Manual

Eaton

Eaton RS2 Series Manual

Eaton PDI WaveStar TFA STS 250-600A User manual

Eaton

Eaton PDI WaveStar TFA STS 250-600A User manual

Eaton EU1E-SWD Series Manual

Eaton

Eaton EU1E-SWD Series Manual

Eaton iCube 2.0 User manual

Eaton

Eaton iCube 2.0 User manual

Popular Industrial Equipment manuals by other brands

Rockwell Automation Allen-Bradley PowerFlex AFE Hardware Service Manual

Rockwell Automation

Rockwell Automation Allen-Bradley PowerFlex AFE Hardware Service Manual

Vahle MKHD Mounting instructions

Vahle

Vahle MKHD Mounting instructions

ABB ACQ580-04 Quick installation guide

ABB

ABB ACQ580-04 Quick installation guide

KAKA Industrial Q01-5216B Operation manual

KAKA Industrial

KAKA Industrial Q01-5216B Operation manual

Palmgren 80421 Operating manual & parts list

Palmgren

Palmgren 80421 Operating manual & parts list

4B Watchdog Super Elite Operation manual supplement

4B

4B Watchdog Super Elite Operation manual supplement

Master MS Seeds Instructions for use and maintenance

Master

Master MS Seeds Instructions for use and maintenance

Cryomech PT415 Installation, Operation and Routine Maintenance Manual

Cryomech

Cryomech PT415 Installation, Operation and Routine Maintenance Manual

Tetra Pak Alfast 200 Series Operation manual

Tetra Pak

Tetra Pak Alfast 200 Series Operation manual

ABB HT594327 Operation manual

ABB

ABB HT594327 Operation manual

MICRO-EPSILON thermoMETER CT CT-SF operating instructions

MICRO-EPSILON

MICRO-EPSILON thermoMETER CT CT-SF operating instructions

KINSHOFER AUGERTORQUE SB Series Operator's manual

KINSHOFER

KINSHOFER AUGERTORQUE SB Series Operator's manual

PMC PHX-2 Service manual

PMC

PMC PHX-2 Service manual

Sigicom INFRA C22 Ex manual

Sigicom

Sigicom INFRA C22 Ex manual

Vestil H Series manual

Vestil

Vestil H Series manual

Rohde SK 66 instruction manual

Rohde

Rohde SK 66 instruction manual

Align PTT6 Operation manual

Align

Align PTT6 Operation manual

AFL Hyperscale SWR 1200 ODF installation guide

AFL Hyperscale

AFL Hyperscale SWR 1200 ODF installation guide

manuals.online logo
manuals.online logoBrands
  • About & Mission
  • Contact us
  • Privacy Policy
  • Terms and Conditions

Copyright 2025 Manuals.Online. All Rights Reserved.