Ecler Nuo 4.0 User manual

USER MANUAL
MANUAL DE INSTRUCCIONES
MANUEL UTILISATEUR
BEDIENUNGSANLEITUNG


3
LIST OF CONTENTS
1.IMPORTANTREMARK 04
2.INTRODUCTION 05
3.INSTALLATION 05
4.QUICKSTART 08
5. OPERATION AND USAGE 10
6. FURTHER CONSIDERATIONS 12
7.FUNCTIONLIST 13
8.FUNCTIONDIAGRAM 13
9. TECHNICAL CHARACTERISTICS 50
10. CONFIGURATION DIAGRAM 51
11.BLOCKDIAGRAM 52
All numbers subject to variation due to production tolerances. ECLER SA reserves the right to make changes or
improvements in manufacturing or design which may affect specifications.

4
1. IMPORTANT REMARK
Safety Instructions
In order to get the optimum operation and efficiency from your mixing unit, it is VERY IMPORTANT - before you
plug anything - to read this manual very carefully and take seriously into account all considerations specified within
it. We strongly recommend that its maintenance be carried out by our Authorised Technical Services.
This apparatus must be earthed through its mains cable.
Do not expose the unit to rain or water splashes, and do not place liquid containers or incandescent
objects like candles on top of the unit.
Any change in the configuration of the unit must be carried out by a qualified technician. Should any
connection / disconnection task be done, always disconnect the unit from the mains supply.
Warranty Descriptions
Your ECLER equipment has undergone exhaustive laboratory and quality control tests before leaving the factory.
Nevertheless, your may be in need of our Technical Service during the period covered by the Guarantee or
afterwards. In that case, carefully protect your equipment in its original packet and send it to our Technical Service
with the transport and insurance paid. Attach a photocopy of your Guarantee Certificate and a detailed description
of the defect you have observed.
ECLER S.A. guarantees the NUO4.0 mixer against material defects and manufacturing faults for the period of one
year, starting from the original purchase date.
ECLER, S.A., will repair the defective equipment within the aforementioned period, with no charge for parts and
labour.
To ensure the validity of the Guarantee, it is essential that the attached Guarantee, Registration Card is filled out
correctly and remitted to your ECLER distributor, within 10 DAYS after date of purchase.
The Guarantee is non-transferable and protects the original buyer only.
The Guarantee does not cover:
Damages caused by mistreatment or negligent handling, lack of elementary precautions, disregard to the
instructions in the manual, faulty connection or accidents.
ECLER, S.A., will not be held responsible for any direct or indirect damage, loss or other damage originated by or
relating to the set.
* sets that have been manipulated, altered or repaired other than at the authorized Technical Service centers.
* the exterior fittings and electro-mechanical parts, nor their wear due to use.
* shipping and insurance expenses, nor for damages the set may incur during its transport.
This Guaranteed is valid only for repairs or services carried out at an authorized Technical Service Center.

5
2. INTRODUCTION
Congratulations for acquiring a genuine, professional ECLER device!
The NUO4.0 is a professional DJ mixer designed and manufactured by ECLER; an enterprise with headquarters in
Barcelona, which works on professional audio equipment since 1965.
The NUO4.0 is a professional audio mixer thought for any kind of DJ, due to its wide range of functions, which
make it a console able to mix any kind of music style: techno, house, minimal, electro, hip hop, …
The NUO4.0 is a mixer thought for scratching techniques, due to the versatility of the adjustments of faders and
crossfaders. The NUO4.0 is furthermore able to wear the ETERNAL crossfader, ECLER’s magnetic crossfader with
5 years guarantee, which has been specially designed for scratching specialists.
This genuine mixer uses the best components available on the market, obtaining the highest possible sound
quality. The over 40 years of experience in the design of professional audio equipment make that the circuits are
extremely efficient and a warm and crystal clear analogue sound is obtained. All circuits are mounted and tested in
our factory site in Barcelona.
Furthermore, the NUO4.0 is a mixer which has been specially designed for all kinds of professional installations,
thanks to its two balanced outputs and its two microphone inputs. Its design and resistance turn it into the ideal
console for professional installations, as well as for mobile applications executed by trendiest DJ’s.
3. INSTALLATION
The main consideration to be taken when looking for the best setup location for the NUO4.0 has to be the
maximum commodity for the user and the easiness for realizing the necessary
connections.
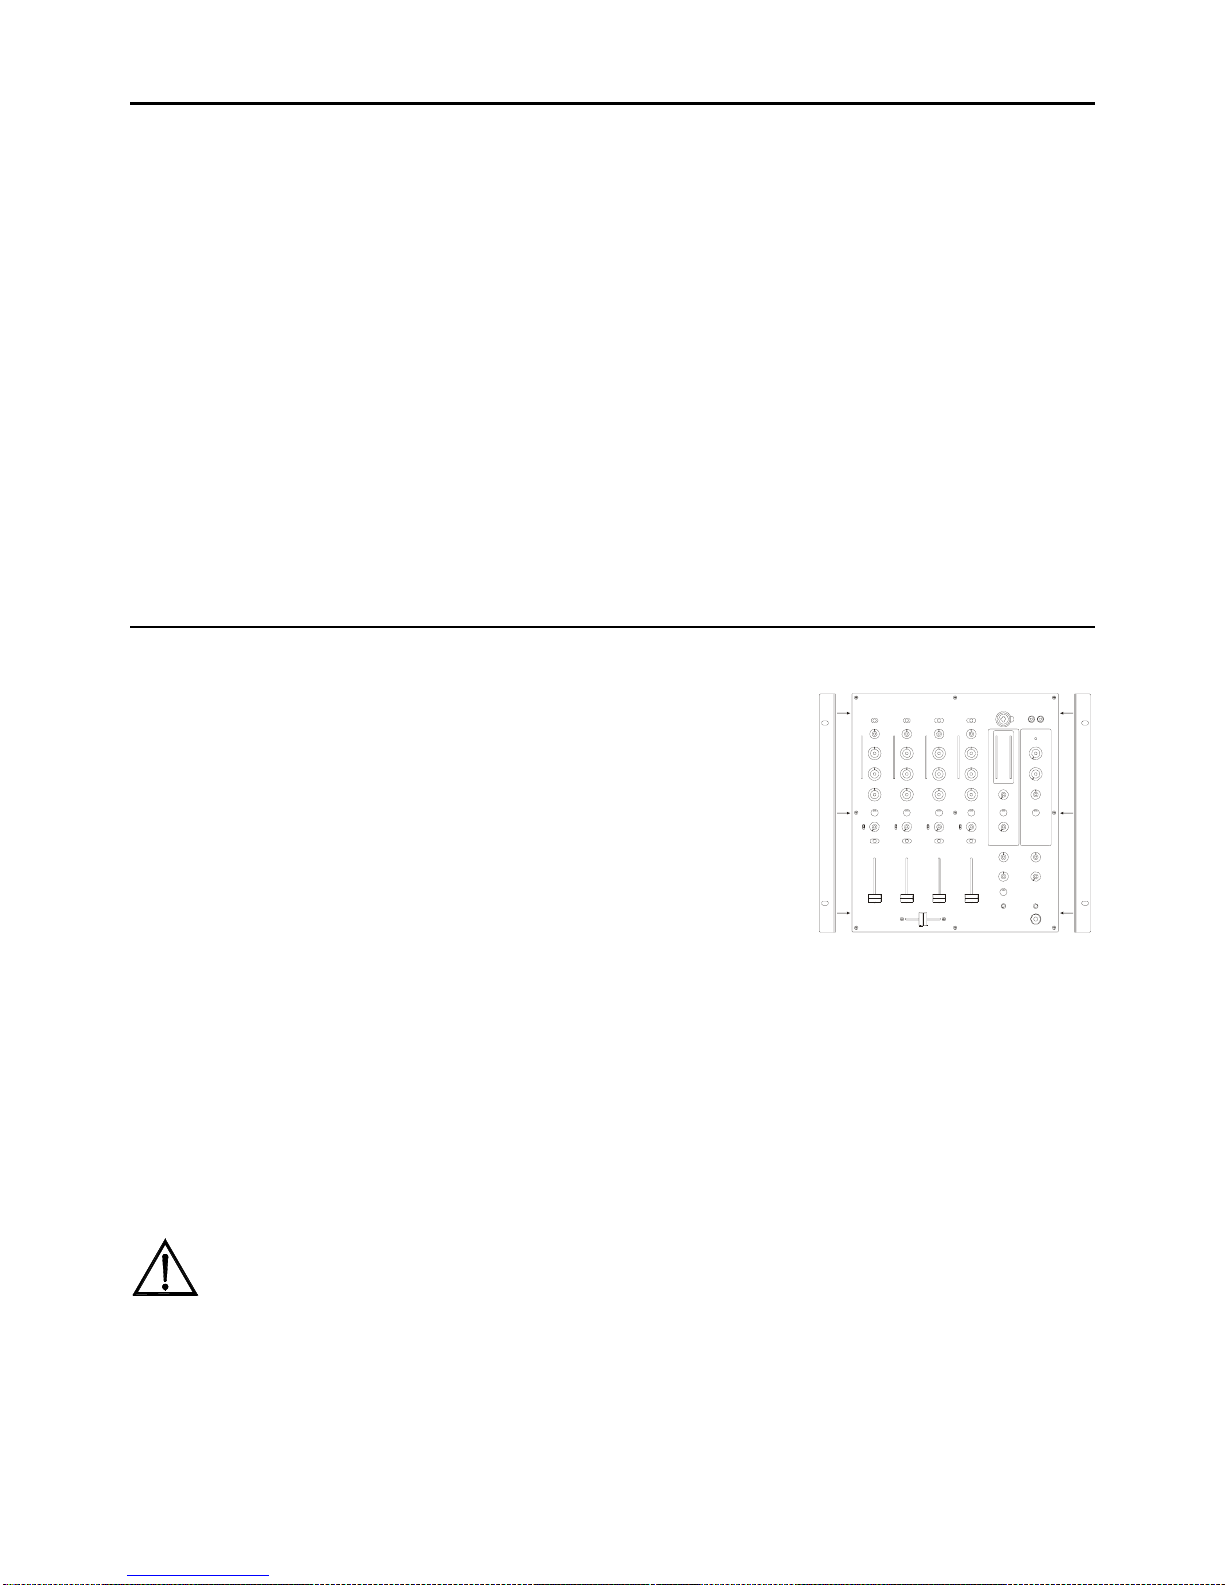
The NUO4.0 has been basically designed as an on desk mixer and its usual
location will be between two turntables or CD players. The mixer is 37 cm
(14.57") deep and 32 cm (12.6") wide.
Using the metallic side panel kit (optionally available) you may fix your NUO4.0
directly on a support surface or on those side panels which also allow you to
skew it. The "NUORAKI" metallic holders allow you to install the mixer in a
standard 19" rack.
Because of the high gain of the PHONO and MICRO inputs, always try to place the mixer as far away as possible
from noise sources (dimmers, engines, etc.) and mains wires. For the very same reason, and under any
circumstance, you should never remove the unit's metallic cover.
The power consumption of the NUO4.0 is very low, so they do not need any cooling, but you should avoid extreme
temperatures and the atmosphere should be as dry and dust free as possible.
The NUO4.0 operates now with a new universal input power supply “Switching Power Supply” and can perfectly
works without any internal modification from 90V to 264V – 47 to 63Hz. Make sure that the mains-wire is far away
from the signal-cables in order to avoid any possible audio hum.
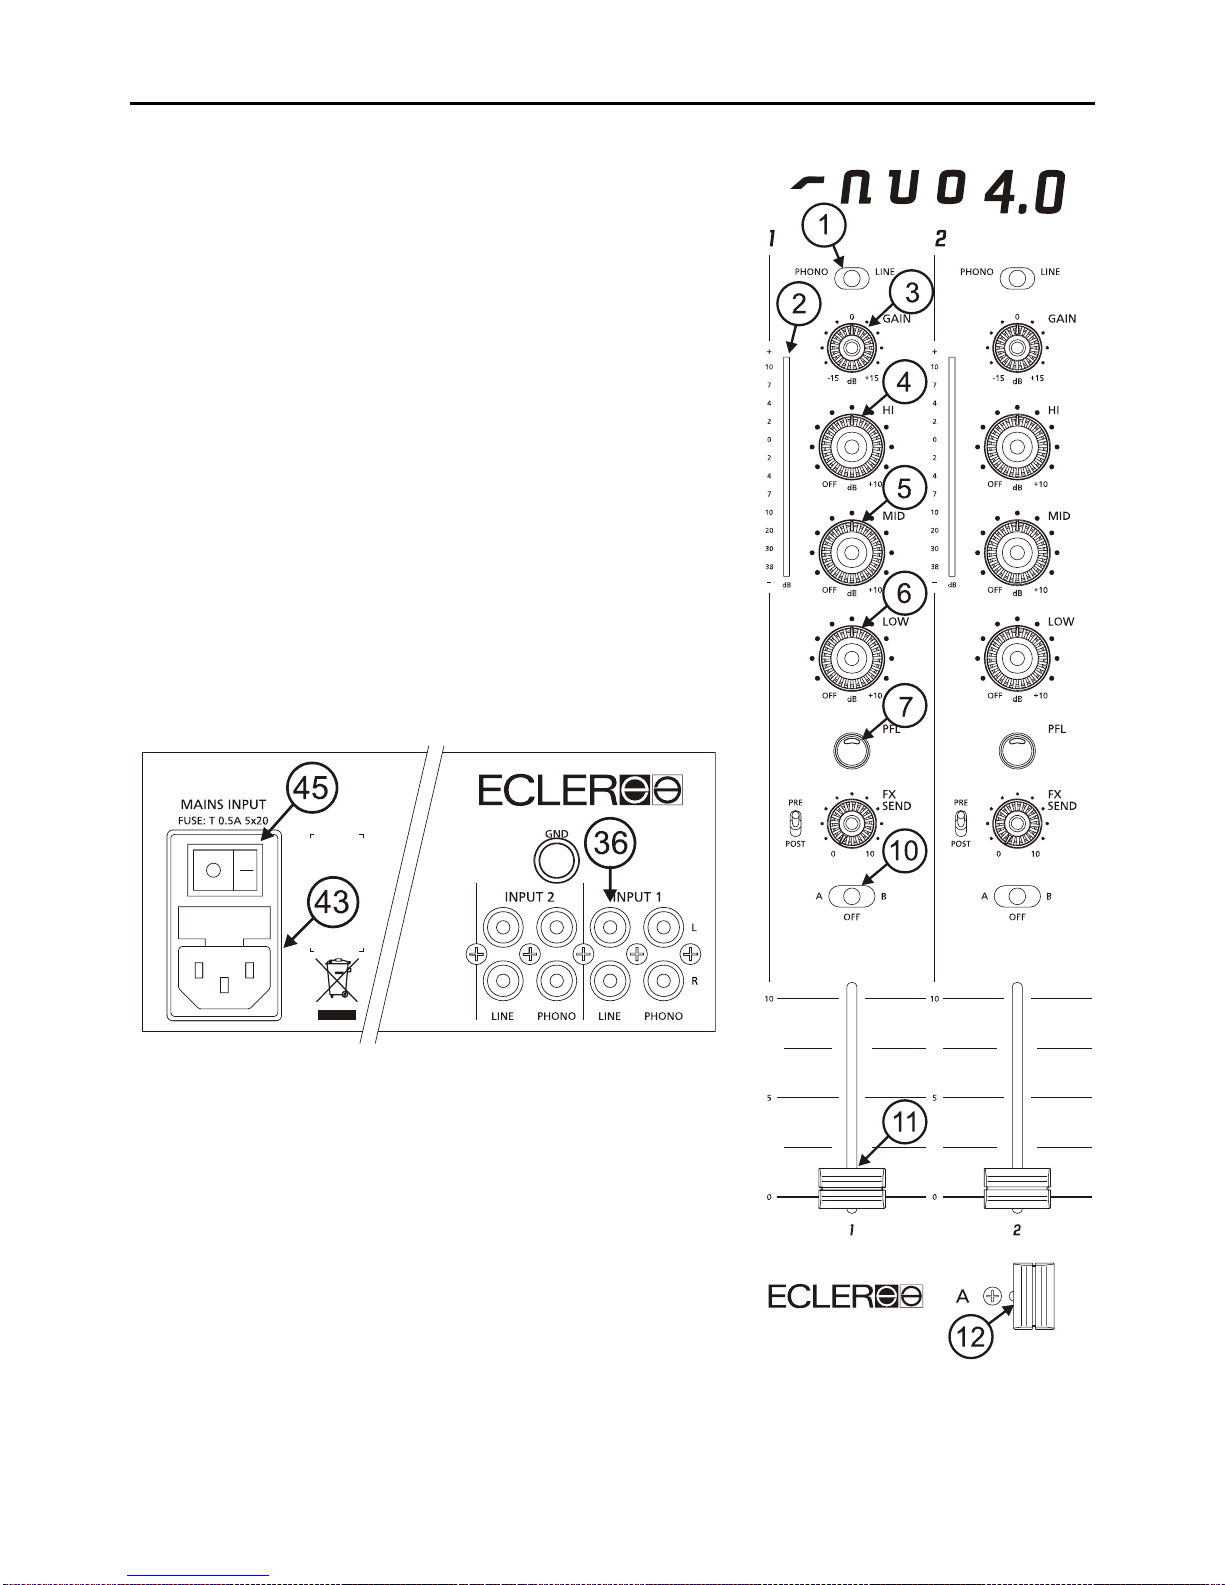
In order to protect the unit from an eventual electrical overload it carries a T 0.5A fuse. Should it ever blow up,
unplug the unit from mains and replace it with an identical one. If the new fuse blows again contact immediately
with our authorized technical service.
ATTENTION: NEVER SHORT-CIRCUIT THE SECURITY PATH NOR USE A HIGHER VALUE FUSE.
CAUTION: Fuse substitutions have to be performed by a qualified technician.

6
Audio input connections
INPUT 1 PHONO Turntable
INPUT 1 LINE CD Deck
INPUT 2 PHONO Turntable
INPUT 2 LINE CD Deck
INPUT 3 PHONO Turntable
INPUT 3 LINE CD Deck
INPUT 3 MICRO Microphone
INPUT 4 PHONO Turntable
INPUT 4 LINE CD Deck
INPUT 4 MICRO Microphone
Phono Inputs
Phono Turntables must be fitted with a magnetic cartridge with nominal output level between -55dBV and -25dBV
(1,77 to 56mV). The PHONO inputs (35) of the NUO4.0 have a high headroom (margin before saturation) and it
can handle higher output cartridges than what is usual. These inputs are supplied with a nominal input sensitivity of
-40dBV(10mV).
Line Inputs
The sensitivity of the inputs marked as LINE (36) is 0dBV (1V). You can connect sound sources such as CD, DAT
or MP3 players, as well as keyboards and other instruments.
Microphone input
The MICRO inputs (13, 37) are adjusted for a nominal input level of -50dBV. The frontal connector (13) is a combo
XLR3/Jack type, while the rear connector (37) is a XLR·type. These microphone inputs allow connections in
balanced mode. The connection has to be done as follows:
Hot or direct signal > Pin 2 Tip
Cold or inverted signal > Pin 3 Ring
Ground > Pin 1 Sleeve
The microphones must have low impedance (from 200 to 600Ω) and must be monophonic. For unbalanced
connections, a short circuit must be done between pin 3 and ground or the center ring. The NUO4.0 wears an 18V
Phantom power for condenser microphones. An internal jumper allows disabling the phantom power. The NUO4.0
MICRO input is delivered ex works with enabled phantom power (see the configuration diagram).

7
Audio outputs connections
MASTER Main power amplifier
BOOTH Booth/Room2 power amplifier
REC Recording
FX Send/Return External effect device (Input and Output)
Headphones Headphones
MASTER output
This stereo output feeds the PA system through balanced XLR3 connectors (38, 39) and an unbalanced RCA
connector (40). The nominal level for MASTER output is set to 0dBV (1V), but can be set to +6dBV using an
internal jumper. The MASTER output level is controlled by the MASTER potentiometer (24).
Near the MASTER controller you will find the L+R switch (27), which adds the left channel and the right channel for
MASTER and BOOTH outputs. This function is especially useful if a failure occurs on one of the channels during a
live session (a typical example could be a bad contact in the turntable’s capsule). Enabling this switch, the mixer
will send the L+R sum to both loudspeakers, so that the major part of the audience will not notice the malfunction.
MASTER and BOOTH have a balance controller BAL (26)
BOOTH output
Normally this is used to obtain an independent output for the DJ booth. This stereo BOOTH output wears a
balanced XLR3 output and an unbalanced RCA output. The nominal level for the BOOTH output is set to 0dBV
(1V), but can be adjusted to +6dBV using an internal jumper. The BOOTH output level is controlled by the BOOTH
potentiometer (25).
Record output
There is a REC output (22) on the control surface, which uses RCA connectors. The nominal output level for the
REC output is 0dBV (1V). This output is taken post-fader, before the MASTER signal.
FX Send/Return effects loop
The RCA connectors on the FX SEND output (41) and the FX RETURN input (42) allow creating a signal loop for
external effects processors, samplers or sequencers. The nominal level for the SEND output, as well as for the
RETURN input, is 0dBV (1V).
The signal sent to the FX SEND output can be taken before or behind the fader using the PRE/POST switch (9)
and the send level can be set using the associated potentiometer (8). The NUO4.0 also wears a general FX SEND
controller (17), which adds the four channels, a general FX RETURN controller (15) and a controller for the FX
RETURN monitoring signal, FX PFL (16).
Headphones
In order to obtain a high performance, these should be of the high impedance type (200-600Ω). These are to be
connected to the headphones output (30) located on the controller surface using a stereophonic, normalized ¼’’
jack connector or a 3.5mm minijack connector. Sleeve is Ground, Ring is Right Channel and Tip is Left Channel.

8
4. QUICK START
Install and connect the NUO4.0 as described in the INSTALLATION paragraph nº1.
We will describe a “Quick Start” procedure using the LINE input of
channel 1 and headphone monitoring output only.
1. Set the controllers to their initial position
Set the rotating controllers GAIN, HI, MID and LOW from channel 1 (3, 4,
5, 6) to their central position. Set the channel’s fader (11) to its lower end
and assign the A/OFF/B switch (10) to position A (the channel is now
assigned to the crossfader’s A side).
2. Connect the headphones
Connect them to the headphones output (30). Set the headphones
LEVEL controller (29) to minimum level and move the SELECT (28)
controller into PFL position.
3. Connect a CD player
Connect a CD player to LINE input on channel 1 (36), insert a CD and
play the CD.
4. Connect the mixer's power cable
Connect the power cable to the mixer’s power supply input (43) and turn it
on using the MAINS INPUT switch (45). Both elements are located on the
mixer’s backside.
5. Select the input source
Make sure that channel 1’s input switch (1) is in LINE position and that
the channel’s VU-meter (2) glows up. If this doesn’t happen, verify that
the CD player is correctly connected and that there is an audio track
being played back.
6. Adjust the input level
Move the GAIN (3) control until the VU-meter shows 0dB.
7. Send the signal to the main output
Move the fader from channel 1 (11) all the way up and set the crossfader
(12) to side A.

9
8. Listen to the signal with your headphones
Press the PFL button (7) on channel 1. Adjust the LEVEL controller (29) to obtain a comfortable monitoring volume.
Now you should hear music with your headphones. Turn the SELECT controller (28) to the right to crossfade the
PFL signal and the MIX signal. When this controller is completely turned to the right, only the MIX signal will be
monitored.
9. Try the operation of the tone controllers
Experiment with this powerful 3-way stereo equaliser (4, 5, 6). This tone control has been designed for a creative
sound edition: each way can be individually isolated using the big and ergonomic rotary controllers.
10. Verify the crossfader settings.
Each channel can be assigned to the crossfader using the A/OFF/B
switch (10). The crossfader allows melting the signals assigned to its
sides. If the switch is in position A or B, the channel is assigned to one
or the other side of the crossfader. The OFF position disables the
crossfader function for this channel.
11. Adjust the crossfader curve
The XFADER SHAPE control (19) allows you to precisely adjust the
skew angle of the crossfader’s curve. Turning the controller completely
to the left, the two songs will be melt softly. The crossfader’s curve
raises when turning the controller to the right. Moving the controller
completely to the right, the signal will enter suddenly with just a short
movement of the crossfader, which is a very suitable feature for
scratching techniques.

10
5. OPERATION AND USAGE
Start-up
This can be done using the switch (45) located at the mixer’s back panel. Now the LED ON (23) indicator will
highlight. Even if the noise produced while enabling the NUO4.0 is as low as possible and gets completely
cancelled if all faders are turned down, it is always recommendable to turn on the devices using the following
sequence:
1. Sound sources.
2. Mixer, equalizers, active filters.
3. Finally, power amplifiers.
Powering off should be done by following the exact reverse sequence in order to avoid any possible damage to the
loudspeakers.
Control Description
Input selector
Each channel features an input toggle switch selector (1).
Channel GAIN
All the NUO4.0 input channels have an accessible input sensitivity GAIN control (3). The GAIN controls adjust the
input level of each channel in order to compensate the different sources connected to the mixer.
The gain adjustments should be done with great care, using as a reference the VU-meter (2) on each channel. The
standard level reference used to mix audio signals is 0dBV.
The gain margin is set to ±15dB, but can be reduced to ±6dBV. This setting is independent for each channel and
can be done using soldering bridges. See the configuration diagram.
Equalization
The tone control system for each channel offers a wide range of modification from -30 to +10dB for low frequencies
(6) and high frequencies (4) and from -25 to +10dB for middle frequencies (5). This wide range of variation, known
as “kill” type, can completely attenuate the selected frequency range and has been specially designed for creative
usage during live sessions.
ATTENTION: Use equalization carefully, by boosting too much the low frequency range, you can induce an
excessive displacement of the speakers membrane.
Monitoring System
The NUO4.0 is equipped with a flexible and easy monitoring system that will allow the performers to finely tune PFL
(Pre-fader listening) and Mix levels of each input through the VU-METER and the HEADPHONES. Each channel
can be monitorized visually and pre-listened pressing the dedicated PFL (7) button.
For HEADPHONES monitoring, the SELECT rotary potentiometer (28) allows you to blend a selected PFL together
with the main MIX Program. The LEVEL rotary potentiometer (29) controls the level of headphones output.
Each channel has a dedicated VU-meter that allows visual monitoring of the PFL signal (2).

11
Sending to external effects units FX Send/Return
The 4 channels from the NUO4.0 are equipped with potentiometers (8) that allow sending the signal to an external
effects unit, sampler, etc. These potentiometers allow to precisely adjusting the signal level sent from each
channel.
The FX SEND output (41) has to be connected to the effects processor’s input and its output to the RETURN input
(42) or any LINE input (36).
This signal send can be configured either PRE or POST fader with the PRE/POST toggle switch (9), so that the
level is affected or not by the channel fader.
The NUO4.0 also wears a general FX SEND controller (17), which adds the four channels, a general FX RETURN
controller (15) and a controller for the FX RETURN monitoring signal, FX PFL (16).
Faders
The NUO4.0 is equipped with the new generation of ECLER 60mm faders (11) which are precise, extremely soft
and their features withstand over 4.000.000 manipulations, thanks to the ECLER VCA system (VCA: Voltage
Controlled Amplifier)
The usage of VCA technology allows the modification of the fader's behavior. On the frontal panel you will find the
FADER SHAPE potentiometer (18), which allows adjusting the fader's curve so that the volume is proportionally
distributed on the fader’s range or that it appears suddenly.
Crossfader
Each channel can be assigned to the crossfader (12) using the A/OFF/B switch (10). The crossfader allows melting
the signals assigned to its sides. If the switch is in position A or B, the channel is assigned to one or the other side
of the crossfader. The OFF position disables the crossfader function for this channel.
The NUO4.0’s crossfader includes a range of controls which allow adjusting its behavior and make it a really
accurate tool. The XFADER SHAPE control (19) allows you to precisely adjust the skew angle of the crossfader’s
curve. Turning the controller completely to the left, the two songs will be melt softly. The crossfader’s curve raises
when turning the controller to the right. Moving the controller completely to the right, the signal will enter suddenly
with just a short movement of the crossfader, which is a very suitable feature for scratching techniques.
The REVERSE switch (20) inverts the crossfader’s direction. Depending on the selected direction, it is possible to
perform “cuts” as well as “transforms” moving the crossfader into the same direction.
The electronically correction for the CUT IN (21) is only effective if the NUO4.0 has been equipped with the optional
ETERNAL crossfader. If it only wears the standard crossfader, the CUT IN potentiometer must remain in the OFF
position. The CUT IN is the existing distance between the physical end of the crossfader and the entering point of
the signal. The position with the shortest CUT IN provides a nearly instantaneous signal cut. To find this position
the fader has to be set to an end and the CUT IN potentiometer must be turned rightwards until a musical signal
can be heard. To enlarge the CUT IN time, turn the potentiometer to the left.
If you want to extend the life time of your crossfader, the NUO4.0 allows the installation of the awarded ETERNAL
crossfader. This inductive crossfader technology is based on a magnetic control system and is completely contact
free. The combination of this technology with an exclusive, mechanical sliding system provides a soft handling and
one of the most precise crossfaders available these days. The inductive ETERNAL crossfader has been specially
designed to execute extreme turntablism techniques, which require an extremely soft and fast movement of the
crossfader.

12
If you wish to install the ETERNAL crossfader, please accomplish the following instructions:
1. Remove the crossfader’s button from the mixer’s surface.
2. Unscrew the mixer’s panel and remove it.
3. Remove the two screws that hold the crossfader.
4. Carefully disconnect the multipin connector.
5. Replace the crossfader with the ETERNAL crossfader.
Make sure the orientation is the one described on the
drawing.
6. Fix it with the two screws.
7. Connect the multipin connector you disconnected before.
8. Mount the panel and fix it with screws.
9. Fit the crossfader’s button.
ATTENTION: Always use original ECLER replacement parts.
WARNING: the replacement of the crossfader has to be done by a qualified technician.
MASTER and BOOTH output levels
The NUO4.0 features two main output level controls MASTER and BOOTH. The MASTER level is controlled by the
MASTER (24) level knob. The BOOTH level is controlled by the BOOTH (25) level knob.
The balance potentiometer BAL (26) and the L+R switch (27) affect both outputs.
6. FURTHER CONSIDERATIONS
Ground loops
Ensure at all times that no signal sources reaching the mixing desk and no devices connected to its output have
their earths interconnected; that is, earth should never reach them via two or more different paths, as this could
lead to humming which could even interfere with sound reproduction quality. In order to avoid earth loops, ensure
that the shielding of cables, if connected to the chassis, are never connected with each other.
Background noise
The use of active circuitry can yield, depending on the configuration, to a significant noise level. The NUO4.0 has
been designed for the minimum possible noise. Anyway, the noise level will always depend on the correct use and
installation of the mixer. It is not the same setting up the FADER at "2" and the MASTER at "10" that the other way
round; FADER at "10" and MASTER at "2". In the first case you get a poor signal to noise ratio that will be fully
amplified by the master while on the second we have a good signal to noise ratio only amplified by "2". As a result,
the background noise is greater in the first case than in the second one.
Audio connections
As a general rule of thumb, make the signal connections as short as possible and use the best connectors and
cable available. Cables and connectors are frequently held cheap, forgetting that a bad connection can result in a
poor sound quality.
Cleaning
The control panel should never be cleaned with solvent or abrasive substances as it could become damaged. To
clean it, use a slightly moist soft cloth, together with a neutral liquid detergent, and then dry it with a clean cloth. It is
advisable to remove all sweat stains after use. Be careful to ensure that water never enters the machine through
any of the openings.
FRONT PANEL
ETERNAL
LONG LIFE
BOTTOM VIEW

13
7. FUNCTION LIST 8. FUNCTION DIAGRAM
1. Input selector
2. LED VU Meter
3. Input sensitivity adjust, GAIN
4. Treble control, HI
5. Midrange control, MID
6. Bass control, LOW
7. Prefader listening control, PFL
8. Fx Send controller, FX SEND
9. Send switch to effect bus, PRE/POST
10. Send to XF switch, A/OFF/B
11. Fader
12. Crossfader control
13. Microphone XLR/JACK combo
connector, MICRO
14. LED VU Meter
15. Fx Return controller, FX RETURN
16. Prefader listening control, FX PFL
17. Fx Send controller, FX SEND
18. Fader Shape adjustment, FADER
SHAPE
19. Crossfader Shape adjuster,
XFADER SHAPE
20. Crossfader reverse function,
REVERSE
21. Crossfader "cut in time" adjustment,
CUT IN
22. Recording output, REC OUT
23. LED indicator, ON
24. Volume control, MASTER
25. Volume control, BOOTH
26. Balance control, BAL
27. Left and Right signal sum, L+R
28. PFL/MIX monitoring crossfader,
SELECT
29. Headphones volume control, LEVEL
30. Stereo jack headphones
31. Ground pin, GND
32. Left channel balanced output,
BOOTH L
33. Right channel balanced output,
BOOTH R
34. RCA output, BOOTH
35. Phono input, PHONO
36. Line input, LINE
37. Micro input, MICRO
38. Left channel balanced output, MASTER L
39. Right channel balanced output, MASTER R
40. RCA output, MASTER
41. External FX send output, FX SEND
42. External FX return input, FX RETURN
43. Mains socket
44. Fuse holder
45. Power switch

14

15
ÍNDICE
1.NOTAIMPORTANTE 16
2.INTRODUCCIÓN 17
3.INSTALACIÓN 17
4.INICIORÁPIDO 20
5.OPERACIÓNYUSO 22
6. OTRAS CONSIDERACIONES 24
7.LISTADEFUNCIONES 25
8. DIAGRAMA DE FUNCIONES 25
9. CARACTERÍSTICAS TÉCNICAS 50
10. DIAGRAMA DE CONFIGURACIÓN 51
11.DIAGRAMADEBLOQUES 52
Todos los datos están sujetos a variación debida a tolerancias de producción. ECLER S.A. se reserva el derecho de
realizar cambios o mejoras en la fabricación o diseño que pudieran afectar las especificaciones.

16
1. NOTA IMPORTANTE
Instrucciones de seguridad
Para conseguir la máxima funcionalidad del aparato y su máximo rendimiento, es muy importante antes de su
conexión, leer detenidamente y tener muy presentes las consideraciones que en este manual se especifican. Para
garantizar el óptimo funcionamiento de este aparato, recomendamos que su mantenimiento y eventuales
reparaciones sean llevadas a cabo por nuestros Servicios Técnicos autorizados.
Este aparato debe conectarse a tierra a través de su cable de red.
No exponer la unidad a la lluvia o a salpicaduras de agua, no colocar recipientes que contengan líquidos
u objetos incandescentes tales como velas sobre el aparato.
Cualquier cambio en la configuración de la unidad debe ser llevado a cabo por técnicos cualificados. Cualquier
conexión o desconexión de la unidad debe ser realizada, siempre, con la unidad desconectada de la red.
Descripción de la garantía
Su equipo ECLER ha superado ensayos de laboratorio y exhaustivos controles de calidad antes de salir de
fábrica. No obstante podría darse el caso que necesite nuestro Servicio Técnico durante el periodo que cubre la
garantía o posteriormente. En tal caso, proteja cuidadosamente la unidad en su caja original y envíelo a nuestro
Servicio Técnico con los gastos y el seguro pagados. Adjunte una fotocopia del certificado de garantía y una
descripción detallada del defecto observado.
ECLER S.A. garantiza el mezclador NUO4.0 ante defectos de materiales o fabricación durante el periodo de un
año transcurrido tras la fecha de compra original.
ECLER S.A. reparará el equipo defectuoso dentro del periodo especificado, sin cargo alguno para piezas y mano
de obra.
Para asegurar la validez de la garantía es preciso que la Garantía y la Tarjeta de Registro se rellenen
correctamente y se remitan a su distribuidor ECLER, en el plazo de 10 días después de la fecha de compra.
La garantía no es transferible y solamente protege al comprador original.
La garantía no cubre:
Daños ocasionados por malos tratos o manejo negligente, falta de cuidados elementales, desatención de las
instrucciones del manual, conexión equivocada o accidentes.
ECLER S.A., no será responsable por ningún daño directo o indirecto, pérdida o perjuicio originado por o en
relación con el equipo.
* aparatos que hayan sido manipulados, alterados o reparados fuera del Servicio Técnico autorizado.
* el mueble exterior, los componentes electromecánicos ni su desgaste por uso.
* los gastos de envío y seguros, ni los daños que el aparato pueda sufrir durante el transporte.
Esta garantía es válida sólo si las reparaciones o servicios se realizan en un Servicio Técnico autorizado.

17
2. INTRODUCCIÓN
¡Felicidades por adquirir un auténtico equipo profesional ECLER!
El NUO4.0 es un mezclador profesional para DJ diseñado y fabricado por ECLER, una empresa con sede en
Barcelona dedicada al audio profesional desde 1965.
El NUO4.0 es un mezclador de audio profesional orientado a cualquier tipo de DJ, gracias a su amplia variedad de
funciones que le convierten en una consola apta para mezclar cualquier estilo musical: techno, house, minimal,
electro, hip hop...
El NUO4.0 es un mezclador apto para el scratch gracias a la versatilidad de sus ajustes de fader y crossfader. El
NUO4.0 es además apto para Eternal, el crossfader magnético de Ecler con cinco años de garantía especialmente
diseñado para los virtuosos del scratch.
Este genuino mezclador utiliza los mejores componentes disponibles en el mercado, obteniendo así la más alta
calidad de sonido. Los más de 40 años de experiencia en el diseño de equipos de audio profesional hacen que los
circuitos sean extremadamente eficientes y se consiga un sonido analógico cálido y cristalino. Todos sus circuitos
son montados y testados en nuestra fábrica de Barcelona.
El NUO4.0 es además un mezclador especialmente apto para instalaciones profesionales de toda índole, gracias a
sus dos salidas balanceadas y dos entradas de micrófono. Su formato y robustez hacen de él la consola ideal,
tanto para instalaciones profesionales, como para uso portátil por parte de los DJs más vanguardistas.
3. INSTALACIÓN
La principal consideración a tener en cuenta en el momento de buscar la ubicación de su NUO4.0 debe ser la
máxima comodidad de trabajo del operador, y su facilidad de conexionado.
El NUO4.0 está básicamente concebido como mezclador de sobremesa y su
ubicación habitual será entre dos giradiscos o reproductores de CD. El
mezclador tiene un formato de 37 cm (14,57") de profundidad y 32 cm (12,6")
de anchura.
Mediante el kit de laterales metálicos (disponibles como opción) podrá sujetar
firmemente su NUO4.0, ya sea directamente sobre la superficie sobre la que se
apoye, o sobre los laterales, que también le permitirán inclinarlo. Existe otra
opción de perfiles metálicos "NUORAKI" que permiten la ubicación del
mezclador en muebles rack estándar de 19".
Dada la elevada ganancia de las entradas de PHONO y de MICRO debe procurarse situar el mezclador lo más
alejado posible de fuentes de ruido (variadores de tensión, motores, etc.) así como de cualquier cable de red. Por
esta misma razón y bajo ninguna circunstancia debe quitarse la tapa metálica del aparato.
Ya que el consumo del NUO4.0 es muy bajo, éste no precisa ventilación, sin embargo debe evitarse que esté
expuesto a una temperatura extrema y que la atmósfera del local en que esté emplazado sea lo más seca y limpia
de polvo posible.
El NUO4.0 funciona con una fuente de alimentación conmutada de tipo universal permitiendo trabajar sin ningún
tipo de ajuste desde 90V a 264V / 47-63Hz. Asegúrese de que el cable de red se encuentre lejos de los cables de
señal para evitar zumbidos.
Para proteger al mezclador de eventuales sobrecargas en la línea de red existe un fusible de red de tipo T 0,5 A.
En caso de que éste se fundiera se desconectaría el aparato y se sustituiría por otro de idénticas características.
Si éste último se volviera a fundir, consulte con nuestro Servicio Técnico.
ATENCIÓN: EN NINGÚN CASO DEBE CORTOCIRCUITAR EL CIRCUITO DE PROTECCIÓN O
PONER UN FUSIBLE DE VALOR MÁS ELEVADO.
ADVERTENCIA: La sustitución del fusible debe ser realizada por un técnico cualificado.

18
Conexiones de entrada de audio
INPUT 1 PHONO Plato giradiscos
INPUT 1 LINE Reproductor de CD
INPUT 2 PHONO Plato giradiscos
INPUT 2 LINE Reproductor de CD
INPUT 3 PHONO Plato giradiscos
INPUT 3 LINE Reproductor de CD
INPUT 3 MICRO Micrófono
INPUT 4 PHONO Plato giradiscos
INPUT 4 LINE Reproductor de CD
INPUT 4 MICRO Micrófono
Entradas de Phono
Los platos giradiscos deben ir equipados con cápsula magnética con un nivel de salida nominal entre -55dBV y
-25dBV (1,7 a 56 mV). Las entradas PHONO (35) del NUO4.0 tienen un amplio margen antes de la saturación
(headroom) y pueden admitir cápsulas con mayor nivel de salida de lo habitual. Estas entradas presentan una
sensibilidad de entrada nominal de -40 dBV (10 mV).
Entradas de Línea
La sensibilidad de las entradas marcadas como LINE (36) es de 0dBV (1V). Conecte fuentes de sonido como
reproductores de CD, DAT, MP3, teclados u otros instrumentos.
Entradas de Micrófono
Las entradas de MICRO (13-37) están preparadas para un nivel nominal de entrada de -50dBV. La conexión
frontal (13) es del tipo combo XLR3/Jack y la conexión posterior (37) es del tipo XLR3. Estas entradas de
micrófono admiten la conexión en modo balanceado; para ello se realizará la conexión tal y como se indica:
Vivo o señal directa > Terminal 2 Punta
Frío o señal invertida > Terminal 3 Aro central
Masa > Terminal 1 Base
Los micrófonos deben ser de baja impedancia (de 200 a 600Ω) y monofónicos. Para conexiones no balanceadas,
cortocircuitar a masa el terminal 3 o el aro central. El NUO4.0 dispone de alimentación Phantom de 18V para
micrófonos equipados de condensador. Un jumper interno permite inhibir el funcionamiento de la alimentación
Phantom. La entrada MICRO del NUO4.0 se sirve de fábrica en posición "Phantom ON" (ver diagrama de
configuración).

19
Conexiones de salida de audio
MASTER Amplificador de potencia principal
BOOTH Amplificador de cabina
REC Dispositivo de grabación
FX Send/Return Bus de envío auxiliar a efectos
Headphones Auriculares
Salida MASTER
Esta salida estéreo alimenta al sistema de PA a través de una conexión XLR3 balanceada (38, 39) y una RCA (40)
no balanceada. El nivel nominal de la salida MASTER está ajustado a 0dBV (1V), pero puede ajustarse a +6dBV
mediante un jumper interno. El nivel de salida MASTER se controla con el potenciómetro MASTER (24).
Cerca del control MASTER se encuentra el conmutador L+R (27), que suma las señales izquierda y derecha de
las salidas MASTER y BOOTH. Esta función es especialmente útil en el caso que se produzca un fallo en uno de
los dos canales durante la sesión (ejemplo típico: mal contacto en la cápsula del plato giradiscos). Activando este
botón, el mezclador envía la suma L+R a ambos altavoces, pasando el problema desapercibido para la mayoría
del público.
MASTER y BOOTH disponen de un control de balance BAL (26).
Salida BOOTH
Habitualmente se usa para obtener una salida independiente en la cabina del DJ. Esta salida estéreo BOOTH
incorpora una conexión XLR3 balanceada y una RCA no balanceada. El nivel nominal de la salida BOOTH está
ajustado a 0dBV (1V), pero puede ajustarse a +6dBV mediante un jumper interno. El nivel de salida BOOTH se
controla con el potenciómetro BOOTH (25).
Salida de grabación
Hay una salida REC (22) sobre la superficie de control que emplea conexiones RCA. El nivel de salida nominal de
la salida REC es de 0dBV (1V). Esta salida es post fader, antes de Master.
Bucle externo FX Send/Return
Las conexiones de tipo RCA de salida FX SEND (41) y de entrada FX RETURN (42) permiten la realización de un
bucle externo con cualquier procesador de efectos, sampler o dispositivo secuenciador. El nivel nominal de la
salida SEND, así como la entrada RETURN es de 0dBV (1V).
La señal enviada a la salida FX SEND se selecciona antes o después del fader mediante el conmutador
PRE/POST (9), y el nivel de envío con su potenciómetro asociado (8). El NUO4.0 dispone además de un control
general de envío a efectos FX SEND (17) que suma las 4 vías, un control general de retorno de efectos FX
RETURN (15) y un control de pre-escucha de la señal de retorno de efectos FX PFL (16).
Auriculares
Para obtener el mejor rendimiento en su funcionamiento, éstos deberán ser de alta impedancia (200-600Ω). Se
conectarán a la salida de auriculares (30) situada sobre la propia placa de mandos mediante un conector jack
normalizado de 1/4" estereofónico o un conector mini jack de 3,5 mm. El casquillo del jack será la masa, el anillo
central el canal derecho y la punta el canal izquierdo.

20
4. INICIO RÁPIDO
Instale y conecte el NUO4.0 tal y como se describe en el primer párrafo del apartado Instalación.
A continuación describimos un procedimiento de inicio rápido usando la
entrada LINE de la vía 1 y monitorizando la señal a través de la salida de
auriculares.
1. Ponga los controles en posición de inicio.
Ajuste los controles rotativos GAIN, HI, MID y LOW de la vía 1 (3, 4, 5, 6)
en posición central enclavada. Sitúe el fader (11) del canal abajo y asigne
el selector A/OFF/B (10) en posición A (el canal está asignado ahora al
lado A del crossfader).
2. Conecte unos auriculares.
Conéctelos a la salida de auriculares (30). Ajuste el control LEVEL (29)
de auriculares al mínimo y lleve el control SELECT (28) a su posición
PFL.
3. Conecte un reproductor de CD.
Conecte un reproductor de CD a la entrada LINE de la vía 1 (36), inserte
un CD y póngalo en marcha.
4. Conecte el mezclador a la red eléctrica.
Conecte el cable de red en la entrada de alimentación (43) del mezclador
y póngalo en marcha pulsando el interruptor MAINS INPUT (45) situados
ambos en la parte trasera.
5. Seleccione la fuente de entrada.
Compruebe que el selector de entrada de la vía 1 (1) está en posición
LINE y que se ilumina el Vu-metro (2) de ese canal. Si no se ilumina,
asegúrese de que el reproductor de CD está bien conectado y de que se
está reproduciendo una pista de audio.
6. Ajuste el nivel de entrada.
Mueva el control GAIN (3) hasta que el Vu-metro indique 0dB.
7. Envíe la señal a la salida principal.
Coloque el fader de la vía 1 (11) arriba y sitúe el crossfader (12) en el lado A.
Table of contents
Languages:
Other Ecler Music Mixer manuals

Ecler
Ecler SMAC PRO20 User manual

Ecler
Ecler HAK320 User manual

Ecler
Ecler MAC40v User manual

Ecler
Ecler nuo5 User manual

Ecler
Ecler SAM512T User manual

Ecler
Ecler SMAC PRO30 User manual

Ecler
Ecler HMA120 User manual

Ecler
Ecler HAK320 User manual

Ecler
Ecler WPmMIX-T User manual

Ecler
Ecler SAM 614 User manual

Ecler
Ecler SAM312 User manual

Ecler
Ecler eHMA SERIES User manual

Ecler
Ecler eSAM402 User manual

Ecler
Ecler SAM612T User manual

Ecler
Ecler SMAC PRO40 User manual

Ecler
Ecler ESAM702 User manual

Ecler
Ecler Compact 8 User manual

Ecler
Ecler nuo 2.0 User manual

Ecler
Ecler MAC70v User manual

Ecler
Ecler DAM614 User manual