eDecks Step Stringer Handrail User manual

Kit Contents
Don’t forget to check your work with a level as you go! Page 1 of 8
www.eDecks.co.uk
All images are for illustration only, Please see individual item listings for actual item specifications
SINGLE SIDED HANDRAIL KIT FOR 3/4/5/6/7/8/9/10 STEPS:
A. 1 X 95MM NOTCHED NEWEL POST
B. 1 X 180MM NOTCHED NEWEL POST
C. 3 X 45DEGREE HAND/BASE RAILS (1 BASE RAIL, 2 HANDRAIL)
D. SPINDLES*
E. 50MM SCREWS*
F. 75MM SCREWS*
SINGLE SIDED HANDRAIL KIT FOR 11/12 STEPS:
A. 2 X 95MM NOTCHED NEWEL POST
B. 1 X 180MM NOTCHED NEWEL POST
C. 6 X 45DEGREE HAND/BASE RAILS (2 BASE RAIL, 4 HANDRAIL)
D. SPINDLES*
E. 50MM SCREWS*
F. 75MM SCREWS*
DOUBLE SIDED HANDRAIL KIT FOR 3/4/5/6/7/8/9/10 STEPS:
A. 2 X 95MM NOTCHED NEWEL POST
B. 2 X 180MM NOTCHED NEWEL POST
C. 6 X 45DEGREE HAND/BASE RAILS (2 BASE RAIL, 4 HANDRAIL)
D. SPINDLES*
E. 50MM SCREWS*
F. 75MM SCREWS*
DOUBLE SIDED HANDRAIL KIT FOR 11/12 STEPS:
A. 4 X 95MM NOTCHED NEWEL POST (POST A)
B. 2 X 180MM NOTCHED NEWEL POST (POST B)
C. 12 X 45DEGREE HAND/BASE RAILS (4 BASE RAIL, 8 HANDRAIL)
D. SPINDLES*
E. 50MM SCREWS*
F. 75MM SCREWS*
*PLEASE NOTE. THE NUMBER OF SPINDLES & SCREWS PROVIDED IS DEPENDENT
ON KIT SIZE.
A
BC
D
C
Kit Contents
Don’t forget to check your work with a level as you go!
Page 1 of 8
www.eDecks.co.uk
All images are for illustration only, Please see individual item listings for actual item specifications
SINGLE SIDED HANDRAIL KIT FOR 3/4/5/6/7/8/9/10 STEPS:
SINGLE SIDED HANDRAIL KIT FOR 3/4/5/6/7/8/9/10 STEPS:
A.
1 X 95MM NOTCHED NEWEL POST
B.
1 X 180MM NOTCHED NEWEL POST
C.
3 X 45DEGREE HAND/BASE RAILS (1 BASE RAIL, 2 HANDRAIL)
3 X 45DEGREE HAND/BASE RAILS (1 BASE RAIL, 2 HANDRAIL)
D.
SPINDLES*
E.
50MM SCREWS*
F.
75MM SCREWS*
SINGLE SIDED HANDRAIL KIT FOR 11/12 STEPS:
A.
2 X 95MM NOTCHED NEWEL POST
B.
1 X 180MM NOTCHED NEWEL POST
C.
6 X 45DEGREE HAND/BASE RAILS (2 BASE RAIL, 4 HANDRAIL)
6 X 45DEGREE HAND/BASE RAILS (2 BASE RAIL, 4 HANDRAIL)
D.
SPINDLES*
E.
50MM SCREWS*
F.
75MM SCREWS*
DOUBLE SIDED HANDRAIL KIT FOR 3/4/5/6/7/8/9/10 STEPS:
A.
2 X 95MM NOTCHED NEWEL POST
B.
2 X 180MM NOTCHED NEWEL POST
C.
6 X 45DEGREE HAND/BASE RAILS (2 BASE RAIL, 4 HANDRAIL)
D.
SPINDLES*
E.
50MM SCREWS*
F.
75MM SCREWS*
DOUBLE SIDED HANDRAIL KIT FOR 11/12 STEPS:
A.
4 X 95MM NOTCHED NEWEL POST (POST A)
B.
2 X 180MM NOTCHED NEWEL POST (POST B)
C.
12 X 45DEGREE HAND/BASE RAILS (4 BASE RAIL, 8 HANDRAIL)
D.
SPINDLES*
E.
50MM SCREWS*
F.
75MM SCREWS*
*PLEASE NOTE. THE NUMBER OF SPINDLES & SCREWS PROVIDED IS DEPENDENT
ON KIT SIZE.
A
B
C
D
C
DOUBLE SIDED HANDRAIL KIT FOR 3/4/5/6/7/8/9/10 STEPS:
6 X 45DEGREE HAND/BASE RAILS (2 BASE RAIL, 4 HANDRAIL)
12 X 45DEGREE HAND/BASE RAILS (4 BASE RAIL, 8 HANDRAIL)
*PLEASE NOTE. THE NUMBER OF SPINDLES & SCREWS PROVIDED IS DEPENDENT
Step Stringer Handrail Fitting Instructions
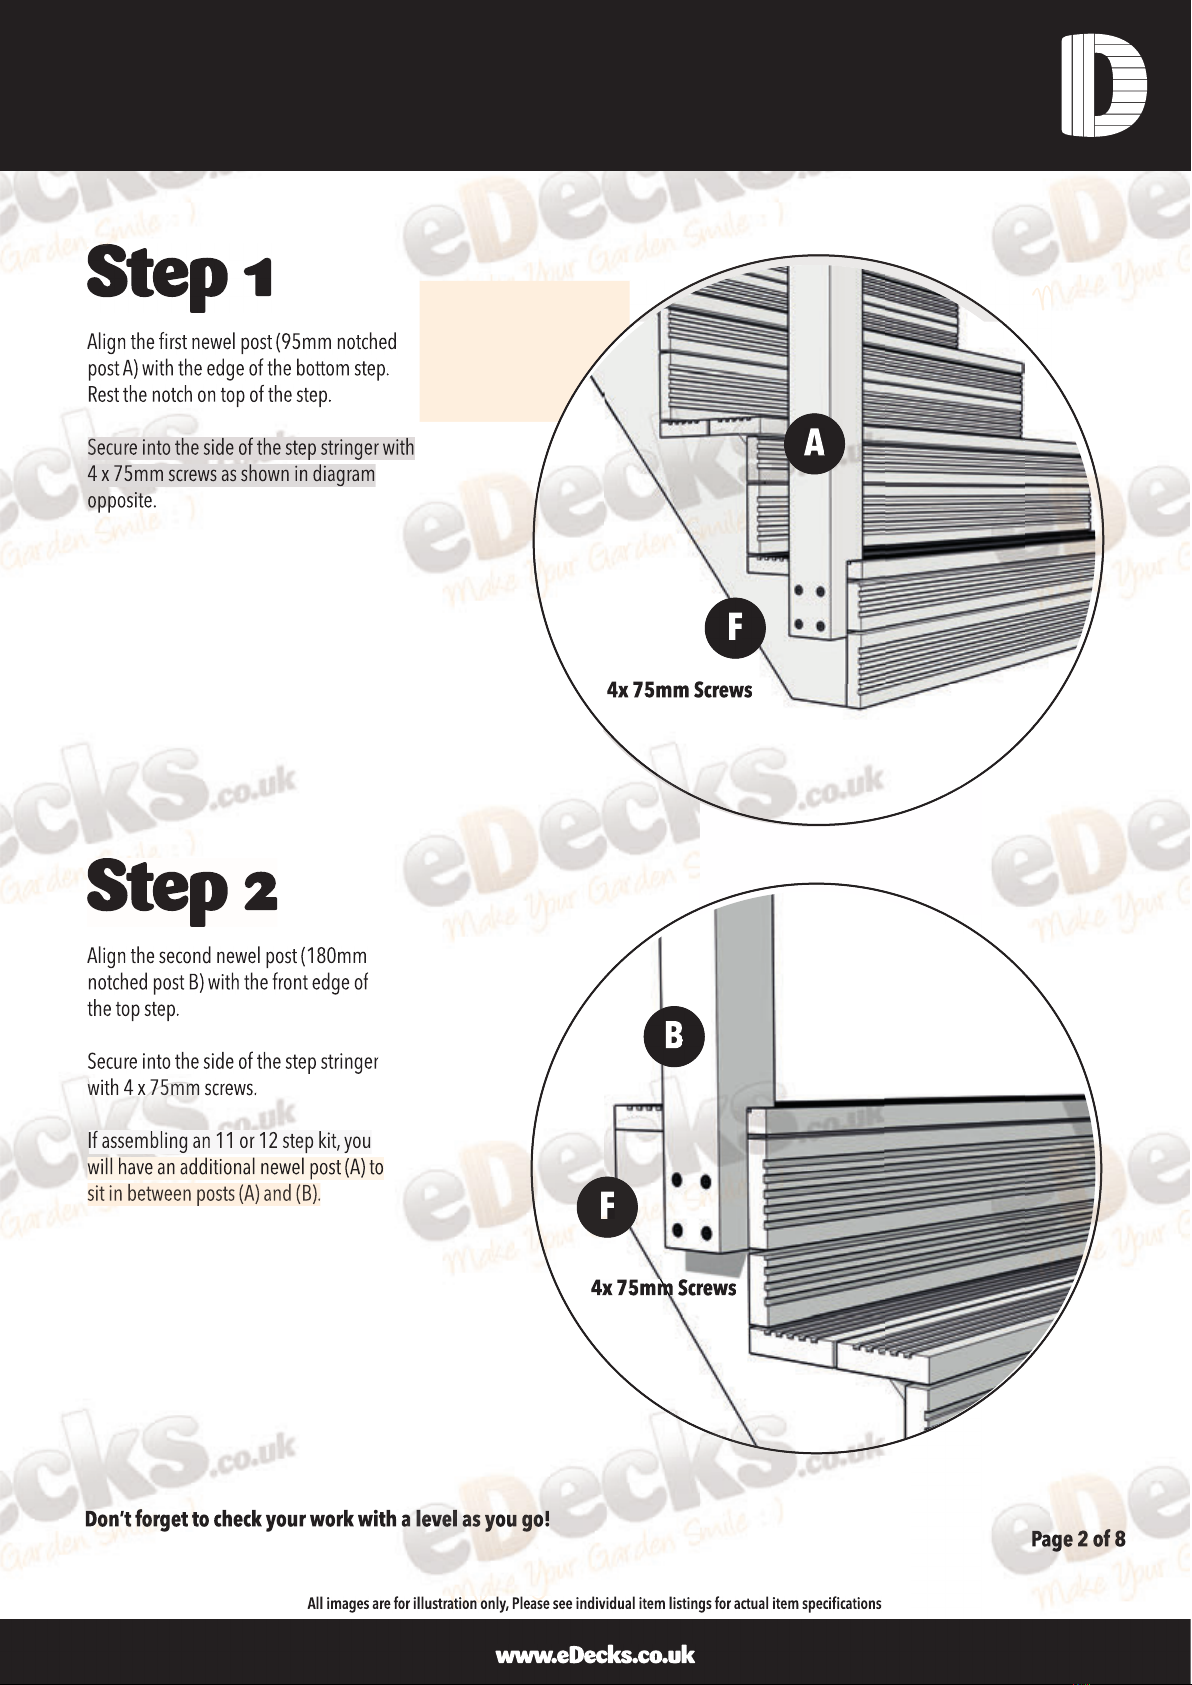
Step 1
Don’t forget to check your work with a level as you go! Page 2 of 8
www.eDecks.co.uk
All images are for illustration only, Please see individual item listings for actual item specifications
Align the first newel post (95mm notched
post A) with the edge of the bottom step.
Rest the notch on top of the step.
Secure into the side of the step stringer with
4 x 75mm screws as shown in diagram
opposite.
Step 2
Align the second newel post (180mm
notched post B) with the front edge of
the top step.
Secure into the side of the step stringer
with 4 x 75mm screws.
If assembling an 11 or 12 step kit, you
will have an additional newel post (A) to
sit in between posts (A) and (B).
4x 75mm Screws
A
F
4x 75mm Screws
B
F
Step 1
Don’t forget to check your work with a level as you go!
Page 2 of 8
www.eDecks.co.uk
All images are for illustration only, Please see individual item listings for actual item specifications
Align the first newel post (95mm notched
post A) with the edge of the bottom step.
Rest the notch on top of the step.
Secure into the side of the step stringer with
4 x 75mm screws as shown in diagram
opposite.
Step 2
Align the second newel post (180mm
notched post B) with the front edge of
the top step.
Secure into the side of the step stringer
with 4 x 75mm screws.
If assembling an 11 or 12 step kit, you
will have an additional newel post (A) to
sit in between posts (A) and (B).
4x 75mm Screws
A
F
4x 75mm Screws
B
F
Step Stringer Handrail Fitting Instructions
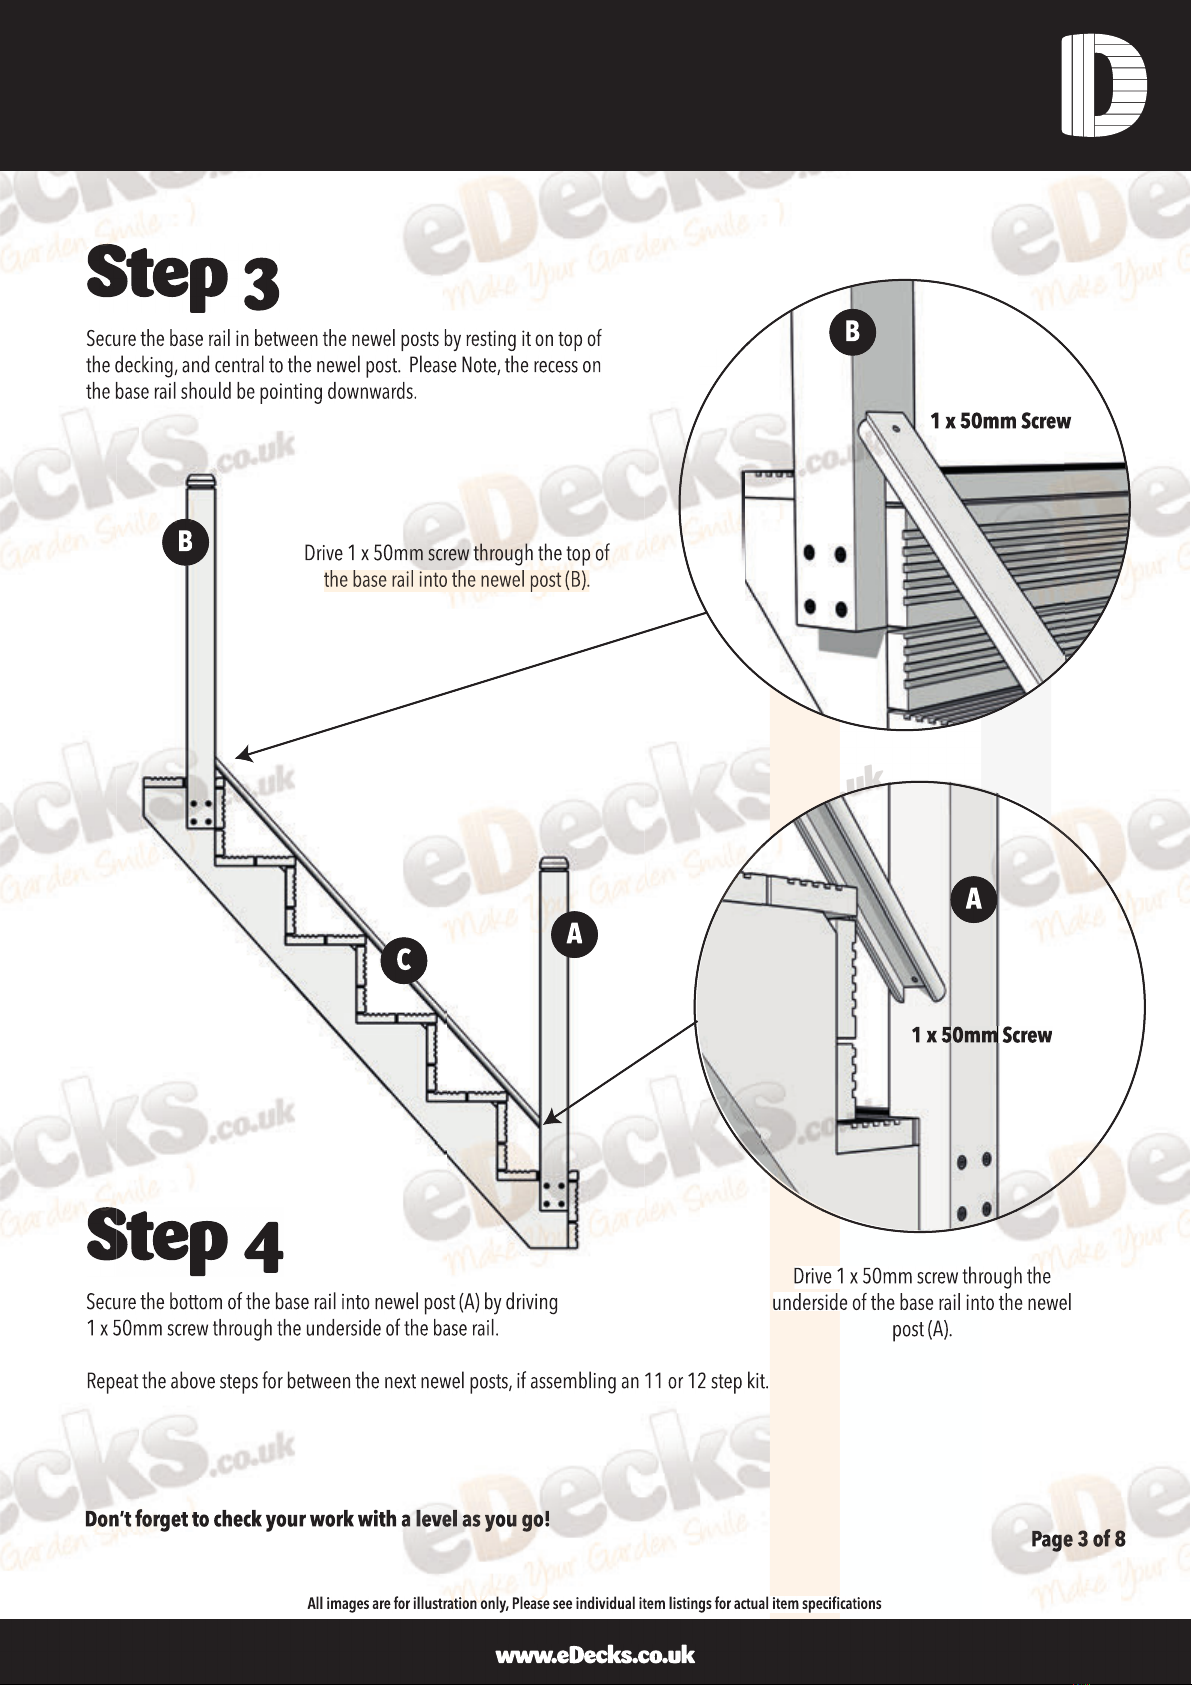
Step 3
Don’t forget to check your work with a level as you go! Page 3 of 8
Secure the base rail in between the newel posts by resting it on top of
the decking, and central to the newel post. Please Note, the recess on
the base rail should be pointing downwards.
Step 4
Secure the bottom of the base rail into newel post (A) by driving
1 x 50mm screw through the underside of the base rail.
Repeat the above steps for between the next newel posts, if assembling an 11 or 12 step kit.
www.eDecks.co.uk
All images are for illustration only, Please see individual item listings for actual item specifications
A
C
B
1 x 50mm Screw
A
B
Drive 1 x 50mm screw through the top of
the base rail into the newel post (B).
Drive 1 x 50mm screw through the
underside of the base rail into the newel
post (A).
1 x 50mm Screw
Step 3
Don’t forget to check your work with a level as you go!
Page 3 of 8
Secure the base rail in between the newel posts by resting it on top of
the decking, and central to the newel post. Please Note, the recess on
the base rail should be pointing downwards.
Step 4
Step 4
Secure the bottom of the base rail into newel post (A) by driving
1 x 50mm screw through the underside of the base rail.
Repeat the above steps for between the next newel posts, if assembling an 11 or 12 step kit.
www.eDecks.co.uk
All images are for illustration only, Please see individual item listings for actual item specifications
A
C
B
1 x 50mm Screw
A
B
Drive 1 x 50mm screw through the top of
the base rail into the newel post (B).
Drive 1 x 50mm screw through the
underside of the base rail into the newel
post (A).
1 x 50mm Screw
Step Stringer Handrail Fitting Instructions

Step 5
Don’t forget to check your work with a level as you go! Page 4 of 8
Place 1 angled spindle (D) on top of the base rail and flush against newel post (B),
Secure the spindle to the newel post with 3 x equally spaced 50mm screws.
Mirror this by securing another angled spindle flush against newel post (A)
www.eDecks.co.uk
All images are for illustration only, Please see individual item listings for actual item specifications
A
B
B
D
D
D
C
3 x 50mm Screws
3 x 50mm Screws
A
D
Step 5
Don’t forget to check your work with a level as you go!
Page 4 of 8
Place 1 angled spindle (D) on top of the base rail and flush against newel post (B),
Secure the spindle to the newel post with 3 x equally spaced 50mm screws.
Mirror this by securing another angled spindle flush against newel post (A)
Mirror this by securing another angled spindle flush against newel post (A)
www.eDecks.co.uk
All images are for illustration only, Please see individual item listings for actual item specifications
A
B
B
D
D
D
C
3 x 50mm Screws
3 x 50mm Screws
A
D
Step Stringer Handrail Fitting Instructions

Step 6
Don’t forget to check your work with a level as you go! Page 5 of 8
Drop the first piece of handrail on top of the pre secured spindles.
Drive 1 x 50mm screw through the handrail into the spindle.
Drive 1 x 50mm screw through the base rail into the spindle.
Then repeat process for the top spindle.
www.eDecks.co.uk
All images are for illustration only, Please see individual item listings for actual item specifications
D
D
1 x 50mm Screw
1 x 50mm Screw
A
D
A
B
C
C
C
C
Step 6
Don’t forget to check your work with a level as you go!
Page 5 of 8
Drop the first piece of handrail on top of the pre secured spindles.
Drive 1 x 50mm screw through the handrail into the spindle.
Drive 1 x 50mm screw through the base rail into the spindle.
Then repeat process for the top spindle.
www.eDecks.co.uk
All images are for illustration only, Please see individual item listings for actual item specifications
1 x 50mm Screw
1 x 50mm Screw
A
D
Don’t forget to check your work with a level as you go!
D
D
A
B
C
C
C
C
Step Stringer Handrail Fitting Instructions
Don’t forget to check your work with a level as you go! Page 6 of 8
www.eDecks.co.uk
All images are for illustration only, Please see individual item listings for actual item specifications
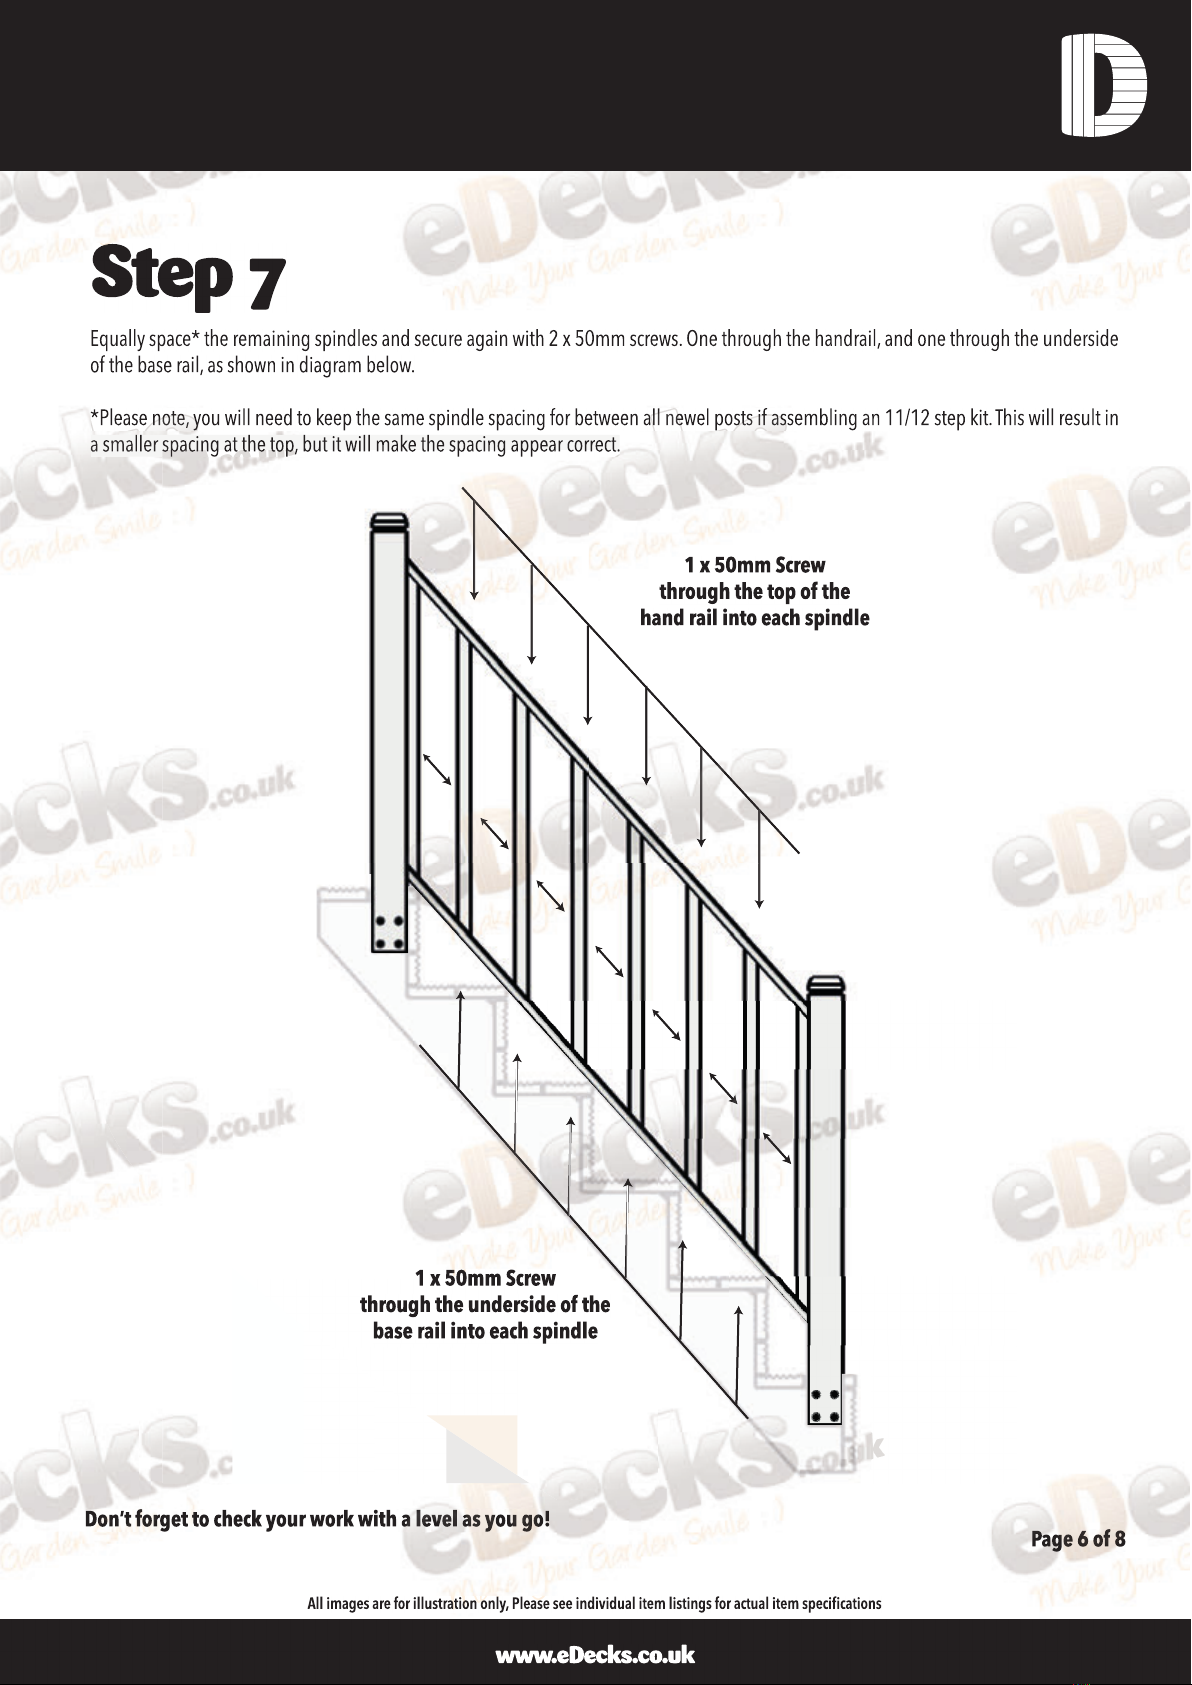
Step 7
Equally space* the remaining spindles and secure again with 2 x 50mm screws. One through the handrail, and one through the underside
of the base rail, as shown in diagram below.
*Please note, you will need to keep the same spindle spacing for between all newel posts if assembling an 11/12 step kit. This will result in
a smaller spacing at the top, but it will make the spacing appear correct.
1 x 50mm Screw
through the underside of the
base rail into each spindle
1 x 50mm Screw
through the top of the
hand rail into each spindle
Don’t forget to check your work with a level as you go!
Page 6 of 8
www.eDecks.co.uk
All images are for illustration only, Please see individual item listings for actual item specifications
Step 7
Equally space* the remaining spindles and secure again with 2 x 50mm screws. One through the handrail, and one through the underside
of the base rail, as shown in diagram below.
*Please note, you will need to keep the same spindle spacing for between all newel posts if assembling an 11/12 step kit. This will result in
a smaller spacing at the top, but it will make the spacing appear correct.
a smaller spacing at the top, but it will make the spacing appear correct.
1 x 50mm Screw
through the underside of the
base rail into each spindle
1 x 50mm Screw
through the top of the
hand rail into each spindle
Step Stringer Handrail Fitting Instructions
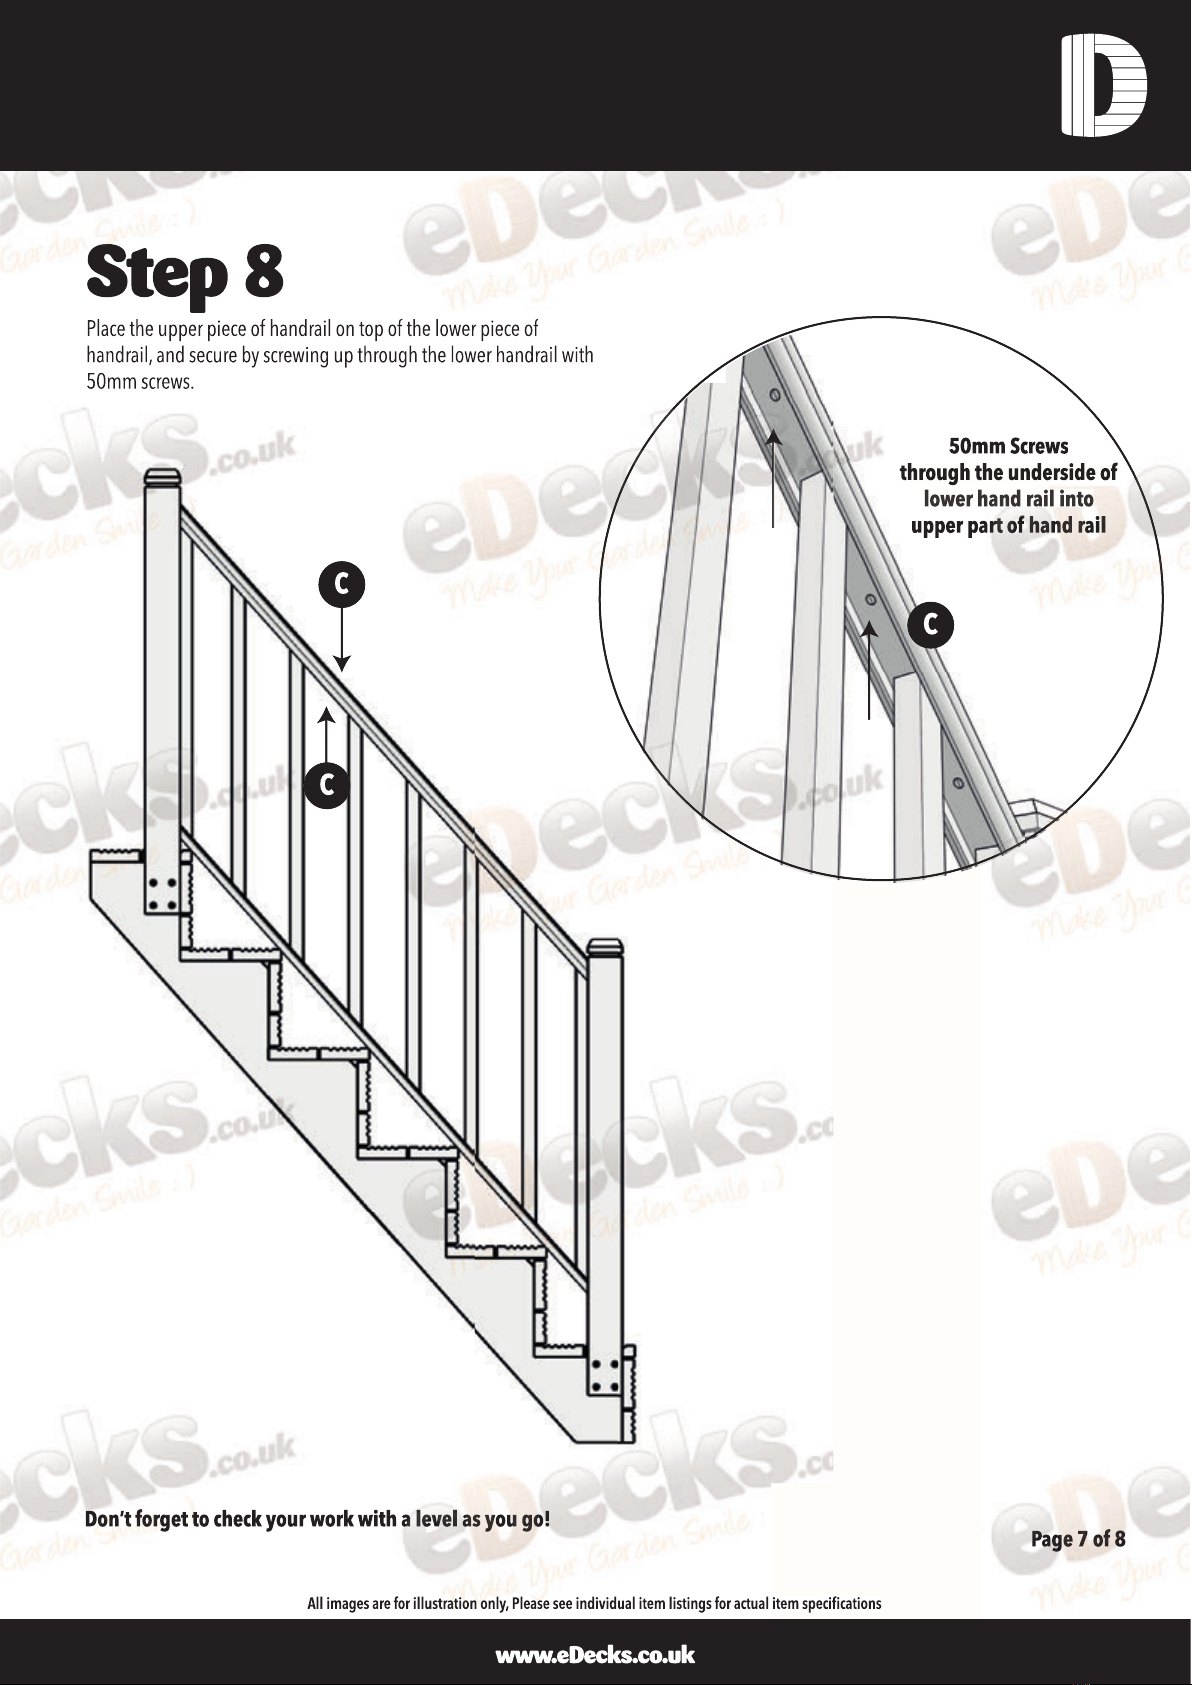
50mm Screws
through the underside of
lower hand rail into
upper part of hand rail
Step 8
Don’t forget to check your work with a level as you go! Page 7 of 8
Place the upper piece of handrail on top of the lower piece of
handrail, and secure by screwing up through the lower handrail with
50mm screws.
www.eDecks.co.uk
All images are for illustration only, Please see individual item listings for actual item specifications
C
C
C
50mm Screws
through the underside of
lower hand rail into
upper part of hand rail
Step 8
Don’t forget to check your work with a level as you go!
Page 7 of 8
Place the upper piece of handrail on top of the lower piece of
handrail, and secure by screwing up through the lower handrail with
50mm screws.
www.eDecks.co.uk
All images are for illustration only, Please see individual item listings for actual item specifications
C
C
C
Step Stringer Handrail Fitting Instructions
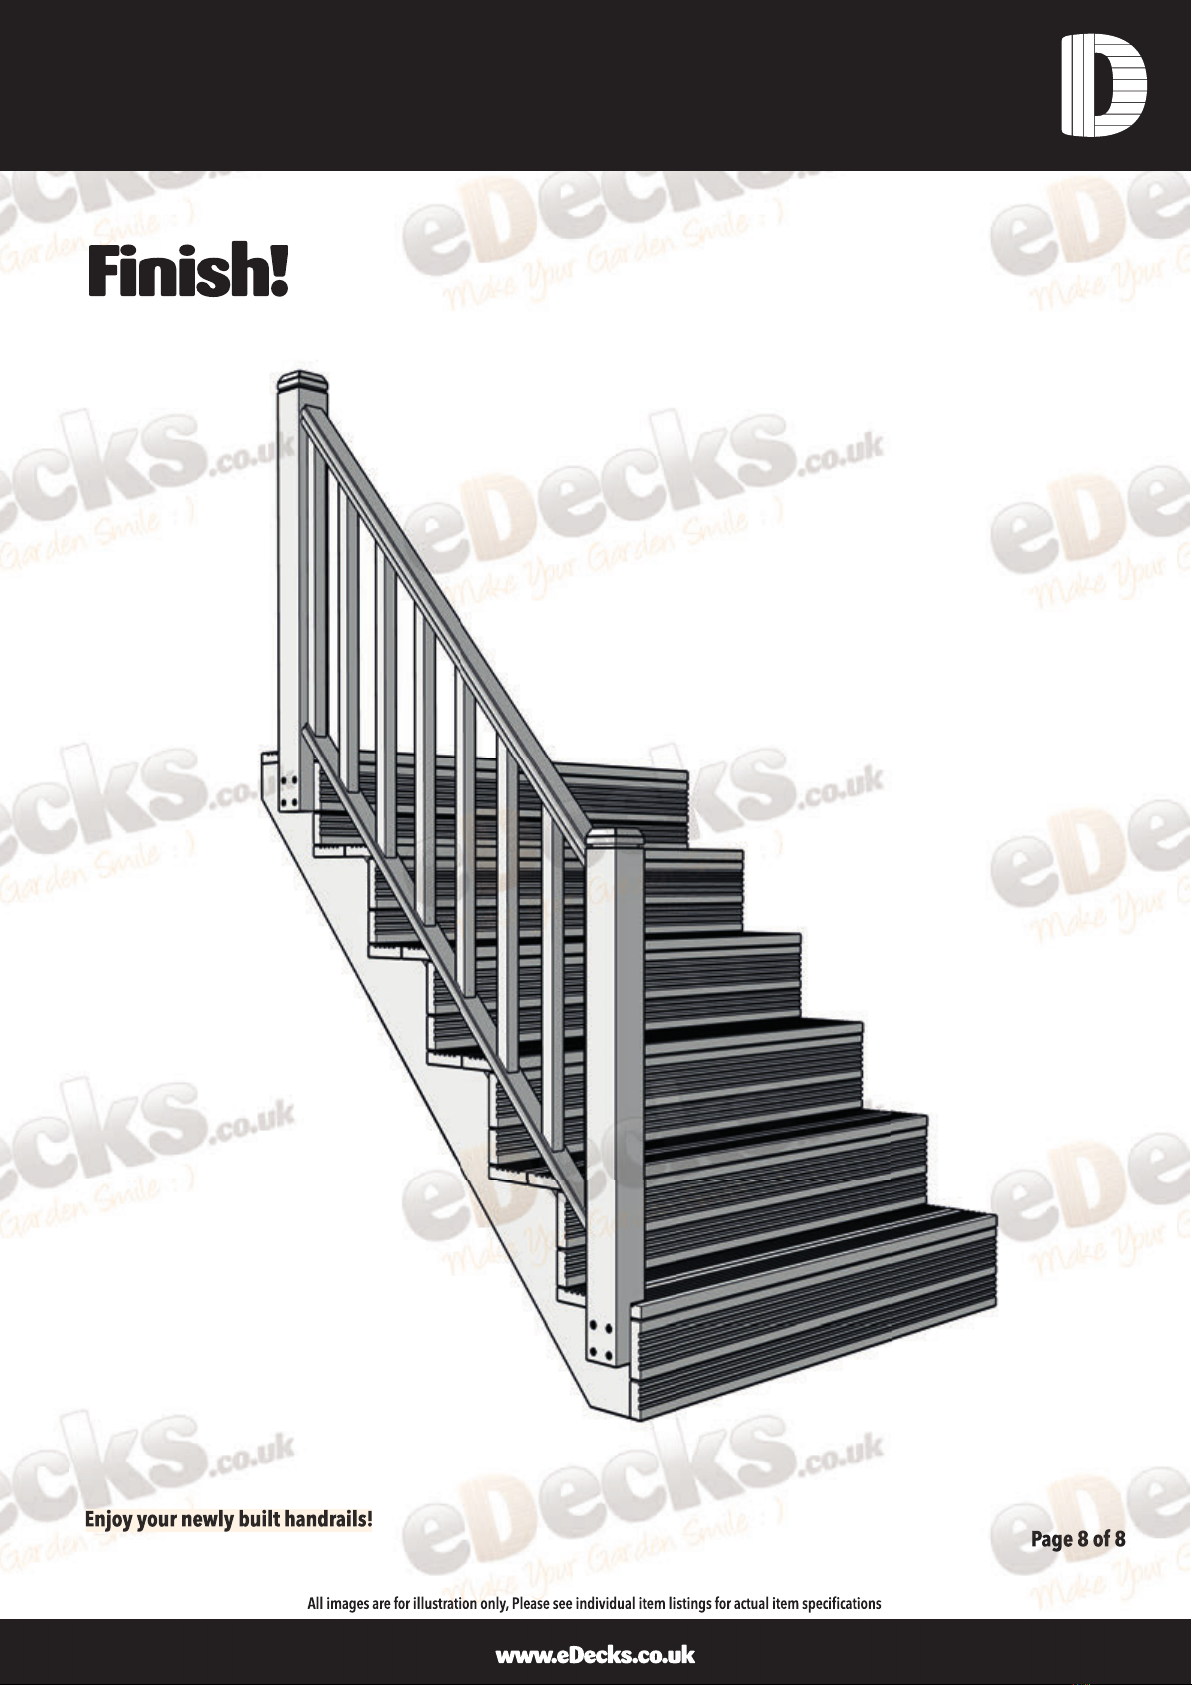
Finish!
Enjoy your newly built handrails! Page 8 of 8
All images are for illustration only, Please see individual item listings for actual item specifications
www.eDecks.co.uk
Finish!
Enjoy your newly built handrails!
Page 8 of 8
All images are for illustration only, Please see individual item listings for actual item specifications
www.eDecks.co.uk
Step Stringer Handrail Fitting Instructions
Other eDecks Outdoor Furnishing manuals

eDecks
eDecks Garden Swing User manual

eDecks
eDecks Hot Tub Decking Kit with Roof User manual

eDecks
eDecks Modern Deck User manual

eDecks
eDecks Atlas User manual

eDecks
eDecks Step Stringer User manual

eDecks
eDecks Rosedene User manual

eDecks
eDecks Queen Anne User manual

eDecks
eDecks Hot Tub Decking Kit User manual

eDecks
eDecks Parliament Pergola User manual
Popular Outdoor Furnishing manuals by other brands


Palram
Palram Patio Cover Roof Blinds Set manual

Coopers of Stortford
Coopers of Stortford K765 Instructions for use

Sunjoy
Sunjoy A101012202 manual

SUNS
SUNS Alvaro A Assembly instruction

BASI
BASI SWL 60 operating instructions

Backyard Discovery
Backyard Discovery Hillsdale Cabana 2102415 Owner's manual & assembly instructions


