eKuore Pro User manual

eKuore Pro for Telemedicine Demo IOS - User Manual
Index
Error al renderizar el macro 'toc' : Illegal/unsupported escape sequence near index 3 .*\Index ^
What is eKuore Pro For Telemedicine
eKuore Pro For Telemedicine (eKP4T) is a wireless electronic stethoscope. It streams the auscultation audio from a patient’s body to any
software through wifi in real-time.
has been developed and registered by .eKuore Pro For Telemedicine eKuore
Key Concepts
Hard Reset
If for any reason, the device doesn't respond, you can force a hard reset maintaining a long press on the power button, until all led lights are off.
Note that with a hard reset, the configuration settings of the device won't change, for changing the configuration settings you must proceed with a
factory reset.
Factory Reset
To perform a factory reset, you must press the 2 volume buttons simultaneously for 5 seconds. A factory reset cannot be performed while
streaming. The factory reset will erase previous WLAN configuration settings in an eKP4T.
This documentation is only for the Demo SDK.
The Demo SDK does not allow for full integration, but rather to show the streaming capabilities of the device so tests can be run
if needed before integrating the SDK.

Configuration Mode
If this is the the device turns on or if a has been performed, it will not have stored any WLAN configuration. So newfirst time factory reset
connection settings are required.
Connecting with a device in configuration mode is helpful for those situations where you want to collect some information, like the device’s serial
number, before configuring the WIFI.
Streaming Mode
When the WLAN has been configured successfully in the device, and the eKP4T is connected to the WLAN and ready to be managed and sent
the data to the host system.
Heartbeat Monitor
Verification process to ensure that data is being transferred between the device and the software. Regular “calls” (every 1-3s) are launched from
the software to the device.
Features of eKuore Pro For Telemedicine SDK iOS
eKuore Pro For Telemedicine iOS SDK provides management functionalities for an device:eKP4T
Configure the connection (IP, SSID, password, and ports) of the eKP4T device with a router in a WLAN.
Manage the device connection.
Manage the streaming of auscultation audio from an eKP4T device in real-time through a WLAN.
Check the device information when the device is connected to the same WLAN where the system runs.
Get Battery Level.
Interacting with device characteristics: Filter, Volume and LedStatus.
Get device characteristics in real-time. We use the swift Combine framework to publish any changes to the device.
Change device characteristics.
Listen to connection status changes
.connected
.hardwareDisconnected
.disconnecting
.disconnected
.waiting(let error)
.failed(let error)
UtilitiesDevice discovering (beta) allow discovering all device in the network.eKP4T

What is eKuore Pro For Telemedicine Demo
eKuore Pro For Telemedicine Demo is a simple, tiny project based on a SwiftUI interface over the eKuore Pro For Telemedicine SDK iOS
framework to allow a potential user to test the framework in its system. It provides a working example that exposes all the features included in the
framework.
Prerequisites
The system which will run the demo project needs a minimum of Swift 5 installed on it.
An eKuore Pro For Telemedicine devices is needed too.
How to use eKuore Pro For Telemedicine Demo
The user interface will be visible:

1. a.
b.
c.
d.
e.
2. a. i.
ii.
iii.
b.
List View
Discover
Connect to eKP4T in Configuration Mode
List of the devices connected to the application
Connect known device
List of the discovered devices
Main View
Information / Interaction Panel
Details view
Remote Control view
WLAN Config view
Log Panel
1. List View
The menu of the application.
1.a Discover
The action to start to discover eKP4T devices in the network. This button has 2 different states:
Start discover: On press, the application starts to discover the devices in the network and change its label to the next state.
Stop Discover: On press, the application stops to discover devices in the network.
When a device is discovered, it shows in the discovered list.
1.b Connect to eKP4T in Configuration Mode
The action to connect to device in .eKP4T Configuration mode
Make sure that the system in which the is running, is not connected to any network via cable (ethernet) when trying to:eKP4T Demo
configure, connect, stream or work with the device.
This will override any other wireless connections.

1.c List of the devices connected to the application
A selectable list of the devices connected to the application.
On selecting a device in the list, you will see all information in the Information / Interaction Panel.
Has a context menu that allows:
Disconnect a connected device.
Connect a disconnected device.
Remove the device from the list.
The demo does not provide any feedback when it cannot connect to an device in . Make sure your system iseKP4T Configuration mode
connected to the WiFi hotspot that the device emits as the following image:
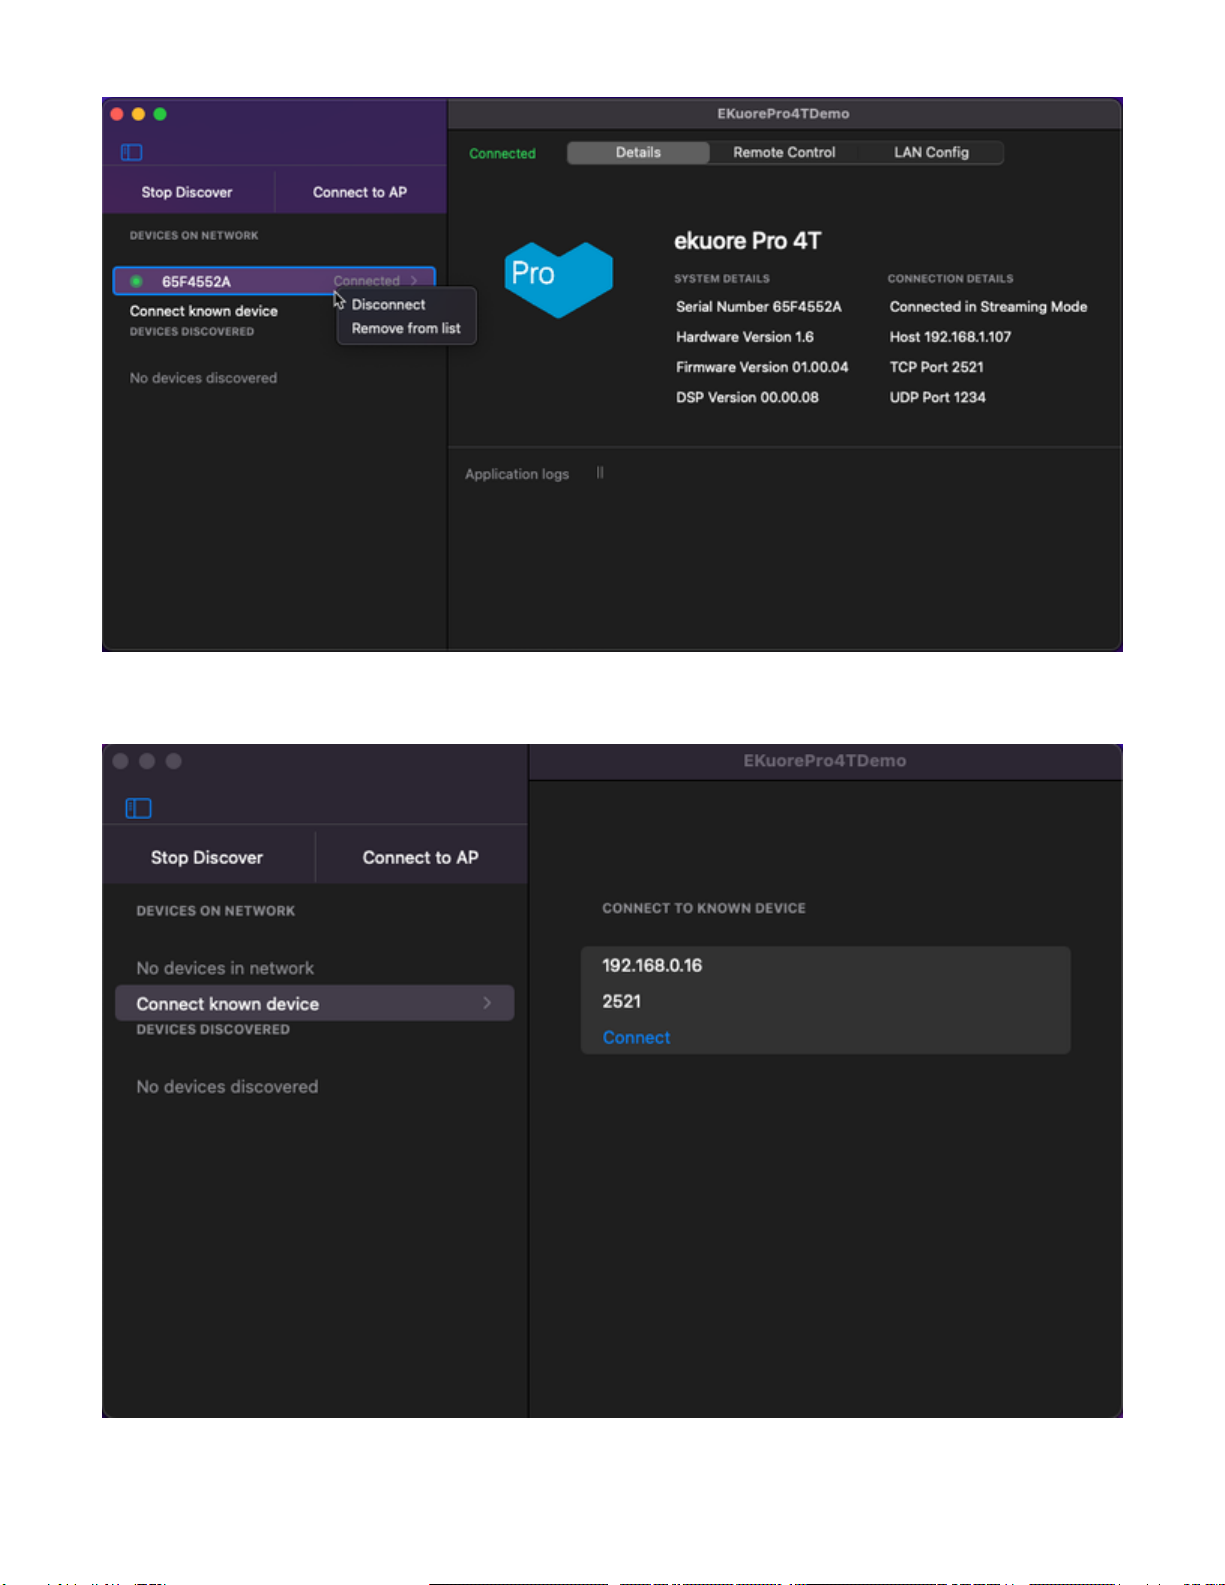
1.d Connect the known device
Access to the form view to connect to a known IP address and port of the device you want to connect to.
1.d List of the discovered devices

A selectable list of the devices discovered.
On selecting a device in the list, you will see the discovered device form, where you can connect to the selected device.
Has a context menu that allows:
Connect a device directly.
Remove discovered device from the list.
2. Main View
2.a Information / Interaction Panel
This panel shows all needed information and actions that the integrator can perform to the device selected.
2.a.i Details view
When you connect a discovered device, that device will be removed from the de discovered list and will add to the list of the device on
the network.

2.a.ii Remote Control view
2.a.iii WLAN Config

If this is the first time that the device is turned on, or if a (pressing the volume buttons and together for 5 seconds) has beenFactory-reset
performed on the device the last time it was used, it will not have any connection configuration stored (device network light will be ).orange
To configure the connection and set it ready to stream audio through the WLAN, the integrator must set into the device’s memory the parameters
of the network, including the (open, WEP, WPA/WPA2), the name of the (the access point of the router in your currentsecurity type SSID
WLAN), the (make sure is the right one) to access the network, and the management and audio streaming ports.password
To do so, the host system must be connected as a client to the eKP4T device, which will be available as a public access point while this
configuration step, like a standard router.
These parameters must be typed on the text fields in the configuration section. When the fields are written, click the button.Submit
The default ports used for control messages and audio streaming are 2521 and 1234 respectively. We suggest you set these since they are the
default used by the device, but they can be modified if needed.
2.b Log panel
All the information will be visible on this panel as a log message.

1.
2.
The pause icon next to the label allows to stop showing log message.Application Logs
Quick Setup (video tutorial)
Demo_3.mov
Troubleshooting
Here is a brief list of the most common connection problems with eKuore Pro For Telemedicine demo and its solutions:
If you cannot get the streaming from the device, it is possible that the WLAN password is not the correct one, please make sure of this.
Reset your device and start again from .Configuration
If you cannot get the streaming from the device, the required ports may be closed by the router or any other device in your WLAN. Try to
configure other ports the device and try again from .Factory-resetting Configuration
History
Here is the list of releases of this project:
1.0.0
Initial release, add base functionalities as specified for this product.
Other manuals for Pro
1
Table of contents
Other eKuore Medical Equipment manuals


Popular Medical Equipment manuals by other brands


Getinge
Getinge Arjohuntleigh Nimbus 3 Professional Instructions for use

Mettler Electronics
Mettler Electronics Sonicator 730 Maintenance manual

Pressalit Care
Pressalit Care R1100 Mounting instruction

Denas MS
Denas MS DENAS-T operating manual

bort medical
bort medical ActiveColor quick guide

AccuVein
AccuVein AV400 user manual


