manuals.online logo
Brands
  1. Home
  2. •
  3. Brands
  4. •
  5. ekwb
  6. •
  7. Computer Hardware
  8. •
  9. ekwb EK-SF3D Inflection Point EVO User manual

ekwb EK-SF3D Inflection Point EVO User manual

All disclosures, notices and warranty conditions are being written on EK Water Blocks website. Revision 1.0. Released on 21st of May, 2013.
EK-SF3D Inflection Point EVO –LGA-115x
CPU liquid nitrogen evaporation cooler installation manual
This product is intended for installation only by expert users. Please consult with a qualified technician for installation. Improper installation may result in damage to your equipment. EK Water Blocks assumes no liability
whatsoever, expressed or implied, for the use of these products, nor their installation. The following instructions are subject to change without notice. Please visit our web site at www.ekwb.com for updates.
Before you start using this product please follow these basic guidelines:
1. Please carefully read the manual before through before beginning with the installation process!
2. Art eraser insulation method is not recommended. EK recommends either Vaseline coat insulation method or using neoprene sheets.
3. If you intend to use adhesive properties of enclosed insulation sheets it is recommended to apply single layer of electrical/scotch/duct tape to the circuit board before adhering the insulation
sheet to the motherboard.
4. The heaters are not used to completely defrost the motherboard during operation. Their purpose is to heat up the VRM capacitor area under extreme cold as well as to minimize the need for
additional insulation!
STEP 1: GENERAL INFORMATION ON PRODUCT COMPATIBILITY
STEP 2: TABLE OF CONTENT
Congratulations on your purchase of EK-SF3D Inflection Point EVO universal CPU
liquid nitrogen evaporation cooler. This item comes disassembled therefore it is
mandatory to assemble it by screwing the aluminum extension to the copper core
prior taking further installation steps. Make sure the o-ring
gasket is present and installed.
The EK-SF3D Inflection Point EVO by itself is not a complete
product. It is mandatory to purchase socket-specific mounting
mechanism, depending on your platform:
Intel LGA-1156/1155/1150:
-EK-SF3D Inflection Point EVO - Mounting LGA-115x
(EAN: 3831109857236)
Intel LGA-2011:
-EK-SF3D Inflection Point EVO - Mounting LGA-2011
(EAN: 3831109857243)
AMD 754/939/940/AMx/FMx:
-EK-SF3D Inflection Point EVO –Mounting AMD
(EAN: 3831109857250)
The following items are enclosed with each EK-SF3D Inflection Point EVO –
Mounting LGA-115x unit:
-EK-SF3D Inflection Point EVO - Mounting LGA-115x adapter with gaskets
-EK-SF3D Heater 4W type A (LGA-115x)
-LGA-115x Backplate (stainless steel)
-Self-adhesive insulation sheet:
o3mm front (socket) sheet
o15mm backplate sheet
-Mounting screws:
oPlastic washers M4
oPOM Backplate standoffs
oM4x22 ISO 7380 screws
oM4-M4 Adapter Backplate screws
-Required set of Torx T20 and 2.5mm Allen keys
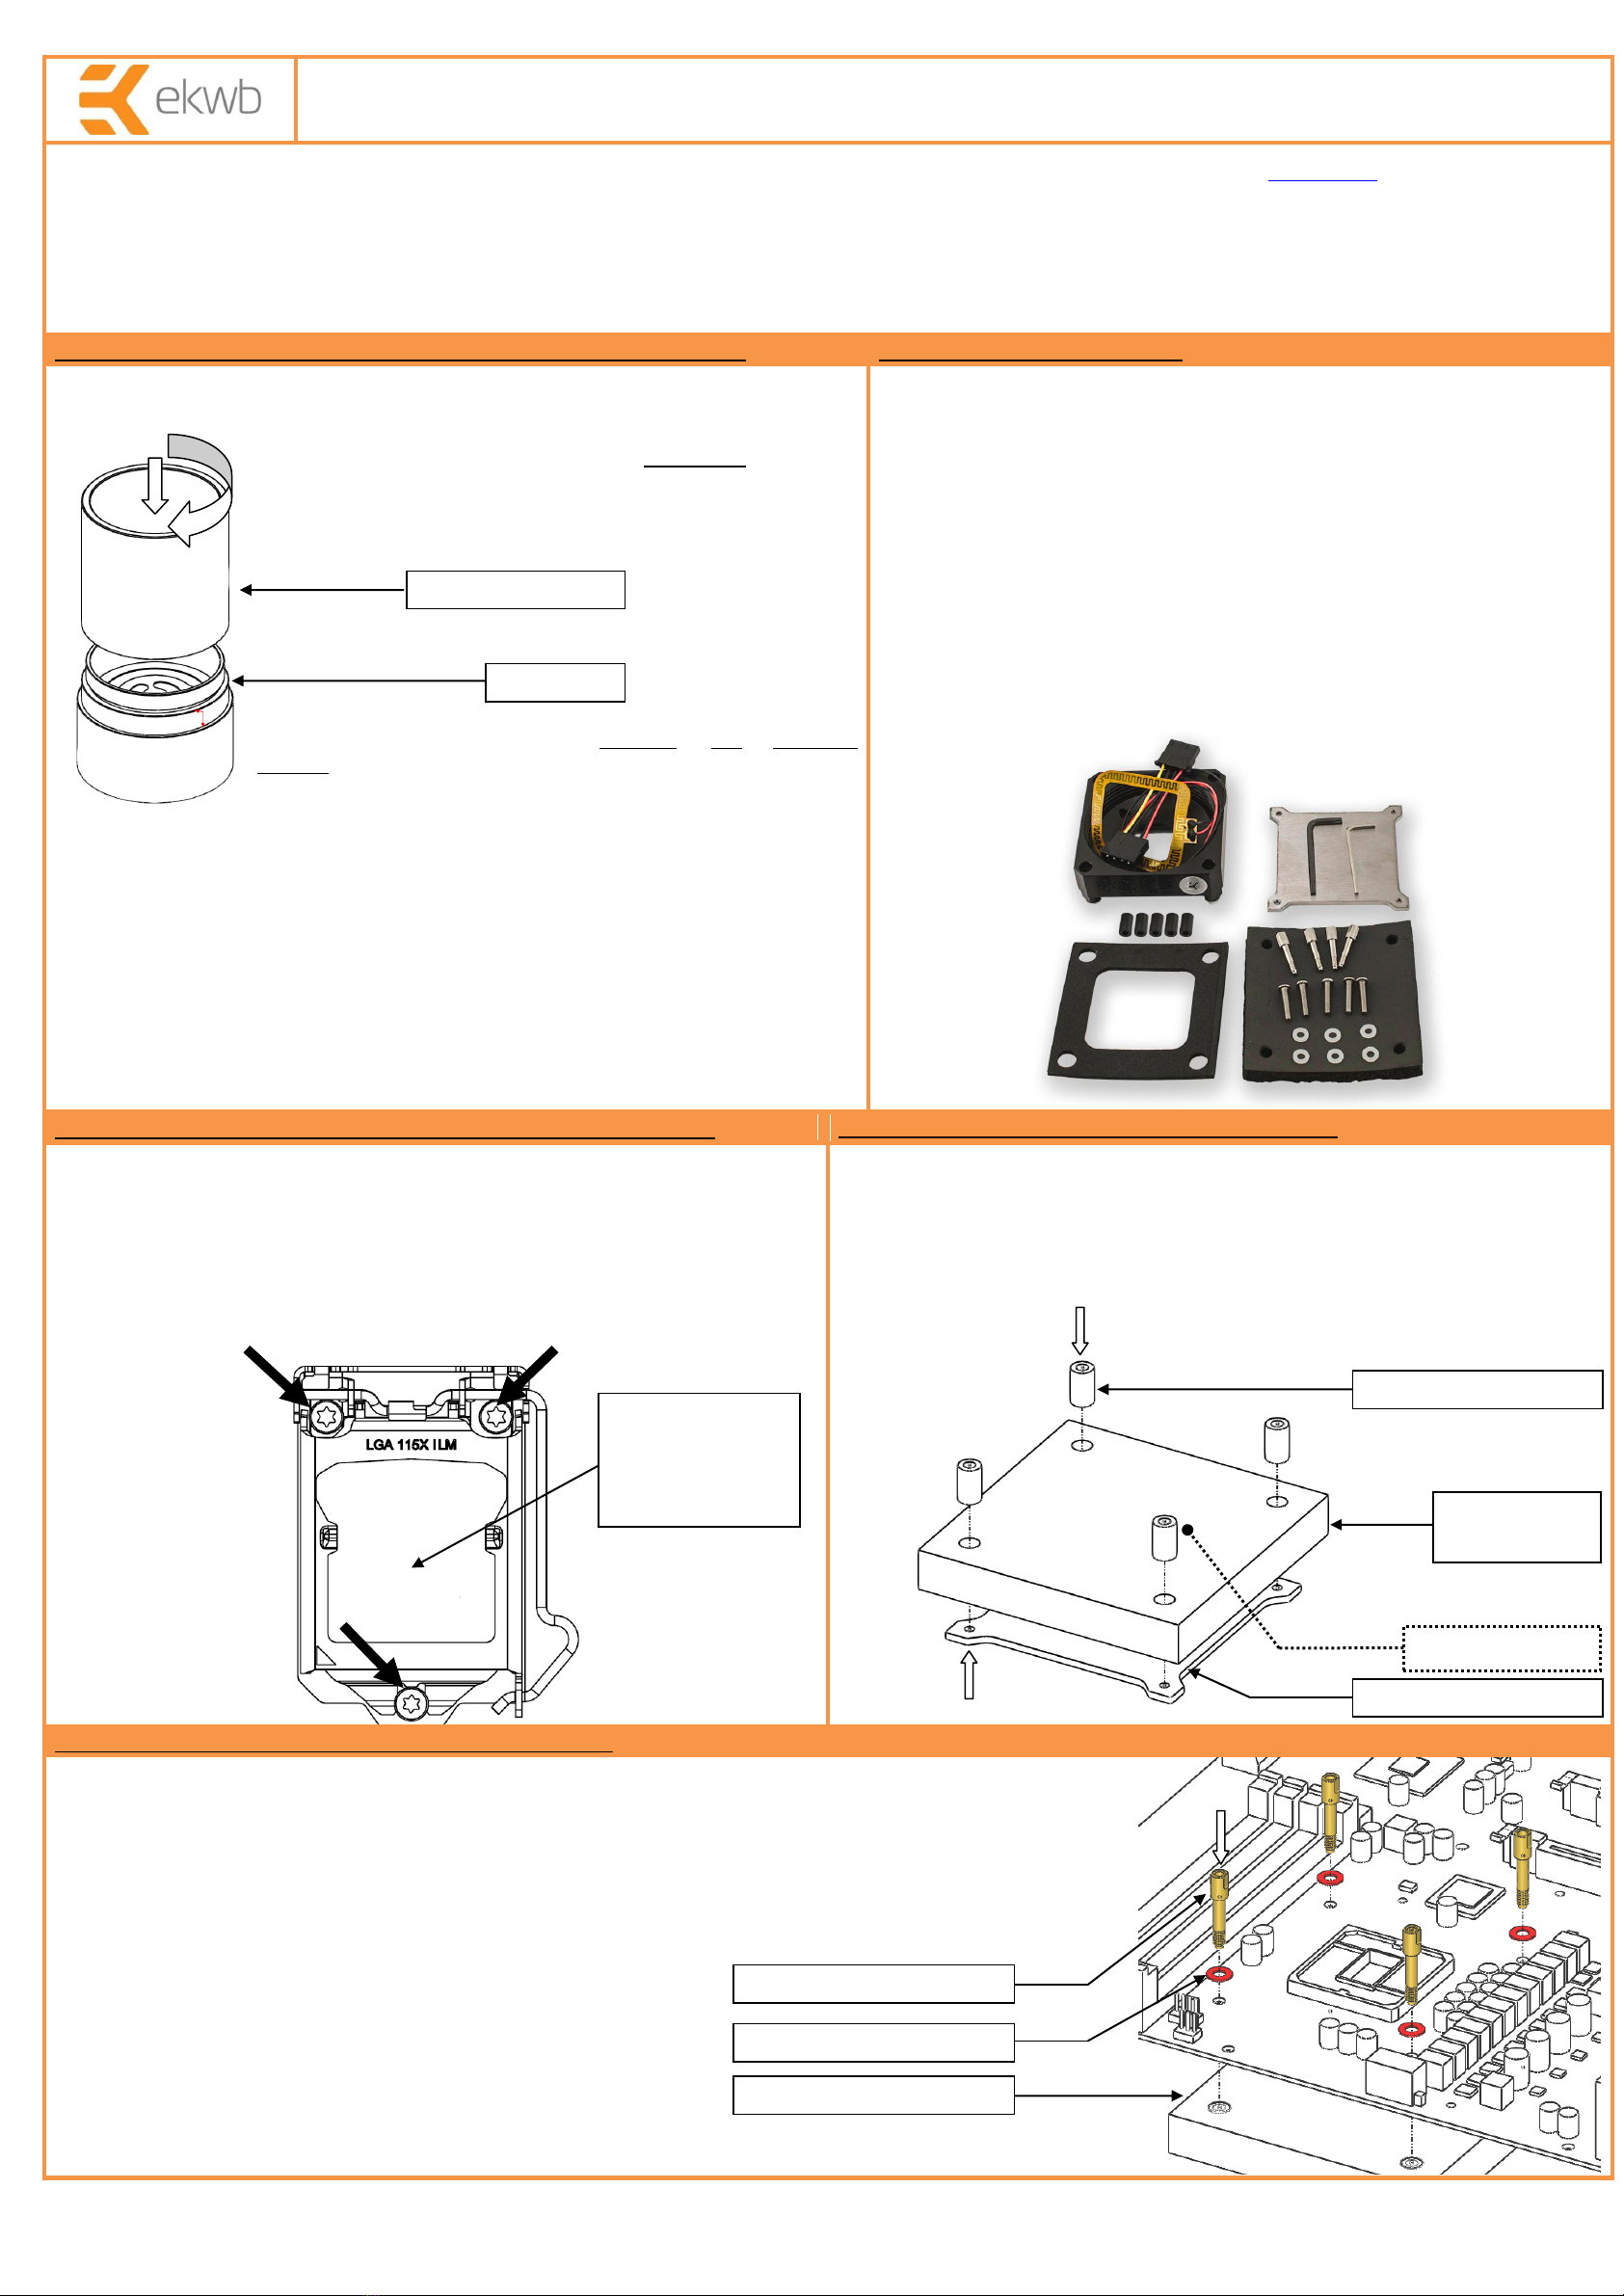
STEP 3: REMOVING THE ORIGINAL ILM - LATCH MECHANISM
STEP 4: INSTALLING THE BACKPLATE SYSTEM
With the enclosed Torx T20 key please remove the three screws securing the
socket latch mechanism (ILM) and original backplate (BP) to the motherboard.
Remove the socket latch, all three screws as well as socket backplate and store
them in a safe place as these items will not be used at any stage of the
installation. Make sure you have install the plastic cover over the socket
pins during this procedure!
In order to install the backplate system please follow the steps below:
1. Place 13mm POM Backplate standoffs into each of the four openings on
the thicker backplate closed-cell insulation sheet
2. Place the stainless steel Backplate to the back side of the thicker
insulation sheet and align all four threaded openings with the POM
standoffs. The adhesive side should be on the opposite site of the metal
backplate.
STEP 4 cont.: INSTALLING THE BACKPLATE SYSTEM
1. OPTIONAL: You may peel off adhesive side from the insulation sheet at this point (not necassery) in
order to allow it to stick to the circuit board.
2. Place the motherboard over the newly assembled Backplate system. Align all four LGA-115x mounting
holes on the motherboard with the openings in the backplate assembly.
3. Equip each of the four M4-M4 Adapter Backplate screws with a plastic washer and install it through all
four LGA-115x mounting openings on the motherboard. You may also use mini wrench (size 5mm) in
order to tighten the screws but force of the thumbs should also suffice.
Copper core
Aluminium extension
Make sure to
protect the socket
pins against
physical damage!
POM Backplate standoff
Backplate
insulation sheet
Adhesive side up
Stainless steel backplate
Backplate Assembly (STEP4)
M4 plastic washer
M4-M4 Adapter B.P. screw
All disclosures, notices and warranty conditions are being written on EK Water Blocks website. Revision 1.0. Released on 21st of May, 2013.
STEP 5: INSTALLING THE LGA-115x MOUNTING ADAPTER
1. Install the LGA-115x CPU into the socket. Apply the enclosed Gelid GC-Extreme TIM enclosed with the EK-SF3D Inflection Point EVO.
2. Install the enclosed EK-SF3D Heater 4W type A (LGA-115x) directly onto the PCB. Peel off the protective sticker and adhere it directly onto the circuit
board. Alternatively you can install the heater directly onto the LGA-115x Mounting Adapter, directly over the o-ring / gasket channel.
3. Install the 3mm thick self-adhesive closed-cell insulation sheet directly to the motherboard. Align it with the screws on the motherboard. You may need
to cut it to fit past nearby capacitors. Apply roll of 3mm self-adhesive around the Mounting Adapter outer edges if required.
4. Install the LGA-115x Adapter on to the motherboard by simply pressing it down against the motherboard. It is mandatory to install as shown on the
photo below! The correct orientation is of highest importance! The milled-out triangle shape should serve as an orientation point. The triangle
(ENCIRCLED; right picture) should always point towards the corner where the original latch hook was secured. On the majority of the motherboard the
LGA-115x Mounting Adapter is installed correctly when the EK logo is facing away from the PCI/PCI-express slots.
Also double check there is a gasket installed in the recess at the bottom side of the adapter
5. Install the four M4x22 ISO7380 stainless steel screws into each of the four openings and fasten them using enclosed Allen Key 2.5mm.
STEP 6: INSTALLING THE TEMPERATURE SENSOR/PROBE
STEP 7: ATTACHING THE EVAPORATION COOLER TO THE ADAPTER
Install the thin-wire K-type thermocouple (TC) sensor/probe (or
equivalent; not enclosed) to the pre-drilled slot near the contact
surface of the evaporator's copper core (encircled). We recommend
dipping the TC buble into enclosed Gelid GC-Extreme TIM/grease in
order to further improve the precision of the temperature read-outs.
Route the TC wire into the pre-milled slot on the side of the
evaporator wall and use scotch- or electrical tape to secure the probe
to the copper core. Do not use scotch tape above the step marked on
the photograph below:
To finish up the installation follow these steps:
1. Install the hand-grip mounting nut with pre-installed 10W thin-foil heater over the
evaporation cooler. Make sure to route the thermocouple wire past the the mounting
nut!
2. Screw down the mounting nut using right-hand turns until the connection feels
secure and/or until you reach the end of the thread. Do not use any tools (i.e. pliers)
for tightening of the nut as you may damage your components!
3. Connect both heater’s 4-pin Molex connectors to the power supply unit (may be
auxiliary as well)
If you intend to use adhesive properties of enclosed insulation sheets it is recommended to apply single
layer of electrical/scotch/duct tape to the circuit board before adhering the insulation sheet to the
motherboard.
REQUIRED TOOLS:
-Scissors
-Blade knife
-Duct or electrical tape
-Additional insulation material as per users insulation method (optional)
M4x22 ISO730 screw
LGA-115x Mounting
Adapter
M4x22 ISO730 screw
Tape limit line
Heater 4W Type A
3mm insulation sheet
Hand-grip mounting nut
Evaporation cooler

This manual suits for next models

1

Other ekwb Computer Hardware manuals

ekwb EK-FC980 GTX Classy Manual

ekwb

ekwb EK-FC980 GTX Classy Manual

ekwb EK-FC670 GTX Backplate Manual

ekwb

ekwb EK-FC670 GTX Backplate Manual

ekwb EK-FC7950 Manual

ekwb

ekwb EK-FC7950 Manual

ekwb EK-FB KIT EVGA SR-X Installation instructions manual

ekwb

ekwb EK-FB KIT EVGA SR-X Installation instructions manual

ekwb EK-FC1080 GTX Ti Strix User manual

ekwb

ekwb EK-FC1080 GTX Ti Strix User manual

ekwb EK-PRO GPU WB AMP-Trinity RTX 4090 Ni+Inox User manual

ekwb

ekwb EK-PRO GPU WB AMP-Trinity RTX 4090 Ni+Inox User manual

ekwb EK-XLC PREDATOR 240 User manual

ekwb

ekwb EK-XLC PREDATOR 240 User manual

ekwb EK-DBAY DCP 2.2 Manual

ekwb

ekwb EK-DBAY DCP 2.2 Manual

ekwb EK-FC1070 GTX User manual

ekwb

ekwb EK-FC1070 GTX User manual

ekwb EK-FB ASUS C6H Monoblock User manual

ekwb

ekwb EK-FB ASUS C6H Monoblock User manual

ekwb EK-Quantum RX 6800 User manual

ekwb

ekwb EK-Quantum RX 6800 User manual

ekwb MSI MPG X570S Carbon EK X User manual

ekwb

ekwb MSI MPG X570S Carbon EK X User manual

ekwb EK-Annihilator Pro ILM Series User manual

ekwb

ekwb EK-Annihilator Pro ILM Series User manual

ekwb EK-Classic 115 D-RGB Series User manual

ekwb

ekwb EK-Classic 115 D-RGB Series User manual

ekwb EK-Quantum Kinetic TBE DDC PWM Series User manual

ekwb

ekwb EK-Quantum Kinetic TBE DDC PWM Series User manual

ekwb EK-Reservoir Combo DCP 2.2 Manual

ekwb

ekwb EK-Reservoir Combo DCP 2.2 Manual

ekwb EK-PRO GPU WB RTX A4090 User manual

ekwb

ekwb EK-PRO GPU WB RTX A4090 User manual

ekwb EK-FB KIT GA-X99 LE Guide

ekwb

ekwb EK-FB KIT GA-X99 LE Guide

ekwb EK-FC750 GTX Series User manual

ekwb

ekwb EK-FC750 GTX Series User manual

ekwb EK-FB EVGA X58 LE Guide

ekwb

ekwb EK-FB EVGA X58 LE Guide

ekwb EK-Quantum Vector2 Trio RTX 3080/90 ABP Set... User manual

ekwb

ekwb EK-Quantum Vector2 Trio RTX 3080/90 ABP Set... User manual

ekwb EK-FB ASUS PRIME X299 Monoblock User manual

ekwb

ekwb EK-FB ASUS PRIME X299 Monoblock User manual

ekwb EK-FC980 GTX Classy KPE Backplate Guide

ekwb

ekwb EK-FC980 GTX Classy KPE Backplate Guide

ekwb EK-FC1080 GTX Ti FTW3 User manual

ekwb

ekwb EK-FC1080 GTX Ti FTW3 User manual

Popular Computer Hardware manuals by other brands

Z3 Technology Z3-DM8169-4CH-RPS user guide

Z3 Technology

Z3 Technology Z3-DM8169-4CH-RPS user guide

Exsys EX-16415 user manual

Exsys

Exsys EX-16415 user manual

FAAC E145 manual

FAAC

FAAC E145 manual

Nvidia DGX A100 user guide

Nvidia

Nvidia DGX A100 user guide

Spectrum generatorNETBOX DN2.65 Series Hardware manual

Spectrum

Spectrum generatorNETBOX DN2.65 Series Hardware manual

S&T kontron COMe-cWL6 user guide

S&T

S&T kontron COMe-cWL6 user guide

ETAS ES5340.2 user guide

ETAS

ETAS ES5340.2 user guide

ADLINK Technology aTCA-80606PA user manual

ADLINK Technology

ADLINK Technology aTCA-80606PA user manual

YUGE CEM600 EVDO Mini user guide

YUGE

YUGE CEM600 EVDO Mini user guide

Ross XPression Getting started

Ross

Ross XPression Getting started

ADLINK Technology CM5-P1000 user manual

ADLINK Technology

ADLINK Technology CM5-P1000 user manual

Silicon Graphics 1600SW Installation note

Silicon Graphics

Silicon Graphics 1600SW Installation note

Fibocom NL952-NA-00 Hardware user manual

Fibocom

Fibocom NL952-NA-00 Hardware user manual

Gigabyte WATER FORCE installation guide

Gigabyte

Gigabyte WATER FORCE installation guide

SeaLevel SEAI/OUSBSERIAL user manual

SeaLevel

SeaLevel SEAI/OUSBSERIAL user manual

National Instruments Isolated Analog Output Module SCC-AO10 user guide

National Instruments

National Instruments Isolated Analog Output Module SCC-AO10 user guide

Avermedia D315 Series manual

Avermedia

Avermedia D315 Series manual

Hama 00062758 quick guide

Hama

Hama 00062758 quick guide

manuals.online logo
manuals.online logoBrands
  • About & Mission
  • Contact us
  • Privacy Policy
  • Terms and Conditions

Copyright 2025 Manuals.Online. All Rights Reserved.