ELCART PAGINA 4 DI 6 User manual

ELCART
ELCART DISTRIBUTION SPA via Michelangelo Buonarroti, 46 - 20093 Cologno Monzese (Milano) ITALY
Manuale di istruzioni/Scheda tecnica
La divulgazione dei dati contenuti in questa scheda è da ritenersi un servizio puramente informativo e non costituisce alcun vincolo da parte della Elcart in merito a prestazioni ed utilizzo del prodotto.
The divulgation of data contained on this technical sheet are exclusively for informational reasons and establish no link on behalf of Elcart regard to the performances and the use of the product.
La divulgacion de los datos contenidos en esta ficha son un servicio unicamente informativo y no constituyen ningun vinculo de parte de Elcart respecto a las prestaciones y uso del producto.
ART. 12/23014-00 PAGINA 1 DI 6
MANUALE DI ISTRUZIONI PER IL MONTAGGIO DEL SUPPORTO A PARETE PER TV LED / LCD / PLASMA
ART. 12/23014-00 Colore: NERO
1. Caratteristiche tecniche:
Carico massimo: 25 kg
Angolo di rotazione: ±90°
Angolo di inclinazione: +5°~-15°
Angolo di rotazione: ±20°
Distanza dalla parete: 52~300mm
Vesa: 75-100-200
2. Elenco dei pezzi in dotazione:
Si prega di verificare la presenza di tutti i pezzi nella confezione, confrontandoli con l’elenco sottostante. Assicurarsi che tutti i pezzi
siano nella confezione. Non usare mai pezzi difettosi. Non sostituire mai i pezzi con altri aventi caratteristiche diverse.
Nota: Un’errata installazione potrebbe causare danni alle persone!
3. Installazione e istruzioni operative
Nota: leggere attentamente queste istruzioni prima dell'installazione!
Passo 1
Passo 2Passo 3
(A) Viti ST6.3*65 (3) (B) Ancoraggi in plastica Ø10*61 (3) (C) Rondella piana Ø4 (4) (D) Rondella piana Ø5 (4) (E) Rondella piana Ø6*Ø16*1.5 (7) (F) Vite M4*8 (4)
(G) Vite M4*12 (4) (H) Vite M5*8 (8) (I) Vite M5*12 (4) (J) Vite M6*8 (4) (K) Vite M6*12 (4) (L) Vite M8*8 (4)
(M) Vite M8*12 (4) (N) Chiave S=13 (1) Copertura di plastica (1) Copertura di plastica (1) Estensioni (4)
Livella (1)
Allentare i due bulloni sulla piastra TV come mostrato nella figura, quindi sollevare e rimuovere la piastra TV dalla piastra a muro.
Bulloni
Piastra TV
Metti la bolla di livello sul bordo superiore della piastra a muro.
B
E
A
Utilizzare la piastra a muro come modello per praticare tre fori di Ø 8mm e 50 mm
di profondità nella parete verticale.
Quindi incastrare i tre tasselli di plastica per cemento nei fori.
Fissare la piastra a muro con tre bulloni attraverso i fori di montaggio per installare
saldamente la piastra a muro sulla parete verticale.

ELCART
ELCART DISTRIBUTION SPA via Michelangelo Buonarroti, 46 - 20093 Cologno Monzese (Milano) ITALY
Manuale di istruzioni/Scheda tecnica
La divulgazione dei dati contenuti in questa scheda è da ritenersi un servizio puramente informativo e non costituisce alcun vincolo da parte della Elcart in merito a prestazioni ed utilizzo del prodotto.
The divulgation of data contained on this technical sheet are exclusively for informational reasons and establish no link on behalf of Elcart regard to the performances and the use of the product.
La divulgacion de los datos contenidos en esta ficha son un servicio unicamente informativo y no constituyen ningun vinculo de parte de Elcart respecto a las prestaciones y uso del producto.
ART. 12/23014-00 PAGINA 2 DI 6
Passo
4Passo 5-a
Passo 5-b
Passo 6
Passo 7
Note
(1) Scegliete un punto adatto dove istallare la piastra di fissaggio a muro. Accertatevi che la parete sostenga pesi dai 100 kg in su.
(2) Gli utenti devono controllare e sottoporre frequentemente il prodotto a manutenzione, in base allo stato di utilizzo, in modo da assicurare
che il televisore a schermo piatto funzioni in modo normale, sicuro e non rischioso.
Si prega di pulire frequentemente le parti di giunzione con un panno asciutto. Non utilizzare in luoghi esposti alla pioggia o in un ambiente umido.
Si prega di controllare ogni due mesi che tutte le viti siano ben fissate.
Coperture di plastica
Inserire i due coperchi di plastica su entrambi i lati della
piastra a muro.
TV
C/D/E
F/G/H/I/J/K
L/M
Installare il pannello TV sulla piastra del televisore con i bulloni adatti selezionati
dal sacchetto delle parti, infine regolare l'azimut del pannello TV in una posizione
adatta per la visione.
C/D/E
F/G/H/I/J/K
L/M
TV
Se le dimensioni della piastra TV sono inferiori alle dimensioni della parte posteriore del televisore, utilizzare i quattro bulloni per fissare saldamente
le quattro staffe di estensione in una posizione adatta sulla piastra del televisore.
Quindi collegate le quattro staffe di espansione insieme alla piastra TV direttamente sul retro del televisore.
Nota: la rondella viene utilizzata solo per i bulloni.
TV
TV
Parete
Parete
Bulloni
Sollevare il display con la piastra TV sopra la piastra a muro, appendere la piastra TV alla piastra a muro come mostrato in figura.
Quindi serrare i due bulloni alla piastra TV per fissarli saldamente. Nota: la rondella è usata solo per i bulloni.
Parete
TV
±90° ±90°
Cavo
+5°
-15°
L'angolo di visualizzazione del display può essere regolato tra l'intervallo specifico come mostrato in figura.
Questo modello include anche una funzione di gestione dei cavi.
Nota: durante la regolazione, si prega di fare attenzione alla propria mano per evitare tagli e prestare attenzione alla posizione dei cavi per evitare danni.
Made in China
IMPORTATO E DISTRIBUITO DA
ELCART DISTRIBUTION SPA
Via Michelangelo Buonarroti, 46
20093 COLOGNO MONZESE (MI)
ITALY

ELCART
ELCART DISTRIBUTION SPA via Michelangelo Buonarroti, 46 - 20093 Cologno Monzese (Milano) ITALY
Manuale di istruzioni/Scheda tecnica
La divulgazione dei dati contenuti in questa scheda è da ritenersi un servizio puramente informativo e non costituisce alcun vincolo da parte della Elcart in merito a prestazioni ed utilizzo del prodotto.
The divulgation of data contained on this technical sheet are exclusively for informational reasons and establish no link on behalf of Elcart regard to the performances and the use of the product.
La divulgacion de los datos contenidos en esta ficha son un servicio unicamente informativo y no constituyen ningun vinculo de parte de Elcart respecto a las prestaciones y uso del producto.
ART. 12/23014-00 PAGINA 3 DI 6
INSTRUCTION MANUAL FOR MOUNTING THE WALL SUPPORT FOR LED TV / LCD / PLASMA
ART. 12/23014-00 Color: BLACK
1. Technical parameter:
Maximum load: 25kg
Swing angle: ±90°
Pitching angle: +5°~-15°
Rotate angle: ±20°
Distance from wall: 52~300mm
Vesa: 75-100-200
2. List of pieces supplied:
Please check the parts in the package compare with the following list. Make sure all of the parts are in the package.
Never use defective parts. Never replace part with different specification.
Note: Incorrect installation may cause injury!
3. Installation and operating instructions
Note: Please read these instructions carefully before installation!
Step 1
Step 2Step 3
(A)ST6.3*65 screws(3) (B)Ø10*61 Plastic anchors(3) (C)Ø4 Flat washer(4) (D)Ø5 Flat washer(4) (E)Ø6*Ø16*1.5 Flat washer(7) (F)M4*8 Screw(4)
(G)M4*12 Screw(4) (H)M5*8 Screw(8) (I)M5*12 Screw(4) (J)M6*8 Screw(4) (K)M6*12 Screw(4) (L)M8*8 Screw(4)
(M)M8*12 Screw(4) (N)Spanner S=13(1) Plastic cover(1) Plastic cover(1) Extensions(4)
Level bubble(1)
Loosen the two bolts on the TVplate as shown in the fig, thenlift and remove the TV plate from the wall plate.
Bolts
TV plate
Put the level bubble on the top eage of the wall plate.
B
E
A
Use the wall plate as a templet to drill three holes of Ø 8mm and 50mm depth
in the vertical wall.Then wedge three plastic concrete anchors into the holes.
Fix the wall plate with three lag bolts through the mounting holes to install the wall
plate on the vertical wall firmly.

ELCART
ELCART DISTRIBUTION SPA via Michelangelo Buonarroti, 46 - 20093 Cologno Monzese (Milano) ITALY
Manuale di istruzioni/Scheda tecnica
La divulgazione dei dati contenuti in questa scheda è da ritenersi un servizio puramente informativo e non costituisce alcun vincolo da parte della Elcart in merito a prestazioni ed utilizzo del prodotto.
The divulgation of data contained on this technical sheet are exclusively for informational reasons and establish no link on behalf of Elcart regard to the performances and the use of the product.
La divulgacion de los datos contenidos en esta ficha son un servicio unicamente informativo y no constituyen ningun vinculo de parte de Elcart respecto a las prestaciones y uso del producto.
ART. 12/23014-00 PAGINA 4 DI 6
Step 4 Step 5-a
Step 5-b
Step 6
Step 7
Notes
(1) Choose the right place to install wall plate. The bracket must be installed on solid concrete wall.
Make sure the wall can support 100kg weights up.
(2) Users should check and maintain the product frequently according to the use status to ensure the flat panel TV works normally,
safely and securely.
Please wipe joining parts with a dry cloth frequently. Don't use it in rain or in moist environment.
Please check once two months if all bolts are secure or not.
Plastic covers
Insert the two plastic covers on both side of wall plate.
TV
C/D/E
F/G/H/I/J/K
L/M
Install the panel TV on the TV plate with suitable bolts selected from the parts bag,
At last adjust the azimuth of the panel TV to a suitable position for watching.
C/D/E
F/G/H/I/J/K
L/M
TV
If the size of the TV plate is smaller than the size of the back of the TV,use the four bolts to fix the four extension boards to a suitable location
on the TV plate tightly.Then Attached the four extension boards together with the TV plate directly to the back of TV.
Note:The washer is only used for bolts.
TV
TV
WALL
WALL
Bolts
Lift the display together with the TV plate above the wall plate,hang the TV plate to the wall plate as shown in the figure.
Then tighten the two bolts back to the TV plate to fix them firmly.
WALL
TV
±90° ±90°
Cable
+5°
-15°
The view angle of the display can be adjusted between in the specific range as shown in the figure. This mount also includes a cable
management feature.
Note:While adjusting,please take care of your hand to avoid clipping, and pay attention to the cables’ position to avoid damage.
Made in China
IMPORTED AND DISTRIBUTED BY:
ELCART DISTRIBUTION SPA
Via Michelangelo Buonarroti, 46
20093 COLOGNO MONZESE (MI)
ITALY

ELCART
ELCART DISTRIBUTION SPA via Michelangelo Buonarroti, 46 - 20093 Cologno Monzese (Milano) ITALY
Manuale di istruzioni/Scheda tecnica
La divulgazione dei dati contenuti in questa scheda è da ritenersi un servizio puramente informativo e non costituisce alcun vincolo da parte della Elcart in merito a prestazioni ed utilizzo del prodotto.
The divulgation of data contained on this technical sheet are exclusively for informational reasons and establish no link on behalf of Elcart regard to the performances and the use of the product.
La divulgacion de los datos contenidos en esta ficha son un servicio unicamente informativo y no constituyen ningun vinculo de parte de Elcart respecto a las prestaciones y uso del producto.
ART. 12/23014-00 PAGINA 5 DI 6
MANUAL DE INSTRUCCIONES PARA MONTAR LA SOPORTE DE PARED PARA TV LED / LCD / PLASMA
ART. 12/23014-00 Color: NEGRO
1. Características técnicas:
Carga máxima: 25 kg
Ángulo de rotación: ±90°
Ángulo de inclinación: +5°~-15°
Ángulo de rotación: ±20°
Distancia de la pared: 52~300 mm
Vesa: 75-100-200
2. Lista de las piezas suministradas:
Verifique la presencia de todas las piezas en el paquete y compárelas con la lista a continuación. Asegúrese de que todas las piezas
estén en el paquete. Nunca use piezas defectuosas. Nunca reemplace las piezas con otras que tengan diferentes características.
Nota: ¡Una instalación incorrecta podría causar lesiones personales!
3. Instrucciones de instalación y funcionamiento
Nota: lea estas instrucciones cuidadosamente antes de la instalación.
Paso 1
Paso 2Paso 3
(A) Tornillos ST6.3*65 (3) (B) Anclajes de plástico Ø10*61 (3) (C) Arandela plana Ø4 (4) (D) Arandela plana Ø5 (4) (E) Arandela plana Ø6*Ø16*1.5 (7) (F) Tornillo M4*8 (4)
(G) Tornillo M4*12 (4) (H) Tornillo M5*8 (8) (I) Tornillo M5*12 (4) (J) Tornillo M6*8 (4) (K) Tornillo M6*12 (4) (L) Tornillo M8*8 (4)
(M) Tornillo M8*12 (4) (N) Clave S=13 (1) Cubierta de plástico (1) Cubierta de plástico (1) Extensiones (4)
Nivel de burbuja (1)
Afloje los dos pernos de la placa de TV como se muestra en la figura, luego levante y retire la placa de TV de la placa de pared.
Pernos
Placa de TV
Coloque la burbuja en el borde superior de la placa de pared.
B
E
A
Use la placa de pared como modelo para perforar tres agujeros de Ø8 mm y 50 mm
de profundidad en la pared vertical.
Luego inserte tres agujeros de cemento de plástico en los agujeros.
Fije la placa de pared con tres pernos con resorte a través de los agujeros de montaje
para instalar de forma segura la placa de pared en la pared vertical.

ELCART
ELCART DISTRIBUTION SPA via Michelangelo Buonarroti, 46 - 20093 Cologno Monzese (Milano) ITALY
Manuale di istruzioni/Scheda tecnica
La divulgazione dei dati contenuti in questa scheda è da ritenersi un servizio puramente informativo e non costituisce alcun vincolo da parte della Elcart in merito a prestazioni ed utilizzo del prodotto.
The divulgation of data contained on this technical sheet are exclusively for informational reasons and establish no link on behalf of Elcart regard to the performances and the use of the product.
La divulgacion de los datos contenidos en esta ficha son un servicio unicamente informativo y no constituyen ningun vinculo de parte de Elcart respecto a las prestaciones y uso del producto.
ART. 12/23014-00 PAGINA 6 DI 6
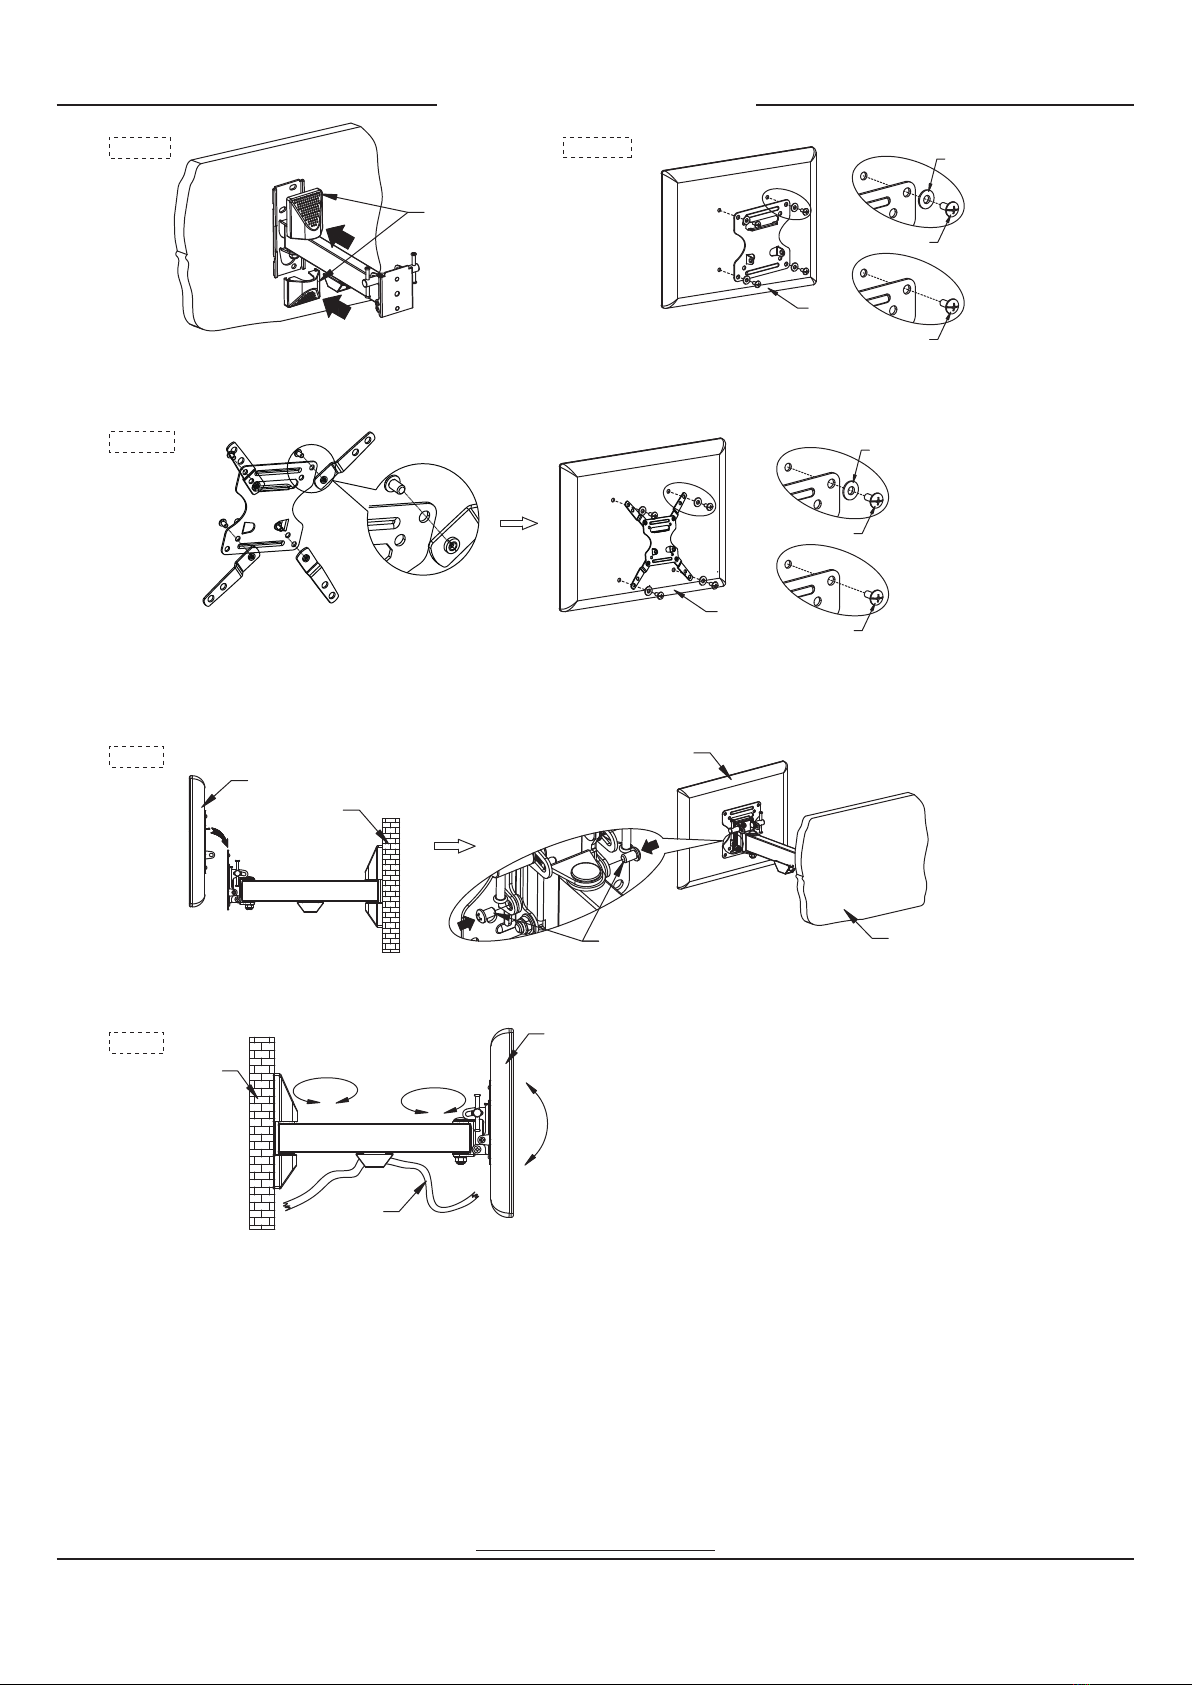
Paso
4Paso 5-a
Paso 5-b
Paso 6
Paso 7
Notas:
(1) Seleccione un lugar adecuado para instalar la placa de fijación a la pared. Asegúrese de que la pared soporte pesas de 100 kg.
(2) Los usuarios deben verificar y enviar el producto de mantenimiento con frecuencia, dependiendo del estado de uso, para asegurarse
de que el televisor de pantalla plana funcione de manera normal, segura y sin riesgos.
Limpie frecuentemente las piezas de unión con un paño seco. No lo use en lugares expuestos a la lluvia o en un ambiente húmedo.
Por favor revise cada dos meses que todos los tornillos estén apretados.
Cubiertas de plástico
Inserte las dos cubiertas de plástico en ambos lados de la placa
de pared.
TV
C/D/E
F/G/H/I/J/K
L/M
Instalar el panel de TV en la placa de TV con pernos adecuados seleccionados
de la bolsa de piezas, a continuación, ajustar el azimut del panel de TV en una
posición adecuada para su visualización.
C/D/E
F/G/H/I/J/K
L/M
TV
Si el tamaño de la placa de TV son más pequeños que el tamaño de la parte trasera del televisor, utilice los cuatro tornillos para sujetar firmemente
las cuatro tablas de extensión en una posición adecuada en la placa de TV.
Luego, conecte las cuatro tarjetas de expansión junto con la placa de TV directamente en la parte posterior del televisor.
Nota: la lavadora se usa solo para los pernos.
TV
TV
Pared
Pared
Pernos
Levante la pantalla con la placa de TV sobre la placa de pared, cuelgue la placa de TV a la placa de pared como se muestra en la figura.
Luego apriete los dos pernos a la placa de TV para asegurarlos firmemente. Nota: la lavadora se usa solo para pernos.
Pared
TV
±90° ±90°
Cable
+5°
-15°
El ángulo de visualización de la pantalla se puede ajustar entre el intervalo específico como se muestra en la figura.
Este montaje también incluye una función de gestión de cables.
Nota: cuando realice el ajuste, preste atención a su mano para evitar cortes y preste atención a la posición de los cables para evitar daños.
Made in China
IMPORTADO Y DISTRIBUIDO POR
ELCART DISTRIBUTION SPA
Via Michelangelo Buonarroti, 46
20093 COLOGNO MONZESE (MI)
ITALY
Table of contents
Languages:
Other ELCART Measuring Instrument manuals

ELCART
ELCART NIMEX NI9210 User manual

ELCART
ELCART 09/08500-00 Assembly instructions

ELCART
ELCART Nimex 09/08535-00 Instruction Manual

ELCART
ELCART NI-23600 User manual

ELCART
ELCART NI4000 User manual

ELCART
ELCART TMR TC-100 User manual

ELCART
ELCART 09/08730-00 User manual

ELCART
ELCART 09/08550-00 User manual

ELCART
ELCART NIMEX NI9230 User manual